Leaderboard


Popular Content
Showing content with the highest reputation on 02/15/2018 in Posts
-
As pictured it was a metallic charcoal black/gray matte finish, but I felt it was a bit too shiny so I sanded back a bit and put down a coat of flat black enamel spray paint. I was going to airbrush it with acrylic instead and put clear coat over it, but the air valve wasn’t working on my brush. Fortunately we had a really nice day (40°F) and was able to paint outdoors. Revised photos: THANK YOU everyone for your advice, shared reference photos, and the tips you’ve shared! I’m sure somewhere along the line I’ll build another E11 (hero level) and pass this onto my son. But for now it’ll be great to have this to troop with! Sent from my iPhone using Tapatalk3 points
-
TD final assembly complete. I decided to get the belt started next. Corners cut at 45 deg. Rivet cover plates cut and polished. Rivet holes drilled Snaps installed on back side of belt and snapped in place to check fit. I’m very happy with how it crossed the ab button plate. Finally, I glued the rivet cover plates in place. Sent from my iPhone using Tapatalk3 points
-
Thanks again guys for all the kind words. Quick Update - End Cap Clip When I was checking out Suitcase Props on Shapeways, I saw they also produced an end cap clip which looked better than the Doopydoo's version. I picked up one of those at the same time. Here's a shot of the two along with the aluminum channel from T-Jay's Completion Kit... Using the same 1mm brass strip I purchased previously, I fabricated a strip to fit on the bottom of the clip. I gave it a bit of a curve to hold the clip up and simply attached it using E6000. We will see if it holds up over time... I also added some green stuff to add a knurling pattern to the top of the 3D printed clip... I cut the channel to the correct length and used a file to round off the edges of the channel. I gave them all a coat of primer to reduce the roughness of the 3D print and to help the paint adhere to the metal pieces. Then, finally, I installed a piece of a nail to pin the clip into the channel. Luckily, the hole I drilled in the channel was ever so slightly off, which means there is a bit of pressure pushing on the nail so it won't fall out by itself. That's it for today. :-) Mark3 points
-
I was busy delivering Valentine gifts for civilians who requested TKs through the Great Lakes Garrison website
 2 points
 -
Great work troopers, another 200 to reach that goal2 points
-
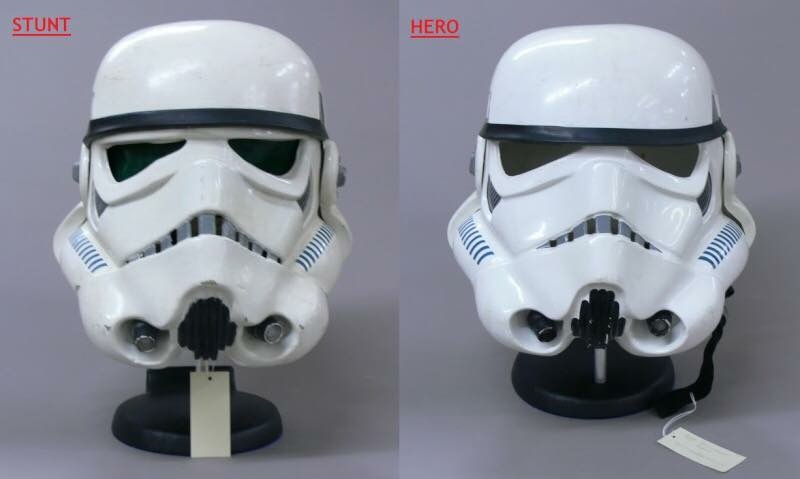
Damn it - I’ve just spend an hour playing “spot the difference”!!2 points
-
Starting to get happier results. After having a meltdown and panic attack my armor is on the way soon. Should be shipping in next 3-4 days I'd estimate. Lots of members are getting parts in and we are starting to see amazing results. I suppose it was worth the wait I knew it was gonna be awhile but I suppose I was more hopeful of timelines, seems like the yoke, back and ab parts have been a big challenge to lay. Hoping once these first halves (torso, chest, yoke, back, shoulders, butt, and cod) are shipped that rest should be smooth sailing. Still waiting on updates on the biceps, forearms, both legs all the way up (spats to the top) From what I have seen everything is beautiful, amazing and accurate. I'm looking forward to starting my rigging soon and posting in here more often. I'm also almost done with FO Tie Pilot so first order will be well represented from me.2 points
-
A AA - Andrew A., the self-proclaimed original maker of screen-used helmets and armor. ABS - Acrylonitrile-Butadiene-Styrene, a lightweight, rigid thermoplastic used to form white armor. ACD - Armored Calvary Detachment AFX - Armor FX, a supplier/producer/brand of stormtrooper armor. AKA - Also known as (i.e. alias) ANH - A New Hope, Star Wars Episode IV. AP - Authentic Props. A maker of ANH style armor. B BBY - Before the Battle of Yavin. BSN - Bikerscout.net, the official website of the scout trooper detachment. BFG - Big freaking gun, reference to a SW weapon based off of a machine gun, rifle, etc. Essentially any SW blaster aside from sidearms or carbine sized C C1 or CI - Star Wars Celebration I (1999). C2 or CII - Star Wars Celebration II (2002). C3 or CIII - Star Wars Celebration III (2005). C4 or CIV Star Wars Celebration IV (2007). C5 or CV - Star Wars Celebration VI (2010). C6 or CVI - Star Wars Celebration VI (2012). CO - Commanding Officer. CTN - Clonetroopers.net, the official website of the clonetroopers detachment. CRL - Costume Reference Library (http://www.501st.com/crl/index.php) D D*C - Dragon Con, a large sci-fi convention held annually in Atlanta, Georgia (USA). D.O. - Deployment Officer. Responsible for approving level 2 (Expert Infantry) and level 3 (Centurion) TK armor. DL - Detachment Leader, elected head of a detachment. DOA - Dead on arrival, often used to indicate something was broken when you received it. E ECG - Empire City Garrison EIB - Expert Infantry Badge (nee Elite, nee Mark) (http://whitear...?showtopic=8583) ESB - Empire Strikes Back, Star Wars Episode V. EU - Expanded Universe, a term often applied to anything Star Wars that was not seen in the six films themselves. F FIDM - Fashion Institute of Design Merchandising FRS - Family Radio Service, a small and relatively inexpensive two-way radio system. FISD- First Imperial Stormtrooper Detachment-The official website of the 501st stormtrooper detachment. FO- First Order. FX - Generally refers to Armor FX, a supplier/producer/brand of stormtrooper armor. G GF - Gerardo F., a one-time maker of screen accurate stormtrooper armor as well as the original FX sculpts GL - George Lucas. GT - Galaxy Trading : an early purveyor of armor H HWT - Heavy Weapons Trooper, a kind of Stormtrooper found in the EU (Expanded universe). HIPS - High Impact Polystyrene, a kind of hard but brittle plastic. Most common after ABS used for Vacuum forming Stormtrooper armor. Cheaper but more fragile than ABS. I I.A. (or IA) - Imperial Attache. Extended Staff members who assist new members and liaise with the FISD and their local unit. K KOTOR - Knights of the Old Republic KS - Kropserkel L LFL - Lucasfilm Limited LOL - Laugh out loud. M MEPD - MEPD.net Mos Eisley Police Department. A 501st detachment dedicated to the armor and equipment used by the Sandtroopers shown in Star Wars: A New Hope. MG - Mountain Garrison. MOM - Magic of Myth, a traveling exhibit of Star Wars props that toured years ago. MOTF - Matters of the Force, the Star Wars programming track at Dragon Con. MWG - Midwest Garrison. N NEG - New England Garrison. NER - Northeast Remnant garrison. O OL - Outpost Leader (equivalent of a CO). OLG - Old Line Garrison. OS - Outpost Second (equivalent of an XO). OT - Original Trilogy (Episode 4-6) P PA - Polymer Armory, a maker of clone armor PVC - Polyvinyl chloride, a thermoplastic resin commonly used to create plastic pipes. PT - Pirate Trooper (A recaster) / Prequel Trilogy (Episode 1-3) R RA - Richie's Armor RC - Republic Commando. RL - Rebel Legion. ROTJ - Return of the Jedi, Star Wars Episode VI. RPF - Replica Props Forum, a non-501st forum for prop replication information sharing. RS - Rebelscum.com, a website for the Star Wars collector. RT-MOD - a supplier/producer/brand of fan-sculpted stormtrooper armor. S SC - Studio Creations SDCC - San Diego Comic Con, a large sci-fi con held annually in San Diego, California (USA). SDS - Shepperton Studios SF - Star Fortress: a maker of many costumes and props that is shunned as the owner is a wanted pedophile. SL - Squad Leader, or Sith Lord SWW - Disney/MGM Studios Star Wars Weekends events held every summer in Orlando, Florida (USA). T TAG - Terror Australis Garrison TB - 501st Costume designation for Biker Scout TBA - To be announced. TBD - To be determined. TD - 501st Costume designation for Sandtroopers and Heavy Weapons Troopers TDH - The Dented Helmet, a non-501st forum for Fett and related costuming discussions. TE -Trooper Expert, the original supplier/producer/brand of ANH stormtrooper armor. TFA- The Force Awakens TFN - theforce.net, the official website of the Fan Force. TFT - Toys for Tots, a U.S. charity that collects toys for Christmas distribution. TK - 501st Costume designation for Stormtroopers TLJ- The Last Jedi TM - Trooper Master, a supplier/producer/brand of stormtrooper armor. TOD - Tour of duty, a record of your event attendance and participation. U UKG - United Kingdom Garrison. V VoNC - Vote of No Confidence. W WTF - Walt's Trooper Factory. "Vetted" TK armorer. X XO - Executive Officer.1 point
-
- 3D modeling: 100% - Splitting and optimizing: 100% - Hardware listing: 100% - Exporting files in a 3D printable format: 100% - "Directions" .pdf: 50% - Uploading: 0% - FISD topic creation: 0% I'm getting very close to finally finish these First Order quadnoculars now, perhaps even by the end of the week. But right now, I'm in need of your help! I am looking for this picture in high and clear resolution to illustrate my "Directions" .pdf: I've searched a bit on Google but with no real luck. So if any of you has it, or have the Visual Dictionary and a good scanner, I would be very grateful if you could post it here. Cheers, T5H.1 point
-
Thank you, thank you and thank you1 point
-
Nice work, good luck with approval1 point
-
As far as I know, only an Admin can delete them. Standard users (like us) can only edit their own posts. Below them there are buttons for Multiquote, Quote and Edit. Not sure how this looks on Tapatalk, but you should see it when using a computer.1 point
-
Sorry Dan, Tino...I tried to delete the multiples but couldn’t find the option [emoji848] Sent from my iPhone using Tapatalk1 point
-
Looks like an easy approval. Good Luck!1 point
-
Hey Brian, Andrew or myself will be with you shortly1 point
-
Looking good - great work Sean1 point
-
Just moved from West Virginia to Pennsylvania this past year, and as a reward for all the hassle of moving I got this plate. Before that, I belonged to a different franchise.1 point
-
let's hope you stay GML for a while We got garrison license plate frames: (I got a different number, referring to when I bought my car.)1 point
-
In the Costuming and Builds section there are build areas for TFA armor you could start a build thread here For TLJ here1 point
-
TK-30205 requesting access please http://www.501st.com/members/displaymember.php?userID=21914&costumeID=1241 point
-
Thank you that helps a lot. Sent from my SM-G955U using Tapatalk1 point
-
Thanks. I have some of his files which I’m having printed, as I never get time to use the desktop pc anymore I haven’t looked inside the file for the pdf Sent from my iPhone using Tapatalk1 point
-
If you dry fit the ears its usually pretty easy to tell which side is which, I'm pretty sure the one on the left up there is the left ear.1 point
-
If you will notice on the below image the screw holes end up almost vertically and the angle of the lower half of the ear angles backwards If looking at the helmet from the back as you wear wearing it, your image the one on the left is the left ear and one on the right is the right ear.\ 13 tube stripes is optimal but you can have less or more, from the CRL: Tube stripes are medium blue, should be 13 per side, but can be 9 and 16 per side with the curve bends extending backwards.1 point
-
I went for black, self adhesive EVA sheets and cut them to size. Easy to work with and can also be used to cover any wiring. Sent from my iPhone using Tapatalk1 point
-
If your knee is centered then yes, don`t want the shins to short1 point
-
Also you want a good read and worth the 24$ Star Wars “stormtroopers beyond the armor” so worth the money and a awesome read ... Amazon
 1 point
 -
You could still go back and edit your posts. Either to place new content there, or just to state "double post" - less scrolling down for your readers1 point
-
will do, won't take long1 point
-
moved this topic to the right section indeed doopydoo's is a very good supplier for blaster parts. Where did you get your blaster from? There are some greeblies you'll have to remove from your ESB blaster and some things to add (like hengstler counter and power cylinders). those parts might even be for sale in our ongoing sales section. https://www.whitearmor.net/forum/forum/16-ongoing-sales-project-orders/1 point
-
After being sidelined for a few days with a planned surgery, I'm getting back into the swing of things. I've been having to correct a lot of self-inflicted mistakes lately. Forearms: KB's forearms come as 4 separate pieces, a front and back and two side rails. When cut and formed correctly, they make a completely enclosed piece. I taped up the forearms to wrap my head around how to put them together. Upon doing this, I realized that I made a bit of a mistake during initial trimming. I cut off the side rail on one of the side pieces that the front piece would sit on for assembly. I did this on both forearms. Whoops! In order to fix this, I found some cut pieces out of the heap of scrap ABS I saved and created some faux rails on the missing sides. Hard to tell from the photo but here they are on both pieces. After a TON of fitment, measuring and alignment, I used a dremel to sand down all of the excess return edge so that the side rails would line up with with the back piece. At which point I glued the side rails to the back piece. On the sides that had the mounting rails intact, there are no features in the piece to work around so I used an interior cover strip to hold the pieces together. The other pieces have indents for the greeblies to be applied later. As such they do not fit securely without some modifications. Using tape, I stuck the two pieces together to where I wanted them to be and drew a line where the indents don't overlap and measured the difference. I then backed it off a few mm so that there wasn't any open space when glued together. Using lexan scissors I cut out those indents. I then double checked fitment and glued them together when I saw they were okay. With everything in place on the sides, I then moved to the front pieces. I guess I forgot to take photos here but referencing the CRL, the front piece sits flush on the mounting rails so that it isn't jutting out from the front too much. As originally cut, my pieces were sitting out too far. So I used a belt sander to sand off about 5 mm of edge, checking fitment along the way until the pieces sat more flush on the mounts. Content with fitment I then applied glue onto the sides that had the mounts intact, let them dry, then glued the other sides with a lot of patience, magnets and clamps to get it to sit flush with the sides. It was a chore and I don't recommend it to anyone. Point being, be sure not to trim the side pieces of the forearms too much and leave those rails intact! KB just posted on FB today that he is working on a new mold for the forearms so perhaps this will be ancient history for future KB builders but be sure to ask before cutting too much. The NEXT issue I encountered as a result of my mis-trimming with the forearms is that the upper points of the front piece with the make shift mounting rails jutting out, leaving an unsightly gap. I wracked my brain of the best way to fix this and had a moment of serendipity. Each piece I had to correct was the mirror image of the other. The pieces with the intact rails needed to be trimmed anyway so I took those trimmings and found that they were 90% matches to the opposite piece! So with a bit of glue, some magnets and patience, I fit those trimmings to the opposite side so that the pointy gap was nearly gone! Here are both pieces with the small corrective shims. I'm confident that after filling in the seams up top and painting that you won't even be able to notice. Happy with the work to fix my mistakes, I applied the front "greeblie" after sanding and general clean up to its respective area with E6000 and will let it dry for a few days.1 point
-
I’m the same... think.... I’ll do that tomorrow.... but then i forget..... my wife says it’s my age...... lol Sent from my iPhone using Tapatalk1 point
-
They are faux leather, for that price I'd want real leather which will age far better. Personally I'd wait for IB, or go for some painted black boots which would actually be more accurate.1 point
-
I was able to get quite a bit completed tonight. I started with fitting and trimming the shins. Easy peasy with the new AM2.0 shins. Since the shins went faster than I expected, I jumped right into the thighs. After a quick test fit, I determined I was ok to trim the fri. To 10mm per side for the cover strips. After cutting the front down to size it was time to test fit and determine the rear cuts. These AM2.0 thighs are FANTASTIC! These to a fraction of the time to fit vs. my last kit. Here you see front and rear trimmed 98% for now. I will do final fitting and return edge sanding just before glueing my cover strips. Cheers! Sent from my iPhone using Tapatalk1 point
-
After a far away troop today, I'm back and plugging along with a few more things tonight. Adhesive: At the recommendation of others, my principle adhesive will be ABS cement. I found this on Amazon (adding link to OP). I probably got waaaay too much but better than not enough. Never having purchased it before, I wasn't sure how much I would truly need. You'd probably be okay with just a pint for this build. It says "Low VOC" but it is really smelly! With small kids and a pregnant wife in the home, all glueing will take place in the garage with this ventilator. Fixing Imperfections with Heat Gun Some of my pieces have some "bubbles" or lips that make good edges more difficult. I decided to attempt some heat gun work on one such flaw on a piece of bicep tonight. My gun has a "High" and "Low" setting so I set it to "Low" hit the area for no more than 7-10 seconds at a time and pressed it against a flat surface to flatten it out a bit. Before: After: Biceps Pt 1: Content with that small fix, I then proceeded to glue one side of the biceps tonight. To do so I glued an interior cover strip to each bicep like so... After letting that cure for an hour or so (way better turn around time than E6000) I then glued the other half to each side. There are small gaps near the top and bottom of the seam but that will be filled in and painted over later one so I'm not concerned about them. Shoulder Bells: I also worked on the shoulder bells tonight. Following Ruthar's great tutorial, I clamped the inserts so that they stick out from the top edge of the bell about 1/2". I then traced the outline of the insert with pencil. Finally, after sanding the insert and the outlined section of the bell, I applied adhesive and clamped it down. I repeated these steps for the other bell. Executioner Bells: I then repeated the above steps for the Executioner Bells. They will be chillin' for a while until I get to painting them. Posterior Prep for Strapping: I also took the opportunity while things were drying to prepare the posterior piece for future strapping. I measure the length of the notch and split the difference. I then created faux notches to match the Anovos piece at 50 mm distance from that center line. Matching the distances outline in Ukswrath's thread of 3/4" in and 1" up I marked some holes for drilling. I'm not sure if it had to be exactly those distances and such. The key is symmetry and consistency. The little "swoop" up on the top center ridge was how the piece came to me so I just had to deal with it like that.1 point
-
Ab Box Trimming and Shaping To trim the Ab boxes to the desired shape I used a contour tool. I didn't know this even existed until earlier this week. It made this task a breeze! I shaped the tops and bottoms of each box, making sure to keep the tools orientation correct (gotta be cautious of that or else you'll get the exact opposite contour that you desire!) I then taped the boxes to the Ab to get a rough fit. Overall not too shabby! Box D has a bit of a gap up top from over trimming the curve but I can fill that in later upon assembly.1 point
-
More Shin work: Continuing on from last night, I set out to create faux shelfs to have a more even seam on either side. So I used some excess ABS and glued it with some overlap then glued the front piece onto that overlap. After removing magnets: On the other side, I added a shelf onto the back portion of the shin so the overlap goes from front to back. This was per Ruthar's recommendation in his build to create a cleaner look from the front. Down the line I will add velcro to the shelf and front half that overlaps to close it up. I'm a bit worried that I may have cut off too much ABS here so that when I close it, it won't create a good seam as there will be too much tension pulling outward. Test fitting it around my calf is totally fine but I won't know how it truly looks until much later after painting and such. I may just add some velcro to it as soon as it arrives from Amazon just to know for sure. I might replace this shelf with a slightly longer one too. That's still up in the air. I then set out to do the right shin, leaving a little more ABS to allow for easier overlap on the open inner side this time around. For symmetry's sake, I measured the distance from the indent to the seam of my left shin and copied that on the right. I'm not sure what the exact measurement should be but I wanted to be consistent with mine and kept it about 10 mm. I also added a slightly larger shelf to allow more velcro and adhesion. Maybe too much. I can always trim that piece down the road though. Here are the differences in gaps on the open side for comparison. About 3 inches on the left and 2 inches on the right. All in all though I'm pleased with how the curves turned out on both shins and felt it was worth the trouble.1 point
-
Yeah! Finally! I think this is the sixth 'big brown box day' for me.1 point
-
1 point
-
Some of the cut lines are fairly easy to find/see on this armor. Others...not so much. I'm a little unclear how much return edge I'm supposed to have on the Yoke pieces. Input appreciated. This is the Yoke proper. Looking at the photos in Tony's thread, it appears that there should be no return edge on the medial sides of the yoke. So should I cut these completely? Right Distal Yoke (sorry, pharmacist here so I'm using medical terms). There appears like there should be some edge on this portions. How many mm's we talking here? I trimmed some of the excess on the Left Distal Yoke but realize that it should be more than this right? Not sure of the proper term for this piece but it connects the yoke and the back. So the Bridge perhaps? At any rate it appears like there should be no return edge across where I have already cut, but how much on the outer edges needs to go? Finally the back piece. I've roughly marked up what I think needs to go but just need affirmation.1 point
-
When I've dropped the kids off to school, I can take some pics of my strapping. [emoji6] Sendt fra min SM-G930F med Tapatalk1 point
-
As hankey said: And I also read it helps focus your vision out of the bucket, can definitely see that one. Oh and the most important reason why is it looks cool as poodoo. If you want to go über accurate though leave it white. Good choice on Geeky Pinks! Can't go wrong with her. Awesome that you're gonna start a thread, takes a while to document everything but it is so worth it. Plus you dump a lot of knowledge and information out to those new builders and get the chance to get answers from the more experienced ones on that costume. The tent I used was a small 2-person "go to a festival and leave it there" type of tent, it's really cramped and not a lot of space so I could really just paint a big piece at once or both thighs/shins etc. Also if you don't have a proper respirator and you're going to do this, GET ONE. Painting inside such a confined space without a proper respirator with filters is just asking for trouble, also wear clothes you don't care about.1 point
-
Blacked out the inside of my bucket today with some spray rubber. Didn't use PlastiDip because the place that sells it here is always out of stock. Some seams on the outside of my Anovos helmet were kind of big, so I made sure to put masking tape as well as I could in them to prevent the spray rubber from oozing out. And it worked! Masked off: A few coats: After: Looks like a proper helmet now! Going to let it cure for a few days before I add the velcro for the padding, fans, and the wireless mic. Went with 4 coats as per can instructions. Received my Stanley chest, 240 litres! Not sure if this will be too big for me or not, we'll see. Also pimped it out with some patches and reflective tape:1 point
-
Did you know Jim uses wooden sticks when he casts the holsters? I sure do now, dangit My plan was to fill all the screwholes with 4hour epoxy, coat the screws in silicone, jam them in, let cure, then screw them out. Worked pretty OK but some of them were in there pretty good so I had to use some pliers, and well... Pliers gives you great leverage, need I say more? Slobbed on some 5min Epoxy and put the 2 halves back together, filled the crack with filler, no problem! I've been hauling impolite persons this week because I had this week free from work. Done a LOT of sanding, priming, filling, painting, gluing, cutting, everything. So not many progress pictures here sorry, been so focused. Here is the holster completed: Used 4hour epoxy to glue the holster to the thigh. 2 of the holes were shot, so I redrilled them so the screws just sit loosely in there, and put some 60sec on the threads, pushed them in and called it a day. You could also probably use M6 screws for the big ones. Also in the CRL pictures the screws are painted over, they are not in the movie: My slight belt mishap meant that the 2 chicago screws that were to seal all layers at the male buckle were on the glued-on part. I didn't trust it to hold so I decided to glue the inner polyester layer to the rest of the belt. Would have used E6000 here but that takes forever so I just used the 60sec Loctite (really come to like this glue). Note that I glued the belt in a circular pattern this time. This gets rid of the crinkles (is that even a word? oh ok, just Googled it, it is!). Downside is that it stays that way, you can't lay it flat for storage. Also here is how I attached the wobbly belt box, and how it moves: My TD, completed. I absolutely hate decals, it wrinkles up and it's just terrible but they look so good. Attachment for TD was just 2 long strips of industrial velcro (that I had to order from the states). Note that on the right side of the TD, the entire circle is filled in, and not just the inner circle (The decal set from Trooperbay only comes with a decal for the inner circle). The entire circle should be filled as that is how it is in the movie (see picture below). I know one guy on the Jim Facebook Build Group who was told to do this by his GML. For any Swedes or Norwegians doing this, the snus lid of a G3 Portion is 105% the size of the Jim right TD circle, lol. I just traced it out on a piece of vinyl car wrap from eBay. Man I love eBay. For the backing material on all of the holes I used this tape from TESA because I really like the texture it has over regular gaffers tape. More matte. Also covered the insides of the forearms with this as you can see the fibreglass real easy from behind when bending your arms. Ab section done: When supporting a bit for TK-20240 (only other FOTK in Norway.. for now!) he mentioned his shoulders hurt after the troop. I've also read this on various groups and FISD that it can be a problem with this heavy fibreglass kit. So I decided to add some padding to the yoke. But Ensi, what are you going to use?? Foam?? Yes! I do auto detailing as a hobby and I have several polishing pads laying around, so I grabbed a black one meant for applying waxes/sealants and glaze (no abrasion). Cut it up and applied some hook-side velcro to the yoke, this is neat as the polishing pad already comes with the loop side on it for attaching to polishers. Also an accuracy update I don't think I mentioned. On the outside of the forearms (opposite side of greeblies) there is a seam on the Jim kit. When I resized them I decided to do it in a way so that it became seamless on that side. See pictures: Going to post test-fitting pictures in the next post as this one is getting big enough..1 point
-
You're too right! Thanks Thanks! Thanks man. Yeah I know there are some in Denmark and some in Sweden, but not sure. I'll be the second one in Norway if I keep up this pace Will definitely contact one of them if I run into any trouble! So I knolled all my my kit to get a sense of where I am in the build and also to take an awesome picture. Got a lot of painting done today in my camping tent (lol..). Not much left now, I can feel it!!1 point
-
Great effort! Loving your build thread - it's important to keep a sense of humour whilst getting lost in the build. Sent from my iPhone using Tapatalk Pro1 point
-
Apoxie Sculpt Demonstration Since 2014, I have been using Apoxie Sculpt as my favorite filler. Its safe to use indoors and non-toxic compound to work with. Unlike bondo, you have about two hours to work it before it turns into a rock. Please be sure to read the manufacturer's directions and practice with it before using on your armor. There are lots of other methods to fill in the shim gaps or any gaps, but this is just a personal preference. Be sure to work the compound for about 15 minutes before applying to your armor. You're going to ensure the 50/50 putty is properly mixed. I use a spray bottle of faucet water to moisten it up and give me toothpaste like compound. Here's a trick. I'm using an old cheese spreader to apply AS into the shim gaps. Go slow and work it into the gaps. Don't rush. Take your time. Once you're done, let it hang out overnight. In this case, I left it alone for couple days. Washing your tools: I just used warm water, dishwashing soap, and an old dish scrubber.1 point
-
Inside backer = I used Weld On ABS cement. This will ensure the backers and the shims don't break apart. Experimenting more on other strips / shims.1 point
-
Chest piece is snugged (test fit only). I will be sanding the back of the piece to get the desire cut out as done by Tony. To be continued . . .1 point
-
One thing I would love to see is a "mark all threads read" link on the main forum index page. I would like to make everything appear as If I already read it so when I come back I can click new contect and not get so many pages of them. I just want to start from scratch again. No big deal if we can.1 point