Leaderboard

.thumb.webp.27f7939d37871f319ff836257d4a3668.webp)


Popular Content
Showing content with the highest reputation on 01/01/2018 in all areas
-
Additional photos, as specified in the EIB CRL requirements:
 2 points
 -
What a great start into 2018! Absolutely outstanding work! Congratulations for recreating the first fully operational magazine well from resin. Man, that modification raises the bar one more time. Oh, and I had a good laugh seeing that photo with the LEGO minifigure. It reminded me of something. Emmet has done a good job on the trigger guard.2 points
-
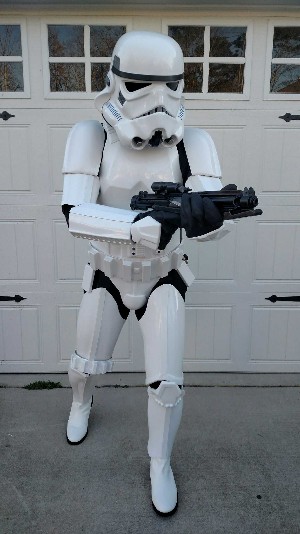
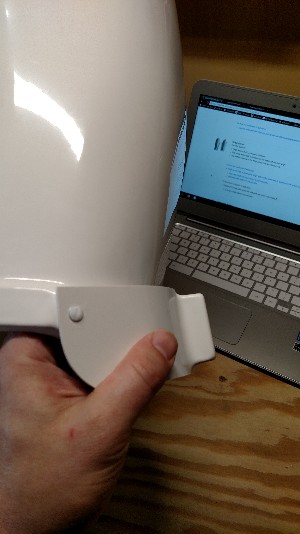
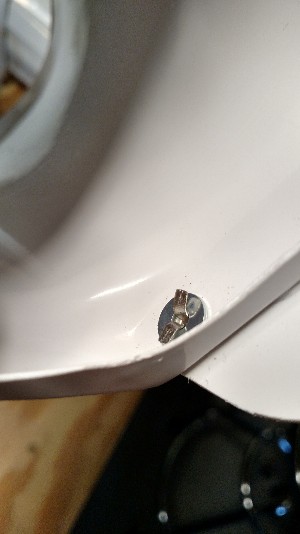
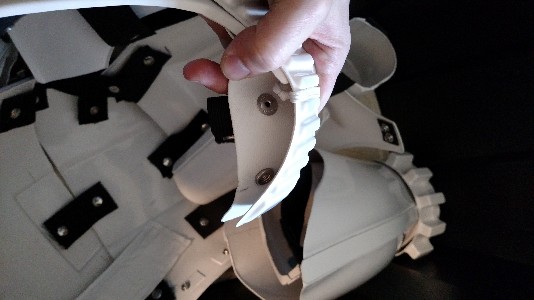
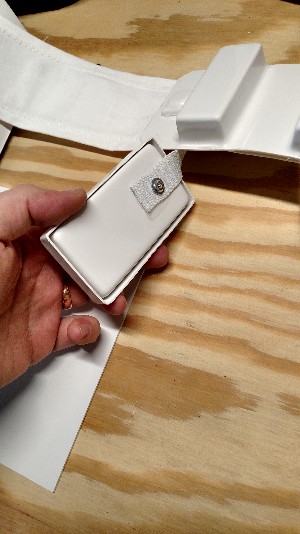
I decided to work out a complete, comprehensive list for those about to start an OT TK armor build (ANH Stunt, Hero, etc,) to help get everything in place for when "Big Brown Box" day arrives! This list does not include soft parts, (neck seal, boots, etc.) but focuses on the hardware and supplies for building the armor itself. However, a list of soft parts can be found HERE I believe I have covered most items, but would appreciate additional suggestions/corrections to add, and will keep it updated as such. Yes, it looks a bit daunting, but some of the items you will already have, and the rest can be purchased at major home improvement stores, online, or borrowed from a TK friend! Plus, it gives you something to do while you "hurry up and wait" for your kit! This list is includes items used for the EIB and Centurion programs, (marked with double red asterisks)**. These items are not required for initial TK approval, but I encourage everyone to consider them as an option. Hope this helps, and best of luck on your build! PLEASE NOTE: Some kits come with all the hardware you will need to build to Centurion level, i.e. split rivets, ear screws, TD screws, etc., however, not all armorers supply the correct ones. If you are (hopefully) planning on aiming for level 3, please check with your armorer to see if they provide these. You can also reference the photos below to see if they are accurate. These supplies are based on using the snap method for connecting the armor. Example photos are shown at the bottom for many of the items, but not all. (Everyone knows what a hammer looks like). Items with photos have a notation. 1. E-6000 glue- Great for almost everything, and removable if necessary. Highly recommended. (Pick up some wooden tongue depressors as well, makes spreading it easier)! (Photo 1) (Please see updated information on E-6000 below, after #50 before purchasing). 2. Binder or notebook- To keep notes on your research. 3. Dremel or rotary tool- A "must have". (Photo 2). Be sure to get the sanding drum attachment and extra sanding drums (Photo 3). I suggest the 180 grit type. 4. Small plastic containers- Keeps everything organized. 5. Lexan scissors- Curved and straight, for cutting ABS. (Photo 4) 6. Small spring clamps- For holding things in place while gluing. You can't have too many! (Photo 5) 7. Line 24 snaps- For strapping. You will need at least 30, and do NOT "cheap-out" on these, but purchase quality ones. (Steer clear of Wal-Mart snaps). Tandy is recommended. Tutorial located here: https://www.whitearmor.net/forum/topic/44617-snap-setting-101/ (Photo 6) 8. Snap setting tools- There are 2 types to choose from- One is a two piece set (requires a hammer) (Photo 7) and the other is the pliers style (Photo 8) 9. Hammer- For setting snaps if you use the 2 piece style of snap setter. 10. Pliers/vise grips- 11. Screwdriver- Slotted head. 12. Rivets-** 5/16 (8mm). (Photo 9) Round head bifurcated/split rivets with washers. You will need 9. (3 for the kidney, 3 for the ab, one for the cod piece, 2 for the thigh ammo pack). You will also need 3 speed (Chicago") rivets to attach your ABS belt to your canvas one. These are attached by hand and not to be confused with the aluminum ones listed below (#19). Some like to use the screen accurate single cap rivets (Photo 10) to attach the ammo thigh pack but these are not a requirement. 13. Elastic- 1 inch wide black for shoulder bells, etc. (4 ft.) 2 inch wide white for ab/back plate shoulder connection (1 ft.), 1 inch wide white for drop boxes, (1 ft.) 1/4 inch wide white** (1 ft.) for shoulder straps. 14. Nylon strapping- 1 inch wide black, at least 6 to 8 ft. long. 2 inch wide black (48 inches) for high tension areas if you are using the double snap method. (NP) 15. Exacto knife/extra blades- For cutting, trimming, cutting nylon strapping. (Photo 11) 16. Heavy duty razor knife/extra blades- For cutting cover strips and scoring around pieces that will be removed. (Photo 12) 17. Heavy duty scissors/tin snips- For (carefully) cutting large sections of ABS. (Photo 13) 18. Metal ruler or straight edge- (At least 18 inches long). For use as a cutting guide, especially cover strips. 19. Hand Rivet gun/aluminum open end blind rivets- For putting your helmet together. Available for about $10-$12.00, EASY to use! (Photo 14) 20. Metric Ruler- 21. 2 x 2 or larger piece of carpet- Protects work surface, keeps dust down, and stops small parts from rolling away. 22. Rags/paper towels- And plenty of them. 23. Blue painter's tape- 1 inch and 2 inch widths. For keeping glued parts in place and dry-fitting your armor. 24. China marker/pencil- For marking cut lines. 25. Sandpaper- I highly recommend Sandblaster Pro Flexible silicone sanding sheets from 3M, 220 grit. You will never use anything else, I promise. They last forever! 26. Sanding block- The sponge type, 120 grit. 27. Band Aids- You will need these. Might as well keep them handy. 28. Rare earth magnets- (10 minimum) SUPER strong! I use the 20 mm x 3 mm round ones. Cover them in blue tape to prevent scratching your armor. You cannot have too many!!! Tutorial located here: https://www.whitearmor.net/forum/topic/44619-magnets-101/ (Photo 15) 29. Butane Lighter- For sealing the ends of nylon strapping. (see # 44 below for a better option) 30. Large "half-round" file- For smoothing out edges before sanding. I used this a LOT, especially in the curved areas. (Photo 16) 31. Small "Needle file" set- Very inexpensive, comes in 6 different shapes, and is perfect for the teeth and eye openings on your helmet. (Photo 17) 32. Foam padding- 1 inch thick. Great for helmet and armor padding. Available at craft or fabric stores. 33. Velcro- 2 inch wide black (various uses) and 1 inch wide white, for calf closures (about 36 inches). Go for the "Industrial Strength" kind. 34. PAINT: Satin Black: Humbrol # 85 or Testors # 1747 for vocoder, trap/ tear drop/ear bar outlines/stripe(s), ROTJ and ESB frown, TD screw heads. Gray: Humbrol # 5 or Testors # 1138 for trap/tear drop/ear bar background, ANH frown and ab-buttons. French Blue: Humbrol # 14 or Testors # 2715 ForTube stripes/ab buttons. Mediterranean Blue Humbrol (Tube stripes alternative color) Testors: No exact match Gloss white for all rivet heads (excluding cod rivet). Mineral spirits for brush cleaning 35. Goo Gone- Citrus based solvent that will remove latex and enamel paint and NOT harm your armor. (Photo 18). 36. Small paint brushes- Assorted sizes. Try to buy quality ones.. Cheap brushes =cheap looking results. I suggest picking up a "filbert" (Photo 19) style brush (photo 5) as well, as it's rounded tip works great for painting the ab plate buttons and vocoder. Another GREAT way to get clean, crisp lines on the ab buttons is to use Testors Micro-Sponge brushes (Photo 20). 37. Wire or fiberglass mesh- (Window screen). For inside the "frown" of your helmet. A piece 3 x 8 inches will work fine, and you can trim it as needed. 38. Safety Glasses- It never hurts to be too careful, especially when using a Dremel type tool. For your Thermal Detonator, (TD) clips: (Note: There are some GREAT pre-made TD clips you can buy on this site, and some kits include them, but you can use the following 5 items to make your own. 39. Aluminum strip- 1 inch wide 40. Screws- Size #6 pan-head slotted screws **, 1/2 inch long, You will need 4. (Photo 21). NOTE: The CRLs have been updated and round head screws are permitted, but they must be the slotted (not philips) style. 41. Hacksaw- For cutting the aluminum strip. 42. Drill- Electric or battery operated, with various size bits. 43. Vise grip OPTIONAL ITEMS: 44. Heat sealing iron- For making return edges. Not normally needed, but there are some great tutorials on this here on FISD. Try it on a scrap first, though! 45. Soldering Iron- For making holes in nylon strapping and sealing the ends. Pretty inexpensive, and worth the cost! (Photo 22) 46. Plasti-Dip- A black rubberized coating you can spray inside your helmet, (also available in a brush-on). Or, you can use spray paint. Just remember to sand and prime first! 47. Heat gun- Not normally needed. For shaping ABS. Use this CAREFULLY, and practice on scraps first until you get the hang of it. These things can reach 1500 degrees and melt your armor. 48. CA (super) glue- Not recommended for first time builders, as it is PERMANENT, and you can't fix mistakes. Also, if it drips on your armor it is nearly impossible to remove. It can also become brittle over time, causing connections to fail. 49. Acetone- For use ONLY in making ABS paste for filling small gaps, (see tutorials). Do NOT put this directly on your armor, as it will melt it. 50. SUGRU- This is an easy way to attach the lenses in your helmet. Tutorial located here: https://www.whitearmor.net/forum/topic/44593-how-to-attach-lenses-using-sugru/ 51. Respirator- An informative post was made by Clint, (cm325i) concerning the effects of E-6000 glue on some individuals. Definitely worth a read: http://www.whitearmor.net/forum/topic/33347-e6000-warnings-read-them-and-wear-a-respirator/ 52. Cut resistant gloves- Especially helpful if you are prone to cutting yourself. Available online for about $12.00 (Photo 23) E-6000 update: Please note that there are certain online retailers (including those in Europe) that are selling FAKE E-6000 or "knock-offs" like these: The genuine product is clearly marked Made in the USA, and has a batch number on each tube. They do not sell to distributors in Asia, so if you try to save a few bucks by ordering from a seller there it is not the real stuff. If you have any doubts, you can contact the manufacturer at www.eclecticproducts.com, and they will let you know where to get it. The fake stuff is garbage and will not hold up. 1. 2. 3. 4. 5. 6. 7. 8. 9. 10. 11. 12. 13. 14. 15. 16. 17. 18. 19. 20. 21. 22. 23. IMPORTANT UPDATE! To make life easier, Ray (Dieltski) made this into an awesome Google spreadsheet, which you can download to keep track and add notes! Just click here. Thanks, Ray! .1 point
-
Great application mate! It’s a little hard to see in the pic but I assume the sniper knee plate is aligned with the shin ridges? It looks to be so disregard if so! Not sure if the TD clips are meant to overlap the control panel. That might just be my OCD though. Do you have black elastic holding the shoulder bells in place? Again it’s probably the pics. Are you planning on going onwards to Centurion? Looking great though. I’m sure you’ve got this.1 point
-
Hi all, Happy new year to all. :-) As I did with my blaster build, I’ve put together a short video of the build that I thought I’d share here. Mostly for my records down the line, but also just for fun. :-) Sent from my iPhone using Tapatalk1 point
-
Ive been Trooping in one of Walts kits for a year and have had zero issues! Quality kit from a standup guy thats understands customer service. I wouldn't hesitate telling someone to contact Walt or anyone of his crew for a kit.1 point
-
Hey Mike, I would take a little off the big one. I had to remove all the return edge of the small one to make it look right. here is a quick pic of the smaller one - it is not glued on, I just set in more or less in place for the pic. Also, for your coverstrips - use lots of glue. I've had to go back and redo several coverstrips. Sand the glued areas with really coarse sandpaper too. Don't worry about making mistakes with the e6000 - they are easy to fix. Looking good so far!1 point
-
Go with the reference they don't have to be perfect but they should be smaller than the "mounting plate".1 point
-
On it.1 point
-
Should be no issue - work with Eric & make it so1 point
-
Happy New Year! I have to say, Im so blessed for all the advice on here, help, and constant questions I ask and get help with everyday . Thank you!! Especially the ones that have let me private message them over and over. I did more trimming today! Can you check me? I am trying to trim smaller one down enough...and all the references I see are way smaller. Held temporarily with magnets Sent from my iPhone using Tapatalk1 point
-
Listen to the cable guy. It took me a bit to get on tapatalk, but it has solved many issues for me. The build is looking great. Still waiting on my ANOVOS kit, but it should be coming anytime now. Sent from my VK815 using Tapatalk1 point
-
I think a mid-tier server at digital ocean would work fine enough. They cost $20 per month.1 point
-
Congrats mate! Looking sharp. Now onwards to centurion!1 point
-
Looks like you are off to a great start, Mark! I have completed a few of these with Tino's incredible completion kits, and I really think you should go the extra mile and use everything he includes. (You won't be sorry, I promise)! You are fortunate to have all the extra tools on hand, so I would take advantage of that fact and make this a showpiece!1 point
-
If we need to up our budget I'll throw in a few $.1 point
-
Well done!1 point
-
Superb - well done, Andrew! :-) Sent from my iPhone using Tapatalk1 point
-
Congratulations Trooper1 point
-
Mathias & Eric should be chatting a lot on this. I'm sure they will have a proposal soon on how best to address this.1 point
-
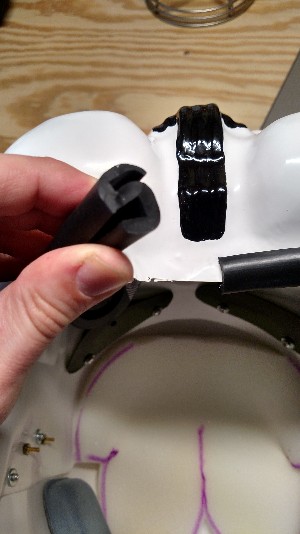
I've also been picking away at strapping. I have never worked with line 24 snaps (or any snaps for that matter) until this build. I learned a few things. 1 - make sure the post is set all the way down. I didn't so this to the female snaps on my fist strap and I thought all my snap bases - that were already glued to my armor - were somehow faulty (moment of unmanly panic ensued). It was my female snaps on the straps - because of the give in the material (folded elastic) it can be deceiving to tell when they are set far enough. 2 - nylon webbing for bases works really well - but they do not offer much support when you are pressing really hard on a snap. I created a dent in my armor when trying to connect my poorly constructed snaps. Anyway, if you have not worked with snaps before, I recommend you don't be an idiot like me - actually make a few and test your snaps as you go to make sure they work before gluing them into your armor. Measuring and lining up the snap bases - all 1" nylon webbing. I roughed up the areas with sandpaper and glued with E-6000. The nylon bases adhere very well to the armor and can be pretty tough to remove. I worried that my snap bases along the bottom of the back piece are too close to the side edge - I misread instructions from another thread. It is hard to see in this pic, but there is a snap base on the other side of this piece - you can see the dent left after I pressed too hard trying to connect the snap on the other side. Okay, I admit it isn't that bad - it just freaked me out when it happened. I will try to use ABS bases whenever possible next time. Almost all my snap bases in. Missing one on the kidney and missing the shoulder strap snap bases. I used 1" elastic for the strapping connecting the back to the kidney. Finished elastic strap. Elastic strapping done. I found it hard to determine how to measure the elastic. Mine ended up pretty tight - to the point where it was pulling the armor together and overlapping. I'll wait to adjust this once I get everything connected and actually on me to see how it all sits. It is looking pretty good in this pic, but the final fitting will tell. Most everything else is being strapped together with 1" nylon. The kidney and the posterior should line up along the outside edge (see below) - and depending on how it is sitting, it does. This is another thing I will have to see how it actually looks when doing my fitting. I trimmed away enough of the return edge to these pieces that they do tend to overlap each other every now and then. The OCD is going to go nuts on this one. For the cod to posterior, I cut a 12" piece of 1" elastic. I attached the elastic to the cod with a split rivet and #6 washer. I had never set a split rivet before and it took me a little while to get the hang of it. It felt like I was going to bend or break the armor. I found a chisel in the garage which worked really well. I could pry the rivet apart with the chisel end, and then I set the chisel on its side over the rivet to help spread the rivet more and more. Then gently hammered the ends down. then it was time to connect the ab to the kidney with six split rivets (already painted white). I measured the distance of the holes along the left side of the ab and kidney. I cut 1" nylon and used a soldering iron to burn in the holes at the required spacing. I fitted it once without fully setting the split rivets just to see if there was any noticeable gap or if a strap was too loose. It looked good - there was a little bit of a gap but I figured that was ok since the rivets would tighten up once set. rivets set. The left side ab to kidney connection. My Christmas-enhanced waistline still fits in this puppy.1 point
-
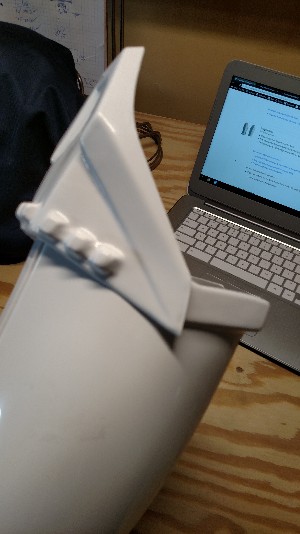
Drop boxes. Happy New Year. I'm spending New Year's Eve in my office, building armor. What better way to ring in the new year? Anyway, tonight I finished up my belt. First I cut two 11" pieces of 1" white elastic. I always use a soldering iron to cauterize any cut edges. I looped and positioned the elastics to where the drop boxes should be. I had to cut away some of the elastic to fit around the ABS belt rivet. Hard to tell, but it is cauterized. With the inner box fitted into the outer box, I marked where the hole lined up along a center line of the drop box. I held the drop box so that the inner was centered in the outer drop box and the edge of the outer drop box was just barely touching the ABS part of the belt. I'm using pop rivets to attach the drop boxes. I test fitted everything before actually installing the rivet. I saw somewhere where someone put a 1/8" washer on the inside - I tried to do this but the washer popped off during the setting of the rivet. So on the other drop box, I put the washer on the other side to help hold the elastic... but the rivet barely caught on the other side. There isn't much rivet holding this thing in place. I will position and glue everything down anyways - but, lesson learned. I didn't know the best way to glue the inner drop box to the outer drop box - all I could do was sand the surfaces and dumped a whole whack of E-6000 into the outer drop box. You can see the E-6000 flowing out. I just picked up a new tube of E-6000, so I had no issues with going crazy with the glue. I also ended up cutting part of the elastic to fit around the snap - the drop box is not in the final position so the snap is under the elastic in this picture.1 point
-
Congrats Andrew and Happy New Year!1 point
-
TK-61515 Reporting for duty! Sent from my XT1254 using Tapatalk1 point
-
Thought I’d send “the other guys” some well-wishes...1 point
-
Sent from my iPhone using Tapatalk1 point
-
I just donated on Krayt Clan they seem to have a fund that pays for things and take donations all year long. I haven’t used their site as much as this one but I’m willing to help the cause on and forum. Sent from my iPhone using Tapatalk1 point
-
I'd gladly contribute.1 point
-
I had my second troop yesterday as well as an event in the morning where I was learning to handle. I would highly recommend this to all troopers. It gave me great insight as what to look for and be aware of while in costume. Things can go wrong really quickly and I was able to help a TK from falling over. The troop was great. About 3 1/2 hours suited up. Fans in helmet a must for me. One of my drop boxes started coming apart. I has white duct tape in my box so I was able to do a quick field repair. On inspection when I got home I found I hadn't used enough E6000. You can never use too much E6000. Simple fix with lots of glue and a couple clamps. I also know of some more tweaks I need to do to the armour for comfort. I got loads of help and advise from 501st members in the change room while suiting up. Great people, great time.1 point
-
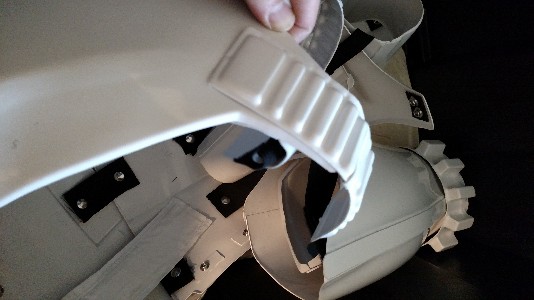
Hello everyone! Hope everyone is having a wonderful holiday celebration and here's an early Happy New Year to all you good folks at the FISD! Today, I update with revisions made on the magazine housing - it's catch assembly, the magazine ejector, making way for insertion of plastic replica magazine. Finally, I finish off with my custom aluminum trigger guard. I am to the moon and back when it came to getting a working and reliable catch assembly. Previous attempts on custom threading proved frustrating and futile; my solution with a Chicago screw and it's extender REALLY put a smile ear to ear for me =) Completing my custom trigger guard was also very rewarding as well as hollowing a large portion of the magazine well =) cheers! Mark 2 catch assembly - used Chicago screw with 1 inch extension. Butchered a 1/2 " extension to insert into catch piece Finished catch piece, forgoing green stuff additions on catch and instead file away bottom aluminum support section of catch to capture catch contours following SMG references Catch assembly, different angles Chicago screw extender cut to depth length of catch and glued in place inside catch using J-B weld Catch - various angles Magazine release button base removed and glued to top of Chicago screw using E-6000 Thickened shelf holding top part of exposed ejector using two thin styrene plastic sheets cut to pattern. Glued with E-6000 and Green stuff to finish up. Flattening the front part of the ejector made it no longer flush against the 'shelf' Catch assembly and ejector display of custom component parts for magazine housing Progression of ejector modifications of custom aluminum piece on the exposed end following SMG references Magazine release button, compression spring and catch rod in final position Catch and catch rod at final positioning on underside of magazine housing Installed catch assembly with ejector in magazine housing - various angles Installed catch assembly with ejector in magazine housing - various angles Setup for deepening the magazine housing channel for later insertion of plastic magazine replica. Dremel set up to be stationary, with magazine housing to slide overtop deck of cards for smooth movement during Dremel process. Dremel process for increasing the depth of the channel that would hold the magazine For final details, switched back to using Dremel extender. Square file to smooth out channel Process of Dremel out channel that would hold the magazine Channel widened and deepened to hold the magazine. More work to do after replica plastic magazine on hand for test fit. Magazine housing with channel deepened Original doopydoos channel configuration Vs modified channel Custom trigger guard made from aluminum - 4” long before bending to shape. Aluminum from T-Jay completion set on FISD Custom aluminum trigger guard is wider by 2mm in the front - 12mm in the front then 10mm in the rear following SMG references Doopydoos trigger guard - detached and attached Doopydoos trigger guard attachment to trigger housing Doopydoos trigger guard attachment to trigger housing Comparison of Doopydoos attached trigger guard to SMG references - it is inaccurate as it installs short compared to the real thing Research on trigger guard details - SMG reference and desired end result - this finished aluminum trigger guard by T-Jay Aluminum trigger guard, cut to length and width before shaping Construction of trigger guard - lines etched with hacksaw blade on the inside, under 1 / 3rd thickness so to guide aluminum during bending phase. Trigger piece pushed against shovel main aluminum tube body to shape so to get even distribution of bend. Test fit of custom trigger guard ends against trigger housing Comparison pictures - SMG reference to doopydoos part and custom aluminum trigger guard Completed custom aluminum trigger guard Thanks for reading once again; here's a shout out, an early one nonetheless, have a terrific start to the new year! Jesse Sent from my iPhone using Tapatalk1 point
-
I was thinking that maybe using magnets instead of velcro might stop it flexing?1 point
-
Hey Chris, I had to cut away at the neck area on the chest to bring it up. Just follow the original curve lines and cut conservatively (cut a little, try it on, cut a tiny bit more, try it on...). The kidney/ab/butt/chest can handle a nice hot water bath to shape them up a bit. I dumped between two and three 8-quart pots of boiling water in the kitchen sink to make the Armor Spa. Also when you get your strapping in, that'll bring things in a bit as well.1 point
-
I’ve used only tape and paper 5 coat of plastidip the final resoult Inviato dal mio iPhone utilizzando Tapatalk1 point
-
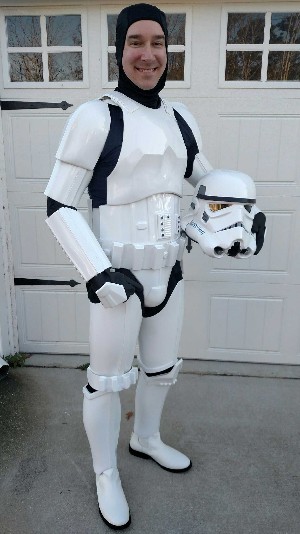
Well everything worked out guys, thanks for all the advice. Got new shoulders, body and thighs sent to me. Everything fit for most part and wore it at work at my movie theater. All the kids loved it. Shoulders in pic are old shoulders. Working on replacing them with new ones soon. Sent from my iPhone using Tapatalk1 point
-
Alum front sights1 point
-
http://i.imgur.com/1sVQJsi.gif http://i.imgur.com/1sVQJsi.gif In Memoriam From the DL From the New XO From the Provost Marshall From the Deployment Office CRL Updates December Is Going TO Be Phastastic WANTED: The Last Jedi Premiere Troop Photos What's Your TKID? Hall of Fame EIB & Centurion: What do these terms mean? Obscure Trivia Nissan & Star Wars Just For Laughs Competitions Trooping The Last Jedi Notable Troops Imperial Attaché Program Advanced Tactics Awards EIB - The March To 1000 Merchandise Public Relations Follow FISD Not one of our own members but someone who many of us in the 501st would have heard of, Anthony Senerchia Jr who was an inspiration for the viral ALS Ice Bucket Challenge, passed away at the end of November at the age of 46, ending a 14-year battle with amyotrophic lateral sclerosis. “He worked tirelessly to raise awareness for ALS and was directly responsible for the world-renowned Ice bucket challenge,” his obituary said, calling him “a fireball who tried everything in life.” Anthony was diagnosed with ALS, commonly known as Lou Gehrig’s disease, in 2003. “It’s a difficult disease and tough when you’re losing,” his wife, Jeanette, told media. “Your body is failing you. But he was a fighter… He was our light. He made our life better.” The ALS Ice Bucket Challenge went viral and raised $115 million during two months in 2014 — money that went largely to fund research. And Anthony Senerchia played a significant role in getting it started. Many members took part after the 501st legion was nominated by JJ Abrams. Chestnuts Roasting on an Open Fire (Team) Back in the day when the 501st was smaller, we actually tried to incentivize people to get out and troop, especially in costumes that were not as popular as the TK. MEPD was the first detachment to create “patrols” to help build some esprit de corp amongst people who troop together. The reason why Fire Teams can’t use any 501st or FISD imagery in the logos they create is because they are not official units at all, and only official units can use official branding. It also means that there are no such thing as “official” Fire Team events either, as only Garrisons and Squads can organize events. In this regard, Fire Teams, patrols, etc. are really akin to the Quilted Trooper Brigade, the Muppet Troopers, or the League of Extraordinary Troopers. Ways to have fun and celebrate trooping in costume together, but nothing more. I hope that clears the air so everyone is on the same page. If you do have questions though, please do ask them in the Fire Team area and a friendly staff member will assist you. With Unquestioned Loyalty Paul Hoeffer TK8020 “Daetrin” FISD Detachment Leader Fellow troopers, 2017 was an incredible year for the FISD, especially with the many CRL updates. This could not have happened without the research of our community and for that, I am very thankful. I could not thank enough the staff in the Detachment. Wonderful and hard working people. Dedicated to this passion that we all have. Rumors are that an anticipated movie is coming out this week? Barely heard of it… Most of us, will probably be busy in trooping rush for The Last Jedi and naturally, watch the movie. Can’t wait to hear all of your comments on it. I can’t wait to see it, I feel like a teen girl waiting for the new Twilight! I know some members have already seen the movie, which I pretty jealous of. I would like to take the time to wish each and everyone of you happy holidays to you and your families. May the season bring you the music of laughter, the warmth of friendship and love. With Unquestioned Loyalty Eric Salottolo TK37427 “Tolo” FISD Executive Officer Greetings Troopers! The staff is always spending a lot of time trying to clean up and de-clutter the forum. Recently our focus has zeroed in on the For Sale sections. I would like to take this time to ask that all members who have a For Sale thread in either the Personal Items forum or in the On Going Sales forum to take the time to update their photos. We have some topics that have been attacked by the Photobucket incident and the item(s) for sale are no longer able to be viewed. I would also like to inform the membership that if you create a for sale thread, you will now be required to post ATLEAST ONE photo of the item for sale in your thread. This will ensure that there is transparency between the seller and any potential buyer of the item that is to be sold. If the seller fails to post the one photo in their for sale thread then their thread shall be locked and deleted. Again, the staff is NOT responsible for any transaction that is conducted on the forum. We urge all members to use the Pay for Goods and Services option through PayPal so that way there is recourse for those involved in a disputed transaction. If you have any questions regarding the new photo requirement feel free to reach out to me via private message. With Unquestioned Loyalty Steve Sheades TK-10466 starsaber25 FISD Provost Marshall Greetings Ladies and gentlemen of the FISD As mentioned earlier in the news letter, we are moving ever closer to our goal of 1000 approved Expert Infantrymen in the March to 1000 campaign While on this subject, we would like to acknowledge everyone that helped in any way this year, to bring the Detachment closer and closer to this achievement. The caliber of applications that come across our desk is incredible and makes us truly proud to serve. This high standard is a credit to you all and we thank you. As we near the festive season please continue to submit your applications. We intend to approve as many as time permits up to the 22nd of December, where Tony and I will be taking a break to spend time with family and friends. We shall resume approvals after the 3rd of January and catch up on the potential back log as quickly as possible. Don't forget we have until the February elections to try and reach the 1000 mark this term. On behalf of Tony and myself, have a safe and wonderful holiday break and see you all next year. With Unquestioned Loyalty Tony Jobe TK-10116 ukswrath FISD Deployment Officer & With Unquestioned Loyalty Andrew Franke TK-11469 Sly11 FISD Deployment Officer CRL News Want to be a CRL Model? Also, I’d like to put a call out for CRL models. Some of our older costumes are out of date and while they were the best at the time, standards and quality have moved inexorably upward. If you are an EI or ideally a Centurion costume holder, want to be the model for a CRL, and feel you look better than the CRL, do post pictures in the 501st area and let us know. In particular I bet we can find more accurate HWT, ROTJ, and TKC members. CRLs Updates! Exciting news! First Order Stormtroopers are now eligible for Expert Infantry and Centurion. Yup, that includes TFA, TLJ, and the TLJ Executioner. This is great news as it allows our First Order members to be able to apply for these programs and be recognized for all their hard work. Also, the OT TK's will have a small change to how the right thigh ammo pack is trimmed. Read more about it here What else? The Force Awakens CRL - Added the ammo pouch as an accessory - Added the ammo vest as an accessory - Added the Jeddha patrol pack as an accessory Rogue One - Small updates to Expert Infantryman/Centurion to clarify text Saving the Best for Last - Phasma! Yes! The Phasma CRL is getting updated to include Expert Infantryman and Centurion requirements in December. In addition, be on the look-out for Phasma: The Last Jedi. The team will be hard at work getting these completed by the new year. WANTED Hi all with the upcoming premiere of The Last Jedi and many of us attending troops it would greatly appreciated if you could share your photos to this thread, we will adding some of these to January's newsletter. as well as a link to that thread. As always you can post a troop report of your event here, previews to these are also included in the following month's newsletter. Enjoy your troops and looking forward to seeing those photos http://www.guarnero.com/images/334_trooper.jpg What does your TKID mean, if anything. This comes has come up a few times and it's always interesting to read through some of the reasons how a member came up with their TKID. A few of the threads to read through are: https://www.whitearmor.net/forum/topic/40476-whats-in-a-tk-number/?tab=comments#comment-541080 & https://www.whitearmor.net/forum/topic/36318-how-did-you-choose-your-tk-id/?hl=%2Bchoose+%2Bnumber & https://www.whitearmor.net/forum/topic/22807-what-does-your-tk-id-represent/ A very busy November for Field Training Exercises, with a plethora of great photos and Trooper Reports! This month we had Troopers celebrating their “First Troops”, The JDRF One Walk, Battlefront II Release Days, Kids Expo, Star Wars and the Power of Costume, and a special Veterans Day / Remembrance Day Stormtrooper Hall of Fame Thread to recognize our military members. You Troopers have made it very difficult choice yet again, on picking the next one of you to be recognized in the Stormtrooper Hall of Fame. One of the most impactful photos that caught my eye this month shows exactly what Trooping is all about. Recognizing TK - 83042 Asa “It was a good day to serve the Empire” ATTENTION TROOPERS!!! WANTED: “The Last Jedi Troop Photos” by TK - 85421!!! With the release of The Last Jedi only days away Glen has started a thread to share some of your awesome photos of that day - be sure to post them here: one of those posts could be our next lucky inductee to the Stormtrooper Hall of Fame! Rock-on Troopers, Rock-on and a salute to you all! With Unquestioned Loyalty Aaron Gibson TK99725 "Pyrates" Imperial Propaganda Department So what exactly are EIB (Expert Infantry Badge) and Centurion levels? These programs were designed for those who choose to take their armor above and beyond the minimum requirements for basic 501st Legion approval. It gives you the chance to show a level of dedication and pride that takes your armor closer to being as "screen accurate" as possible, without as much extra work as you may realize. (You may surprise yourself with what you are capable of)! It also works on giving a better look to the Legion as an entity, and you can bet others will take notice of your hard work. The 501st has a list of detailed requirements for Basic approval, (level 1), EIB, (level 2) and Centurion, (level 3) which can be found here in the Costume Reference Library, (CRL) http://databank.501st.com/databank/Costuming:FISD_CRL Here are a few of the questions people may be wondering about: 1. "I am a (tall/short/heavy/thin) trooper. Can I still apply? Of course! These programs are open and encouraged for all sizes of TKs, as long as the costume is correct and meets the guidelines. There are many specific build tutorials to every option, as well as a vast network of fellow TKs on the FISD to help you out and offer suggestions. 2. "How much extra will I have to pay for extra items"? The cost is actually quite reasonable, considering the few extra supplies you will need, which are listed in the requirements area. While it may run you a little more to implement these additions to your costume, they will go a long way to improving accuracy. All needed items can be found for sale on this thread: https://www.whitearmor.net/forum/forum/16-ongoing-sales-project-orders/ While blasters are not required for basic approval, for EIB and Centurion levels they are, and may need upgrades (also listed in the CRL). 3. "I haven't even got my kit yet, is it too early to start planning"? Actually, aiming for Centurion is easiest to do right out of the box. 4. "I have my basic TK approval, can I still get in these programs"? In a word... absolutely! 5. "Are there any "perks" to this extra work and cost"? Besides knowing that you have a great looking set of armor, the 501st and FISD believes you should be deservedly recognized for your achievement(s), and allows you to wear the appropriate embroidered "rocker" badge of rank (available for a very minimum cost) on your shirt, helmet bag, etc., as well as rank decals to put on your armor bin. You will also have access to select "challenge coin" runs, receive (free) a cool certificate for your new rank, and have your title posted below your name in your FISD signature. Plus, once you reach these levels, you will have the extra knowledge to help out those who are looking to apply as well. 6. "Is it hard to apply, and what happens then"? After basic approval, all you do is make sure your armor is up to the standards set forth in the CRL, post a thread with the required photos in the appropriate area (see below), and wait a bit for the D.O.s (Deployment Officers) to address it. (Hint: Studying other people's threads before you submit can be a GREAT help). These are also listed on the main page of the FISD site. While waiting for approval, you will get some comments from others who will offer suggestions and constructive advice to help you out. If you should need any changes, the DOs will let you know, so you can adjust accordingly. Don't be dismayed if you do need changes... it's all for your benefit! After you are approved for EIB, then you can submit for Centurion. EIB https://www.whitearmor.net/forum/forum/19-request-expert-infantryman-status/ Centurion https://www.whitearmor.net/forum/forum/72-request-centurion-status/ Note: You will see some suggestions in the existing submissions/approval requests that, while not actually part of the CRL, are highly suggested items, (for your benefit), such as "flat-head screw heads on the TD (thermal detonator) should be painted black" for Centurion, etc. Those small details all add up to closer screen accuracy. Just remember that the FISD is here to help you every step of the way with whatever other questions you may have, but if you can't seem to find what you are looking for in your research, just post the question, (or PM justjoseph63) and best of luck on your build! A new monthly item that lists a few unusual facts about the SW franchise. This month: ""Noises off" 1. The sound of the Imperial Star Destroyer was made by manipulating the sound of a broken air conditioner. 2. The sounds for lightsabers is a mix of the hum of a 35mm movie projector on idle and the feedback and the feedback produced by passing a stripped microphone cable near a television. 3. The language used by the Jawas is Zulu, sped up electronically. 4. Greedo is actually speaking Quechua, an indigenous language of the Andes (played backwards). 5. Chewbacca's voice was a mix of large animals, (mostly bears). 6. R2-D2's "beeps and boops" were made by electronically manipulating human (mostly babies) voices. 7. The alien language spoken by Garindan (the Mos Eisley spy with the long nose) is actually the processed voice of John Wayne. Nissan has a lot of new adverts out with it collaboration with the Star Wars brand, you can see a lot of them here. Also a lot of their Star Wars concept cars. Also head to Nissan's website, lots of available content there. All most that time of year again, may you all enjoy the pleasures of the festive season Voting is now closed and the winning entry which you the members decided is Design 5 Congratulations to Eric TK41970 Etrooper70 I would just like to thank all of you who submitted designs, there are definitely no losers here, so many excellent, varied designs. It is amazing how many talented members we have not just here in FISD but throughout the legion, once again thank you all that took the time to submit a design. The Last Jedi For those that are unaware the 501st has been given approval by Disney/LFL to organise troops for the premier of The Last Jedi. There are a couple of rules, as always please make sure the host of the event does not advertise your appearance, BUT you are welcome to advertise on your own / garrison / squad's social media. Also for The Last Jedi you can only visit cinemas, no other retail locations. Official correspondence from Disney/LFL · December 14-21: The Last Jedi Theatrical Events Hi all, We wanted to send the club leads some advance notice of two events that will be open to costumed appearances by fans without prior approval from Disney or Lucasfilm – the Battlefront II launch, spanning the weekend of November 17-19 (give or take a day or two) and the release of The Last Jedi, during the week of December 14-21. For the Battlefront II launch, we’re asking that the appearances be limited to those retailers who are selling Battlefront II and that costumed appearances not be used in the advertising for the event. Costumed fans who wish to participate at special events surrounding the launch of The Last Jedi between December 14-21, 2017 may do so at accommodating theaters without seeking approval from Disney/Lucasfilm. Like the BFII launch, we are asking that costumed appearances not be used in the advertising for the event. We are leaving it to the individual fans and fan groups to independently organize around these events as they see fit, so if you or your group will require a special area for changing in/out of costume, etc., please reach out to the theater management/staff to make those arrangements. PLEASE NOTE that costumed appearances for The Last Jedi premieres are restricted to theatrical venues only and do not include general retailers, toy stores, restaurants, etc. We want to thank all our fans for their continued support of Star Wars and look forward to celebrating more exciting movie releases with you in the years to come! *NOTE* Always follow your garrison/squad's guidelines when in comes to organising Disney/LFL promotional troops. Want Your Troop to be Included? Post your troop report in the Field Training Exercises section here Those with troop logs please post a separate troop report as it is easier to link too. November Kadena Special Olympics More here By: Asa, SgtGarand , TK83042 St Anthony's Fete http://imagizer.imageshack.us/v2/800x600q90/923/HkCtWn.jpg More here By: Glen, gmrhodes13, TK85421 Ivan and Tabby's Wedding More here By: Glen, gmrhodes13, TK85421 Battlefront II Release EB Games Mandurah More here By: Glen, gmrhodes13, TK85421 Perth Children's Hospital Foundation Big Walk http://imageshack.com/a/img922/827/544nke.jpg More here By: Glen, gmrhodes13, TK85421 Battlefront II Release EB Games Rockingham http://imagizer.imageshack.us/v2/800x600q90/922/UWKeJA.jpg More here By: Glen, gmrhodes13, TK85421 JDRF One Walk More here By: Glen, gmrhodes13, TK85421 Special Children's Christmas Party http://imagizer.imageshack.us/v2/800x600q90/924/T654aO.jpg More here By: Glen, gmrhodes13, TK85421 Star Wars and the Power of Costume, St Petersburg, FL More here By: Mark, WhiteWalker, TK82666 http://i.imgur.com/REASe78.jpg Serve proudly, gentlemen, and and Tim (Dark CMF) says: "Keep doing what it is that got you here"! Are you an approved TK that spends more time on the boards than the average Trooper? Do you enjoy using your knowledge to help out future and existing Troopers? If so, we would like to invite you to join the Imperial Attache program! Members of the I.A. team are chosen to help out not only those here on the boards, but on a local level as well. Our aim is to have at least one in each and every Garrison, Squad and Outpost in the entire legion to be the eyes and ears of the FISD on a local level. A suggested level of EIB or above is preferred, as part of the duties include assisting those aiming for levels 2 and 3, but is not a requirement. Being active on the boards on a regular basis , welcoming new members and helping out where you can is, though. Some of the benefits: 1. Access to exclusive Attache merch., including patches, etc. 2. Having the Imperial Attache title under your name. 3. Being a part of the team that welcomes new and prospective members of the FISD. 4. Being the "go-to" person in your Garrison, Squad or Outpost. 5. Exclusive access to the Attache HQ area, Imperial Propaganda Machine (newsletter) and merchandise discussions. We are currently in need of Attaches in many units, especially International Garrisons/Squads and Outposts. For more information on this program, please head here and if you should have any questions or concerns, feel free to contact me at any time. For a complete list of Imperial Attaches, go here This area lists all those who have gone above and beyond basic approval toward screen accuracy. FOR OCTOBER - NOVEMBER the 1st Imperial Stormtrooper Detachment would like to congratulate: Expert Infantry Badge Award: Asa Pittman "SgtGarand" TK 83042 EIB 769 Jeffrey Northman "jeffnorth86" TK 33729 EIB 770 Martin Mølgaard "Dainbrandr" TK 92527 EIB 771 Paul Mahannah "Shooter762" TK 68469 EIB 772 Javier Cardenas "DarkTrooper71" TK 17671 EIB 773 Patrick Robertz "Schmetterhemd" TK 77217 EIB 774 Tom Harvey "Poseidon" TK 52811 EIB 775 Nicholas MacNeil "Silentperformance" TK 26329 EIB 776 Jeff Pitts "Droid Runner" TK 19232 EIB 777 Tino Jacobs "T-Jay" TK 61276 EIB 778 Stephen Edwards "Gwithian" TK 14655 EIB 779 Andreas Engstrom "Coil" TK 24269 EIB 780 Jim Summerlin "BDWC" TK 24233 EIB 781 Brian Edick "Harbinger" TK 92802 EIB 782 Glen Rhodes "gmrhodes13" TK 85421 EIB TFA Glen Rhodes "gmrhodes13" TK 85421 EIB TLJE (Side Note: This makes 5 EIB approvals for this Trooper)!!! GREAT job on your approval, now on to Level 3! Request your free EIB certificate here Centurion Badge Award: http://www.whitearmor.net/eib/centurion_badge.png Gary Cardenas "FencingCorvetteTrooper" TK 72313 Centurion 356 Asa Pittman "SgtGarand" TK 83042 Centurion 357 Simon Hansen "SimonBoba" TK 32700 Centurion 358 Jeffrey Northman "jeffnorth86" TK 33729 Centurion 359 Patrick Robertz "Schmetterhemd" TK 77217 Centurion 360 Tino Jacobs "T-Jay" TK 61276 Centurion 361 Outstanding job on reaching Centurion, troopers! Request your free Centurion certificate here If you see any of these Troopers around your Garrison or Squad, be sure to congratulate them! As many of you are aware, the FISD is currently in our March to 1000 program. Our goal is to reach the one thousand mark of Troopers who have earned their Expert Infantry Badge, and although we are well on our way to this goal, we still have a long way to go! The amount of approved submissions is increasing (over 80 this year alone) thanks to the dedication of those willing to go the "extra mile" toward screen accuracy. Here is a brief description of EIB as written by Paul (Daetrin), our founder: "Expert Infantryman status is not required for members of this detachment. It should be viewed as an optional set of requirements for those who wish to take the accuracy of their costumes to the next level, and be recognized accordingly. We're a costuming club - think of it as an award for costuming excellence and you get the picture. The requirements will not replace or supersede 501st standards, but only serve as an inspiration for the level of accuracy that can be achieved. The standards are meant to be high but achievable..." Besides the added pride you will have in your armor, those reaching this level can purchase exclusive EIB gear (patches, decals, coins (coming soon) etc.) and get a free certificate for your accomplishment. If you are interested or would like more information about the program head here that will help. You can also contact myself or any Imperial Attaché, and we will be more than happy to assist you! Racing Shirts Preston TK91488 has posted an interest thread for FISD racing shirts, it can be found here Also Some FISD merchandise now available thanks to Mike TK4510 for organising these. Interest Thread for Silver Bullion Challenge Coin Interest thread here Also New Troopers Helping Troopers 3 inch decal, design by Glen TK85421 Decals are $4.00 each, shipped anywhere worldwide Sale thread here Also http://powaysigncompany.com/wp-content/uploads/2017/10/Cent_EIB_Stickers.jpg FISD Blue EIB or Centurion Red 4 inch sticker with rocker and badge. Pricing $5.00 each, shipped anywhere worldwide Sales thread here Other merchandise available FISD Kit Box 97mm Kit Box Discs are £7 ea + shipping Sale thread here Also FISD ID Badge ID Badges are £10 ea + shipping Sale thread here More FISD approved merchandise can be found here Newsletter We are always on the look out for content, ideas, funny photos or even your TK adventure story so feel free to contact either Danny or myself. Don't forget to post those troop reports, we are especially looking forward to seeing both your The Last Jedi and Christmas photos. From the both of us we wish everyone a very Merry Christmas and a safe and prosperous New Year, see you in 2018. With Unquestioned Loyalty Glen "Q" Rhodes TK85421 "gmrhodes13" PRO - Communication & With Unquestioned Loyalty Daniel Lauber TK55550 - "Ripper_L" PRO - Content Editor At Large Don't Forget We're on Facebook and Twitter! Facebook: www.facebook.com/whitearmor If you're on FB, stop by and say hi, ask questions, and share stories! Twitter: www.twitter.com/FISD501st or @FISD501st follow FISD on Twitter! Instagram: www.instagram.com/501stfisd On behalf of the 1st Imperial Stormtrooper Detachment Command Staff and the Imperial Propaganda Department <End Transmission> http://i.imgur.com/1sVQJsi.gif1 point
-
Hiya, The Tapatalk app is a really easy way to upload your forum posts, if you’ve not tried it. Makes uploading images really easy. :-) Sent from my iPhone using Tapatalk1 point
-
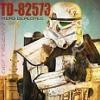
There's a couple of these threads floating around already but I choose my ID 82573 because I was in the 82nd Airborne Division and served with the 5th Squadron, 73rd Cavalry Regiment. Just a nod to my military service.1 point