Leaderboard


Popular Content
Showing content with the highest reputation on 09/20/2017 in all areas
-
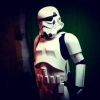
Hi folks, Made some decent progress this evening. I wanted to attach the grip before I carried on with the trigger. Sizing up, leaving the gap between the grip and the mount for the folding stock. (Cute touch - "Doopydoos" and a smiley face on the grip) More to come. :-) Sent from my iPhone using Tapatalk3 points
-
You may have heard the term "Armor Party" mentioned here, and wondered exactly what that means. While these are not "official" 501st or FISD events, below is some basic information which may be helpful for those who would like to either attend or host one. How do I find one in my area? These are normally posted on your local Garrison or Squad websites, usually in the "New recruits" or Events area. If you have any questions, you can ask the board admins for your local unit. A list of all Garrison/Squad/Outposts can be found here: http://www.501st.com/members/displayUnits.php You may also have a local Imperial Attache that you are welcome to PM. A complete list can be found here: https://www.whitearmor.net/forum/topic/38483-fisd-imperial-attache-list/ Goals These events are aimed for those who are beginning or are in the process of building a set of TK armor. There will be approved Troopers there who have been there-done that and will help you with any questions or problems you may encounter and offer advice. However... if you have not received or even ordered your kit you are more than welcome (and encouraged) to attend. These are "judgement free" zones, so no matter how strange or inane you think your questions may be (or how many you have) we have heard them all, and are here to assist you. You will also get to meet the future friends you will be eventually trooping with. Supplies "I have my kit, so what else should I bring"? 1. I would start with a spiral notebook and a pen. This way you can write down any questions you may have before you get there, as well as take notes and contact information. Bring these items even if you don't have your armor yet. 2. Many hosts may have some supplies on hand, but what stage of your build you are in will determine what you will need. I suggest bringing a Dremel tool (with accessories), clamps, magnets, E-6000, sandpaper, a pencil, etc. When in doubt, bring everything you have. A complete list can be found here: https://www.whitearmor.net/forum/topic/31404-supply-list-for-your-tk-build/ 3. If you have them, bring your undersuit and boots. These will come in handy for fitting your armor if you are at that stage. 4. If you have a laptop, bring it for FISD references. Food/Drinks While some hosts will supply snacks and water, some make a whole day event (or a barbeque) out of it. Ask your host in advance, and be prepared to bring your own water/soda/juice, snacks etc. Some hosts allow alcohol (usually BYO), some do not, so please respect their wishes. Again, check with the host before bringing it. Not to be a buzzkill, but I personally don't recommend drinking while using a razor knife or electric tools. Conduct 1. If you smoke or vape, please check with your host to see if there is an area where you can do this and not offend others who don't. 2. If you drink (alcohol), please be responsible. 3. If you need to use someone else's tools or supplies, ask beforehand. 4. Please try to avoid bringing small children without checking with your host first. Sharp objects, flying ABS pieces and kids may not mix. Plus, they can get really bored. 5. The same goes for pets. 6. If you sign up to attend, please do so. You may also want to enquire about where to park. 7. Please do not expect others to build your armor for you at an AP. They are here to help, not do it for you. I have heard of some who actually dropped their armor off and said "I'll be back later to get it". Needless to say it was left in the box untouched. When it's over.. Remember to thank your host, as well as those who helped you, and PLEASE offer to assist in the clean-up afterward. It's the right thing to do. HOSTING AN AP If you wish to host an Armor Party, I highly recommend it. A Saturday or Sunday afternoon of camaraderie with fellow (and future) TKs can make for a great time, and is REALLY appreciated by those who need help with their build or have questions. So how do I do it? 1. Determine what type of space you have and how many people you can accommodate. Some use a garage, basement or patio, as long as there is shade (summer) or heat (winter). You will also need multiple electric outlets for tools, as well as sufficient tables, chairs and hopefully a workbench of some sort. 2. Ask the senior TKs, EIs and Centurions in your Squad/Garrison if they can commit to attend and help out with build questions. You really can't have too much white-armor knowledge at these events. Having one or more experienced FO TKs will definitely help. 3. Check with your neighbors. These events very rarely get loud, but parking may be a concern. 4. After you have determined that you are good to go, post up the information on your local 501st site (and FB if you have that). Be sure to give all the details you can in the post, including day, date, begin/end time, food/drink/alcohol/kid/pet/parking policy and if there is a limit on how many people you can accommodate. Don't forget the address/directions to your house! You may also want to provide an alternate date in case in inclement weather. 5. Have a laptop or computer online and at the ready with the FISD site available. This will help with any technical info. 6. Be prepared to answer the same questions over and over. These folks are depending on and will appreciate your knowledge. 7. If you get the chance, take lots of photos and post them up here! If you have any suggestions/additions for this, please feel free to post up below, or if you have any questions about hosting or attending please feel free to PM me.2 points
-
Alright troopers this will be the official TLJ Stormtrooper discussion thread where all things related will be discussed and reviewed for the new CRL/s. The wiki entry when complete for the CRL is here: https://origin-wiki.501st.com/databank/TK_TLJ_Executioner NOTE: this is a blending of the proposed CRL sent to FISD by Luis, Christopher Gutirrez (kitgutierrez) and others of the Philippine Garrison who have done excellent work creating this costume, and also from gmrhodes13/Q/Glen from Perth, Australia. FYI that Kit has already submitted the costume to the LMO via the GML area for approval. Helmet For 501st approval: - Lenses are smoky brown or gray in color. They may be bubble in shape or flat and must be sufficiently dark enough to obscure the costumer's eyes. - A single silver aerator/mic tip cylinder is on lower left side of the wearer's chin. - The frown is solid black and covered in black hexagonal mesh that extends to the tears - Each tear (area beneath the corners of eye lenses) is solid black - Seven cut out tube stripe slots are on each side of the helmet - Two clip greeblies are present over the traps on the side - Two clip greebles are present on the top of the helmet, parallel to the trap greeblies - Along the base of the helmet a black stripe runs from the side of the helmet and across the back to the other side. - There is a slight groove that circumvents the helmet above the brow - There is a slight grove that circumvents the helmet along the bottom and over the chin - A brow of solid black material spans from the traps over the lenses - Directly below the traps toward the base of the helmet is a small trapezoidal stripe. - The frown is solid black and has seven teeth, with black mesh behind. The mesh is hexagonal and extends to the tears. - There is a slight groove on the side that starts from the solid black brow and goes over the traps and ends on the black strip along the base. - There is a matte black stripe which covers about 1/3 of the helmet’s right side which extends from the solid black brow infront to the black strip along the base at the back. Termination of this matte black stripe on the side is the slight groove going over the traps. Neckseal For 501st approval: - Black with horizontal ribs, fitted to the wearer, and extending from the base of the neck to conceal the entire neck. No hair or skin should be visible around the neck area. Chest Plate For 501st approval: - The chest plate overlaps the abdominal plate - The center-top of the chest plate is recessed and black on the side and upward facing edges. - A smaller clasp greeblie shall be present on each side of the chest, just inside a small indented area the size of the greeblie. - There is a slight groove running vertical on each lateral side of the chest that angles toward the center - Six recessed black ovals are on the wearer's right side, left of the greeblie. Back/Yoke For 501st approval: - The back plate contains a "O II" design where the O is black - The back/yoke is one seamless piece - The yoke portion extends over the wearer's shoulders and curves under the armpits - The yoke is painted matte black. Thermal Detonator For 501st approval: - The thermal detonator mounting plate sits under the back plate and rests above the belt. - The control panel is black. - The righthand recessed end cape is black. - The lefthand end cap extends from the detonator assembly and is all black. - There should be no visible seams. Shoulder Gaskets For 501st approval: - Gaskets shall be rubber or a shiny black material with ridges - The shoulder gaskets must cover all exposed areas under the shoulder bell, between the bicep and chest, and between bicep and back. Shoulder Bells For 501st approval: - One on each shoulder. - The shoulders are considered effectively symmetrical. They may be worn interchangeably on the left and right shoulders. - Shoulders have small round extension at the top under the bell itself that butts up against the yoke. - Shoulders are matte black. - There is a light grey, approximately 2.5 inch wide First Order Cog present on each shoulder bell. This may be painted or a decal. Biceps For 501st approval: - Biceps has one seam on the side that faces forward. - A clip greeblie is present low and across the seam - There is a seam or an overlap at the inside facing side of the bicep - Two black ovals are present on the outside facing side of the bicep Elbow Gaskets For 501st approval: - Gaskets shall be rubber or a shiny black material with ridges - The elbow gaskets must cover all exposed areas between the bicep and forearm Forearms For 501st approval: - Forearms shall have ridged rail, similar to a picatinny, embedded on the inside of the forearm, roughly covered 1/3rd by a box shape. - Forearms shall have a box on the bottom the wrist end. Each box shall have a single black square in the lower inside corner. - Each forearm shall have two 'clasp greeblies' on the outside facing surface, near the wrist. - Detail box includes black rectangle on small edge perpendicular and closest to wrist. Gloves/Handplates For 501st approval: - Are black with white palm, thumb and forefinger. - Extend underneath the forearm. - White area is made from leather or leather-like material. - Handplates are rigid square boxes and the hand plates are mounted securely over the back of the glove. - The black oval detail is aligned with the index finger of each hand. Abdomen Section For 501st approval: - The abdomen section must wrap around the wearer's body without a visible seam. - The abdomen has 7 boxes attached that matches the order and placement shown and sit flush against the armor. - The large box has a small black recessed square to on the lower left to the wearer. - The second box to the right of the wearer has a small black recessed rectangle near the top. Codpiece For 501st approval: - The codpeice sits below the abdomen and under the belt. Posterior armor For 501st approval: - The posterior armor sits below the abdomen and under the belt. - The top portion of the part shown is hidden by the belt and used to connect the plate to the abdomen armor. Belt For 501st approval: - The belt is ribbed and made from a rubber or a rubber like material. - Five white rectangular boxes and one pouch sit on the belt. - There are 2 horizontal boxes on the front, on each side of the center. They are painted white on the outside half and black on the inside half. - There are 2 vertical boxes on the right of the wearer. - There is a large vertical black pouch with a white cover behind the left side of the wearer. - A small black cloth pouch is worn on the left side and hides the buckle or remaining belt material. Undersuit For 501st approval: - An undergarment must be worn such that the space between the thighs and the belt shows a black material. The black material may be shiny or matte. - The reference photo shows the type used on screen but is not required for basic approval. Thighs For 501st approval: - There are seams on the inside and outside of the thighs. - A clip greeblie is present high and across the outside seams of each thigh. - The right outside thigh (to the wearer) includes a base for a holster. Knee Gaskets For 501st approval: - Gaskets shall be rubber or a shiny black material with ridges - The knee gaskets must cover all exposed areas between the thigh and shin Knee Plates For 501st approval: - The knee plates mirror each other and are placed evenly between the thigh and the shin. - Convex edge of knee plate faces upward. Shins For 501st approval: - There are seams on the inside and outside of the shins, with the opening on the inside. - A clip greeblie is present high and across the outside seams of each shin. - The wearer's left outside shin includes two vertical thin boxes that are seamless. - There is a small black recessed rectangle at the bottom outside front of the shins. Spats For 501st approval: - The spats wrap around the lower ankle, just below the black ankle rectangles. - The spats are enclosed on the outside of the ankle with a greeblie that overlaps the open side. - There is a visible seam on the inside of the ankle. Boots For 501st approval: - The boots are above ankle height and made of white leather or leather-like material. - There is a seam down both sides of the front that swoops out to the side of the foot. - There is a vertical zipper on the inside that spans the height of the boot. - There is a black flat sole with no heel. - No buckles or laces. Optional Accessories Items below are optional costume accessories. These items are not required for approval, but if present appear as described below. First Order Stormtrooper Laser Ax For 501st approval: - Scratch-built or a 3D printed laser ax. - Details to be painted black, white and silver per reference photos.2 points
-
Well my blaster is almost done printing. So have another photo of shiny 3d parts Still just waiting on things to get to me currently so unfortunately besides the 3d print stuff I don't have much to add haha Started gathering materials for a scratch built Laser Ax. Aannndd...that's about it! More next time2 points
-
While reading though a build thread may be helpful to most, I thought it might be equally helpful to share a little illustration I made showing approximately where I cut my kit to fit my 5'4", 110lb. frame. The red lines are roughly where I made the trims. These lines show reductions in the kit size for height, not necessarily width (I made many cuts for width as well, but those cuts were typical for fitting a TK of any height). Cutting in these areas will still keep your TK within Centurion guidelines. Remember to always trim less than you think you'll need to, and try the pieces on frequently as you go to ensure a good fit.2 points
-
No shame in needing assistance to get into these kits ... ;-) Sent from my iPad using Tapatalk2 points
-
Clearly you are already doing both.2 points
-
A simple hacksaw did the job. And a file was used on the long side for trimming it.2 points
-
Hi Fellow Troopers, Well, after fulfilling my dream of becoming a Stormtrooper, I decided to take on a small side project. My six year old son Archie has been digging my armor and with Halloween a few months away he informed my that he also wanted to be a Stormtrooper. Two seconds after he announced this, my three year old daughter shouted out that she too wanted to be a pink Stormtrooper. She quickly changed her mind saying she'd rather be a pink Darth Vader because "it would be so cute". Yes it would Daisy....yes it would....but that's for another time. So it's time to get back to the workshop, dig out the build supplies, find new products online and order more stuff in brown boxes. I looked at several examples of kid builds and realized that EVA foam would be the best option to use. It's lightweight, flexible, and seems to be easily cut and glued together. I guess I'll see when I get to that point. For now, I'm starting with the helmet. I went to the trusty and highly praised Walt's Trooper Factory (WTF) for a child sized TK helmet. Walt got back to me immediately with the price and I placed the order. He let me know that delivery was about 6 weeks out from the time of the order. So, I was pleasantly surprised when the BBB showed up the next week. Nice huh? Here's what you get in the box. I'm hosting these images on imgur and trying this for the first time...hopefully you can see the pics. It's similar to my RS lid with a front and back piece, (2) sets of ears, a lens, brow and neck trim, rivets, ear bolts/nuts, cast hovi-tips and blue stripe decals. The ABS is sturdy with a thin spot only on the underside of the vocoder which was the same thin spot on my RS lid. Since I now know how these go together, this helmet build should be quick. Here are some shots of the back lid. It has pretty well defined trim lines...unlike the RS lid. Here's the front. Duh...of course it's the front. Why am I explaining this to you guys...you know what a TK lid looks like! The WTF lid is not quite as crisp/clean as my RS lid in the background but that's okay because it's scaled down about 60%-70% of a full size and still looks good. It's really great that WTF makes these kits for kids....brilliant really. That's it for now. I'm into the painting phase of the lid but for tonight I'll stop here as it's getting late and I need some sleep. Hope everyone enjoys this build and I hope that it proves useful for anyone else thinking about tackling a kid size TK costume. Stay tuned for the next update!1 point
-
Laser Ax build thread Thought it was time to post some pictures, as many will be doing I'm using my TFA armor and swapping out some pieces for the Executioner version. Jumped in on a helmet from Jimmi, (but I also have some others on the way), I wasn't happy with a couple of areas so set about getting rid of some lumps and bumps, also adjusted some areas around the mouth/teeth and cheeks. Started work on replacement back/yoke, shoulders and also the biceps as the closure appears more curved in references. Finally a break in the weather, at the tail end of our winter and been cold and wet, was able to get some spray putty applied. Also applied a mist guide coat of black, helps when you wet sand to see any dips or pinholes Left the spray putty to dry for a few days then it was time to wet sand, then prime Gave the shoulders a try with the matt black paint, not used it before so wasn't sure how thick or thin to apply, no issues worked out well Also put together another TD, my Anovos kit TD has the extended cap so will use that one for the Executioner and needed a replacement for my standard TFA kit. No major issues after wet sanding so on to some primer I'm using automotive acrylic paint same as I did for the rest of my armor, matches well to the Anovos helmets, dries quickly, is able to be sanded and buffed and doesn't have the same issues as Rustoleum and Krylon paints. 3 coats of white then 3 coats of clear. Time to start masking for more matt black. More cold and wet days so decided to make some carry bags for the Laser Ax, made the bag for the head section rigid so it wouldn't get damaged in transport. Masking helmet for the satin black, that was fun, NOT. Let the helmet dry for a few days before masking for the matt black stripe. Applied decals to the standard TD and the shoulder cogs. I wasn't happy with the colour of the silver so decided to mix some black and silver to get a nice match to the screen seen shoulder cogs, then applied with an airbrush to some white cog decals I had, came out really well. I also added some sticky back foam to some areas between the armor so it won't rub on the matt black paint. Added the extra paint to the Executioner TD. Painted the inside of the helmet, fitted the lenses, helmet fans and foam. Next it will be kit up and get some photos taken, now where's my wrangler/photographer when I need her.1 point
-
Coming along nicely1 point
-
Congrats from centurion 300! Looks great man! Sent from my iPhone using Tapatalk1 point
-
If you need time to adjust and line up for final fitting then 5 minute epoxy also works great. Think I used loktites one but any branded one will be fine.1 point
-
Ahh dude that's exactly my approach as well - so funny our approaches are similar: pursue excellence with component pieces. I think I have similar blood to your part of the world as I align myself with Tino's build approach as well lol1 point
-
Cheers Jesse. I appreciate the feedback and advice. :-) I'm currently in the "trial fitting" stage. I think I'm likely to glue quite near the end, once I know where and how everything fits together. Also, painting might be easier with separate parts - for metallic and plastic appearance. And yes - I'm really enjoying it!! Just need more hours in the day. ;-) Sent from my iPhone using Tapatalk1 point
-
Nice work Dan - your blaster is really taking shape now. Not sure what stage these photos are on your build but applying CA glue to go along with the bolts may go along way to ensure the grip piece remains attached to the receiver tube. I remember Tino saying somewhere that the glue provided in his completion set is good for resin to resin contact. =), my two cents, hope you're having as much fun as we the audience!1 point
-
I understand I just get excited over TLJ CRL's. Going to be my first approved 501st kit when they hit So back on topic then: If the Executioner armor is just a recolored TLJ TK (which is looking like is more and more the case) I would say the left side of the TD being longer, The helmet and possibly the cod piece are the three main ones I can see and I know have been in discussion. Soft parts look the same as well as gloves and boots. But I definitely don't have the trained eye of most on here!1 point
-
2 quick things, Michael.. Due to the white background of your post above I could not add the certificate link, so it is located below. Also, if your Centurion badge does not appear below your name within 24 hours of so please contact Andrew and he can sort that out. Thanks! http://www.whitearmor.net/eib/certificates/50601-centurion.png1 point
-
Clarification, some CRL discussions or decisions are not available to everyone, so yea1 point
-
Yes, the developing CRLs are not available to everyone as you've mentioned. This thread gives access to all who are interested in the latest information, discuss up and coming changes, post photos for possible use in the CRL, etc, etc. Daetrin should be along soon to spear head the discussion.1 point
-
Ok checked in with Tony (Ukswrath) about it and he said there's no return edge necessary in this location for any level of submission. Great news!!1 point
-
Congrats Michael1 point
-
I would go with satin.1 point
-
Ok. I call this done. The only one thing left is the numbers on the counter. I've tried several times to do a transparent screen like seen on the fisd blaster reference with veeeery poor results. It's clearly a process that's gonna take me a while to master and I don't want that to delay this blaster much longer. so, until further notice I call this build done. Here I post you my final reveal pics... this long journey made this: Into.... THIS: Here is the "working" scope with reticle inside View from below to show the inner rod on the folding stock and the inner barrel In case you wonder about the painting process, I'll summarize it a little for you. After the black primer you saw on the previous post was fully dry, I went to rub all the main gun with a cloth covered in graphite, avoiding the t tracks, the counter and the scope, because I wanted all this parts to look like made of different materials. Then I lightly weathered all except the counter and the t tracks with silver and grease steel. Then I painted the silver parts on the grip. After that, weathered the scope in old gold using dry brush technic. Masking the bolt, the counter and the scope, sprayed matt varnish on the blaster. Then masking all but the handle, hit that with several layers of gloss black. Masking again all but the scope, the counter and the handle, sprayed those parts with a high gloss clear lacquer... and final touches here and there with silver, rusty black and old gold acrylic pens. I'm more than happy how this came out! And finally, here is the Pal... no longer grumpy and now the happiest trooper in the station, ready to terribly miss point black shooting those dammmmm rebels with his glorious non lethal e11 blaster. Big thanks to you all for your attention, your ideas and your support! Enviado desde mi iPhone utilizando Tapatalk1 point
-
You need Satin.1 point
-
Great job with those magnetic shins, Stephen! They look like they turned out quite nicely. I've talked to a few other TKs who have tried to convert their shins to magnetic closures, but ultimately give up because they just can't make it work after a few attempts. It takes a lot of time, patience, and perserverance to succeed with this little mod. Way to go!!!1 point
-
The armor is great, but I'm checking out your workshop and I'm totally green with envy. So much space and so clean!!! My workshop looks like Scarif right now, just less sand and less water. Pieces of Halloween stuff everywhere (yep, body parts, too.).1 point
-
Congrats and welcome to Centurion!1 point
-
This really helps Dan, thanks so much! I'm honestly not sure which one to go with. I like the gloss because it matches the "gloss-ness" of the overall helmet, but, like you said, the satin looks great too because of the worn look. I'm definitely torn on this one lol.1 point
-
This forum is awesome. Thank you all for the great info and references! Cheesewhoopy, you set me up for a biceps joke. I had to resist being new to this forum, too early.1 point
-
Nice work! This looks awesome Sent from my iPhone using Tapatalk1 point
-
Already posted the second one 2 posts up, cod placement is awesome1 point
-
Rob pretty much covered it but the tl;dr is as lights and sounds weren't seen on screen they will not be allowed on a troop. They can be fitted but must be switched off when on a UKG troop. Clear/see through scopes are fine though. I'm trying to get the policy in the public sections as I wasn't aware it was the policy until last night so I am sure theres a lot who don't know.1 point
-
The self-made trigger guard in this link was built from exactly the same aluminum stripe (item #04 from the Completion Set). The 2mm thickness is sufficient and sturdy enough. It can be bent to shape with hands and pliars. A vice is also useful. In my case, I had to trimm the long side starting 12mm on the top end to 10mm for the lower end.1 point
-
Hey Michael welcome back and thank you for your Centurion application, let's get you approved. CRL and Centurion Application Requirements: All required submission photos are present. Thank you for making the corrections suggested on your EIB app. I know the side shims were a daunting prospect, but you have really done a great job of them. Tony and I are happy to say your armor displays all the elements as set out in the Level 3 CRL. Congratulate and welcome to Centurion brother. Great job Other-Armor Fit/Assembly: In this section we may mention any additional adjustments needed to enhance the overall armor appearance, and we have nothing to add . Excellent job, head on out and make your garrison proud1 point
-
Hi sir! We submitted a CRL draft and some pictures last Sept 5 after i trooped this build for Force Friday here in Manila, Philippines. Actually, my GML Luis Arambulo submitted for me. We also PM'd you about this 2 days ago.. i included there my CRL draft as well. Hope you can advise next steps on how to proceed with our CRL application. Sent from my iPhone using Tapatalk1 point
-
The cheapest replacements I've found are at the dollar store and are actually pretty nice and resilient Sent from my iPhone using Tapatalk Pro1 point
-
You will be fine mate unless it's a big white letter, which it doesn't sound like it is [emoji106] Sent from my iPhone using Tapatalk Pro1 point
-
Coming along nicely, you'll be at the end in no time1 point
-
wooo, that is looking mighty mighty nice.1 point
-
I just wrote my break-up email to Anovos (and yes Anovos, it was you - not me). I must say I feel pretty good about it. I've already ordered TK armor from AP. They seemed pretty good to deal with and they are here in Canada. I would keep Anovos in mind for other kits or helmets (the Death Trooper bucket looks pretty sweet), but I think I will stick to the "in stock" items. I'm excited again.1 point
-
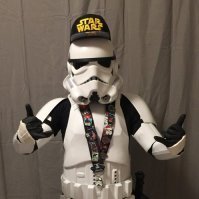
My son tried on all the pieces this afternoon and the costume came out better than I thought it would. He looks awesome and was really excited. He insisted we take a picture together and I wasn't going to pass up that idea. Eventually I have to fix the back of the shins, they didn't come together the way I wanted and I really don't feel like fixing them so they'll have to be good enough for this year. Also, need to figure out what I'm gonna do for shoes. Future 501st member??? And here we are, ready to defend our street from Rebel attacks.1 point
-
Wow, you work so fast and make it look so easy. Do you ever sleep? Great work1 point
-
I have my ANH TK IN THE 501st I also have TFA Luke Skywalker in the Rebel Legion. Sent from my SM-G930P using Tapatalk1 point
-
Another outing this time "Science Alive" an event held in Adelaide and 3 country areas across South Australia to encourage Science. This one was in Whyalla a small city about 80 Km from me. R2D2 and K9 came as well and we met up with a local Dalek builder. "I've told you, you're not the droid I'm looking for!" or "Don't try and blame K9 for all those bodies"1 point
-
I won't say that learning much more about Star Wars has ruined re-watching the movies for me. If anything it's now a game of trying to inspect all the armor for variations. But I will say that it has ruined it for my wife re-watching the movies with me, since I won't shut up about the armor [emoji23]. Sent from my iPhone using Tapatalk1 point
-
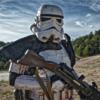
Probably our first full length look at the TLJ FOTK. Check out that overlap on the thigh!!!1 point
-
Looks great, Steven! I swear by the thigh garter system, and it's so danged easy to put on. Really nice job on that build, and I believe you could get to EI and Centurion without much effort. One thing I see that jumps out is the 4 button panel on the ab plate. Depending on how you attached it (hopefully E-6000) it should be removed and trimmed flat, like the ANH screen used one in the photo below. Although not an approval issue, you can trim down or (even completely remove) the return edge on the inside of the thigh tops. Some folks find that it can chafe, especially on longer troops. Best of luck on your approval!1 point
-
Pretty interesting overview of what led up to the development of our beloved E-11. https://www.youtube.com/watch?v=8-PmLxkOmaM1 point
-
Awesome! You have inspired me! I think I will need to make 2 sets for my kids.1 point