

artimorty
-
Posts
289 -
Joined
-
Last visited
About artimorty

Recent Profile Visitors
2,288 profile views


.thumb.webp.27f7939d37871f319ff836257d4a3668.webp)


-
Very nice improvement on this too. Good work. Congrats. Enviado desde mi iPhone utilizando Tapatalk
-

Aunion's first scratchbuild try ( WIP )
artimorty replied to Aunion's topic in Build Threads Requireing Maintenance
wow Antonio. Great job so far. Some very nice ideas here. Love the end cap low tech milling method. Following your progress. This one is gonna be interesting and fun. Cheers -
Wow! That hollow folding stock is amazing! Very nice rubber work.
-
Hello again. Well well well. This post has turned the unexpected milestone of 4K+ views! That's AMAZING for me! Never thought it would get so much attention BIG THANKS to you all. I'm flattered beyond limits. To celebrate it, I've gathered myself and decided to take it a little farther, the last step... so I've built a 3d printed stand, ordered a nice plaque and done the numbers on the henglster counter. Come and see! Finally I managed to tame the technique for the methacrylate glass. I was doing it all wrong all the previous times. I used too much force on such a delicate material. This is to be done gently and slowly. I cut a stripe twice the length needed to cover the numbers from a methacrylate sheet I already had. The reason to make it so long to give me room to hold the piece on both sides and have some extra glass done just in case something happens. For this I used a hobby saw and went slowly. Then, I roughly rounded the long side corners on one just one side of the piece, using a big file with minimal grain, those used to soften metal edges, and worked like charm... Then I spent some good couple of hours dry and wet sanding the thing with 500 sandpaper to smooth it to my limit. After that, half an hour more of elbow grease with "krafft scratch remover polish cream" until I got it transparent again. In the picture you can see that some nasty cracks occurred inside the plastic at some time during the process. Happily, having a long piece saved the day, allowing me to spare the flawed end. I've chosen this particular pic despite the general blur cause you can see clear the background through the piece... nice! After the piece was done, I carved just a little the slot on the hengstler to make it more regular to accommodate the numbers and my new glass. As for the number, I googled images and came up with a site with one I liked. You can track it here: http://www.501st.com.mx/foros/viewtopic.php?t=6198 Then I colour-printed a few different sizes of them in a glossy paper and see which one fits best to my liking. Then just mounted all properly. To fix the glass cover I made, I used Humbrol Clearfix glue. This was recommended on my regular hobby shop. It's an ultra clear glue, cures slowly and is not as a strong as CA glue, but doesn't lose any nasty vapours or fumes and doesn't fog or blur transparent surfaces. I've been told this stuff is what's used to glue cockpit on plane models and things like that. And here it is! Now I have numbers on my blaster! Just as PS, I've also printed a 3D stand from thingiverse so I can rest properly the blaster until my armor is done (sometimes in a near future I hope!). It's my first 3d printed project. I printed it directly with no scaling involve, and had to mod it afterwards to fit my gun. Here is a link to the files: https://www.thingiverse.com/thing:2741481 I've also ordered a nice plaque from Rich at PLAQUES4PROPS for my bigger blaster, a DD, but in the meantime will be displayed next to my rubies... Rich is a nice fellow, very communicative and his work is awesome, despite the fact I found him on a rebel scum forum [emoji854]. If someone is interested, you can see his work and contact him trough his Facebook site: http://facebook.com/plaques4props Thank you all for your interest. Now I can call this really done. Enviado desde mi iPhone utilizando Tapatalk
-
Haven't been able to start it yet! It's my top priority project this year... all I need to do its get my workshop tide up and prepare a nice big table to lay down the pieces while working on it. I've been keeping an eye on your build thread though.
-
Nice addition there. It improves the general silhouette... good luck on your EIB application and congrats on your imminent fatherhood. Wish you the best.
-
Thank you all for reading and your feedback, JC. Glad to read this is helping others to start projects like this. If i can be of any further assistance, just let me know. Good luck on your rubies job! cheers.
-
Thank you very much for your compliments, Jim. Sorry I haven't been able to get back to you soon enough, really busy this days. I am more that flattered that some of you guys think this conversion deserves applying for centurion level no less! Thanks a lot for that. Honestly I don't even know if you can't apply a weapon alone, but I'm afraid you have to do it with your armor... and my anovos kit will still take a while to be taken care of. I will try to cross that bridge once we get there. Anyway, this conversion has much of what is supposed to be in an e-11 blaster, as any hasbro with a good old doopy kit would have, but this, imho has the advantage of a better profile and better shape in general, being the he main issue with this the smaller size and how close are the things in the middle section among them. Definitely it worth the effort and who knows... one day it might become centurion. thanks again!
-
Hey... big thanks you to you for your compliments, Jim. Sorry about the delay answering you but been busy with Halloween costume for the kids and the lot. Of course your build -among others- served as great inspiration for mine... in fact I used your colour pattern for the inner barrel (bright inside and flat outside) following yours. You know how this goes... taking good ideas from here and there and trying to make them work for you. Thanks again!
-
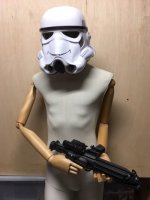
Hey there Reese. The Pal was a Christmas present from my wife last winter. She got it from a local shop, one specialized in furnitures and stuff for shops and stores. Later this year I found exactly the same model on AliExpress. I'm posting here one link to that, but it seems to be the Spanish site of AliExpress and don't know if it will work for you... https://m.es.aliexpress.com/s/item/32659114180.html?spm=a2g0n.search-cache.0.0.13bb6d89slCQJo One last advice if I may... there is a whole bunch of these mannequins, most of them with turning heads and poseable wooden arms and hands (very useful) but different legs position. Mine has one foot advanced, but there is another one in standing at attention position. I think I also saw some model with poseable wooden legs as well, but much more expensive. Hope this help. Cheers.
-
Veeeery nice. And very instructive build, with the tips on the xtc over printed parts. Thanks for sharing.
-
This is simply AMAZING. Unbelievably spectacular. Mind blowing. great great work
-
Well, thank you very much Zac. It wasn't meant to come that far a mod... it just happened this way. Sometimes once you start you cannot put things down. I'm really happy with how it came out, much better than my initial expectations, and it wasn't as difficult as you may think, tough it also has been more time consuming than what I thought it would be. Glad you guys like it and thanks for the kind words!
-
Very nice indeed.
-
Thanks Andrew! Wow, never thought of applying this for centurion... that's flattering and very kind of you. But I don't know if this worth it or if it meets the standard. And wasn't done with that goal in mind... just for a cheap way to complete a mannequin display. I also own a DD kit that sometime in the future will be the main gun in the house, but thinking that it will deserve to be displayed on its own, so this rubies is going to be the blaster for the mannequin for better or worse. but I give you one thing there... this mod got what I modestly think is a good piece for a very low budget. I'd have to run the numbers, but definitely under 50€ and probably under 40€. Most of the things used are spare plastics and sintra foam and resins and bondo and spray cans that I already have... so in this aspect this is something to consider, to provide a cheap way to reach higher ranks for everyone, without having to spend crazy cash. thanks again for your kind words and your support during the process. Nice to have you there all along. cheers.
