Leaderboard


Popular Content
Showing content with the highest reputation on 01/09/2019 in all areas
-
It happens. You are on yet another boring gate guard detail and are trying to relax with a cup of brew. You throw on the latest pod races on the closed circuit screens (hey, it's not like anyone is sneaking on a secret battle station, right?) put your feet up on the desk, lean back and start catching up on the latest FISD news on your data pad. Ah...the good life. Then out of nowhere, you can't get to the forums - it's like they are down. What gives? Did Lord Vader find out you piping pod racing again? Yeesh, doesn't he have something better to do, like track down rebels or something? Then again, maybe he doesn't. A cold bead of sweat starts rolling down your forehead.... Fear not - it's all good! The 501st Legion's webmasters are just trying to integrate the FISD forums with the Legion membership database and from time to time the forum servers are bounced. So it's not you at all, my good trooper! Wait, why are they doing this you ask? Ah...well you know how it's nearing election time and we get all kinds of requests to validate detachment membership, right? And each year it's a monumental task to try to get everything sync'd between the FISD servers and the Legion database, right? Well, your support request prayers have been answered! When the LWM team has completed their work, the Legion's database can simply pull membership data from FISD and automatically update membership requests. How cool is that? Surely worth a few server bounces, right? Huge thanks to the LWMs, especially Cari, for making this possible. Cheers Cari!7 points
-
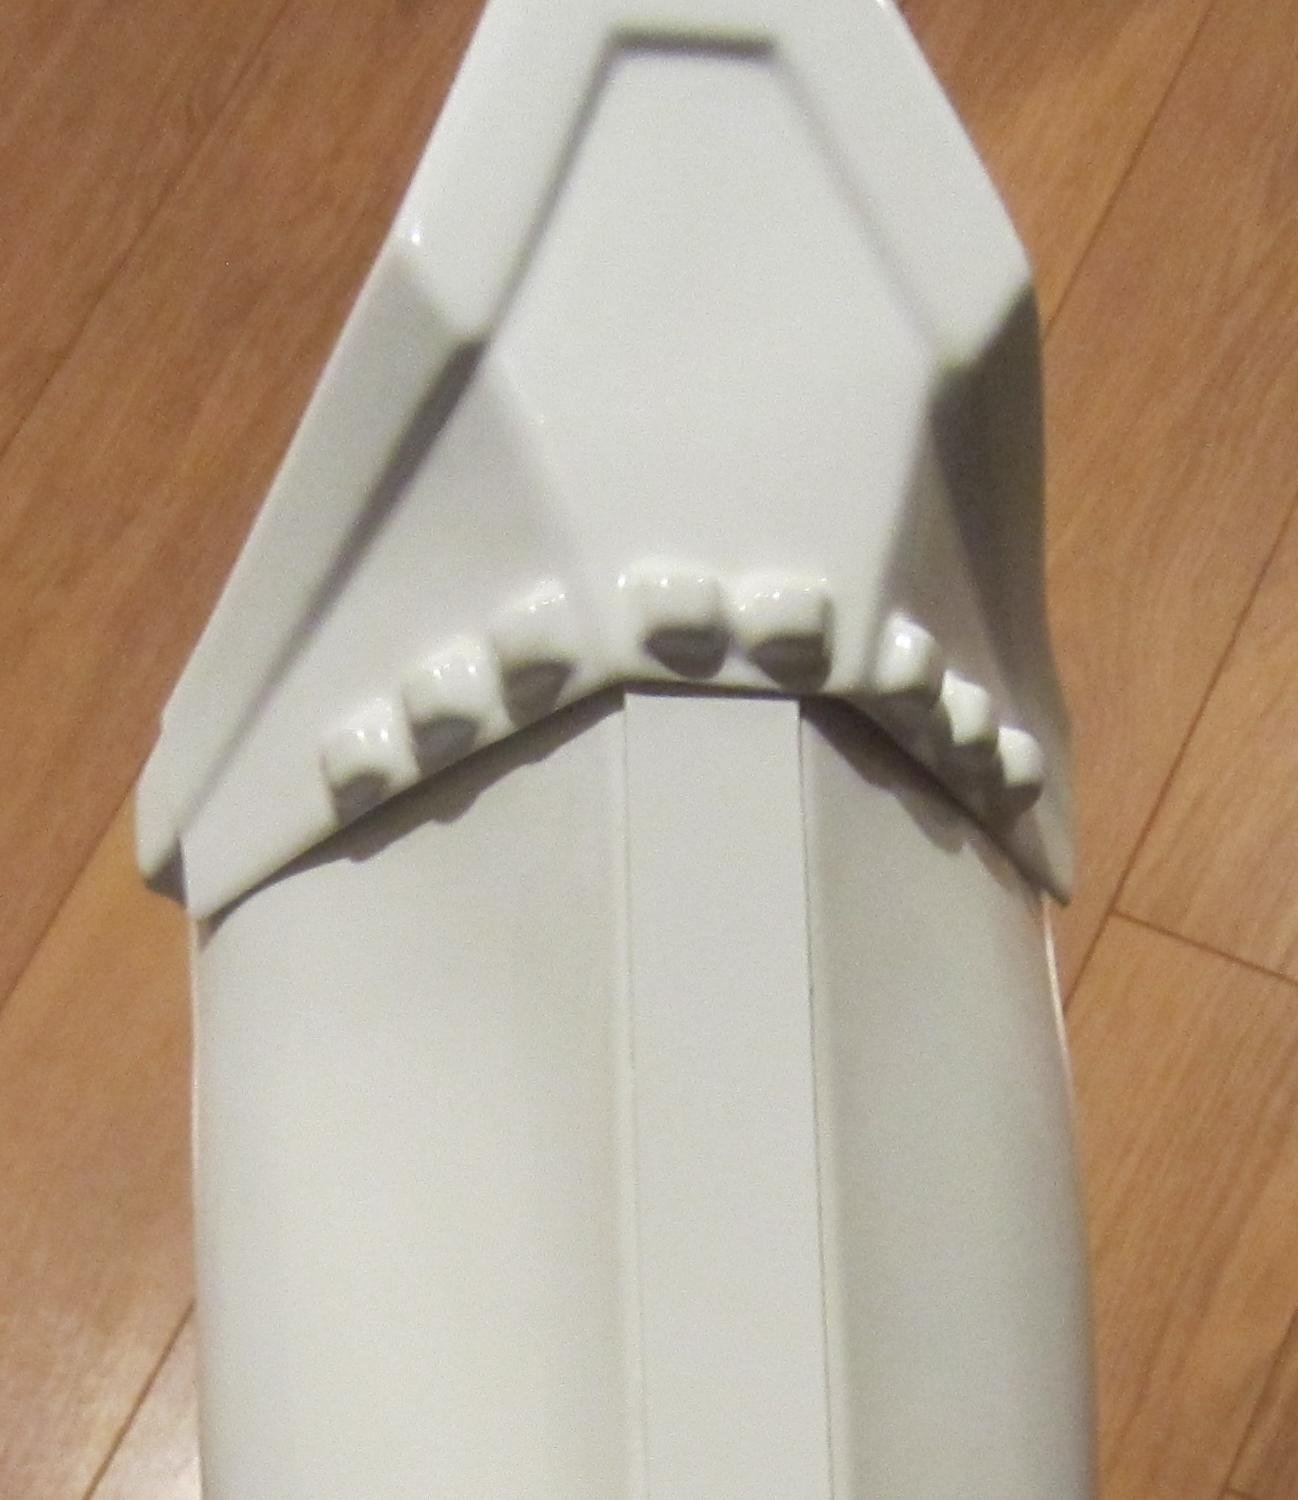
I believe this what you're asking to see. Here's an ATA, note the lower edge of the knee.
 2 points
 -
Oh, I've already had the Shins on and OMG, I know all about the "Trooper waddle." When we were doing this suit-up my wife couldn't quit laughing. At the moment, my particular waddle is caused mostly by the Thighs. I need to get them up another inch or so, plus do the cutouts on the backs of the Shins and Thighs. I'm letting the cutouts go till I have the armor 100% done and have been able to do a greater amount of walking around in it before doing those cuts. When you say "kidney snaps for the belt," I'm guessing you mean the attachment snaps on the front of the Ab? If so, then yes; assembling and attaching the belt is among the last few things I need to do. Short answer: Yes. Long answer: I've had a rubber chicken hanging in my shop (no matter where that shop is) since I created my first shop a couple decades ago. The cheap Chinese rubber they make them with tends to dry-rot quickly so I have to replace them every few years. This particular chicken has lasted the longest, about five years so far. Why a rubber chicken? Best answer is that I'm a Three Stooges kind of guy, which pretty much extends into my tastes for decorating. Which, actually, explains a lot about everything.2 points
-
Hello. Garry reporting in to the Star Garrison out of Houston/Corpus Christi, Texas. Looking forward to getting out for my first troop! TK-144301 point
-
Thanks Brian! I will have another look in the local construction / hardware stores for some suitable aluminum or PVC. So far I found only thin strips and profiles up to 3mm. Unfortunately importing this kind of materials is very uneconomical due to the administration charge for the customs check. The 3D printed part is only 2.5 € and I expect that the knurling pattern can also be applied to it (similar to the PVC).1 point
-
Option A trim the red line add the strip and make the strip angled like the angle Sent from my iPhone using Tapatalk1 point
-
Thanks. Yes you can use the green stuff to get the knurling pattern on there. I think I tried heating the tool handle I was using and heat press it into the pvc plastic. Fuzzy on my memory there. I think it could work using the green stuff on the aluminum but was t sure if it would hold permanently. Now thinking about it, I think would be okay. I bought the over strip at a local home center. I think it is generally used fir some window framing here or something like that. It’s easy to cut and file to shape. If you need any, I can mail you some pieces.1 point
-
I finally solved the problem with metallic screws and fixed the gap between the clips and end caps.1 point
-
Hi guys, This has now been slated for a worldwide release on Amazon Prime from the 8th Feb 2019 https://www.ukgarrison.co.uk/news/item/116-heroes-of-the-empire-released.html1 point
-
Good to see you here, Eric! Looking good! Good luck.1 point
-
Well, I forgot one photo! Here's a picture of my S-trim for my bucket.1 point
-
Nice work, good luck with approval1 point
-
Great piece of work !! Clean brother !! Goodluck on your centurion application!1 point
-
And I have a nice scope for my blaster build!1 point
-
Hi Dan Here are the 3 items requested: - Correct mesh for the 'Hovi mic' aerator tips (purchased from ukswrath), plus interiors painted white - Correct pan head style screws for TD clip - photos of thigh ammo pack inside and out Thanks.1 point
-
I want to. So much! But I'm beat. Tomorrow promises less exhaustion. *faint laughter heard in distance* But here's my new sniper knee, and perhaps now you can see why I trimmed it on an angle... ...'cause it seems to be asking for it. Here are my proposed trim lines - curve to the top vertical bit will be determined when I test fit it on the (proper!) shin. More concerned with the bottom edge ends. I think my only other option is to cut them way out where the bottom ends and flatten the bumpy upper plastic to match but I don't think that's quite practical. See how lumpy it gets right past there? It seems like I have to use that as my end point. N'est-ce pas? Also, I had previously treated my knee like an ear (oh the phrases I've typed in this build........) - like an ear, I say, in that I trimmed this bottom edge to fit the shin perfectly. It was delightful. However somebody mentioned the knee should be trimmed way up under the little ridge/bump/box things, which obviously precludes such lower shaping. Doesn't seem like too much left to me compared to screencaps, but my eye is certainly not as trained as it could be. Anyone else care to weigh in on it?1 point
-
I tried to salvage the doopy end clip T section but opted to make a new one with some PVC plastic. I think I even made one out of aluminum but opted not use it as I could not apply the knurling pattern on it as I wanted.1 point
-
Thanks. I’m hoping this build goes well enough to meet centurion standards and will benefit future builders. Detail is very important to new guys like me. This will chronicle the build through it’s entirety. My goal is to be submitted and approved before the August FanExpo in Toronto this year. At at some point I’d like to get together with a member from my area and demonstrate that help is not just in these forum pages but available with accomplished builders in hands on situations.1 point
-
oh my goodness FOUR ...Caridites?... commenting on my thread in one morning - including FRANK HIMSELF!!! *swoons* I serve Lord Vader. (But, privately, I think Kylo is also the bee's knees. Just to a lesser degree. But still to a degree that caused me to be paralyzed with the mix of fear, awe, and "squeee" that the presence of any Dark Side Adept of his caliber inspires when I had my private audience with him at Disney a few months ago. I had a Very weird look on my face in all the photos, and the aforementioned mix of emotions is my official excuse. ) Back to official tk business! My replacement sniper knee arrived yesterday. Y'all know when I asked for a new one - mere days earlier. Terrell (ATA) is the man! He offered different shipping speeds depending on my level of desperation, too. I've been nothing but pleased with our interactions and continue to highly recommend ATA. I'll sketch in the cut lines and post pics tonight before cutting. We sell poly webbed belts at work for holding up heavy tool belt stuff. I got one to use for my kidney to butt side connections and am quite optimistic. It's SO much thicker than the nylon webbing I got from the fabric store. For reference, I make my snap "plates" out of that and I don't even bother punching holes, I just spread the weave apart with the end of a pen and slide the snap post through. This stuff has a much tighter, thicker weave and is quite rigid. I've made the wide elastic hinge for the center back. It's been curing for several days next to the ab buttons whose glue was refusing to set for some reason. Too cold in the garage perhaps, or maybe it's the lack of air getting to all the glue underneath the thinner button strip. Almost time to leave work and do some REAL work - armor work!1 point
-
Hello again, I grey prime major components leaving out the central capacitors. I then followed up with flat black. As for the ceramic tube, I followed up with semigloss to seal in the orangey color with brass highlights. This also adds shine and reflectivity to it. To ensure maximum adhesion for gluing, I masked away those parts of the cylinders that will have end caps glued overtop. I also thickened the 'wings' with platicard. Bottom plate will remain a bit thick so to accommodate my chosen and scratch-built resisters. 10BA screws still need to be installed and putting together of the resistor wirings and sleeves. Capacitors I will try to bundle and glue in place some how then black wash them...to be continued [emoji38] Sent from my SM-G390W using Tapatalk1 point
-
That’s exactly why I first built some experience before starting with the scope. The main challenge for the drilling is to drill exactly perpendicular (without a column drill), with very little margin for deviations. But I managed and other than that it was a piece of cake. Everything fit perfectly! That sounds like Brian: improving even upon perfection! I’ve been reading your build thread yesterday Brian, amazing how many innovative mods were introduced by you! Really considering the dove tail front sight block now... And still doubting which way to go with the end cap clip, I’m worried that the DoopyDoo’s T-piece is too fragile to use... Thanks again for your awesome scope kit!!!1 point
-
I have made some progress. Almost everything is painted although I may want to do some touchups in the spring. I am reworking my strapping as I had started out with a harness but have slowly switched everything over to being attached to the ab surround and suspended from the chest & back plates. I need to adjust the strapping that joins the butt and cod and then I think I'll be ready to test fit again. I just haven't had the free time lately.1 point
-
Final Assembly and Fitting -- Part I Bet you didn't expect me back so soon. Mrs. Stormtrooper got home early, so she helped me attach and mark the arms for final sizing to determine the location of the snaps at the Bicep/Bell connections... and, for that matter, just help me get the damn thing on. I swear, I envy you guys who can put this stuff on by yourself. Then again, this is the first time I've put it all on, and I suppose it gets easier with time. Plus, the arms weren't attached when I did this. I'm rationalizing, of course, but hopefully it will get easier. We started by just getting on the thighs and torso assembly. Didn't bother putting on the shins as those are good to go, although I regret now not doing it. Would've been good to have a photo of them on with the rest of the outfit. (For that matter, I should have slipped my helmet on, too... Oh, well.) Remember now, this is a first full suit-up, so I know some things are off fitment-wise. Namely, the Thighs need to come up, and the Butt needs to come down. Meanwhile, the Back Plate slipped slightly over the top of the Kidney. However, I don't have the strap at the Cod/Butt connection yet (that will be the last strap I do the final measurement on), so nothing is being held together down there. I'm thinking that when I get that strap connection there that it'll pull everything downward and help to stretch out the rear portion of the assembly -- pulling the Butt and Kidney Plates down and allowing the Back Plate to ride up simultaneously. I may also need to raise the Back Plate a bit more by shortening the shoulder extensions, but I want to get that Cod snap in place first to see what that does -- with luck, I may not need to make any other adjustments on the rear. Otherwise, it all feels like it fits pretty well. Feels weird as hell wearing it, but it feels like it fits fine. I'm a bit dismayed here that the paint on the side rivets is already scraping off. I'll have to redo that paint before submitting. OK, let's get those arms on... We tucked the Shoulder Bell straps up underneath the shoulder elastic and snugged the tips of the Bells right up to where the Shoulder Bridges will be, then secured them in place with some small clamps. She then marked the Bell elastic and shoulder elastic where I'll need to put the snaps for those connections. Then, she slipped the Biceps up under the Bells, and Han-Hooked them in place on the retaining loops at the bottom of the Bells. *snap* That's the sound of me taking the above photo. (Note the camera remote control in my right hand.) We fiddled with the placement of each arm a bit to get everything where it should be and she marked the Biceps where they should go. I'll use the marks tomorrow to install a snap plate in the Bells, and a snap onto the end of the Bicep strap and the arms are finished. By the way, you know that this is AM armor, sized bigger than most. Boy am I glad I got it. I have very long arms -- note how low the Biceps are to maintain a minimal gap at the elbows -- and a small set of armor would have had huge gaps all over. I wish I could have had the Biceps up a bit higher into the Bells, but my arms are what they are. I'm really pleased with the fit for this first full suit-up. Yeah, I realize there are fitting issues: Both Thighs are twisted outward something awful so I'll need to adjust those garter straps, plus I know they need to come up some. Not only will that look better, but it'll remove the effective splint the create over both knees -- I cannot bend my legs at all at the moment. Tomorrow, I'll do those snap connections at the Bicep/Bell junctions, work on getting those Thighs up, install the snaps at the shoulder elastic, and maybe add the ABS Shoulder Bridges. I'll also create that strap for the Cod/Butt connection so I can get a true estimation of the fit on the rear of the suit. After that, it's making the Belt and gluing on the Ab buttons, and I'm ready to hunt Rebel Scum.1 point
-
I was trying to go EIB with my TK.1 point
-
Spoiler alert!!!! I don’t think you’ll have a problem with higher levels. Looks great and I love the detailed explanation. It’s gonna be a huge help for future troopers. Sent from my iPhone using Tapatalk1 point
-
To arms! To arms! -- Part V And you're thinking, Part V? Yeah, parts one through four were way back on Page 3 of the build. At that point all the arm components were done, cover strips and all. However, without the torso done and some shoulders to attach them to, I put them aside. Well, the torso is now done and fully strapped up. I'm about ready to suit up, and the last thing to do before then is to strap up and fit the arms. I did a lot of thought on how I wanted to strap the arms. Some of you do snaps on all the components, I've seen some do all glued-in straps, and a few have even gone with Velcro. Well, I decided I wanted permanent strength but still retain the ability to make adjustments, so I decided on a combination of glue and snaps. For the Biceps and Shoulder Bells, I'm gluing in the top strap of each of piece, while putting a snap at the other end. The glued straps of the Biceps would connect to snaps at the bottoms of the Bell, while the glued-in top straps of the Bells would connect to the shoulder elastic with snaps. I'm using 1" elastic for these straps, and didn't like the way I had to shove it down into the less-than-1"-wide hollow channels on the inside of the Biceps and Bells. No sense stressing the glue joints there, so I first shimmed up the gluing locations with pieces of ABS glued into the hollow channels. I just put a single thickness of ABS at each spot. That doesn't completely fill the channels, but raises the level enough to give a flatter gluing surface. In the above photo I have one strap already glued into the top of a Bell, and you can see the other ABS shims where the remaining straps will go. By the way, I left these straps a bit on the long side, since I didn't yet know where the snaps they'll go to need to be located. I'll find that out when I suit up and see where the arms need to fall. At this point I turned to the retaining loops at the bottoms of the Bells. While all armor is different and all body sizes are different, I learned from research here that these loops should be about 130mm -- approximately 5-1/4" -- from one side to the other. YMMV depending on your armor and body sizes, but the suggested length seemed about right for me. To do the glueup without worrying about having an exact 5-1/4" side-to-side, I first decided on the amount of elastic I wanted to glue inside each side of the Bell and settled on 1-1/2". I measured out 5-1/4" of elastic, then added another 3" to account for the glued-in ends for a total of 8-1/4" for each of the loop straps. Then, I marked out where I'd glue them in with my marks extending 1-1/2" into the Bells. This way, all I had to do was glue the strap ends to my lines, and that would leave exactly 5-1/4" side-to-side. The photo angle skews things a bit in the above picture, but both of those penciled areas are 1" wide by 1-1/2" deep. I wanted to glue things up all at once, so with the Bell loops cut and the plastic marked, I repeated the process for the Forearms, below. You can see above that I'm using 2" elastic for the Forearms. (Note that the gluing locations for these are taken from the Billhag drawings.) With all straps cut and plastic marked, I glued everything up. From left-to-right, we have 2" elastic glued and clamped into the tops of the Forearms, 1" elastic at the tops of the Biceps, 1" at the tops of the Bells, plus 1" elastic forming the bottom retaining loop on the Bells. Noted here that I stretched some masking tape across the Bells so there would be no tension on the loops while the glue was curing. And, yes, I did everything here with E6000. While I've learned that E6000 sets up pretty well in only an hour or two allowing you to work on freshly glued-up components (to a point), these are all high-stress connections so I let everything cure for a full 24 hours before proceeding. Everything turned out great except a bit of squeeze-out on one strap on a Forearm. In the scheme of things this is a tiny error -- I even figured I'd better add arrows so you could see what I'm talking about -- but things like this really eat at me. Shouldn't, though, as no one will ever notice such a small thing (except me, natch). But you can avoid this simply by not putting any glue on the last 1/8" or so of where you're gluing the straps in. That tiny gap won't make a difference in strength, but it'll help keep glue away from the edge when clamping things up. (Meanwhile, while the Dr. Jekyll side of me is fine with the way that arm came out, my Mr. Hyde side is extremely OCD. Expect him to be picking at that excess E6000 with tweezers till it's all gone.) So far, all the arm components are still separate. I won't connect the Bells to the shoulder elastic until I suit up, so I'm not worrying about that for now. Likewise, I won't know the necessary spot for attaching the snap at the bottom of the Bells for the Biceps to snap into until I hold the arms up and determine what overall length I need. However, the elbow connection can be done now because that distance was set back in 1977. For screen accuracy, the gap at the back of elbow should be at a bare minimum as it was in the films, so I wanted to shoot for minimal gap even though it's not a requirement for higher levels. (Spoiler alert: not yet, anyway.) I can make any needed length adjustments later at the Bicep/Bell connection. So the bottom line, then, is that I won't be adjusting the arms at the Forearm/Biceps connection, and for that reason I'm skipping snaps here all together and gluing both ends of the 2" straps at this connection (which is also screen-accurate, for that matter). This is most easily accomplished by laying the Forearms and Biceps on their "backs" with the ridged channels touching, and gluing in the straps between the two sections in this orientation. When done, they came out like this. The connected arm at the top of this image is the right arm and, yes, there's a gap on the front at the arched cutout as there should be -- you wouldn't be able to bend your arm otherwise. The backs, however, as shown on the left arm at the bottom of the photo, actually touch where the two ridged channels meet. With the exception of connecting the Forearm/Bicep assembly together, I'm considering the arms done. (As I noted, I'll determine the location of the snap at the Bicep/Bell connection a bit later.) At this point, I set the Forearms, Biceps and Bells aside and kept moving down the arm to the Hand Plates. Lots of ways to attach these -- glued directly to the gloves (required for higher-level rubber gloves), Velcro, straps running down from inside the Forearm wrist opening, etc. I wanted the flexibility to swap the Hand Plates depending on what gloves I'm wearing -- Gorilla Grip gloves in warm weather, Nomex in cold -- so I opted for the two-loop method that many others have used. For each Hand Plate, I started by measuring two lengths of 1" elastic sized to the circumference of my wrist and palm, and then gluing and clamping up the loops. I used Duco Cement here for its quick cure time. In less than an hour I had two loops glued and ready to install for each Plate. You can see here that I started with the palm loop; once that was dry I repeated the process to attach the wrist loops. Below, you can see what the finished Hand Plate looks like with the loops installed, plus what it looks like worn over my Gorilla Grips. These feel pretty good, but I think I may redo the wrist loops someday down the road. They're fine for now, but I think that if I glue in the ends of the wrist loop separately, instead of gluing up a solid loop, and attaching the ends at an angle that it might improve the fit a bit. Still, these fit fine. And, in all honesty, after I've worn them for a while I'll probably not bother redoing them. (Unless the Mr. Hyde OCD side has anything to say about it.) OK, that's it for the arms. I'll do that final snap to connect Bicep-to-Bell, and then attach the full arm assembly to the Shoulder Bridge elastic in the next step. Speaking of which, the next step is -- and I can't believe I'm typing these words -- Final Assembly and Fitting. Seriously, all I have left is to do a full suit-up at which time I'll add the last couple snaps to hang the arms. After that all I have left to do is make and attach the Belt, and attach the Shoulder Bridges and Ab Buttons. Color me psyched!1 point
-
Here it is, unboxed. I started painting/decaling the helmet last night and hope to have it finished today, other than the lens and grill. I hate Humbrol paint after being spoiled by years of painting miniatures with acrylics. The paint is still tacky from last night. It's a fully trimmed kit but I am 5'9" and I know AP's kits come large so I am guessing there will be some more adjustment needed. I am going to search for a good, detailed build thread that shows fitting and where each type of fastener is used.
 1 point
 -
68. CHP Kids’ Christmas Party – 12/15 Got 'em! Felony vehicle stop with a little help from the Central Division CHP. Right corner behind the Niner. And a little bonus:1 point
-
Troop #13 Christmas Fayre - Fordingbridge December 8th 2018 This was my final troop of 2018. I have family that live in Fordingbridge, a little town/village just outside of the New Forest, so it was lovely to give back to the community. The troop was actually a Rebel Legion UK troop with an invite for the UKG. As you’ll see, I was the only Imperial, but did have a Mando to help me keep an eye on those pesky rebels!! Photos courtesy of Michael Cullen (UKG and Rebel Legion) Met the lovely Ross Sambridge - Snoak body double and Wookiee in The Last Jedi and Solo, respectively. That’s all for this year. Thanks to anyone that’s read my troop log throughout the year. See you all in 2019. Best wishes Dan :-)1 point
-
Got my new Imperial Boots!!! comfortable and they fit really well
.jpg.847a0e0de31517164a0696a595661a69.jpg) 1 point
1 point -
Please don’t mind the upside down thermal detonator.... Sent from my iPhone using Tapatalk1 point