Leaderboard


Popular Content
Showing content with the highest reputation on 12/09/2020 in all areas
-
Now... the fun begins! Harder, (AKA TK-91918).. reporting for duty! Nearly 6 years ago, I learned about the 501st, simply via googling to buy a stormtrooper "costume". I admit, I used the excuse of a Madri Gras party to be the reason to pull the trigger and do it. But upon searching, and discovering the 501st, peaking my curiosity, later to see all the good they do... albeit was already a passion, became purpose. I have been a fan as many here clearly are, since childhood. LOVED Vader. What a bad A** mother right there! The Stormtroopers to me were the elite group and front line, the true power and force to be reckoned with. When my children were little, a friend of theirs was diagnosed with Childhood leukemia. He was one of 14 children in the cancer wing at the local cancer focused hospital. Through a 7 year battle, he was the only child within his ward to survive. I visited him often with the kids and this young man became a son to me as well. I cried when I left, but left him laughing and with hope. "See you tomorrow... stop faking it, its getting old... Love you." One day, I was there, when I witnessed the 501st, trooping through the hallways. At that time, I only thought how cool it was, and those are nice people. Come back to 6 years ago, discovering the 501st existence, and then tying it back to such strong emotional ties, plus fandom... Hence my passion grew. A few years back went through a hurtful divorce. I found myself needing to rediscover myself and re-establish purpose. I had access to money that I could use just for me. After the support of the new love in my life, and family, I purchased a fully commissioned set from RSP. As a plastics degreed mechanical engineer, I knew I could build it, but I wanted to get to trooping and help brighten anyone's day with this persona. After two months, it came!! But the legs were 3" sized too big every dimension. Initially I was heartbroken, but RSP followed true with their reputation. They immediately rushed to correct the mistake at no cost. While I was waiting for the 501st approval, I decided to dawn the armor and report in as an off duty storm trooper. I had so much fun with this, and sending some pictures to friends, I was overwhelmed with people asking for more. I love making the photos. So, I got my approval! "TK-91918.. I AM.. at my post!" I want to thank so many of you for helping me with questions and adjustments, snap strap fittings, where to procure, who to trust, all the plethora of information available... And while I can't possibly thank everyone, @MaskedVengeance @justjoseph63 @CableGuy @ukswrath @Sly11 @gmrhodes13 @Firedog @TKSpartan y'all, have been an incredible help and of the highest value to help me make this purpose and passion a reality. Thank you! Now... I'm gonna return that kindness and assist anyone else with a purpose and passion. Oh, and start my trooplog lol. Regards to all Troopers and aspiring.. Harder, AkA Craig Best5 points
-
Hey troopers, Brand new here but I’ve been a fan of y’all for ages now. Finally getting to a spot in my life where I can stop imagining this and start getting ready to don the helmet for the first time - exciting stuff. Although I’ve still got quite a bit of prep and familiarization ahead before I can start in earnest, I’m thrilled to join the forum and start learning. Fingers crossed we’ll have a 2021 that’s a biiit less insane and I’ll be able to see you folks around sometime soon. Cheers from Virginia - stay safe & sane out there! -Korhal (Dylan)2 points
-
Thank you for all your nice words. I am also very exited about the trooper future. :). When the box will arrive I will send some BBB pictures. And like you said I will start a building thread. "Always, always ALWAYS feel free to ask any questions you may have, Svante... we are here to help every step of the way! " THANK YOU ! I think I will have a lot of questions after starting the building process. And you all encourage me to build a kit. And RS seems like a good choice :))2 points
-
Went to Target. Stay on Target! I found some really cool pillows that match my bedspread designs. But now... I have to always remember how to arrange this.. ugh.2 points
-
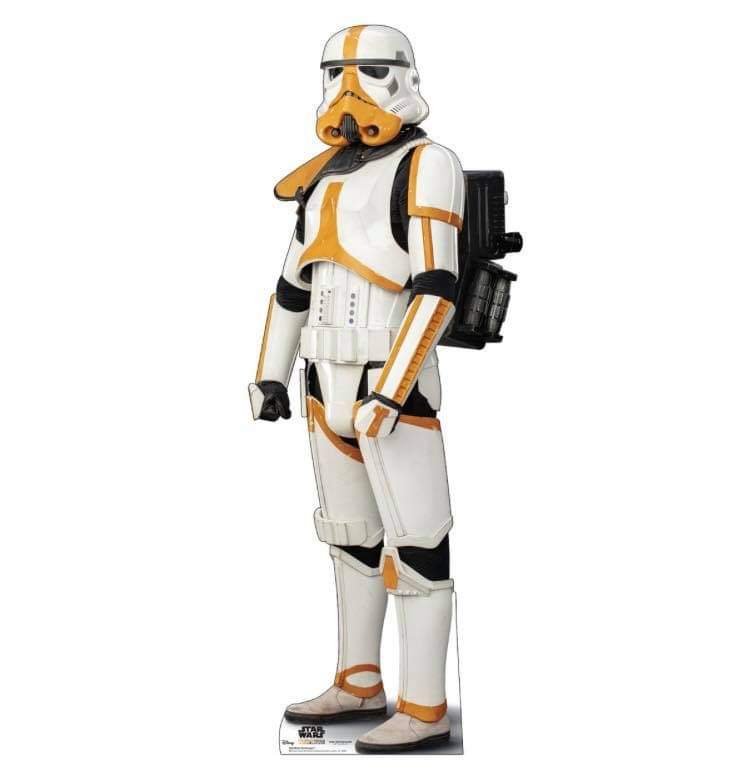
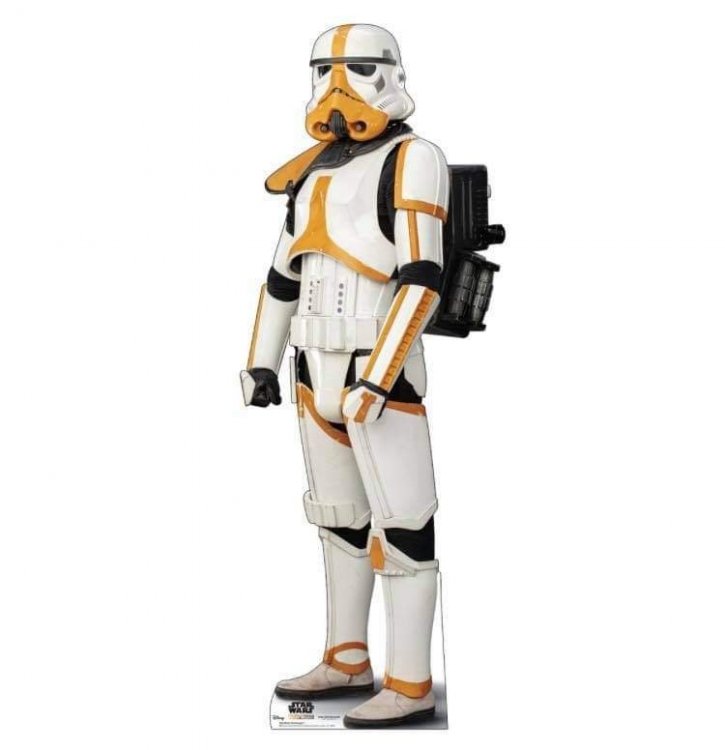
The Mortar Stormtrooper was a specialized variant of stormtrooper that specialized in mortar weaponry. The stormtrooper was equipped with stormtrooper armor, albeit with yellow markings, a yellow pauldron, and a military backpack. The style and position of the yellow markings on the Mortar Stormtrooper were identical to the red markings of the incinerator troopers deployed by the Imperial remnant led by Moff Gideon.
 1 point
 -
While I wait for approvals, I thought I would dawn the armor, and make a good bit of use of it. Diary of an Off-duty Stormtrooper.1 point
-
good eye1 point
-
Congratulations Craig, welcome to the legion sir.1 point
-
I've been talking with Reece about his thread, he was happy just to have the first post updated, he has lost a lot of images and many are FB links which I thought he would still be able to access, hopefully he'll be able to retrieve some more. And I'm sure they'll be a few more, I updated a couple over the last week, some I didn't even remember posting https://www.whitearmor.net/forum/topic/21822-how-to-get-flat-pieces-of-plastic-for-builds-if-you-cant-purhase/, restored by gmrhodes13 https://www.whitearmor.net/forum/topic/23682-basic-model-builing-skills-good-enuff/, restored by gmrhodes13 https://www.whitearmor.net/forum/topic/22177-howto-flat-snap-plates/, restored by gmrhodes13 Page 9 COMPLETED1 point
-
While you are waiting you'll find a lot of great helping info in this thread, research is the key and remember measure twice and cut once1 point
-
Dude, that’s a great backstory. Thank you for sharing it with us. It’s a great reminder of why we do what we do. Kudos on your approval too. Your passion will make you an excellent addition to the ranks of shiny whites! Congrats! Sent from my iPhone using Tapatalk1 point
-
There are indeed, same as on the R1 armor, you can just see it in the image below1 point
-
Also when it comes to painting do not paint the full button, you can see from the images that there is a small area paint free just around the base1 point
-
Took me a couple nights but I managed to get all the brackets installed. Now just need to find how long the elastics are supposed to be. Also got the cod elastic rivetted in place to connect to the butt plate.1 point
-
Congratulations trooper once again, looking forward to seeing your L2 application1 point
-
Great to hear, congratulations trooper and welcome to the ranks1 point
-
Great to hear you are on the mend trooper, we'll be here to assist you once you are back on your feet (or hand)1 point
-
Welcome Dylan. There is a ton of information yes. Much to read. I find that while the screen page seems like there's a lot on the page to digest, you'll discover its easy to read through, descriptive, and in a step by step method. You're definitely in the right location! Have you settled on a manufacture yet? Are you buying or building?1 point
-
Congratulations Craig and welcome to the Legion1 point
-
What a wonderful story, Craig. So pleased you made it and reached your goal. :-) Dan1 point
-
Official welcome to the stormtrooper family and FISD. Thanks for sharing your story also. Tony1 point
-
Congrats on your approval, Craig! I would have commented on your Reporting for Duty post, but I don’t yet have the appropriate account permissions. I’m one of those builders who is taking their sweet time, and hopefully I can find the financial resources to actually proceed and finish to join the 501st. Looking great in your armor! Now to submit for L2 and L3! Sent via Imperial Tapatalk Comms1 point
-
Yes, place it over the ab amor to see how it looks and trim as needed leaving a short edge, as you can see it doesn't cover the ridged section.1 point
-
Congratulations Trooper !! Welcome to the Legion. Enjoy being a Bad Guy Doing Good!!!!1 point
-
Hi, a couple of references for your Ab buttons,1 point
-
Welcome to FISD Dylan!! We are here to help.1 point
-
Welcome to the FISD! As mentioned above - feel free to ask questions, we are here to help.1 point
-
Welcome to the true home of shiny white armor, Dylan! Lots to learn before you dive in, so research will be your best friend. The amount of info. here can look (and is) quite staggering, but we are here to guide you all the way. Always, always feel free to ask any and all questions you may have... it's what we're here for!1 point
-
It was, hopefully we'll see some Stormtroopers throwing them. Generally you need full front, back and both sides images which there isn't from that episode that is why figures are important at times. At the end of the day someone has to build a version of the costume before a CRL will go live. Some more info here https://databank.501st.com/databank/Costuming:CRLGuide1 point
-
Thanks David! I was back and forth between hand painting and decals, I seriously doubted my ability to paint to my liking. But I'm glad I went with hand painting for my lid, turned out much better than I expected it to. And the imperfections add a little character, in my opinion!1 point
-
Welcome to FISD Dylan, we are glad to have you aboard. Yep loads and loads and did I say "loads" of information here, but also some extremely active, knowledgeable and very helpful members to. Looking forward to seeing your journey underway.1 point
-
Good job bro. Now I want to hand paint my stripes once I get to my helmet work.1 point
-
I sense a disturbance in the Force sorry been deep in Covid lockdowns, child wrangling and pulled on to some TV gigs. Please contact me if you need something. I’m hoping to start pulling armor again early next year1 point
-
Hello and welcome aboard1 point
-
@TheRascalKing and @11b30b4 thanks a ton for your insight. I think you guys confirmed a lot of my suspicions, so I'm probably going to get cracking on this thing this weekend. First, regarding the paint, I've heard tons of good stuff about the Eastwood's 2K, but I'd probably break the bank if I went for it. This was the result of that CT Bucket I mentioned a few days ago: Ok, I'll try not to put non-TK pics in this build thread, but I wanted to try that High Performance Enamel on something before I started spraying the good kit. This is a semi gloss finish, but earlier today before I sprayed the Husqvarna Orange, I was second guessing whether I grabbed the wrong stuff. You can't tell too much from the pics but the white came out almost as glossy as my last TK, so I think I'll go with it especially if I hit it with the clear. The way the High Performance played nicely with the Rustoleum Farm and Implement paint was pretty impressive. I haven't had too many issues if I stick to the same name brand, but the issues I did have previously were catastrophic. If the TK paint behaves similar to the CT, this will be a good build. Regarding the temp, this was somewhat tricky. Since it's so stinking cold in Virginia right now, and only going to get colder, my can felt like I pulled it out of the fridge. I sprayed it regardless and it splattered like crazy on the first coat. For the second coat, I gave the can a nice hot bath which caused it to come out super smooth and a little too fast. This is why I used a "doner helmet" for this test. In the end, I got it pretty good, but I also bought a bunch of plastic to build a pseudo booth in my garage; that should help. Regarding humidity, I learned that lesson during the Mando build. I still need to re-paint my armor. Last time I painted the ab details, the paint just kind of flowed into the recessed "buttons," so that should work fine. For the helmet, now that I know that the High Performance works well with other Rustoleums, I'll probably stick with the smoke grey, but I definitely need an airbrush for future builds. Too bad I've got my eyes set on the resin printer and Anycubic Wash and Cure Machine. I'll hit up the Praetorian guys again. I didn't realize they're on the gulf, I think I reached out during one of their hurricane evacuations. So when I unwrapped the green lens material (acrylic I think), I realized that it's actually convex and shaped for the eye sockets, so Jim already hooked us all up. Maybe a little trimming, but it's all good. Also, since I'm going to start this weekend, like any good build, I'll do the helmet first. Since I'm building to the new CRL, I get to make an eye bump again... Yay. Jeff, I looked through your build again last night and I don't know why I didn't notice how you did your helmet tubes, traps, and tears fabric. You kind of made little frames for each cut portion. How did this work out for you? I've got some left over HIPS from my belt build and will try to copy what you did. How did you keep them from pulling away/ moving around inside the bucket? Also, when I test fit everything (and got real itchy) it didn't appear that I was going to have to do any major alterations. Honestly, I think cutting the thigh armor in order to close it with Velcro will be the biggest thing and that's not bad at all. Thank God the lower leg armor fits around my calves. I was worried about that the whole time I was waiting for my kit to arrive. Finally, I saw on FB that some guys already designed a 3D file for the Mortar and Backpack, so yeah, I'm probably going to end up painting my 3d print ROTK. Regarding future spoilers, I'll give everyone two days from now on... but no more.1 point
-
Your bucket job looks great! Great perseverance with your paint challenges as well! In case it ever becomes necessary again, Cricket uses a sponge application method with tube strips stencils, and her results have been pretty good. As for the white screw-head paint, you may also consider trying Testors gloss white enamel paint, either in the tiny bottles or spray form. Sent via Imperial Tapatalk Comms1 point
-
Nice work. I found the Humbrol 22 is too cream in color compared to the helmet/armor color so I use a general white spray paint, just spray a little into the cap, wait for it to thicken a little when drying then apply.1 point
-
It's been a bit since my last post, so time for a progress report. Been working on completing the exterior of my bucket and I think it's finished for the most part. All in all, I'm quite pleased with how it has turned out (was nervous about hand painting). But as always, PLEASE call out anything that doesn't look right. Eye lenses and frown mesh: I originally intended to go with Joseph's sugru lens mounting method, so I purchased some sugru from Joseph and then picked up some more from amazon. Had plenty on hand in case I screwed anything up. I really liked the way A.J. mounted his lenses using JB weld epoxy putty for his screw mounts. Since I liked the idea of being able to remove the lenses easily, I ended up making mounts similar to his, but with sugru. I picked up some black nylon M3 standoffs & screws to use as well. After determining where I wanted the mounts to go around the eyes, I scuffed up the sides of the standoffs, placed them in position and placed a dollop of sugru around them and molded the sugru into place. Then let cure for a couple of days. I then traced out a rough template for cutting my lenses to fit. I also used sugru to mount the frown mesh, basically rolling strips to fit between each tooth gap and then pressing the mesh into it and again letting it cure for a couple days. Now, back to painting: For rear trap, tear, and tube stripes I used TB templates. And just for clarity, when I use left and right here, I will be referring to the wearer's left and right. Let's start with tube stripes. I was able to get the template to lay pretty flat on the left side, but the right side wouldn't no matter how much I wrestled with it. Gaps aplenty. But I went ahead and painted, using white first to try to fill in gaps (as suggested by both Joseph and Glen). As you can see in the pictures below, the right side which was super gappy, bled pretty bad even with the white painted on first, but I expected that. Just too much gap to fill. But it was easily cleaned up with mineral spirit dipped toothpicks and craft sticks (credit to Joseph for the craft stick idea; I found the flatter surface worked well for larger areas, but both worked well overall). Right side (before cleanup on left, after cleanup on right): As stated above, the left tube stripe template went down flat with very minimal gaps, so with the white painted on first, there was very little paint bleed. Great, right? Yes, except some of the stripes decided to peel up with the template! I'm sure it was user error on my part somehow, waited too long/not long enough, or pulled template up to quickly, but either way, I had 5 stripes either completely missing or partially missing. At this point I also noticed that the stripes on this side started further back than on the right side, and I wasn't happy with that either. Dank Ferrik! Initially, I was going to just strip off this side completely and start over, since I had another set of templates. No way was I going to be able to free hand tube stripes! But after some back and forth in my head, I figured I would try free handing the missing and partially missing stripes (and add one more stripe toward the front to even up both sides. This would actually put me at 15 stripes per side). And since mineral spirit dipped toothpicks and crafts sticks had become my friends, I could clean them up that way. After all, I could still strip them off and start over if not satisfied with the results. I also decided to fill in some small blemishes on the right side as well. I was NOT confident in this AT ALL and fully expected to strip the left side and start over BUT..............after cleanup and shaping with the toothpicks, in my humble opinion, I think they turned out pretty well! Waaaaay better than I expected them to! But before more pics, I wanted to quickly address.... Rear trap and tear stripes: Rear trap templates both went down pretty flat for me, no issues, very minimal, minor paint bleed, which I just carefully painted over with gray. Right tear template had no issues, with zero paint bleed. I did experience issues with the left tear templates. It would lay flat, with minimal gaps, but would slowly lift up a little while painting. The stripes were really sloppy after the first try, so painted gray over them and used the second template, with the same results. This time I carefully added gray just to clean up the stripes and, while they weren't as clean as the tear stripes on the right, the results were satisfactory to me. Whew!! Thanks for bearing with my long windedness, pics below are how the exterior of the bucket looks now. To reiterate, I'm very happy with how it all turned out, but am ALWAYS open for critique and ways to improve upon what I have so far! Thanks in advance Troopers! Oh...posting the pics reminded me of a question I had. My Humbrol 22 gloss white looks more creamy eggshell than white (ear screws). It also smelled horribly and needed to be mixed much more than the other colors. Does this sound normal, or perhaps I have a bad batch? I'm thinking I may have to pick up another tin to repaint the ear screws and for the other hardware on the armor.1 point
-
Yes Tino, correct. I am trying to make a master set to make copies from. That’s the plan for the resin ones at least. I tried using right angles ABS strips for the base plate. ABS is easier to drill for sure and would certainly be a better idea for the resin power cylinders as you suggested. The right angle parts are okay but I am not liking the sharp angle of the bend so maybe it’s better to have them laser cut on a flat piece and then just need some heat to bend them into shape. Thanks for your suggestions. I was originally thinking of all resin casted but the base plate is not so straight forward to mold and cast. Fragile as well I imagine.1 point
-
That's great Reese, thank you for taking the time to update the thread1 point
-
I am at work now but will get on to that when I get home. There are a couple of snaps but they from the photo’s they are keeping the belt too low so will bring it up higher with the Velcro strips as suggested.1 point
-
I love this! Keep up the great work!1 point
-
Nice work, getting there1 point
-
Today, walked by something smelling like bantha fodder. Guess it’s that time of the week to get this done.1 point
-
Thanks Dan! I've found your tips and vids here and on YouTube very helpful. Ok, so I completed Take 2 on the tears and traps pinstriping last night. I think they came out much better this time around. I still have to clean up some of the outside edges of the pinstripes (photos below). I also countersunk the screw holes on my ears today. I used a 7/64" drill bit for the screw holes. And I used a 1/4" drill bit to countersink the holes, BY HAND - no drill, just manually turned the bit by hand, as I've seen advised many times for better control. As you can see in the photo below, I used a scrap piece of ABS to drill holes and figure out the size drill bit that would work best for me. And on a side note, saw this shirt on Amazon and I had to pick one up for myself!1 point
-
Today: Decided to work on my aiming skills with a little Nintendo Switch playing something called Fortnite:1 point
-
I think you may be right, a touch on the thin side1 point
-
Hi all, Firstly, I’d like to say that Low and higher brow heights are perfectly acceptable and all members are welcome in the legion. I would just highlight that some appear to reflect Stunt or Hero/Promo troopers. The intention of this post is to share educational reference photos with new and aspiring troopers. Based on watching ANH, viewing the many reference photos and additions behind the scenes and historic photos, there is a clear direction regarding various brow heights in ANH. In the spirit of the CRL, this guide would help improve uniformity across the legion. For those that favour a low brow, I would highly recommend checking out the Hero* or Promo Trooper as an ideal option. *please note that not all Hero helmets had a low brow. Below is the Promo Trooper. This features a hero helmet (this is different to the Stunt helmet) and is an iconic look, featuring a low brow (brow trim essentially ‘on’ the top of the eye sockets). There is essentially zero gap between the bubble lenses and the brow trim. There were just six hero helmets made for ANH, made in gloss ABS, intended for close up shots; Luke has a very similar look; Han, on the other hand, had a clear gap (seen here left of shot) 50 Stunt helmets were made for ANH. These were made from green HDPE plastic, then primed and painted. The majority of TKs seen in action and group shots in ANH were Stunt helmets and had a visibly different appearance, including a longer painted ‘frown’ with (for the most part) 4 ‘teeth’ either side, 3 screws per ear rather than 2, flat lenses rather than bubble and (for the majority seen on screen) had a consistent gap between the top of the eyes and the brow. First up is a photo taken outside Shepperton Design Studios and shows approximately half of the 50 Stunt helmets primed and ready to send to the studio. The brow height is consistent across these helmets, each having a clear gap between the eyes and the brow. Note below that perhaps 2 or 3 of 26 helmets have a slightly lower brow. On to screen used, there are a few lower brow stunts featured through ANH, however they are certainly outnumbered by the conventional look. Note the same scenario from ESB (re-using ANH Stunt helmets for the most part); Even quite a few Hero helmets, including Han’s, had the usual gap. I hope that these reference photos help to show the difference with various helmets. This post,and the information included, comes from a passion for the wonderful character that is the Stormtrooper and is not intended as a negative view on those that choose the low brow. Both have their place in our character lineup. I would simply suggest considering the hero or Promo Trooper as an option for those that prefer the low brow. Best wishes Dan NB - credit to StarWarsHelmets.com for a lot of this information. I’ve learned a lot from there over the last couple of years.1 point