Leaderboard


Popular Content
Showing content with the highest reputation on 08/29/2020 in all areas
-
Hello all. Long time no see. Hope you are all going well with this pandemic. As you might've guessed I haven't been able to work on my trooper too much, the quarantine has sucked the energy out of my to be honest. Some small updates: My blaster finally arrived! After around 3 months of waiting it's here, resin cast from A&J Productions in Poland! I'm keen to build it, it's given me energy to wanna build again! But I think I might have to start a new thread in the weapons catagory, I'm not to sure if it's against the rules since if I build it here it's technically not building my armour. Talking about armour the small list of things I need to do are: -Attach the handplates to the gloves -Make the TD -And finally attach the boots to the inside of the shin using snaps. We recently moved a lot of stuff around so my armour is sitting in a spare room at the moment. I think I might've lost my TD screws, I'll have to have a look. The blaster looks a bit tricky to put together, so I'll defs need help with that! But I'm only going for Cert 1 on the blaster, so it shouldn't take too long. The resin has alot of 'spill' or bits left over so it needs a cleanup for sure. It actually came with more than I expected with springs, the little coil thing and small screws. Keen to start again. Sadly the pandemic has pushed our Melbourne Comic-Con back to sometime into 2021, so we do have time to build! We haven't started my dad's TK yet, but he's been very busy so I might be riding solo here to finish! Long live the Empire! - Tom5 points
-
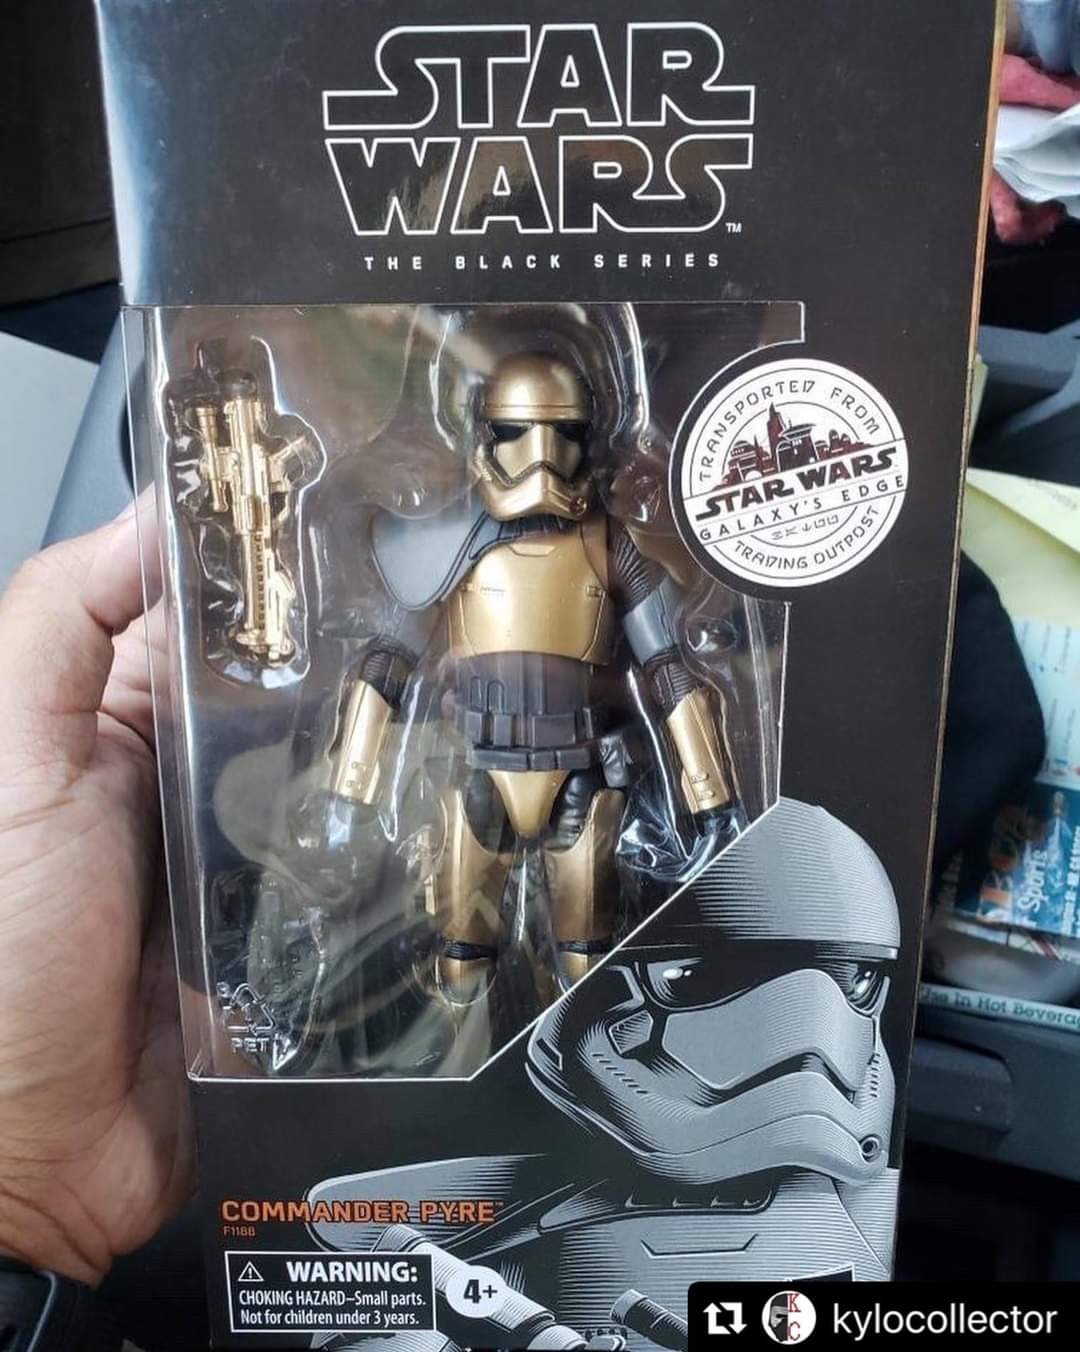
This will make a few people happy, Commander Pyre Black Series realistic version, coming to Target US
 4 points
 -
Just dropping this here from the RPF: https://www.therpf.com/forums/threads/anovos-picks-up-the-high-end-star-wars-costuming-license.212164/page-415#post-5106755 seems like they were unable to renew the license...2 points
-
As a British Firefighter the number 999 appeals to me as it is the equivalent of the US 911 but right now I just want to get in. I feel like I'm cutting it close as it is!2 points
-
Ha Sly! Funny you mention that. The thought of holding off to be Lucky #1000 had crossed my mind too. But then I figured it would be just my luck that several others did too and there would be a mad last minute onslaught of submissions that would push me back to 1003 or something. So glad I'm all done! Sent from my sorrosuub C1 comm link device using Tapatalk2 points
-
Personally I’m shooting for #1138 ;-) Sent from my iPhone using Tapatalk2 points
-
Seems like an easy way to end up being #1001 or #1002. I couldn’t make that gamble personally.2 points
-
I heard that some folk are holding back their applications as they are trying to time it so they can be EI#1000. I would encourage you guys not to do so, as you may find that due to how the applications get processed, you may end up as EI # 1001! :laser: So, don't delay - apply today! This is something you definitely don't want to miss out on.2 points
-
1 point
-
There still hope amigo! Now that you've started your build it will roll like a snowball gaining traction downhill. Maybe you can be the squeaker and get in just under the line.1 point
-
After pining over this character for nearly five years, I have finally committed to building my own set of armor. This will be my very first armored costume, so I’m quite nervous about it. Depending on who is measuring me, I am about 6’ tall (give or take an inch), so the prospect of portraying a tall character like Captain Phasma is something I am really looking forward to doing. I chose to do The Last Jedi version simply because I like the bright chrome look over the weathered version. Pieces of my costume: Helmet: Shawn Thorsson (first run, 2015) Armor Kit: KB Props (on order) Boots: Dr. Martens Flora Chelsea Boots Neck Seal: Geeky Pink’s Fabric Gaskets: Geeky Pink’s Rubber Gaskets (for EIB): ??? Belt: ??? Undersuit: ??? Cape: Sewn by me I’m still in the early stages of building this costume, so my first steps are to prepare the helmet, order everything else I need, and start on my cape. I do plan to eventually submit it for EIB status, so I am not cutting any corners along the way. This is going to be fun, I think. Terrifying, but fun.1 point
-
Sadly you probably missed that boat a long time ago they have a new no refund policy Sent from my SM-G973U using Tapatalk1 point
-
Although this was originally under consideration as a surprise, I think it's time we make an official announcement. You already know of the detachment wide celebration of this mile stone and that there is a special piece of merch which we have been revealing little peeks of right. That merch item will be available to all 501st approved detachment members. But there will be a second until now, secret piece of merch available, and only available to those that are within the 1000 so it is exclusive. I did say this was a monumental occasion for us, and that we would offer fantastic merch item this year to celebrate it. These items will be only available once, so don't delay in getting your EI application in or you will miss out on this exclusive additional piece of FISD history.1 point
-
That would suck! trying to be #1000, then suddenly you end up #1001 etc lol. Just get in and get it done I say. It's been a long march to this point, don't sit on your hands hoping to get your timing right, because you might be asked to provide an extra photo, or make an adjustment, then another application comes in and beats you to the post.1 point
-
Snaps make sense too, but I think it'll be difficult to reach back there to snap/unsnap. But maybe velcro on the triangle will work! I think you're right. Thanks for the image! I agree, the height looks good, but I can take away from the bottom. This pic of my cod piece doesn't have the belt, so not as much is hidden. But I can adjust so it looks like this with the belt on! He probably goes big since we can trim down, but it's difficult to add! Oh well, back to the Dremel! You got that right! I was literally wearing most of this for 2 hours while working. I loved it! I definitely have to do something about the satin black that's rubbing off the sides onto the barrel... I thought my boots felt narrow at first, but I had no issues the whole time! Bending down is near impossible, and I'm not even wearing the full suit lol!1 point
-
Could very well be, there have been months in the past were we have only seen 2 or 3 applications. I know some are just waiting on last pieces, approval and access. I really hope some aren't waiting for the 1000th, that's not what FISD is about, troopers helping troopers, not glory hunters1 point
-
It’s been a week and I’m still awaiting basic approval. Hopefully I can have my app in soon. I’m getting super nervous.1 point
-
I spent today sticking velcro on everything that's done! I think it all fits together well! The satin black on the side plate interior rubs off onto the barrel, so I think I'll put some soft black velcro inside. I stuck a few squares around to hold the belt halves in place. 2 issues with the back... I guess the plate's too low, since the mesh shows through. I might be able to raise it a little by putting velcro on the suspenders so it stays high. Otherwise I guess I'll need a black undershirt. Also, the suspenders stick out a lot. I'll pull off and move down the barrel's rear snaps so the Y split is under the back plate. Does this look like good placement for the cod? I'll trim some off the top so it leaves a gap below the barrel, allowing for movement (I'll snap it on with elastic). I'll trim some off the bottom of the cod too. I'll post tomorrow where I plan on cutting. Does this look like the right height for the butt plate? I can lower it a bit, but I'll need to trim a lot from the bottom and sides. I'll post tomorrow where I plan on cutting this too. I figured I'd check the thighs while I'm wearing everything. THEY'RE HUGE!! I'll cut the back open and figure out how much I need to cut off, but probably 2-4"... I think that much will require moving of the cover strip too... I'll also need to shorten the thighs too! I can barely bend my knee when I hang them at this height. Probably need to trim 1-2". I'll cut the back open first to judge how much from the top. I'll have to cut the groove back into the cover strip too.1 point
-
Thanks, Troopers!1 point
-
Thanks for the input I'll make the corrections to the blaster and send a few more pictures in I look forward to improving my costume.1 point
-
All, thanks for the tips on the paint. It's just weird since I haven't had any issues putting the white on top of the gold, it's only when I try to put anything on top of the white. I think I'm going to follow Tarok's advise and play around with a couple scrap pieces before I try to lay paint down over a cured coat again. Since I showed a pic of the ab armor yesterday, I thought I'd outline this process a little. I'm hoping that by the end of the weekend I'll be posting pics of a few more finished pieces, but for now, I can at least bring this thread up to the current time. First, I'm going to post a pic of something that has become a very valuable tool throughout this process. I'm not sure how widely used this tool is, but the concept is very simple. Of course, these pics are a joke, but the basic steps are gauge body part, measure, and then scale armor in your slicing software. In theory, a person should be able to use this tool when measuring for any type of armor before trimming. If you guys want the file, they can be found here https://www.thingiverse.com/thing:2892755 They were created by Uncle Jessy, but he credits NikkoIndustries with the idea. For an in-depth view of how to use them, check out Nikko's video at https://youtu.be/8p0iqI_qWK8 or Uncle Jessy's video at: https://youtu.be/OM5hwTrVnRU After scaling my armor, there was no way I was going to get it to fit on my print bed. When I chose the CR-10S, I did so because of its large surface, but as I alluded in a previous post, something even larger will be very welcome for future builds. The CR-10S Max is very attractive, but also very expensive. I started to make my cuts in Meshmixer, but was not a fan of cutting right through the front greeblie. Instead I decided to print off the file without the boxes which also helped extraordinarily well with hiding the seam. As I stated yesterday, if I can cut a file behind something that gets affixed later i.e. the belt ammo boxes, it eases the post processing burden. Additionally, printing the greeblies separate allows a person the opportunity to print them again slowly, at a much higher resolution. Preferably, I would like to print detail pieces off with a resin printer, but that's another future purchase. Here's the slice without the boxes. Between the front greeblie and the belt, over half of the cut will be covered with another item. The side slice was a little trickier. Again, I wanted to hide the cut, so I decided that the best place to do so would be along the forward edge of the semi-vertical seams on both sides. I posted this picture yesterday, but this illustrates how I was able to "weld" the armor on the front. Typically I won't plastic weld anything on the outside of the armor, but since this will all be hidden, it was perfectly acceptable and did a great job of strengthening the seam. Greeblies were printed separately, but as I said yesterday, I totally forgot to change my print settings. Regardless, they turned out pretty good. For this part, I did my post processing a little out of order. After I welded the inside of the armor, I ran a thin bead of the Alex Flex along the front seam and sprayed a thin coat of filler primer over the top; this was what sold me on the process. The print lines were actually deeper than the seam I cut directly through the middle of the armor. When I'm able to pick up a tub of the Alex Flex spackle, I'll update the thread. Again I went heavy on the glazing and spot putty before doing my first sanding and priming. Also, this is where I decided that I would stop post processing until after I sized and fitted the rest of the armor to this piece. Doing the plastic welds is kind of fun. It's nothing more than a soldering iron and extra filament. The only issue I've had is that I've burned my knuckles about a hundred times, but that's just me being stupid. After I do the modified tig weld, I typically follow that up by smoothing the weld line, which forces the plastic deeper into the seam. The weld is obviously finished in this pic, but it's worth noting that prior to welding the pieces, I tacked them together using a few dabs of super glue and a bead of E6000. After allowing the E6000 to cure, I ran a bead of super glue along the seam and then dusted it with baking soda. While this cures the super glue almost instantly, I found that the baking soda cement line wasn't very forgiving to flex. In the future, I will fill the gap with the Alex Flex. Really not sure what I was thinking, but I really didn't like how narrow the gap was in the back of the armor, so like an idiot, I cut it wider to give me extra room to slip the piece on and off, and bring the gap up to "approximately 4 inches," which I swear I read somewhere but can't find now. I'll discuss this in a minute. After cutting these pieces out, I stress tested the armor and was able to flex it open to about 9 inches, which was plenty of room to put the armor on and off. However, knowing that I would be doing this frequently, I decided to print off two flex plates that would cover the seams I just welded. Unfortunately, I forgot to take a picture of this, but here's the Simplify3d visual. The flex plates were wide enough to cover the seams and the high-stress portions of the side-abdominal area. Additionally, at only 2mm thick, they didn't have much infill and were highly flexible. I secured them using E6000 and then welded around the edges. Following this addition, I was able to stretch the abdomen pretty wide, and kept walking around the house like this: Unfortunately, when I put this on, I realized that the rear gap had opened up beyond the dimensions of the rectangle (kidney) plate. Thanks to Jeff (11b30b4) for verifying the size of the kidney plate for me. I had suspected that my kidney plate dimensions were off, but after he told me what his measured in at, I realized that the length and width of what was provided with my armor was correct (I actually increased the depth based off reference pics). Fortunately, I was able to get all my measurements done and adjustments made before I got ambitious with the cutoff wheel. That's how I was able to appropriately size the chest, back and side extensions as well as get community input regarding the thighs, cod, and belt. I agree that the abdominal should be the starting point for this reason; the placement of almost everything seems to hinge on where the abdomen sits. Also fortunately, the rear (kidney) section of the abdominal armor was only like a six hour print. I was able to set everything up, do my telework thing, and come back to finished armor. Last night I welded the sides back together and now have this: Here I clamped one of the old flex plates on so you can see what I was referring to earlier. I totally forgot to print off some new ones this morning and started printing the back of my clone helmet instead, so I won't be able to put the new flex plates on until tomorrow. Following that, I'm going to hit the inside with some resin and keep moving along. Ultimately, though I'm holding it a little low in the pic, it fits how it should. Hopefully I can do the strapping and add this to the pile of white pieces soon. Also, please ignore the mess, that's our COVID stash and evidence that my kids have been feeling rather cooped-up all summer.1 point
-
Lots of helmet photos at the auction link. The original helmet went for $110,000 . Check out the wonky ear screws, they are in totally different spots on each side, and not lined up with the traps. It’s fun to see how different those original ANH helmets were. https://propstoreauction.com/m/lot-details/index/catalog/267/lot/62794/1 point
-
When I first posted this, it was about the helmet prop, an original In good condition that was never converted for ESB and has never been sold before. Really good Reference. I hadn’t noticed that the full suit was from a 501st extra, I assumed it was an LFL suit, but it says right there in the text description. Not only does this feel inappropriate to auction, but I feel like LFL would not be too happy with this either, after giving us a chance of a lifetime. Either those opportunities stop, or there is a provision in the contract against this in the future.1 point
-
Appreciate the kind words! It has been quite a learning experience with this build, especially since it’s my first go at anything like this. I have definitely learned some useful skills.. too bad that’ll mean having to do another costume in the future (my lady may kill me if I do..) but it is satisfying getting closer to a final suit up. She’s starting to see what the huge pile of parts and all the plastic shavings have been turning into. Sent from my iPhone using Tapatalk1 point
-
Just finished my MSE-6 Droid build, and I don't feel like sewing on my Jawa today, so I'm hopping back over to getting more plastic sliced and diced. I took all of the pieces out of the box and gave the box to my kids to play in. This kind of clutter pile makes me crazy, so this is my way to get working on this TK regularly now. When it's in a box, I just forget about it. In the middle of the floor, I'll feel compelled to work on it a little every day. Then I remembered that I need cover strips. Ah, thoooose... I remember cutting lots and lots of them from what seems like a very long time ago (just a few months, really). Not a fan of that part of the build. I like to add inner cover strips long before the outside cover strips. It allows for easier sizing (at least it does for me) while shaping the pieces to my small 5'4" frame. I add my outside cover strips once I'm finished with sizing everything down. I had to reference my previous build for cover strip sizes. Nice thing about having a prior build log is that it's easy to refer to things when you need them! Cover Strip Sizes Thighs (front and back)- 20mm Shins- 20mm Calves- 25mm Arms- 15mm I realized that I would need 16 strips total for the outer strips (so double that amount if you're cutting strips for the insides of the armor). The complete amount of ABS I need is 290mm wide, and 15 inches long. This would allow me the exact width of the pieces I need, plus some extra length to adjust for each piece. Walt included a lot of extra cover strip material for this. Here you can see the sheet included was well more than 290mm. And the length is well over 18 inches (the length of the ruler in the pic). I trimmed the length of the piece to 18 inches so I could make easy cuts. After about an hour of measure, mark, clamp, score, snap, repeat (16 times!), I ended up with this. That big piece on the right is the extra from this sheet. Oh, and did I mention this part...? Yeah, that is ALL the extra ABS Walt included with my kit! There's more than enough for my inner cover strips. Which is great, because I had to purchase extra ABS sheets on Amazon for the inner cover strips on my last build. Thank you, WTF!1 point