Leaderboard


Popular Content
Showing content with the highest reputation on 08/03/2020 in all areas
-
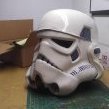
Hello all! After hours of work, I have finally been approved for the 501st, Central California Garrison! I can't wait to join you all on my first troop. I've been wanting to build my own TK armor for the longest time, and being mostly at home for the past 4 months was the perfect opportunity to do just that! It was hardest creative work I've ever attempted, but the journey was fun and the outcome was amazing4 points
-
Alright, time for an update to finish out this thread! I took some photos to show the things that needed to be changed to convert to ESB. Helmet I finished modding the new Anovos helmet from earlier, adding the mic tips and finishing the interior. Front Left Right Back Interior Gloves and Handguards I trimmed down the AM Snowie-style handguards and E6000'ed some 1" elastic into them to pair with my rubber gloves. I decided not to go with the satin ones because I didn't feel like sewing and usually troop in a pair of specific lightweight gloves, so I would only ever wear em for photos (like my rubber gloves). Belt and Holster I use snaps to attach my plastic belt to my canvas belt, which allows me to detach it and ROLL my Imperial Issue canvas belt so that I don't put strain on the insert by folding it in my tiny crate. It also allows me to use the same plastic belt for all three of my TK variants (ANH-S, HWT, and ESB) that I use the base suit for. I paired it with a ESB holster from Darman's Props and opted for the 8oz leather, which is sturdy, looks excellent, and has the correct LOOPS instead of rivet attachments. It is set up to be worn on the RIGHT side of the belt, instead of the left. That's pretty much it! I did not need to make any permanent changes to the base suit for a successful conversion - just added a few new parts. Aaaaaand I actually already submitted to our GMLs and received my approval this weekend, I'm happy to say! Next stop, EIB and Centurion! Thanks for reading and I hope this helps someone out!4 points
-
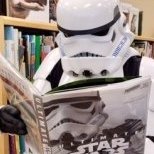
Mandatory Information Name = Justin R. TK ID = 61490 Forum Name = TheRascalKing Legion Profile = https://www.501st.com/members/displaymemberdetails.php?userID=26076 Garrison/Squad = Southern California Garrison, Orange County Squad Armor = Anovos Helmet = Anovos V3 (modified with TrooperBay ESB decals, @justjoseph63 hardware, @ukswrath mic tips) Base Suit Centurion Thread Link = Optional Height = 6ft 0in, or 183cm Weight = 175lbs, or 80kg Boots = Imperial Boots Ammo belt = Anovos Canvas belt = Imperial Issue Holster = Darman's Props Hand Plates = AM Snowtrooper-style Gloves = Rubber chemical gloves Neck Seal = Darman's Props Armor Photos Helmet Off (not adjusted) Full Body Front Full Body Back Full Right Full Left Action Shot Helmet Detail Photos Front Left Right Back Interior S-trim Detail Vocoder and Hovi Mic Tip Detail Lens Color (Backlit if necessary) Accessory Photos Neckseal Thermal Detonator Ammo Belt Boots Blaster (ESB, no Hengstler, no power cells, D-ring) Optional Interior Strapping Abdomen Detail Cod Details Handguards and Gloves (Rubber Glove/Elastic Option) Sniper Knee Attachment (glue) Thigh Ammo Pack Attachment (single-cap rivets) Belt Box Back Detail (fully closed) Wrist Return Edge Detail (none present) Right Ab Snap Detail Left Side (rivets) and Kidney Notch Detail Shoulder Bridge Attachment (glue) Thanks for looking @shashachu, @justjoseph63, and @TKSpartan ! I definitely appreciate you guys! 3 for 3, let's do it!3 points
-
I'm not totally up on R` armor but adjusting the top of the belt looks like a good idea. I have never noticed that stepped area on the lower belt front before, must have been for mobility as the lower image doesn't show any steps. Appears R1 armor splits just like all other armor too going on that top second pic2 points
-
I concur and wish I had done this before painting.2 points
-
Thanks for the input. I have been following your build and have done essentially the same thing. I haven’t posted photos yet, but I picked up a black EVA Foam mat At Harbor Freight and cut some strips and affixed them inside the shin using double sided tape. I originally had too much padding, which definitely cleared the knee, but made me look like Puss in Boots. Yesterday, I removed a layer of padding and removed the rear cover strips and trimmed the shins a little more. I like the look now and the sniper knee barely touches my knee cap. By the time I trim the sniper knee a little, I think I’ll be in good shape.2 points
-
Hello~ I was guided here from the Florida Garrison, so I'll make my introduction. My name is Cainan, though most online know me by Mr. Nova. I'm 31 years old, and currently reside in SWFL, but I'll be relocating to Jacksonville, FL in the upcoming months. Currently, I have no armor, but I would very much like to create the first 501st approved Phase Zero Dark Trooper. The Dark Trooper has been my favorite trooper for well over a decade, and I've always wanted to be able to bring him into reality in the 501st. Hopefully, I will be able to do this with your guidance, and assistance. Anyways, as I listed in my Florida Intro, I'm open to any and all questions, so please feel free to ask! ^^
 2 points
 -
Ready for paint then install the power cylinders. Lots of taping first.2 points
-
The magazine is done, I cracked the corner but it won't be seen in the well. I hollowed out the mag no make room for the battery. I made the mag cover from aluminum. I etched the lettering using a dremel with engraving bit.2 points
-
The elastic is both brown AND black. The way it is fixed to SU costume is with the brown side facing downwards and black side facing up. That applies to the DT, ST, TK and fair to assume Tanker and ATACT.2 points
-
After I marked up the belt and barrel, I spread putty on the chest, back, and shoulder straps. Then I applied putty to the side plates. One was WAY WORSE than the other...1 point
-
So I was thinking about how to fix the belt notches and came up with the idea of cutting off what's on there and trimming down 7mm (equal to the current ones) to make new notches. That would move the belt up a little, letting me wear the barrel a little lower and still bend my hips. The belt would still be wide enough for the ammo boxes. Also, I would trim that 7mm off the barrel's bottom, and even a bit more (probably 1.5cm total). There doesn't seem to be any reason to keep the current 8cm strip across the bottom, but I'd still leave some to put a few velcro squares, preventing the belt from rotating. I didn't see anything in the CRLs regulating the width of the belt, and I figured this would allow me to make the notches fit more cleanly. What do you say?1 point
-
the putty does remove the primer sometimes happens to me all the time but doesn't cause any actual issues once sanded1 point
-
Another awesome build Justin1 point
-
HELMET: I am using the Anovos Standard TFA Helmet. The one in the pictures below is one that I already have. It is a great candidate for painting since I have a few finish issues on it. I am planning on using the following paint, unless people are aware of a better option. I did paint a helmet for someone many years ago and it looked really good. This was from a previous paint job using the above paint. This is NOT the helmet I will be using. Pictures were taken in 2017 and not the final of the helmet. This in ONLY to get feedback on the proposed paint. Comparison of Figure / Book Jacket back cover...Colors are difficult due to quality of pictures. I am definately going to need a better one of the figure and another of the back of the book (if anyone has access to it).1 point
-
Good catches! At least they are super easy fixes, thanks for the feedback! Pics are uploaded in the original post.1 point
-
Oh, dang. It looks like they started soon after I had first attempted to begin this project back in 2015. Looks like there will be a few Dark Troopers, soon! Thanks for the links!1 point
-
A couple of things you may want to address before the DO's get here: You will need to move your drop boxes to the ends of the belt The drop boxes dangle from the sides of the front plastic belt (ammo belt) via white straps and are aligned under the plastic tabs of the ammo belt. TD screws should be black Clips shall be attached with slotted type, flat or dome top style screws, and be black (two per clip) Good luck with your application1 point
-
Nice work, You may also need to provide a few more photos Inside connectors on your thigh ammo strip rivets Also the DO's like to see both sides and front of the sniper plate One thing you could do for accuracy would be to move your TD screws, also the end of the brackets next to the panel do not get rounded corners, but not a requirement Good luck1 point
-
Hi Justin, great to see another great build of yours . One of us will be with you shortly. meanwhile , could you please add the required photos of your blaster? Thanks1 point
-
I was going to do the hot water bath before putting the outer cover strips but was delaying too long so I am going to come back to them when I am fitting everything. One set of outer cover strips curing and I will continue with the thigh sizing. I also ordered the magnets for the calf closures so they should be here soon and the real fun will begin.1 point
-
I’m loving this conversion, and may someday need to do my own as you have, since ESB is my fav of the films anyway. Great work, as always! Sent from my iPhone using Tapatalk1 point
-
The interior cover strips are there for functionality, so they don't have to look pretty and will not affect approval at any level.1 point
-
There will also be a special piece I've been putting together for use in the newsletter for when we reach 10001 point
-
One of the notes I've had was about the clips on my TD being rounded off when they should be straight. I took the time to cut off the rounded portion and move the panel up against the clips so I wouldn't have to drill new holes. I might not have cut it so close to the screws had I used the proper cutting tool and didn't nearly hack off my hand. Be safe troopers! Always use the right tool for the job not just the closest one to your person... Here it is. BEFORE AFTER Reference1 point
-
I think AP is a bit large around the mid section and the right forearm can be funny to fit. I had to do the same on my TD build to make it fit better and look more screen accurate on me. The sizing is probably great for an average body Shape.1 point
-
Finished my tk today, so I'll do my approval pics the next day, maybe I'll catch up1 point
-
Paul has all his stuff available on the “Mr Paul’s Total Grunt fb group, as well as the “Shoretrooper Fam” fb group. Someday I want to build an AT-ACT, so that’s how I found him. Sent from my iPhone using Tapatalk1 point
-
I went out to my local Canadian Tire (general hardware store chain up here) and found some paint that I'm pretty pleased with for an imitation HDPE colour. It could be a bit more Khaki but for an out of the can solution I'm happy with it1 point
-
Received my approval today! Thanks to all for the kind words and encouragement! Next up, EIB and Centurion!1 point
-
He already replied to the [email protected] address, with all the pricing info, so I am all set! Thanks everyone!1 point