Leaderboard


Popular Content
Showing content with the highest reputation on 07/27/2020 in Posts
-
I don't know about craziest but I've done a few surprise birthdays and weddings, the best was the bride of a fellow member (a stormtrooper) contacted us without him knowing and asked for us to make an appearance at their wedding, the member knew nothing until we came charging out when we heard "does anyone have any reason why these two should not be wed" to which we replied "stop, stop your wanted back on the death star" got a roar of laughs and the member was really chuffed, he couldn't stop thanking us after the event.3 points
-
It appears to be following the angle correctly. For the sniper, I know I had an issue with it digging into my knee when trooping, so I had to modify. Make sure you use E6000 or some other removable glue in case you need to adjust. Here is my sniper, you will notice that I shaved off more to move it away from my knee cap, and the angle is tilted out (away from knee). I also use a pad in the front of the shin to really push it out for walking.2 points
-
We were camping at a big campground at the local lake a few years ago on father's day so I bought my Tk and did a walk through the campground in the evening. The following year we were there on the same weekend and I passed a couple teenagers talking, one one said that at sunset a stormtrooper would come around camp and they got excited. One of the other kids asked how she knew thas and she said, "I saw the stormtrooper's truck". Sadly I didn't bring it that trip and was crushed that I had let them down.
 2 points
 -
I wondered this myself when I first read it the day you posted, and through context figured you perhaps accidentally left out the “not.” But since I’m no expert on the matter I figured I’d leave corrections to you pros. =) Sent from my iPhone using Tapatalk2 points
-
Nice work, for tucking in the butt plate I came up with some V tabs With a heat gun you bend strips of ABS plastic into the shape of a V, only glue one side and the other remains free to allow movement when you bend. Just helps stop the butt plate from pushing back from the back plate. Also your biceps appear to be on a lean on the top, adding some foam to the inner outsides at the top may help bring them outwards and appear straighter. You will also notice the biceps sit a lot lower with ESB compared with ANH almost coming out from under the shoulders Good luck with approval2 points
-
The whole COVID mess has induced some build depression. Like, all dressed up but nowhere to troop. I do need to get back to work on this, if for no other reason than to get the parts off the guest room bed.1 point
-
That’s one of the “wonky” ones to which I was referring.1 point
-
There were some really beauties
 1 point
 -
Yeah that'd be easy enough. Shouldn't be bad since there's no return edge or anything. Thanks!1 point
-
Personally I'd probably trim to match, not that much material would be lost1 point
-
FYI I just opened my BBB over the weekend and after causing my own delay in finishing my bucket, will be following this thread religiously. First TK build for me. Can already tell it will take more detail than building my Clone. Scott1 point
-
Ok, I think I have it all worked out now. Still missing some information but for the most part the roster should be good to go.1 point
-
Looks a bit like a mix between TM and ATA parts but reworked and distorted due to the bad pulls.1 point
-
Reducing the return edge as it appears you are doing will make it easier to reshape using the hot water bath method. Also that crack or snip is another way to bend the part in a particular spot. You can cut a v section from the return edge to emphasize the bend in that are, then simply reinforce and ABS past that area of return edge when satisfied. you can make a few v cuts in a line to make the curve gradual rather than so much in one specific spot in the same fashion they make a curve when bending timber or even metal work if that makes sense.1 point
-
Those pulls look terrible.1 point
-
I'm a bit hesitate about giving more pieces a hot water bath at the moment. So what I'm going to do is read more build threads (especially ones with hot water bath techniques) and shape the other side of the kidney on the weekend. In the mean time, I'll take a break from the plastic and work on something else like the strapping system. I have several packets of snaps and nylon webbing ready to go. And I will use the double snap setting for my build for that extra bit of support.1 point
-
Thanks for that. I'll give it a whirl!1 point
-
You won't match the R1 armor from the Mandalorian it is too much different but there is an Incinerator trooper CRL already from the Force Unleashed which you could aim for https://databank.501st.com/databank/Costuming:TK_incinerator others have converted ANH armor to game versions, check out some of the build threads For the U channel you could contact @sskunky1 point
-
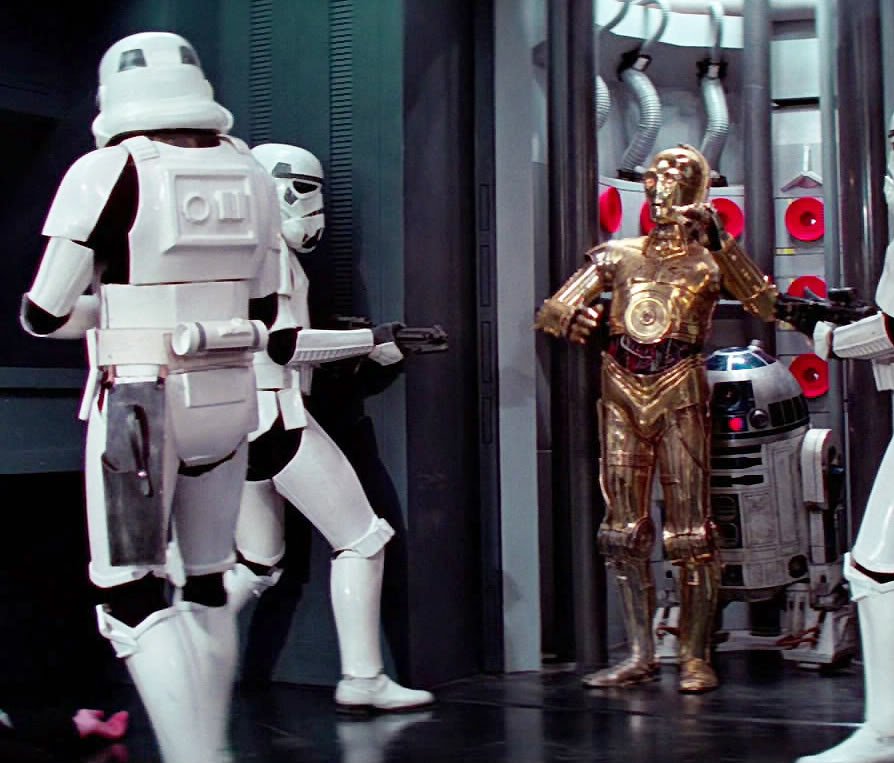
Hi Diego, and THANKS for your EI submission! Before we can move you along there are a few items we need, sir. First up are some of the required photos (examples shown below). 1. Interior strapping 2. Wrist openings 3. Sniper knee close-up (right hand side) 4. Thigh ammo pack (left side close-up) 5. Helmet (left side close-up) 6. Helmet (right side close-up) 7. Helmet (rear) 8. Action shot (choose your own pose) 9. Frown (close-up) 10. Ab button plates 1. 2. 3. 4. 5. 6. 7. 8 9. 10. We are requesting that you add a quick coat of white paint to the ear screws, thigh ammo pack rivets and ab/kidney rivets. (EASY fix)! The screw heads on the thermal detonator will need to be painted black. You will need an ammo (Hengstler) counter mounted on the left hand side of your E-11, as this is a requirement. We will aslo need right and left images. Thanks, and I look forward to seeing the updated photos!1 point
-
With Android I upload to Imgur, then click on the image, then hold thumb on the image, it will open an options page then select copy link, on left, then post into your thread. Doing it this way will give you a link with the image tag, ie: jpg or png and so on.1 point
-
Plus, many folks refer to other's EI threads for builds and when getting ready for EI/Centurion.1 point
-
Hi, ... any Updates with your 850 FOTK build? Thank you.1 point
-
Ok no problem. Thank you for your response.1 point
-
@MaskedVengeance that does sound like a lot of hard work as well! The process of going through was time-consuming, but the end result is absolutely worth it as I'm sure your project will be as well! Not only do I have shots that are easy to reference in high quality (and which can be manipulated to pull more detail), I'm also able to share them out and giving back to the community is something I am interested to do. I'm lucky that I've got some pretty handy tools and smarts at my disposal that have made the process a lot more streamlined (and technically repeatable, with little adjustment, if I get my hands on a 4k copy). Davinci Resolve for video editing to mark the timecodes I wanted to grab stills from, and a program that allows me to make a macro out of any action that I perform, which allowed me to very easily name all the stills for export. It would have taken a lot longer without these. The right tool for the job always makes things go by faster and allows for more flexibility and higher quality in the long run. @ticopowell Thanks for the link! I wasn't aware of that resource. Without digging in too deep, it looks like those are a series of shots from the films at regular intervals. Which is still helpful. My shots are directed specifically toward the stormtroopers and aim to take the most useful images for build reference (though some are for fun). Today I'm working on going through the shots and reviewing the quantifiable particulars between the suits - that's going to be an ongoing process, I may put up a doc somewhere. Aiming to get the helmet completed tonight. Or at least complete enough for review and acceptance into 501st. I'm going to leave internal revisions until after acceptance so that I can hopefully squeak into the 1000 EIB we're aiming for. What's left right now, update late upon full completion: tear and trap stripes, neck edge trimming and S-trim final cut, paint the ear screws white.1 point
-
Good idea, the wait is a pain but well worth it just in case1 point
-
Friend is done priming my Phase 3 helmet! It's now being sent to me to finish up Then it's just the waiting game on my armor.1 point
-
No hay problema... Estoy decidido a alcanzar el nivel 2 y 3, así que haré los cambios necesarios el mes que viene. ¿Necesito dejar este post abierto o abrir uno nuevo? No problem... Decided to reach levels 2 & 3, so I will make the necessary changes next month. Need to keep this post open or make a new one?1 point
-
This armour , which is a bad recast of modified fx armour , is better suited to r.o.t.j. Armour , as that's what it is very loosely based on .1 point
-
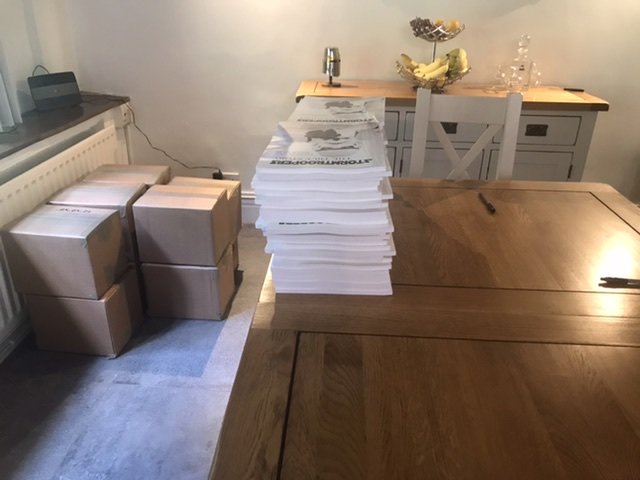
*Update * The books have arrived. We’re busy signing and posting them out. All orders up to 10 th July will have been shipped by Monday 27th July. The book has proven to be so popular that we have ordered another print
 1 point
 -
Just don't rush the painting, sometimes it's better to leave a project to dry properly rather than rushing and having issue with paint reacting when not dry enough, I've ran into this a few times1 point
-
I wet sanded the primer to 400 and washed them off. While they air dried, I sanded the resin and exterior of the shins. I have a question regarding assembly of the shins (which also applies to the biceps and forearms). Jim made these pieces so each half has a cover strip, which helps match the halves to each other. I have heard that coverstrips need to overlap toward the interior (so someone standing next to you doesn't see the seam). That is impossible with Jim's kit, since the left half has a cover strip and the right half has the other. My question: does it matter which way I wear these shins? Either the front cover strips face inward and the back face outward (like in the pic above), or vice versa. Am I worrying too much about something that doesn't matter? Anyways, after that, I applied more putty to the hand plates. The primer really helped point out more imperfections. I looked through my old posts and saw that I was more liberal with the putty on the bucket, to ensure it filled holes and stayed in. So I rubbed putty into the hand plates, instead of scraping it off. Tomorrow I'll sand it to 220 and prime again! I'm pretty sure that'll be enough primer on the hand plates. I was thinking about adjusting my process. Instead of doing a step for every piece (sand everything, prime everything, sand everything, paint everything), I was thinking about staggering pieces. So while I wait for the hand plates to dry, I can trim the barrel, or putty the chest and back, etc. Then I saw @11b30b4recommended that to someone else and I'm sold! That process should help give me an occasional sense of progress and accomplishment. I just need to make sure I size everything together and trim correctly the first time...1 point
-
Hey Jeff, not sure whats going on with your formatting in the first post but the link images are almost off the page, weird Did you copy and paste this in by chance? They need to be placed under the names rather than across the page. This could be a glitch but I haven't seen this one before.1 point
-
This is definitely one of those things where it’s so what you can when you can, like you said. Trying to get as much done on the helmet before I go off back to school in like 2 weeks, bc I probably won’t get another chance until Thanksgiving. And this week has been taken up by my summer class, so yeah. I’ve started too many things and stopped them shortly after, but I will not do it with this, no matter how long it takes! Thanks for the encouragement1 point
-
Man you were busy today!! Thanks for keeping us organized and contributing so much advice to WIPs!1 point
-
1 point
-
Thermal Detonator (con’t): Applied some primer so I could see where I needed to follow up with spot filler. Given how this started out, I’m happy with the result. Question: Did I overlook any details that would hold up approval?1 point
-
I wanted the bolt to look like steel. I’ve masked the parts in contact with the main tube and used the dark grey hammered paint, spraying paint and immediately removing it with a cloth. - picture 1 : aluminum bolt - picture 2 : masking and paint - picture 3- 4 : the result. I've also "painted" the M38 scope text (let it snow, let it snooooow ...)1 point
-
In this HOW TO I'll be illustrating how to modify and attach Wyatt's Imperial cloth gaskets to a FOTK under suit from stormtrooperundersuit.com. After receiving my gaskets from Wyatt my first impression was they appeared flat in thickness in comparison to the rubber gaskets. No disrespect to Wyatt's wife for making these excellent gaskets however, being I can never leave well enough alone I decided to add to the perfection and increase their thickness. Something that also frustrated me about most the gaskets out there was having to buckle the left and right arms together or velcro the gasket to the armor. I wanted something that would basically be part of the under suit itself so that I could step into my armor with less effort, like with a OT TK. To do this I found it easier to just sew the Imperial gaskets directly to the under suit. Items needed: Cloth Imperial Gaskets Under suit form stormtrooperundersuit.com 2" x 6" black Velcro (sew in type) 2 yards of 1/2" polyester filler 2 yards of fabric backing to seal in the filler Tools: Scissors Exacto or similar (split seams) Fabric pencil or similar Sewing machine Imperial gaskets Stormtrooperundersuit.com under suit Starting with the legs, measure, cut and sew filler and backing to underside of knee gaskets. Next, remove stitching from shoulder gaskets seems Sew in filler and backing. With the shoulder gaskets turned inside out, sew the seams together that you separated earlier. Before After. Notice any difference? Returning to the legs. Locate the center of the leg gaskets. Cut a 2" x 2-1/2" section of velcro. Note This only applies if you currently have velcro retaining your knee cap armor. If not you may want to switch or find a way to incorporate your mount into the gaskets. Place the velcro on the fabric and outline Sew in place At this point there's two ways you can go here, either sew the seams together creating a round gasket where the outer diameter is the same at the top and bottom, or you can taper it, like the shape of your leg. If you want to taper it, using a fabric tape ruler measure the upper and lower legs where the gaskets will reside when finished. Cut the fabric accordingly giving yourself 1/2" extra for the sewing seam. Another way to do this is to turn the gasket inside out, wrap it around your leg overlapping one side, using a fabric pencil mark the over lapped section. Don't forget to add 1/2" for seam. Sew the seam. After With the armor knee cap. With under suit With armor, test fit Ready to sew in place Install leg and shoulder gaskets. Mark under suit and gasket locations. Sew in place. Cut of shoulder gasket connecting straps as they are no longer needed After, front side After, back side Finished I'll try to get a few more pictures with better angles.1 point