Leaderboard


Popular Content
Showing content with the highest reputation on 07/19/2020 in all areas
-
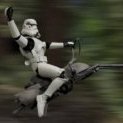
Proud to announce, that my son is officially a member of the Galactic Academy. Cadet CID 5131 reporting for duty.4 points
-
Back plate Kidney plate Butt plate Shoulder bridges For the shoulder bridges, I read about reinforcing techniques to make them stronger. I gathered some scrap pieces of ABS which I will trim to size and glue in the slots underneath. I thought about going the extra mile and strengthing the bridges some more. I was thnking about using these ABS pieces that I would bend to shape and glue to the bridges. More images to come.3 points
-
After consideration and peer pressure, I guess I am going for EIB on my HWT as well but first on my TK so I can make sure my armour is good3 points
-
Hello everyone! Today is BBB day for me!!!!! Im so excited I have a million questions and dont even know where to start! I would appreciate and starting off advice or any advice really. I ordered a ANH kit from Daves Dark side Depot. Thank you in advance!! Stephanie Felton Cadet #20252 points
-
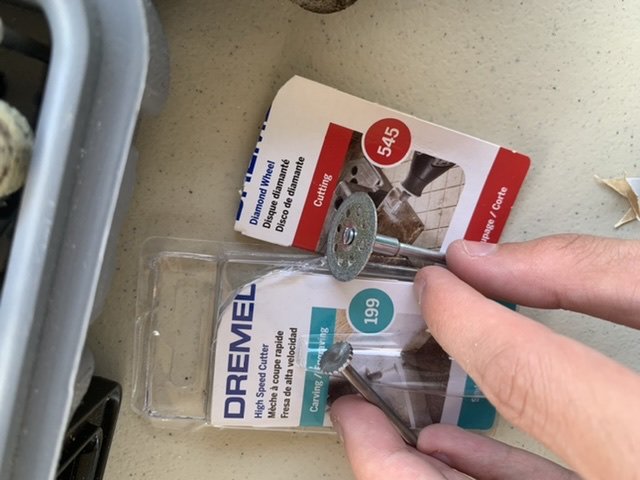
The smaller the bit the more control. Nothing worse than the bit grabbing and taking a chunk out of the side. This is what I normally use but managed to fine a finer one just recently which I've not tried as yet.2 points
-
Apparently FedEx was having me on...as this arrived a couple of hours ago!2 points
-
That's what I did - took about 6" off them. And X-shaped as opposed to Y-shaped? Almost like someone thought of that before linking you ;P Literally the only place I glued on the entire suit was one side of the biceps. I'm afraid gluing and flexing it open anywhere else would damage the suit. Ultra thin Velcro all the way. For filling the oval, I did like a flexible 2-part epoxy, then a skim coat of filler over the top with good results. I'd caution against going straight to gloss white on the sanded fiberglass. 2X says it's primer but it's also about being able to SEE imperfections before final coat. I'm pretty sure you'll see a bunch of pinholes, especially around the edges, if you do. Spraying primer helped me find and sand these, as well as the high and low spots - especially in the thighs. Handguards might be okay, but prime the thighs forsure, imo.2 points
-
It's been good, sadly haven't been able to do much over the past two weeks will get back to it soon though!2 points
-
TFA TD are solid resin and over 1.4 Kg, TLJ is definitely an insert for the tube and much lighter. Yes CRL will be getting an overhaul once Tony is up and running again. New images and addendum for TroS as well. Sorry Christine, back to you now.2 points
-
Stephanie, if you’re doing the Hero TK, I think I might have some bubble lenses laying about. I’ll check when I get home in the morning. You’re welcome to them if they’ll work for you.2 points
-
Thermal detonator fixed with some additional paint. Back to that cod... closer examination of the relationship between the cod and the butt plates (as attached to the ab) showed that the cod was sitting too low, and could stand to be moved up. I noticed this initially when Cameron stood sideways to me. The bottom of the cod and the bottom of the butt plate should be roughly on the same plane, and they definitely were not. I took some measurements, and then took the leap, installing new snaps into the cod to bring it up. The snap placement looks a little wonky, but I can assure you, it will look fine once installed! Okay, so here is the cod installed with the original snaps. Then moved up with the new snaps. Yeah, I guess that I was pretty confident that this would be a better position, just jumping in and installing those new snaps like that! But, hey, it does look better! And in the new position, it emulates the more narrow cod of the TLJ cod shape. Butt plate and cod are in better alignment now as well.2 points
-
ONLY 5, 4, 3 2 1 SPOT LEFT, TROOPERS, SO TIME TO STEP-UP! 1000 Expert Infantry reached! Now that many of us are unfortunately stuck at home and boredom is beginning to take it's toll, it's time to wipe the dust off of that armor bin and become a part of FISD history! Instead of binge-watching re-runs, we are suggesting that you put the D.O. Staff to the test and spend some time on that white armor you miss wearing so much by applying for your Expert Infantry badge! As you may be aware, we are aiming to have #1000 approved by the end of the year. We only have 2 to go, so in order to reach that goal we are asking that you read over the CRLs for your particular armor, (this thread will help) make any necessary adjustments and post up your submission! Photo Checklist- Link here Apply Here Questions: 1. Not sure if I have what it takes to get my EI badge- You don't know until you try, and you have not only the D.O. staff but an entire Detachment to help! 2. I need some repairs/fixes first- This is why we are here! We honestly want you to succeed and are here to help in any way we can. 3. I am happy with the way my armor looks, so why bother?- It not only makes you look more screen accurate, it instills a sense of pride and "esprit de corps"! 4. What if I don't make it? No worries, we will provide detailed suggestions on how to reach your goal! Benefits: 1 Bragging rights for being one of the "Original 1000" 2. You get a cool badge under your name here on the FISD. (Street cred). 3. Access to EI rocker badges (coming soon) to go above your FISD patch (also coming soon)! 4. Access to coin runs for EI awardees only. 5. Certificate for your accomplishment. 6. You will have a more screen accurate looking set of armor, and be one step closer to Centurion!! 7. We are planning a VERY special piece of one-time-only FISD Exclusive merch to honor hitting this milestone! Know that the entire Staff and those who have reached Levels 2 (and 3) are here to help in any way we can, and that you are more than welcome (and encouraged) to ask any and all questions you may have here on this thread, or contact myself or Sha Sha. You can do it, Troopers. Let's turn this "anno horribilis" into a banner year for the FISD!1 point
-
I used some spot putty for those nicks, then filed and sanded so they somewhat blended in. Turns out barely noticeable [emoji2371]1 point
-
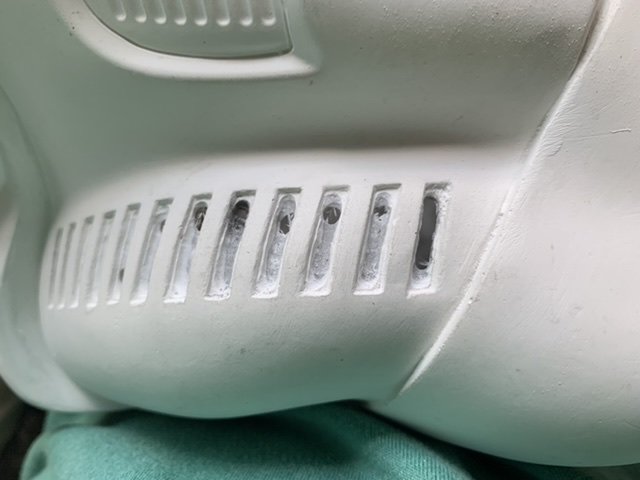
Alright so this is the bit I used first. They didn’t have a lot of options at the Lowes near me, but I did manage to pick up a cutting bit and also the same wheel you used DarthBiscuit. After some filing, it turned out pretty good for the time I had left today. I did however nick the top of the 7th one (forgot what they’re called), so that’s not good. Not entirely sure how I’m gonna fix that, but I’ll cross that bridge, along with any other mistakes I make in this stage, when I get there. Any advice would be nice. Thanks
 1 point
 -
Congratulations1 point
-
Naptime got messed up today, so I didn't have long to work... I focused on the thighs, so I can re-resin the interiors tomorrow. Sanding went well, then I used one of my trusty files to clean the cover strips. Such great detail in Jim's armor! The seam where he attached the front to the back needed a lot of sanding. I'm sure that's the spot Justin referred to when promoting primer! The repair I made looks great (that off-white spot on the top right)! I had put E6000 in the crack, let it cure, applied resin to the interior and exterior, then laid a square of fiberglass cloth across the inside. It flexes just fine with the rest of the thigh!1 point
-
I think I'm done! Well maybe a clear coat since I have already noticed some premature and not intentional wear from my constant fondling on my newly completed happy thing. Commence photo dump: The wires are snugly concealed under the scope rail. Blast "em!1 point
-
Insert happy dance Wooohoooo, now open that box and let the panic set in1 point
-
A minor update: I’ve been painting and sanding the helmet in Gloss white for about a week (not as many coats as you’d think, since it’s been hot and rainy most of the week). I’m slowly getting better at painting, and the layers have been building up, so once I get a pretty good coat on it with few runs, I’ll sand it down with something like 600-800 grit sandpaper to fix whatever issues the surface has, then polish the hell out of it with 1k+ grit sandpaper. I think that should take care of the white. I’ve also attached the shins in the front, and done some test fitting and trimming of the forearms. I’ve got snaps in place on the abdomen, but I realized I should probably do all my test fittings with the undersuit, gloves, and boots on at a minimum so I don’t end up having to re-trim. I’ve got a (level 1) undersuit coming via Amazon, and I’ve had the Imperial Boots boot and glove combo for a while, so I’m just waiting on that to come in so I can start making my harness for the abdominal plate. Slow and steady progress is being made.1 point
-
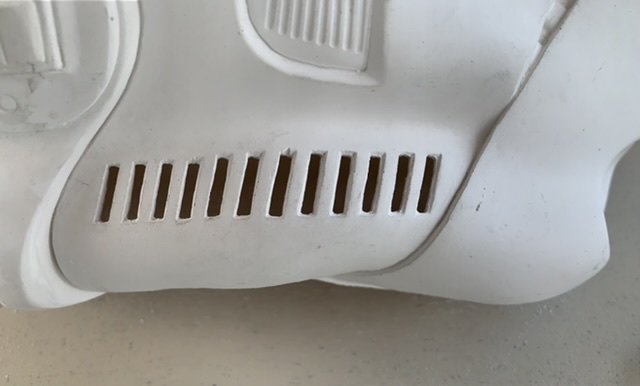
Alright, using the Dremel tool at my dad’s today. I was gonna start on the helmet yesterday, but it was waaay too hot. Not much better today, but it’s only gonna get hotter the rest of the week, or rain. Here’s my progress so far. I’ve only done the right side. The dremel bit I’m using might be just barely too big to go through all the way on this bottom section, and definitely will be too large for the top, so off to Lowe’s to get a smaller bit and some hand files. Thanks for watching.
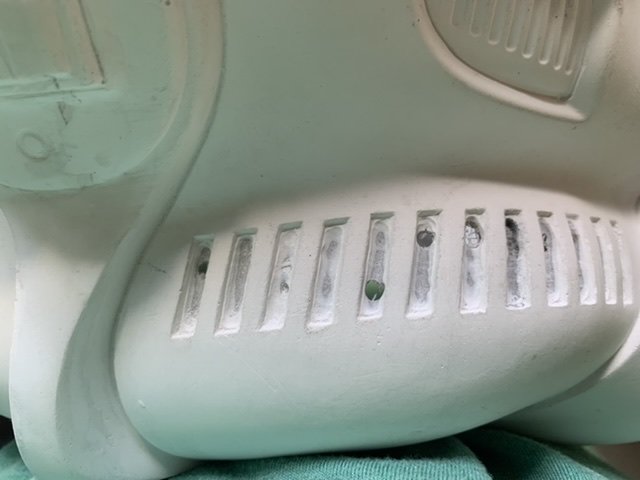 1 point
 -
I don't really want to mess up their nice stitching, but your recommendation makes me think I could over lap the back straps and sew them (I'll post pics if I go that way). I'll probably wait until I fit the barrel and figure out how much I'll cut off, then I'll know where to snap the suspenders and how long they'll be! I think you've both convinced me that gluing before painting gloss will be best! Actually, these aren't the ones you linked, but I did follow Related Items, so you still get credit ;-) I think the difference was I originally looked at normal suspenders (that were Y) and you pointed me toward hockey goalkeeper suspenders (standard X). So good call! I may only glue the biceps as well. The wrists of the forearms seem a little narrow, so I may need them detached to put on (maybe glue one side, velcro/magnet the other?). I still haven't decided how to attach the shins. I don't want them fully glued in the front, since they'll crack at the top/bottom. I'm thinking a short strip of glue in the middle (to hold their position) and then elastic inside across the top/bottom. I may be able to get away with just velcro instead since my stuff has some give to it... I ordered more resin hardener since I still have some resin left. I'll use the to fill the oval, then sand it and even it out with putty. You got me, Justin. I'll prime. You're right, and I was just trying the quick way. Better to do it right the first time!1 point
-
It's ANH Ep4, just waiting to see if its Stunt or Hero version1 point
-
Deep breathing may be needed, that and the odd alcoholic beverage1 point
-
Yah! Peer Pressure!1 point
-
Fantastic work as always Cricket1 point
-
Firstly are you building a Stunt or Hero version, CRL's here: https://databank.501st.com/databank/Costuming:TK_anh_stunt https://databank.501st.com/databank/Costuming:TK_anh_hero For stunt you don't need bubble lenses: Lenses are flat material, green in color, sufficiently dark enough to obscure the costumer's eyes. Here is a spreadsheet of the differences https://drive.google.com/file/d/10tEVteIreh6AHMogW010cuH_Bf8TBfU6/view Some bubble lens sellers in this thread https://www.whitearmor.net/forum/topic/44782-bubble-lenses/1 point
-
Here is a recent approved Centurion WTF kit for comparison You will however need to fill the open section in the lower ridge, either ABS scrap glued behind or add ABS paste and fill/sand/polish1 point
-
I'm onto gluing the thighs now, and ran across this neato problem...any suggestions on how I should make this flush? Am I able to just cut the cover strip at an angle? Is that L2/L3 legal? Lol1 point
-
I’ll be able to say “I was there, but then COVID happened and I had to sell my incomplete TK armor.” Hopefully in the next several years I’ll be able to save back up to repurchase and get into the first 1k Centurions. Sent from my iPhone using Tapatalk1 point
-
Steve McDaniel 11764 EIB Letter size Joseph http://www.whitearmor.net/eib/certificates/11764-eib.png 2951 point
-
Hi Rob, for me , the helmet is the most challenging part of the armor build. Glen has gave you so useful info and I can add the following saying: "Measure twice or more, look at , others build thread, reference photos, and trim and glue once" Good luck and looking forward for your advances.1 point
-
My trigger guard got the ol toothpaste and paint treatment as did my power cylinders. Hengstler I ordered from Shape Ways has this handy narrow hole in it. I sent the ribbon cable for the counter, button, and speaker through there after filing it out just a little. My speaker is just ever so slightly too large for the space so once I have a new speaker I will be done!1 point
-
Paging @gmrhodes13 and all others in the know about the TLJ FOTK cod!!! I'm trying to work with the designer of the 3d files on revising his cod file to better emulate the TLJ cod. He's telling me that there are ridges on the front left and right of the cod based on screen caps. Those ridges don't look right to me at all. Can anyone confirm this???1 point
-
Submitted. Waiting hear back. Praying to Lord Vader and offering sacrifices to the Emperor.1 point
-
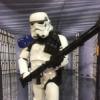
After 8 months of hard work I have got both my ANH Stunt and HWT approved and received my TK designation. I’ve learnt so much from the experiences through all the ups and downs. New friends, new techniques and how to use tools I thought I would never use. Thank you to everyone that has supported me and help during my builds EIB might be goal in the future but I am happy I am finally in the legion Here is my TK first time putting it on to my approval shots: And some action shots from my HWT because I just love these shots Sent from my iPhone using Tapatalk1 point
-
Thanks for the kind words Tino and Brian. You guys along with numerous others whose builds I've reviewed have been an enormous wealth of information and help. Pro tip for today. Drill your holes for the handle into your tube BEFORE you jam all the electronics in there! All along the way you need to be prepared to go a step or two back especially when mixing mods. Today was the day I planned to affix the handle and I rolled the dice. First I realized that I hadn't quite left enough space for the wires and connectors despite shortening the wires previously. I had to make some cuts to the under side of the tube already but today I had to cut a void into the top of the handle. That was a bit nerve wracking due to the wires that run inside from the top of the handle down to the switches. They are no longer anything I can easily remove and set aside. I already E600'd and painted the handle so I gambled and did alright. The only bad thing was that my dremel wheel got going a bit too fast and I altered the paint job between the R and S. We'll just call it weathering! I have only two screws holding the handle on. I might add some E6000 if I start to doubt the two screws but for now it is ON! Then for a functional check. I tried to insert a Gif but it didn't work so here's a still Pew PEW! New speaker comes Saturday giving me a day to finish prepping the Hengstler and tidying up some smaller details.1 point
-
NEW Visual guides created by TK-50297 Wingnut65 Printable PDF below 13 FISD Rogue One L3 Centurion - Ver 001.2020.pdf1 point
-
Alright, been a couple of days since I've updated, but I've been hard at work at finishing this helmet. I've been told by friends that the helmet is the hardest part, and frankly I believe them now. But finally I'm done with the painting! Granted, I definitely do not have the hands of a painter (my hands shake a lot), but I think I did a pretty OK job on this I had a lot of trouble with the lenses, mostly because the lens wasn't long enough to reach the ear screws, so I made some pretty bad cuts in it's place...oops. I tried using hot clue, but it just didn't work that well. Before I knew it the lenses were pretty scratched making it rather hard to see out of the helmet, so I ordered a new lens to replace it. Oh well, looks pretty good though otherwise! Now onto the arm portions of the armor. Hoping it will be much easier lol1 point
-
Printed BlasTech SE-14R, completed Sent from my iPhone using Tapatalk1 point