Leaderboard


Popular Content
Showing content with the highest reputation on 04/27/2020 in Posts
-
Just need to complete my blaster and submit. Now to get that nose to the grindstone.4 points
-
Same old story here! 40 y/o man child who grew up on and with Starwars! I work in the Emergency Room at a local children’s hospital and ran into a few of the local members cheering up the kiddos. That’s when I knew I wanted to join the cause!! So looking to build a kit!! Sent from my iPhone using Tapatalk2 points
-
good morning troopers! after having my Anovos armor for around 4 years built and ready to go im FINALLY going to submit for approval. Im approved as Kylo TFA, Tie pilot, and Scout, but figured the quarantine would be a good time to knock the dust off my TK, and get it official.2 points
-
I fixed up the top inside of the thigh and also took 1/4 inch off the bottom. As you can see, the armor extends bellow my knee. Sent from my Pixel 3 using Tapatalk2 points
-
We will organize Whatsapp armor partie to assemble it in L3 accurate when he has his armour at home. I'm sure that he will be a good "assemblist"2 points
-
So it turns out my wife is a bit of enabler. Around 10 or so days ago she starts asking about why I don't 3D print a costume, to pass the time during lockdown. Maybe a Death Trooper like our friend did or maybe a First Order Stormtrooper..... So I present the next in my semi regular series I like to call: Projects I am starting but may not finish. I know someone who is also printing one and also asked around and also asked a few UKG FOTKs for a bit of advice. I am going to be using these files: https://www.cgtrader.com/3d-print-models/art/other/star-wars-tlj-storm-trooperhelmet-chest-shoulder-armour-ep8 They aren't perfect, I've already adjusted a 1 file for accuracy and will probably need to adjust more either before or after printing. They also will need adjusting for fit, there's far less flex in this than with the ABS or Jim kits. I have printed 2 Ab sections and stopped to double check my measuring. Once I am happy I'll probably need to start over due the below Another isssue I have found is as I need to scale some things, I have to do multiple items as a group so they all scale from the same point, and will still fit after printing. I am using meshmixer to do this, though I have also bought armoursmith to try help with the sizing. For example if you scale the ab section and the boxes seperately then once you go to fit the boxes to the plate the fit is off and so it won't sit properly. To get started I didn't have a huge amount of filament, so whilst I waited for some more to arrive I printed the knee plates, hand plates, and the helmet beak which used all the filament I had. I ordered some Monoprice PLA+ to try and it seems to be a good choice so far. It's cheap, prints good enough that the mandatory sanding won't be a nightmare and also takes the afore mentioned sanding well. The first "fix" I have done is to improve the accuracy of the hand plate. The "indent" that face forwards was just no good. Rather than try fix it with filler and drills I went back to the provided V1 file where it was missing. I took this into fusion and modified it with a far more accurate version, or at least I hope so. I also, after a EPIC screw up by the main UK video game store, treated my self to a DLP resin 3D printer to chear my self up. Not gotten far with this but have printed some of the helmet detail parts and plan on printing all small details on it as I get to them. There's a bit of a learning curve, as with all new technologies, but I'm starting down the path. There were a few failures: and some sucesses: Looking forwards to getting better with this technology. So on to things I already have: 3D printed SC-44C, TFA version needs finishing. I'm not sure if I'll swap to the TLJ yet as they are rather close from more than a few inches away. 3D printed F-11D Standard by 5th Horseman (also needs finishing) The blasters will be getting some new parts from the resin printer so they look better, also getting the paints I need may need to wait for the world to re-open. I've also ordered the smallest torch I could find and have modified the 2 parts to try and fit it. I'll start a build thread for that at some point. Ordered: Imperial Boots Imperial Boots Gloves - bit nervous of these as I was between sizes and they aren't cheap. But I HAVE lost feeling in my hands due to gloved being too tight which took days to return to normal so I hedged up not down. Lots of work to do yet, and not sure when I'll be ordering things like the gaskets and undersuit/some shiny shorts. I also need to find some more reference images, and dig through some more build threads to check things like fit and position of where things sit etc. Learning curve example: Whilst taking the photos this morning I noticed one hand guard was missing it's bottom layers! I was playing with the settings on the print and clearly pressed the wrong thing. Not a huge issue, I can fix this part with some filler but just shows some of the issues you may run into on a build like this. Worst case I can re-print it's about 3h a hand guard. I also plan on casting these for both fun and to be able have a couple of spares in the case.1 point
-
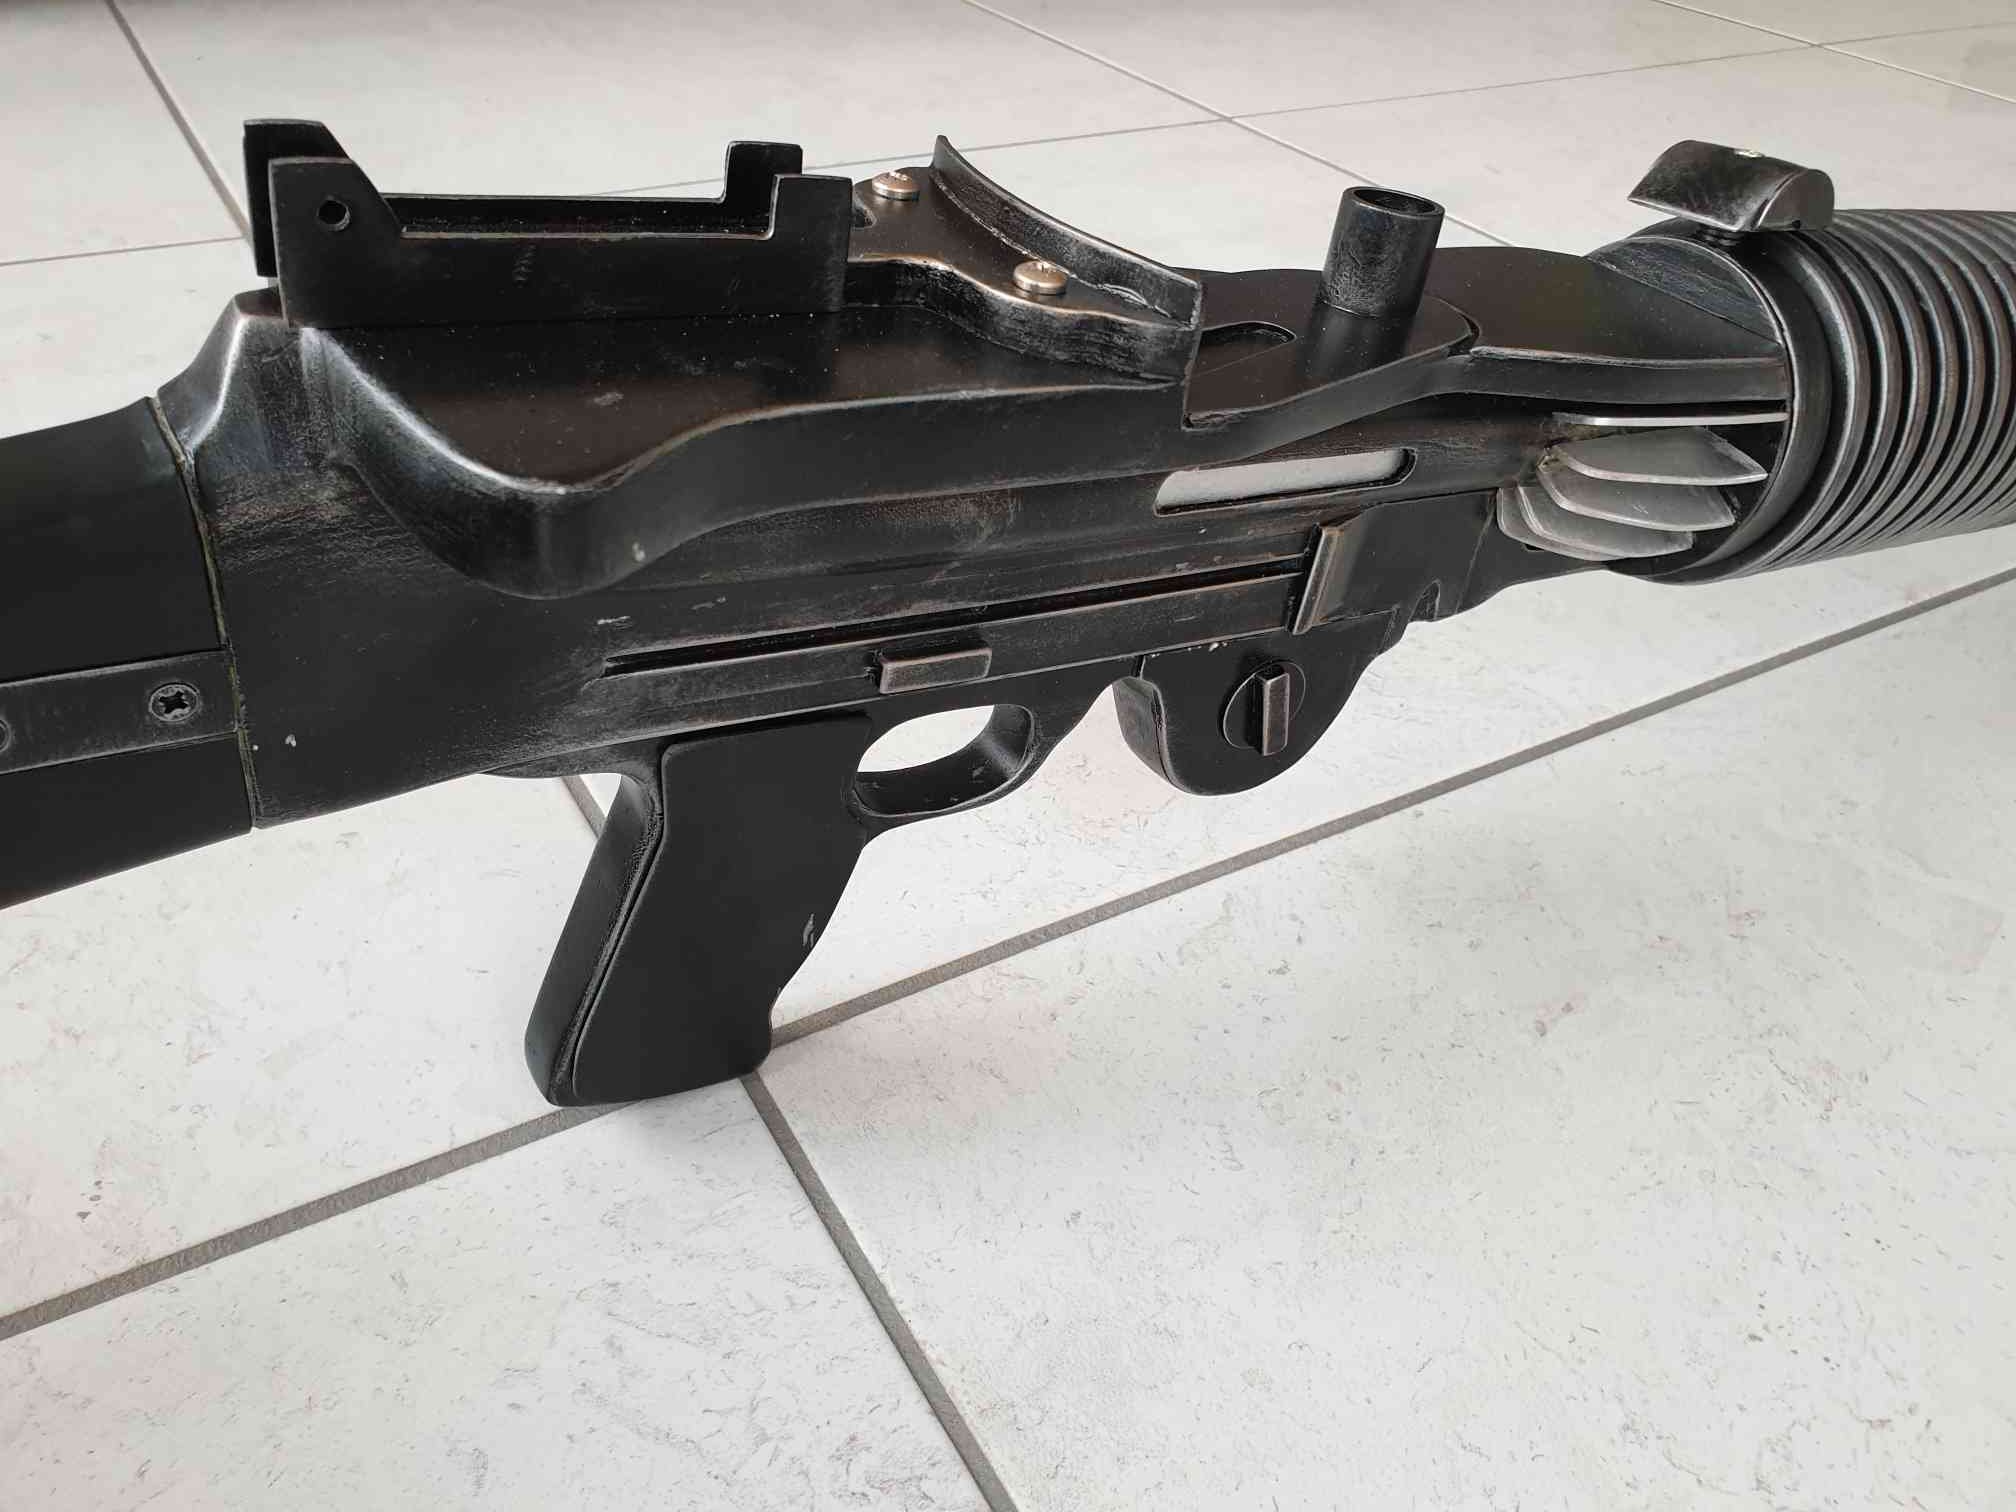
Like a lot of us I have had more time on my hands than usual lately. So after stumbling across Pandatroopers plans for a T-21 light repeating blaster I thought I'd give it a go. The biggest problem I had was purchasing materials as most suppliers around here are currently closed. So I realised I was going to have to make it from anything I had lying around the garage or work. Being in the construction industry this wasnt too difficult. The pine timber and plastic pipe were easy to find but the only plastic sheeting I could find was an old shed window. Using all this and some old aluminium strips I had lying around I got to work. The whole build took 2 weekends and the evenings in between. Unfortunately I didnt take many photos early on but lesson learned for when I build another. After looking at some of the great builds on here, I think I need to up my game next time but I dont think the result is bad for the time it took to build.
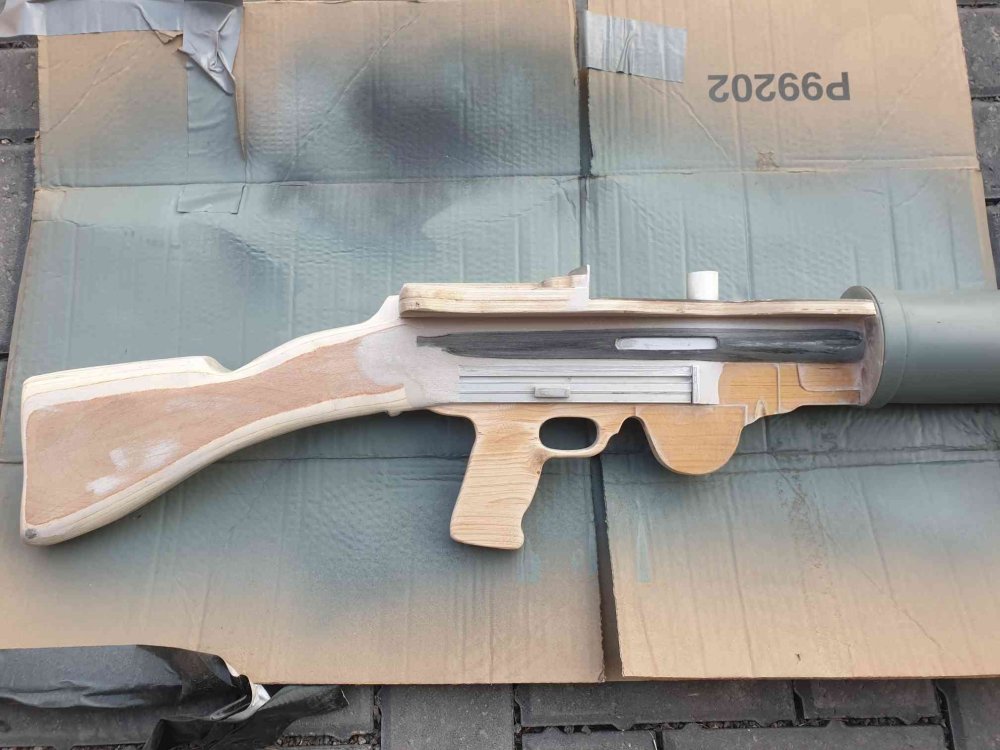
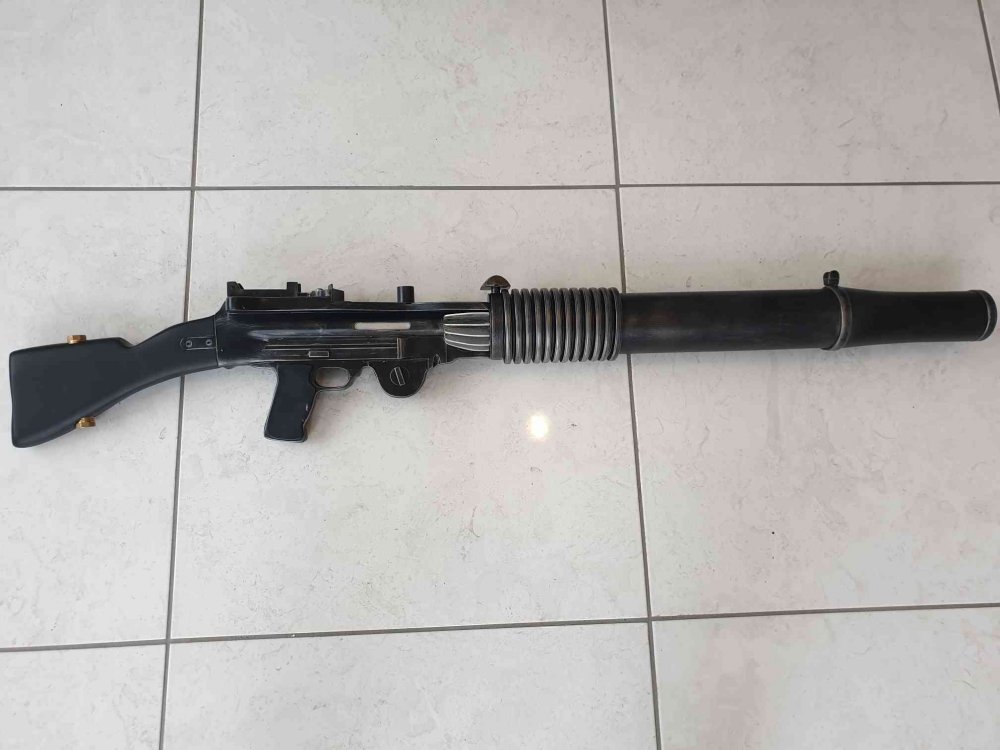
 1 point
 -
ONLY 5, 4, 3 2 1 SPOT LEFT, TROOPERS, SO TIME TO STEP-UP! 1000 Expert Infantry reached! Now that many of us are unfortunately stuck at home and boredom is beginning to take it's toll, it's time to wipe the dust off of that armor bin and become a part of FISD history! Instead of binge-watching re-runs, we are suggesting that you put the D.O. Staff to the test and spend some time on that white armor you miss wearing so much by applying for your Expert Infantry badge! As you may be aware, we are aiming to have #1000 approved by the end of the year. We only have 2 to go, so in order to reach that goal we are asking that you read over the CRLs for your particular armor, (this thread will help) make any necessary adjustments and post up your submission! Photo Checklist- Link here Apply Here Questions: 1. Not sure if I have what it takes to get my EI badge- You don't know until you try, and you have not only the D.O. staff but an entire Detachment to help! 2. I need some repairs/fixes first- This is why we are here! We honestly want you to succeed and are here to help in any way we can. 3. I am happy with the way my armor looks, so why bother?- It not only makes you look more screen accurate, it instills a sense of pride and "esprit de corps"! 4. What if I don't make it? No worries, we will provide detailed suggestions on how to reach your goal! Benefits: 1 Bragging rights for being one of the "Original 1000" 2. You get a cool badge under your name here on the FISD. (Street cred). 3. Access to EI rocker badges (coming soon) to go above your FISD patch (also coming soon)! 4. Access to coin runs for EI awardees only. 5. Certificate for your accomplishment. 6. You will have a more screen accurate looking set of armor, and be one step closer to Centurion!! 7. We are planning a VERY special piece of one-time-only FISD Exclusive merch to honor hitting this milestone! Know that the entire Staff and those who have reached Levels 2 (and 3) are here to help in any way we can, and that you are more than welcome (and encouraged) to ask any and all questions you may have here on this thread, or contact myself or Sha Sha. You can do it, Troopers. Let's turn this "anno horribilis" into a banner year for the FISD!1 point
-
Name: Ted Christian Quisumbing TKID: TK-35679 FISD Forum Name: darthcue Garrison: Cebu Scarif Garrison Sent from my LYA-L29 using Tapatalk1 point
-
Hello everyone. Just thought I'd say hi. I've been checking out the boards for a while and to be honest i don't usually do things like this but my interest and thirst for knowledge made me do it! I may not get too involved by posting regularly but I've seen nothing but good and positive posts from everyone so here i am. I've been a member of the ukg for around 14 years and have owned my armor for approximately 16 year's so like me it's starting to get a bit old and tired but still functioning ok.1 point
-
Hello Thank you for the Reply back and I just sent him an e-mail Thank you Again Cheers Peter Bond1 point
-
I don't recall Spec ops have a pre-approval thread. I have a Shadow at the "Specialist" level and would be happy to look your armor over if you'd like. Can you post photos from all 4 sides, including with the arms up.1 point
-
When Covid-19 finish and post office will run again, we will begin and he will put photos, of course But I think this will still take a few months1 point
-
Definitely check out Spec Ops, and also good job on your build. The main thing to note is, maybe lower the chest so that it overlaps the ab plate more, and maybe being the shoulder bells in a bit, just to complete that look. Good luck on approval, and nice job.1 point
-
Ooh ok thank you!1 point
-
Lol. I did the exact same thing. It might be easiest to just re-order decals or... you could consider painting (more screen accurate - wink wink). Yeah, those last few stripes under the ear should go. Looking good otherwise.1 point
-
@TKSpartan- I haven't tried a hairdryer, but it's so small I'm not sure if I can work it out without tearing it more. I may try and see what happens. Worst case I order another set of stickers.1 point
-
Thanks for all the help and info! I'll be sure to check out uk garrison this week too, thanks Dan.1 point
-
You should be OK leaving the outside return edges on those biceps, but I would be more concerned with the insides. Remember, you will bending your arms most of the time while trooping, and leaving too much edge on the inside bottom and top ("scoop") can will cut into you ("armor bite") over time. The same goes with the scoop on the tops of the forearms. This thread will provide some more insight.1 point
-
Hi Ted, and THANKS for your EI submission! Either Sha Sha or myself with be with you shortly, sir.1 point
-
Thanks all. Yes vintage is a great way to put it. Nice to be welcomed so warmly.1 point
-
Hi Cameron, glad to see your EIB submission . I think you may want to add some more photos in advance that I'm sure the D.O. Team will ask you to add. 1- Photo of your helmet lenses form outside with a light source inside to see the color : CRL : Lenses are flat material, green in color, sufficiently dark enough to obscure the costumer's eyes 2- Close photo of your inner Chest to Back connection to check the Fabric or Elastic . CRL : Chest and back shall be connected with a white fabric or preferably elastic strap at the shoulders. reference 3- Close Photo of the rivet in the lower Cod Area to see the rivets Crl: A split (bifurcated) or single cap rivet is present on the lower tab (cod area) of the abdomen armor. Rivet on must be brass or silver in color, approximately 5/16" (8mm) in diameter and is not painted. Two male snaps are present on the lower center tab of the Posterior Armor. something like this 4- Close photo internal and external of both sides of your tight ammo belt CRL: Thigh ammo belt is attached to thigh with a solid head rivet, painted white, in the upper corner and fastened to the lower thigh ridge. The rivets used shall be single cap, double cap or split rivets. No pop rivets allowed. Rivet should be approximately 5/16" (8mm) in diameter (exterior). 5- Close photo of both sides of your sniper knee. CRL : Sniper knee plate must be aligned with the ridges on the shin. Sniper knee plate must not have visible rivets or fasteners attaching it to the shin. 6-- Close Photos of your boots CRL : There is no seam present on the front of the boot. Boots have a black sole 7- Close photo of your Belt and Holster. Any additional photo or other requirements will be adressesd by the D.O. Cheers and Good luck with your application Trooper !!!1 point
-
Hi Antony, looking good. for Anh helmet yes, for levels 2 and 3 you need to piant the outer ring : crl "Correct 'Hovi mic' aerator tips are present. Screens used shall be of a wide type mesh, with the rim of the mic and the inside white or painted white. Have you tried to smooth the tear using a hair dryer ? I think I would help.1 point
-
Hello and welcome aboard, some great info can be found in the "Getting Started" section, also check out some of the builds, makers names are usually in the build titles Good luck1 point
-
Welcome to the FISD. You’re up a bit from me but I’m sure I’ll run into you once you’re all up and running. Chris1 point
-
Hi Stuart, Welcome aboard. :-) Some great advice, above. We are lucky to have (in my opinion) the world’s finest armour makers based in the UK. As mentioned, at the top end you’ve pretty much got RS and Troopermaster. Both are exceptional, just in slightly different ways. Either will offer more accurate products than Anovos so your plan to purchase all in one go gets a thumbs up from me. If the budget is a little lower, check out RWA Creations and DA Props on Facebook. They both offer excellent value for money and great service. As Tino mentioned, my first suit of armour is RWA and I’ve been very pleased with it. Make sure you sign up over at www.ukgarrison.co.uk and myself or one of the other TK armourers will be happy to guide you to clearance. Any questions, don’t hesitate to ask. :-) Best wishes Dan1 point
-
CHEST PART 2 Another tricky part. The problem for me as I am 170cm (5'7"), which means I am a smaller size compared to what the armour is meant to be for. As such, I need to make my chest more snug than it is meant to be. With the girth of the abdomen piece with the TD, I had to make my chest piece wrap around these snugly, almost no play. If I give some gap, the chest would look oversized. The lucky thing about my size is I am able to glue shut one side of the chest and still squeeze my head and hands through, so I only have to make one side functional, which I will do with magnets. So here is one side glued: And this is how it looks from the outside. On the other side, I indicated where I would drill 3 holes for the magnets to be insetted. And here they are drilled. They are 22mm holes, and I will be using 20mm magnets, so I needed the holes to be slightly bigger for the magnets to go into this recess easily. Next up, I fabricated the "female" magnet holders. I drilled an acylic plate with a 20mm hole to snugly fit the magnet, and another plate wth 22mm hole which will be glued above it, forming the recess of the female magnet. After I glued the magnet into the 20mm hole, I glued the plate with the larger 22mm hole over it, and sanded and rounded the sides. Had to make 3 sets of these. Then I glued these sets below the 3 holes I drilled on the back piece, and then added a thin layer of black foam into the recess, so that when the magnets clasp, the force is cushioned and I don't risk breaking the very brittle Neo-dy magnets. Finally, I glued the "male" magnets on the end of the chest piece. The joint is snug and strong. The photo below shows the inside of that clasp with the 3 magnets. And this is me test fitting it again. As mentioned, notice how snug I need the chest and yoke set up to be around my abdomen piece. But I think it looks sleek. Next is the covering of the pill boxes (with mesh and gaffer tape) and the centre vent (with gaffer tape). They are both secured with Duct Tape. How both looks from the inside,. And how they look from the outside. And finally, can't help to assemble what is completed onto my manny. Getting excited now that it is looking more and more like a Shiny!1 point
-
Weather was beautiful for outdoor sanding yesterday, and I really made good use of it. I used the tip that Lou suggested about having a fan nearby while sanding, and it really made a difference! I was still quite dusty by the end of the session, but far less than I typically would have been. And the fan kept me cool, so that was a nice bonus as well! Here is the result of 2.5 hours of sanding, using 120, 220, and 400 grits with my Mouse sander. I don't have the belt or ab boxes in the shot, but I can assure you that they also got the sanding treatment. I will be doing some additional filling in of low areas on the chest and ab plates, namely at the mid-seam areas. I want these to be completely smooth, and I can still see a little dip below the seams. Another layer of Apoxie Paste should take care of things. Oh, and even though I remembered PPE for my lungs (P100 respirator), and my eyes (goggles), I totally forgot PPE for my arms. I haven't been out in the sun in months, and I am paying for it today. My left forearm is now two-tone pink. Gah! Don't be like me; if you're wearing a short sleeved shirt, wear sunblock when working outside!1 point
-
Thanks All, my WIP is underway on UK Garrison, I will replace my proflie photo from that inferior helmet once mine is finished. Looking forward to meeting some of you once the world has returned to some normality & my build is complete.1 point
-
I will add, and also have this added to Joseph original post, but there will be a very special piece of merch available for when we hit the 1000. Something to celebrate this auspicious occasion. It is already in the design phase, and will honor the old and the new. It will be a one off run as we only get to celebrate this milestone once, and I know you wont want to miss out.1 point
-
I would love to be in the first 1000, unfortunately I’m only 16, and the 501st age restriction is 18 Oh well, I consider myself the luckiest guy in the world to even have stormtrooper armor1 point
-
Fingers crossed that Dave’s Darkside Depot ships my armor in near Centurion status if I can just wear it right! (if I gotta cut, paste, fold, or spindle it - “mutilate” will be the operative word. I got no skills)1 point
-
Most welcome! That’s what build threads are for! I learnt from @ukswrath and @JAFO’s builds too. Glad I could share! Yes that is the Empire 3D, but I hooked up with them over FB. Here’s the link: https://www.facebook.com/Empire3d/1 point
-
Great job on the trimming. Looks about right. When you stick the button covers onto your new belt, just note that ideally they should not touch the edges. There should be a little gap between the button and the edge of the ammo belt. :-) A little like this, perhaps; Great work, Jonathan.1 point
-
Hi Jonathan looking good so far, that's exactly what I would do.1 point
-
looking good so far. .1 point
-
Upgrades because… Since I am no longer working on a Sandtrooper, its just easier for me to keep all of my TK content on FISD. As previously mentioned, I posted this on MEPD but I am transferring it here for anyone who finds it useful. NOTE: this build thread outlines me using ½” thick Sentra as the base material; however, the Sentra snapped at the stock after I finished the build. In March 2019, I rebuilt the gun (a third time) where I used a planed down white pine board as the base material. Everything else is the same as you will see in this build. So, I recommend you use white pine, it weights less than the plywood and is more rigid than Sentra. Finding a ½” thick board is difficult. More than likely you will find ¾” boards at any Home Depot and you will need to plane them down to ½”. In my previous build I used plywood as the base material, and it is a bit heavy after trooping with it for any period of time. I also used Spool86's cast kit (heavily modified) for a lot of the parts. I like Spool86’s parts but they are not as accurate as I would like. Also, cast parts weigh more than 3D printed parts and this added to the overall weight. So, I wanted a more accurate and lighter weight T-21. To this end, I have modeled a lot of the parts and 3D printed them. I will make these parts available for free download from my Thingiverse page here: https://www.thingiverse.com/11b30b4/designs So, a few notes before we begin. The overall dimensions are very close to Pandatrooper’s diagram. I will be reusing the already made stock from my original RO T-21 and some of the other parts. I hope to re-use the barrel, but I will need to determine if it will mate with the new printed parts. Yoshix created a thread MEPD to discuss the RO T-21 differences but I had not seen it until now since most of my previous stuff was on FISD. A good catch was the space on the barrel before the rubber tubing. I did not build my previous T-21 with this gap in mind but I will endeavor to include it for this build. Another thing that has come up has been the discussion about the aerial gunner sight. Specifically, if it is an aerial gunner’s sight or as one of my friends has suggested that it is actually a coil cable (think phone cable) as a nod to the ANH T-21 and it is just sticking up oddly. What I am talking about is the red circles in these pics: I believe they are an aerial gunner sight and will be building my RO T-21 with this in mind. Although there are five different variants of the Lewis gun and there are a ton of different manufacturers of each variant I will be primarily using the MK1 variant. There are not a lot of pictures of the RO T-21 and the ones that I have found are lacking in detail. I have collected a large number of detail pictures of actual Lewis guns from across the internet to develop the 3D models. Although I could make a completely accurate model, there are a few areas I will need to divert from to make this something more buildable. One specific thing I have omitted is the underside of the cooling vent area mid-section of the gun. Seen here (yellow outline) is what was omitted for anyone wanting to go overboard in their build. There are a few other very minor details that I did not include in the 3D models but for the most part, they should be correct. I have embedded many of the roll marks seen on various pictures I have found. Most notably will be roll marks on the feed tray. For the base material of this build I will be using ½” (12.7mm) thick Sentra. I purchased a 4’x’8 sheet of Veranda HP brand PVC board from Home Depot for $69.00. Obviously, you will not need a whole sheet of this stuff but its hard to find in smaller quantities. Sentra is PVC board and Veranda is just a different brand. Keep in mind that I am working within the limitations of Tinkercad as I am not a CAD engineer. That being said, here are the models I have built so far. This is the main feed tray cover, mid-section cooling vents and vent housing. This is the center feed tray, ejector, feed operating arm, rear sight mount, forward feed tray, and assembly pegs. Receiver left side. Receiver right side. Rear receiver and stock mounting plate. I have already started printing these parts and here are some of the raw prints before finishing. I have a Prusa I3 Mk3 and I use MatterHackers MH Build series 1.75mm ABS filament. Some tips on printing: Any of the parts with horizontal holes or overhangs should be supported. I printed everything in ABS and to prevent any elephant foot (warping near the build plate) I printed everything with a brim. As for detail I used 0.07mm ultradetail with a fill of 15% for anything that had any detail. I printed the receiver rear and stock mounting plate at 0.10 detail with all the same settings for fill, brim, and support. Update 12/2/19 I have added a few additional 3D models to my Thingiverse for this build. First, I redesigned the rear sight mount. I added the rear sight with roll marks and adjustment knob and combined them with the receiver rear and stock mount plate I modified my T-21 transition to fit a Shop Vac Extension Wand (read further to understand why) and included the front radiator and flash hider, a backing for the radiator, the front end cap ring, and two barrel ends for the sides of the receiver. Lastly, I finished the models off with the two end caps for the oil brush that are mounted in the stock, the front sight, the trigger, and the gas key adjustment lever. Once I finished the models, I printed them, and they came out great. I should note that each file is printed in 0.07 Ultradetail which takes about 30 hours. After printing, everything got sanded and cleaned. After cleaning, everything got primer and then paint. Next, using Pandatrooper’s pattern and making some minor alterations, I cut the rifle out of Sentra. Once I had the shape, I started to dry fit parts and figure out where things would sit. Initially I was using a larger PVC pipe for the sides of the receiver and in these pictures, the lines you see where for the larger pipe. Here I was working out the trigger and test fitting the trigger guard. I reused the trigger from my previous T-21 but I have made a 3D model for anyone wanting to print one. Around this time, I realized the pipe I was using was a bit larger than I wanted so I found some ¾” SDR 21 PVC pipe which is irrigation thin wall PVC. I used this pipe along with a section of ½” Schedule 40 PVC pipe to make the side barrels on the receiver. I cut each pipe lengthwise in half then sanded them. Next, I drilled the ejection port and finished it with the dremmel. Next, I painted the ¾” pipes black and the ½” pipe silver. I glued the ½” pipe inside the ¾” pipe and then test fit them on the gun. Notice the remainder of the glue line under the new pipe, from the larger pipe I removed. This size pipe better aligns with the barrel part of the radiator. Next, I needed to replace the top aerial gun sight that is seen on the Rogue One version of the T-21. On my previous build I used an iron pipe I-bolt. Since reducing weight was one of my primary goals, I needed to find a new solution. I eventually decided to make the sight out of aluminum. I took some aluminum stock and worked it on my metal lathe. Next, I threaded the parts then cleaned the parts for painting. I also needed to remake the aluminum legs that protrude from the stock mounting plate and into the stock. Once everything was cleaned, I painted all the parts with a black bake on metal paint I use for gunsmithing. While the parts were baking, I took a hard look at my previous T-21 to determine what were the heavy parts. As I stated previously, the base of the T-21 was plywood and the switch to Sentra seamed to reduce the weight buy more than half. All the resin parts on the previous T-21 were heavy as well and switching them with 3D parts further reduced the weight. Switching from the Iron sight to an aluminum one reduced the weight; however, I soon realized that one of the heaviest parts on the previous T-21 was at the extreme front end of the gun, the 2.5” electrical conduit I used for the tapered bore of the barrel shroud was very heavy. I originally used this part because the outside diameter was 2.75”. I looked for a good replacement, but I had very little luck. I could special order a pipe with the outside diameter of 2.75” but most of the options were either too expensive, the wrong material like acrylic, had too thick a wall, or weighed too much. I was forced to consider a pipe with an outside diameter of 2.5” and again I was hard pressed to find a light weight option. Eventually, I found a shop vac extension wand a Lowes that had an outside diameter of 2.5” at one end and tapered to 2.25” at the other end of its 20” length. I only needed about 7” in length and if I measured the seven inches from the larger end the outside diameter of the smaller end would be just shy of 2.5”. The wand was fairly thin walled (about 1/8”) and very light. So about $8.00 this should work. I reworked the T-21 transition 3D model and included it on my Thingiverse page. So with all the parts gathered I continued to assemble the T-21. Next, I looked over the reference pictures and discovered that there are only two rings visible on the large part of the barrel shroud. One about 2” from the rear of the shroud and one with the front sight attached to it. There is also only one on the smaller part of the shroud at the extreme front of the barrel. So since I was reusing the barrel from my previous build I needed to remove some of the rings, fill some holes, re-score the exposed parts of the shroud and re-apply the rubber tubing. I used ¼” windshield washer tube for this. I added 4 mounting screw holes near the rear of the shroud that will be covered by the rear most ring and will make the barrel removable for easy transport. I still need to apply the feed tray parts and grips and finish painting then do a black/ brown wash over the whole thing to weather it but it is coming along nicely and the weight is amazingly very very light. I wish I had though to weigh the previous gun for a comparison, but I would say this thing will end up being 1/4 -1/3 the weight of the previous version. Update 12/5/2019 I assembled the radiator, flash hider, back plate, and end cap ring on the tapered part of the barrel shroud. Next, I installed the tapered barrel shroud to the transition then I dry-brushed silver on all the parts and attached the Feed operating arm, ejector, and the barrel ends on the sides of the receiver. I used E6000 to adhere the grip scales then masked off the radiator and bolt and applied a weathering wash comprised of black acrylic and light brown. Once this dried, I applied a flat clear coat over the whole rifle. I think the dry brush will look more natural in these pics. I did the black wash over the dry brush and it mutes the silver. I am inclined to agree with you about using bondo between the transition and the two parts of the shroud. The line between the transition should not be as defined; how that change will need to wait a bit before I can address it. For anyone interested the total estimated weight of the T-21 is 4.5 pounds. Back on topic, the stock is white pine, as are the grips. I made the stock for the previous version of the ROT-21 and re-purposed it here. The stock consists of two halves roughly ¾” thick and 8” x 18” once I have the outside rough shape, I hollowed out the interior with a router then glued the two halves together. The stain is Minwax Ebony with a satin clear coat on top. As for the strap, from the best images I could find I determined the width of the sling webbing to be 1.25” and the webbing to be black nylon webbing (most likely Mil Spec: MIL-W-4088 Type 10, Class 1A). At one time I made tactical gear and I am familiar with webbings and types. Some things to note from my research: In this screen grab you can see where and how the forward end of the sling is attached (Yellow Circle) and it looks to be an AK-47 sling mount screwed to the top of the barrel shroud just behind the front sight. Note the round (looks to be an areal gunner sight) sight just forward of the feed tray and is in the dead space of the barrel shroud between the two barrel shroud rings (Red Circle). Also note the rubber wrapped tubbing on the barrel shroud goes past and covers the middle barrel shroud ring (between the Red Circle and Yellow Circle). Lastly, note the rear sling mount appears to be on the side of the stock (Light Green Circle) and is most likely in the spot as the bras ID disk seen on some Lewis Guns. An assumption can be made that they are using an Uncle Mikes style sling mount and quick detach since this has been used on several weapons from Rogue One. I hope this build helps others out in making RO T-21s and feel free to ask question and/or point out anything I missed. Update March 2 2019 So Sentra was not the best idea I have ever had. The T-21 snapped where the stock meets the receiver when I snagged it going through a door. Since plywood was too heavy and the Sentra was too weak, I have rebuilt the rifle again using all the previous parts but this time I used a 3/4" white pine board that I planed down to 1/2" thick and seems to be holding up great and the weight is fine. Thanks for the interest.1 point
-
That did it! I'm able to post my question in the TrooperTalk app thread now. Thanks for the tip1 point