Leaderboard


Popular Content
Showing content with the highest reputation on 04/11/2020 in all areas
-
I tend to do the same. Someone once told me here "Why are you reinventing the wheel?" I replied "I'm not, just building a better car around it" Keep up the good work2 points
-
You nailed it, Jon. Thanks!2 points
-
Took off the shims today to stop me from wearing it. Don’t some small modifications current the butt plate into the right shape and removing the return edge around my back plate Sent from my iPhone using Tapatalk2 points
-
First off, is the call for reading a children's book: In the end, I don't think that this one will be used for the Legion's promotion because I screwed up and didn't use a Disney book - but this shoot included many book changes, a costume change, and close to a meltdown from myself so I want to show it off. Plus I do like how it turned out. The next is a PSA I created for my students: This was fun project for the whole family during lockdown. And finally, I took the dog for a walk This last one was by far the best thing I've done since the quarantine started - a lot of smiles and waves. Stay healthy and safe!2 points
-
Yesterday was BBB day! Did a layout today. Excited to get started but overwhelmed too. I'm thinking I will start on the helmet first. I am aiming for Centurion.1 point
-
Great work, always nice to see other ideas on how to solve a problem1 point
-
Fantastic job on the reshaping. Armor is beautiful1 point
-
It may have been a little too thick. But I’m a big fan of over-engineering things so they’ll never break. I hate doing something twice. Sent from my iPhone using Tapatalk1 point
-
R1TK, from what can be seen in movie clips the harness is similar to what the FOTK uses.1 point
-
Nice and sturdy1 point
-
So I’m taking Glen’s idea and altering it just a touch. I found some 1-1/8” webbed elastic on eBay. It’s almost like a belt and is plenty strong to do what I want with it. I ordered some more custom cut 1/4” plastic from TAP Plastics (thanks again Tony). This place offers a ton of variety of colors and materials. I ordered custom cuts, which are square and accurate, because I don’t have the means to cut this stuff and didn’t want excess material. I ordered the dark gray because black wasn’t an option. Shouldn’t be too noticeable once the foam is placed on top. I ordered three pieces (using two and an extra just in case). I measured and marked lines 1” from both sides at either end. Then used a Dremel router bit and a file to shape the slots for the top plate. Each plate is marked the same, except the second (bottom plate) will get cut all the way across and act as a channel for the elastic to run through. I ran the elastic through the slotted plate to get a measurement for each strap. I’ll be sewing some Velcro to each strap so that I can tighten them. A layer of adhesive backed foam will be cut to mirror the top plate and will help protect my forearm armor. The black foam with the white straps should keep this shield as close to the screen used shield as I think I can make it. I’ll follow up once I get the bottom plate completed. I will glue these together and then to the shield. Sent from my iPhone using Tapatalk1 point
-
Welcome to FISD Dave! Sent from my iPhone using Tapatalk1 point
-
Nice work, Garrett! I'd be interested in seeing the outside view of your ab/kidney connection (left side) if you get the chance.1 point
-
Progress so far on the helmet. More filing needed anywhere? Got this in the mail from [mention]justjoseph63 [/mention]1 point
-
Great work mate, almost there1 point
-
Will do thanks for the info. Sent from my iPhone using Tapatalk1 point
-
Awesome build thus far! It looks very clean and thought out. If you have any elastic left at the end ( and a few extra split rivets ) I'd personally redo the abdomen - kidney strapping. It's short! Might very well be more of an aesthetic decision than one concerning structural integrity ( especially after you're in kit and with your belt on ) but that's just me. You're doing a great job. Keep it up!1 point
-
Great work, coming along nicely1 point
-
Happy Friday and thanks all!! Your kind words are keeping me super motivated After finishing gluing the reinforcement pieces for the brackets I drilled holes for and installed ab/kidney and cod strapping. Holding all of the bits in place to hammer the split rivets definitely wasn’t the easiest task! Ended up cutting the elastic for the ab/kidney a bit short too as shown... we’ll see how long it holds up for! Might redo at least the middle one if I have any elastic left over at the end! I also gave the rivet heads a quick sand prior to installing them to help the paint stick... not sure if that was clever or unnecessary, but I accidentally sanded all of the rivets including the non-painted one for the cod so maybe not that clever after all! Next, the rest of the torso strapping! I used the super glue method for these, and it went pretty well over all. Using Zap CA plus kicker it dried in no time and it was pretty exciting to see everything come together! Once that was done, got out the e6000 again and finished off the day by adding the right side torso strap and gluing the shoulder straps into place. Pretty happy with this progress so far! I’m a little concerned that I did some of the strapping a bit too tight in - it seems to be pretty stiff in some places, but I’ll revisit that later on if need be. P.S. I keep checking out @Ruffalo’s submission pics as more reference since they are gorgeous! Hope mine comes out half as stunning as yours is sir!1 point
-
Hey everyone, back after a bit, here's what I've done. Thighs I came back to the thighs, and reshaped them at the top. Mostly just because the shape was inaccurate. Test Fit I did a quick test fit(before I shaped the thighs). The ab sits too low as well as the knee pads are droopy. These will be fixed soon. I also purchased some black Dockers suspenders, which I will attach soon. Here's another lower body test fit with the reshaped thighs. Strapping I also was able to finish strapping the shoulder bell to yoke connection. I also strapped the bicep to shoulder bell with Velcro, although it is not holding up so well, I may change it out for snaps. Other Stuff I also had to take a glamour shot with the armor on Here's a fun photo I took with the "boys"...er armor And that is pretty much it. Until next time1 point
-
Ok awesome yeah I can definitely tell the difference now. I’ve seen some where it looks like they have a slight lip. But, now I see the lip is way to big on mine. Thanks for the help guys!! Sent from my iPhone using Tapatalk1 point
-
@justjoseph Thank You! That was the conclusion I was starting to get to having combed through a handful more Centurion approval threads, but appreciate the direct confirmation! I should have enough of the nickel ones from the pieces Anovos sent in their kit to handle the cod/Han nickel colored ones. I'll use all the black ones for my strapping, etc. Thanks again for the reply and I'll definitely figure out the imgur piece this weekend as now that I'm "in the thick of it", most likely my questions will be much more specific and pics always help!1 point
-
Hello Chris! Welcome to the FISD!1 point
-
Answered in your other thread, Matt.1 point
-
Hi Matt! By "abdomen to belt" connection do you mean the ones that hold the canvas belt to the ab plate? If so, these are hidden, so you can use any size you want, but I would go with the larger line 24 type. Interior strapping (connections that can't be seen) have no bearing on approval at any level. As long as the belt sits evenly on both sides across the front you are good to go, but remember (especially since you are thinking about Centurion level () the top of the ABS belt "should sit at or just above the bottom of the ... ab button panels" as seen in the photos below. For the "Han" snap and the ones that are on the lower tab of the posterior plate you should use the line 24 size (9/16 cap diameter) as opposed to the line 20 (7/16 cap diameter). 1/8 of an inch may not seem like a big difference, but it would be noticeable. Remember that the bottom of the snap faces out on all 3. The black line 24 size you have may get you to Basic approval (this would depend on your GML as snaps are not required for L1), but for Expert Infantry and above I would suggest picking up some of the nickel plated type. You can pick up a set of 10 on Amazon for 6 bucks (link here). Alternatively, you could sand them down a bit and hit them with some silver spray paint, but a can of that will run you just a bit less than buying the snaps and would not look quite as good If you don't already have one, I would suggest getting in imgur photo sharing account. It's fee, easy to use, and will allow you to post all the pics you want to (posting up images of any issues you may have will really help when you ask for advice)! Keep the questions coming, and know that we are here to help!1 point
-
Hey William! Good to see your Centurion app already. We need a few more fixes from you before proceeding with your application. First, your shoulder bell gap is improved, but there's still a visible gap at the top. Is it possible to shorten the elastic holding it on any more? I don't have a good sense of how broad your shoulders are compared to the bells. Reference Images: Next, the horizontal dropbox alignment looks great, but they appear to be hanging a little low. It might just be the photo perspective, but if there is a gap, we're asking you to shorten the elastic so the top of the dropbox sits just at the bottom of the ABS belt. Reference Image: You're almost there!1 point
-
Awesome job, @Vengeance! Really glad to see you tackling all of these changes so quickly. I'll be with you soon.1 point
-
That's right! Brilliant event one of my most favorite ones! Yeah after that troop I removed the bolt and replaced it with some aluminum flashing. dropped a good pound or two, the demil definitely gets heavy as the day goes on. Really makes me wish single point slings were canon! I did swap from Makaze to Parjai as I moved to NW Florida for a new job. Definitely miss Orlando and folks there but I've got a good group here too, just wish Disney and such wasn't 7hrs away!1 point
-
Tampa, the sunshine city... Greetings from Spain... Enjoy with the ANH!!!1 point
-
Great news Chris, I look forward to following your build thread. Sent from my SM-G960F using Tapatalk1 point
-
I know I am VERY late to the party, but may I add that those helmets may in fact be re purposed anovos helmets? It’s not too far fetched, as disney owns them. I own an Anovos TK kit, and the helmet looks identical to me Sent from my iPhone using Tapatalk1 point
-
Hey guys, Previously I have trouble finding a high resolution of the crosshair to be printed in HD on stickers as everything elsewhere is in JPEG format. So I decided to draw my own. based on references I found on the white armor (FISD) forum. Sharing it here for all to use/mod. (This is in AI format, so all may size it to whichever sizing required without it getting pixelated) Cheers! Happy Trooping Wilson TK31593 Preview: E11 Ratina Display V1.ai1 point
-
GREAT to see you getting on these requests, Gaines! The TD screws need to be painted black (easy fix) but you have a lot more space on the left side between the end cap and plate. Looks like it's glued on, but if you get in touch with Gary jr. at the TK Sweatshop I'm sure he can help you get this down closer to 7.5 inches. I have every faith that you can get all this done so that we can add that EI badge under your name soon! The total length is approximately 7.50" Clips shall be attached with slotted type, flat or dome top style screws, and be black1 point
-
Hi Diana, Great to see you're going for higher levels, that's the attitude! overall you looks good in your armor, well done I would like to give you a couple of suggestion from my view for EIB Level, Centurion level would requiere some more adjustments : :As the crl states for basic level : 1- Frown is painted gray and does not leave the teeth area. A total of 8 cut outs in the teeth area of the frown are present. You may want to add some a gray paint to the extremes and remove some from the edges , take a look to the reference photos included. 2- Vocoder (vertically ribbed chin detail) is painted black. you may want to reshape your vocoder as the reference photos, just a few minutes with and toothpick and mineral spirits can be usefull. 3- Thermal detonator belt clips are positioned with little to no gap between the clips and the end caps. You would like to adjust your TD clips as the references Cheers1 point
-
Fingers crossed you’ll get to put it to good use sooner rather than later1 point
-
Fellow members, I would like to announce the translation of our ANH Stunt CRL into it's first foreign language. I would like to thank the team for their diligent and outstanding work on bringing this translation to the Detachment on time. TK_ANH_S_Aurebesh(1).pdf
 1 point
 -
Hi Trooper, Investment in you, your life and health is the best decision. Good luck with this project, I'm sure you're going to achieve this goal and more to come. Let us know how things are going, and If you need some encouraging words, just come to FISD and for sure here we are to give you some support. No one left behind trooper !!!1 point
-
I'm approved!1 point
-
Thanks! And yes. First, you drill the holes, and then you put the bolt through, and have a dab of glue on the head, then you place the box in the right position, and now, from the bottom, press the bolt up against the box and hold it for a while till it dries. Then remove the box with the bolt, and reinforce with more glue, and then epoxy putty for a secure hold. Hope that’s clear!1 point
-
The printed sight block looks nice and sharp. Well done on the installation. I remember first cutting into the main tube to create the dovetail space, wondering if I had gone too far in trying to capture the look of the real sterling. It’s great to see this is now pretty much standard procedure for the doopy builds. It certainly adds that extra element of realism. Keep up the great work!1 point
-
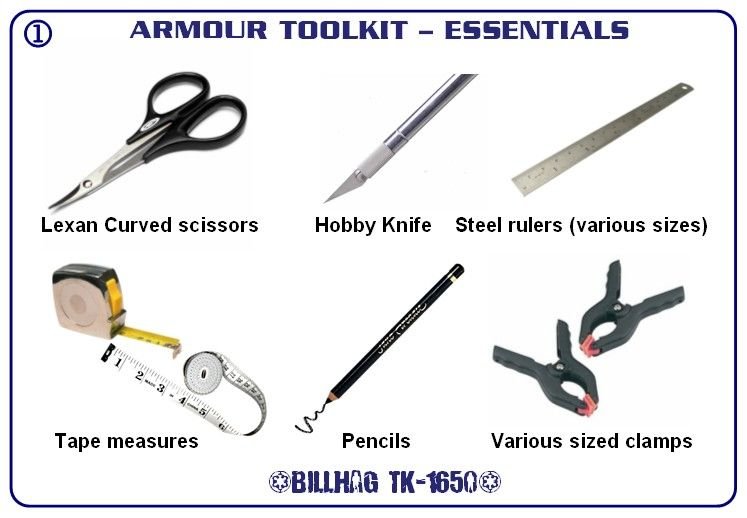
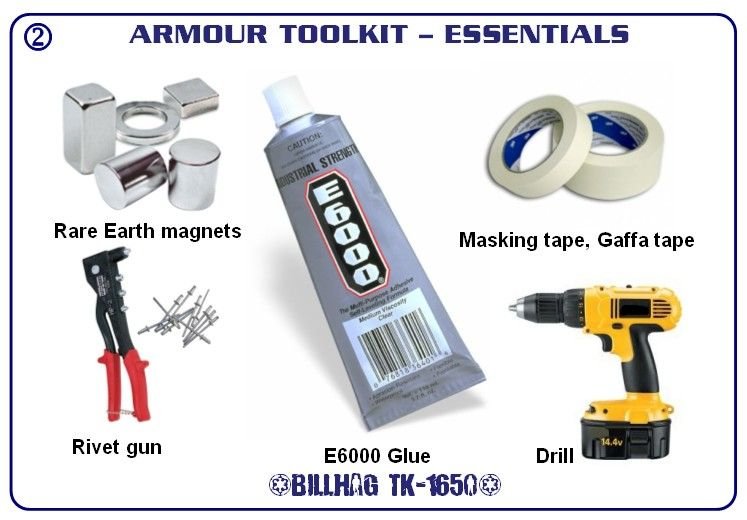
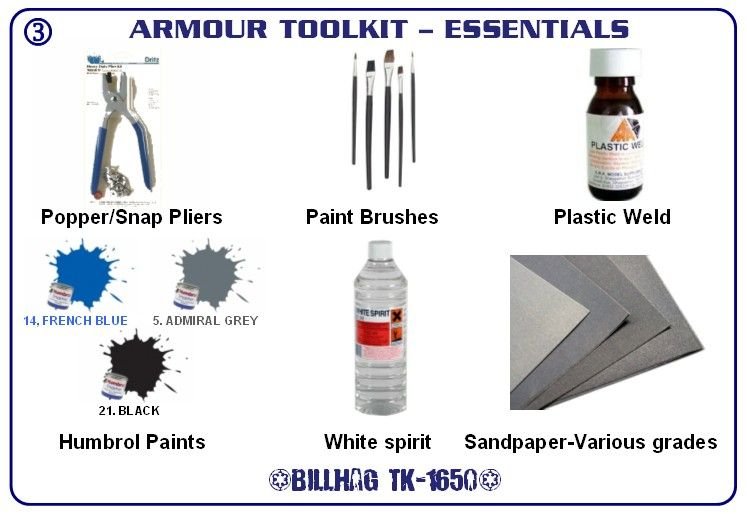
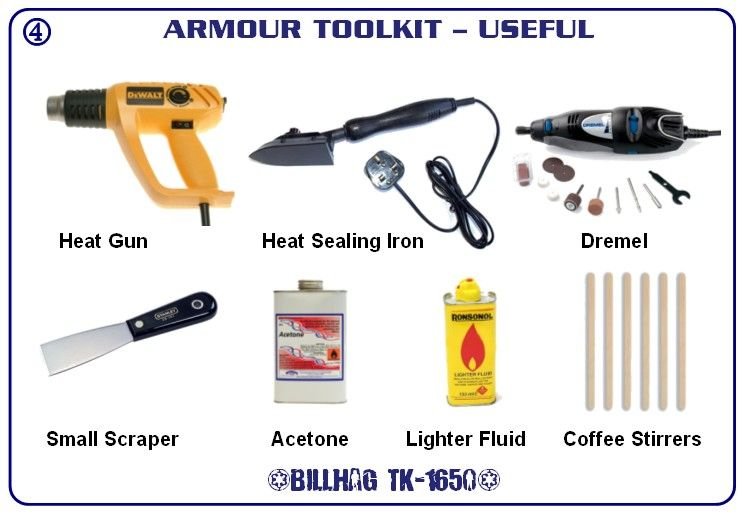
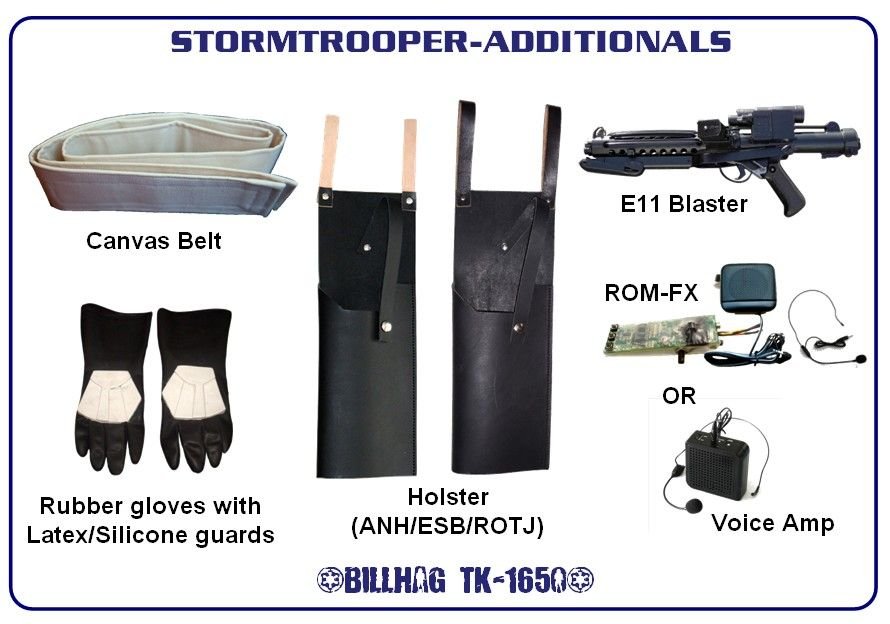
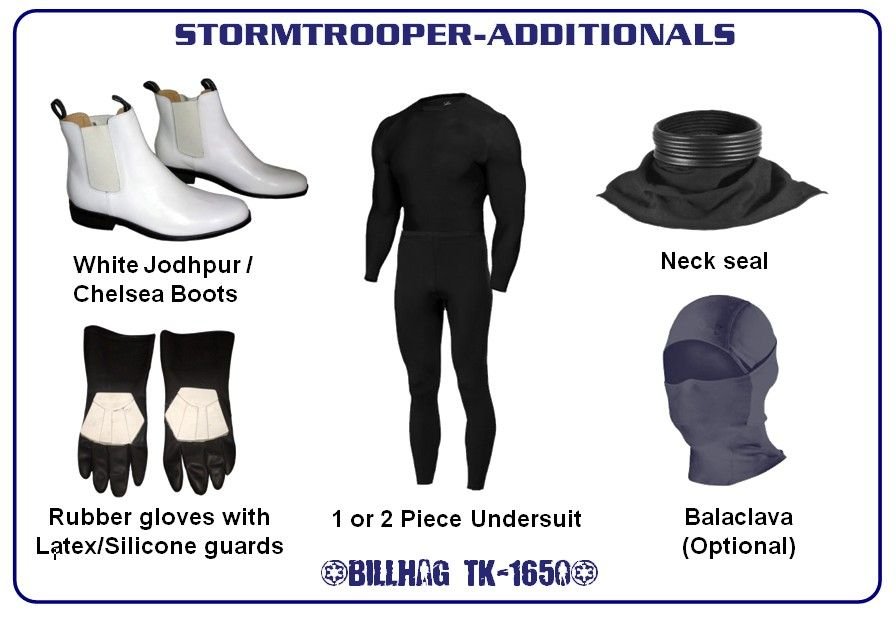
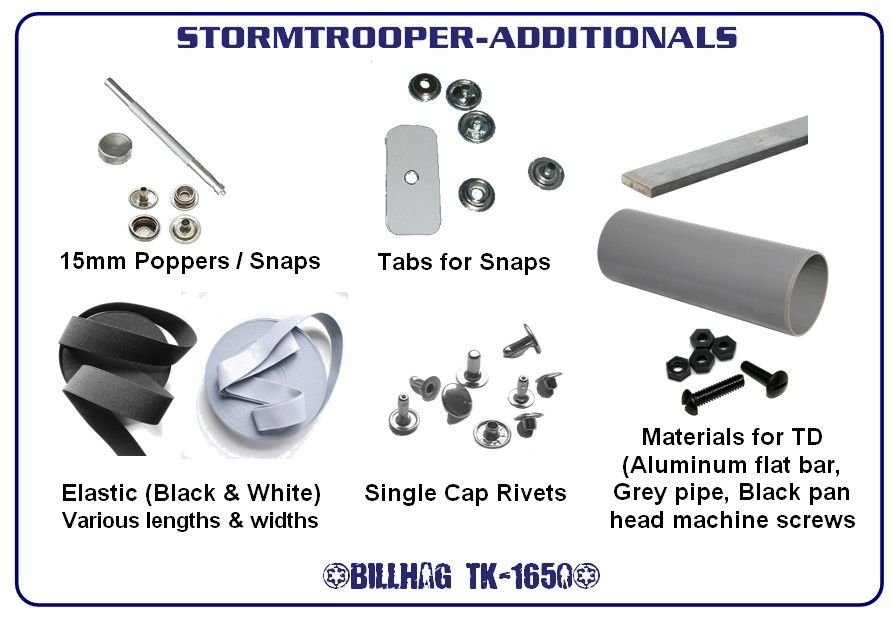
In the same spirit, i've always found these diagrams by Billhag extremely handy for new comers.
 1 point