Leaderboard


Popular Content
Showing content with the highest reputation on 01/10/2020 in all areas
-
Thanks for the shoutout, @wook1138! When I first started that particular build, I was sizing it down for my height- which is 5'4". My garrison friend wanted to be a TK and asked me to sell her the kit before I had finished it so I could properly size it to her frame. She is just 4'11", and we did it! Here's a pic of me (taller trooper, ha!), and her on our way to a parade troop in 2018. She totally rocks her kit! You definitely can size down a TK to fit your frame, Isaac! My friend ordered "short" thighs from Walt's Trooper Factory, and they worked out nicely. That said, you can also size down full-sized thighs just as well. The kit I'm wearing in the pic above initially was made for a typical 5'11" trooper, and I was able to make it fit my small frame. As long as you keep your proportions in check, your kit will look amazing! Don't be afraid of the stormtrooper build! We all are here to help if that's the direction you choose to follow.4 points
-
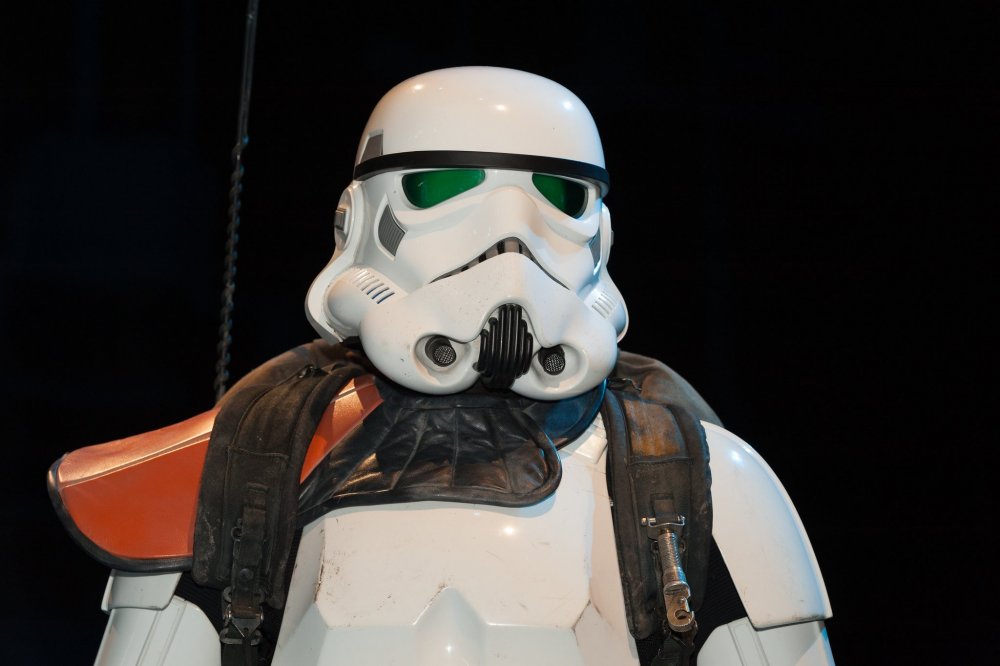
I see this topic come up a lot and I have not seen a comparison so I thought I would do one. Please keep in mind that my knowledge on this subject is limited and I do not have any experience with OT TKs. So the obvious… Rogue One TKs are more detailed than OT. As far as I know, all the OT TKs were vacuum formed in High Impact Poly Styrene (HIPS). This process requires a buck (mold) that heated plastic is laid over then sucked to the buck by vacuum. This is a fast and efficient method of mass producing these costumes; however, the trade off is that all detail is minimalized and designed so that the formed plastic can be removed without damaging the buck. For this reason, parts like the helmet and forearms are formed in parts rather than one solid object. Consider an ANH forearm, the rectangle details are not very well defined. There are 2 parts to the forearm. One part has the rectangles and the other does not. The two parts are glued together and then cover strips of plastic are used to hide the seams. Rogue One TKs are were not vacuum formed. I have heard (although I do not know for sure) that the RO TKs were injection molded. This process requires a 2 or more-sided mold that is completely closed off then heated liquid plastic is injected into the mold. Once the plastic is cured, the mold is opened, and the parts removed. This process allows for thicker and more detailed parts. So both the OT and the RO stormtroopers armor are made from plastic but the RO version is thicker and more detailed. Yes there are differences between ANH, ESB, and ROTJ TK’s but for the most part, the process of making the armor was the same. RO, Solo, and some of The Mandalorian TKs were made to the RO standard. Another consideration in comparing the two types TKs is the methods of assembly and strapping. There is a ton of reference material on how the OT TKs were assembled. There are very specific requirements in the CRLs as to what type of snaps, straps, Velcro, and rivets are used and how they are used. Oddly enough we have less information about how the RO TK is assembled and strapped. One of the best sources I have found for RO TKs is the images from Celebration Europe 2016. In these images we can see Velcro in various places as well as some sort of plastic hook lines connecting the shoulder bells to the biceps. Regardless, the 501st CRLs for RO TKs does not specify how the TK is strapped as long as the strapping is not visible with the exception of the drop boxes and the thighs. It would be awesome if someone who has some contacts with LFL could get some more detailed information and pictures since there is no reason for this information to remain secret this long after RO, I digress. Additionally, there are significant differences in the soft parts of the costume. OT TKs have a neck seal and a black one or two-part undersuit. The undersuit has no detail and most of the people I know who have OT TKs wear under armor. The gloves were rubber military chemical gloves and the boots were slip on brown chelsea boots dyed white. RO TKs have a undersuit that has ribbed fabric at most of the joints and the neck seal. The top shirt has hex mesh in the armpits and the ribbed fabric runs from the top of the neck seal to mid chest. The ribbed fabric must be stitched between the ribs. The boots are the same as the FO boots with a flat sole and side zipper. The gloves are also the same as the FO; although they are all black with leather patches and gridded fabric similar to a mechanics brand glove. Lastly, the OT Tks had holsters and their E-11s are slightly different from the RO E-11. RO TKs did not have holsters. I suspect that it would be difficult to holster the E-11 with a tac-light on the side of it. So lets look at some comparison pictures. These were taking at the ROSW premier. On the left is a member of my Garrison (TK 41808) in his RS Prop Masters ANH Stunt. On the right is me (TK 20980) in my Jimmiroquai RO. Initially, we look very similar; however, closer inspection reveals the level of detail, shape, construction in each part. So, let’s start at the top and work out way down. The helmet: On the left is an OT TK from ANH, on the right is my ROTK helmet. One of the most talked about parts of the helmet is the infamous eye bump. Look at the right eye on the OT helmet, notice the bump along the bottom of the eye just left of the nose? That is the eye bump. All of the bucks for the OT helmets were hand sculpted and it is unclear if this bump was in the original buck or if it is a result of the vacuum forming process; however, what we do know is that the helmets are not symmetrical. RO helmets are symmetrical and although some people swear, they can see the eye bump, I do not see it on the RO helmet. Moving on, the frown is more pronounced on the OT helmet. The number of visible teeth is also an issue. There are images from ANH that show between 6 and 10 teeth. RO helmets have only 7 individual teeth backed by a dark grey mesh. Another difference is the height of the brow trim above the eyes. The brow trim on the OT helmet fits on the edge of the top dome and is adjustable. I believe the proper gap is about ¼” while the gap on the RO helmet is about 1/8”. It is unclear if the brow trim on the RO helmet is actually separate or painted on. On my helmet it is molded into the helmet and I painted it. I should note that is on of the things that must be modified on the Black Series helmet to make it CRL compliant. The gap on the black series is closer to an OT gap. Lastly, the V-coder on the OT helmet is a molded part that is painted. On the RO helmet, the V-coder is a separate part and there must be a visible gap at the bulbous part of the V-coder and the helmet. Looking at the sides of the helmets, the OT tear traps are a simple depression that is painted. The vent lines are painted as is the black outline. The same is true for the temple boxes, although there are no vent lines in the temple boxes. On the RO helmet, the tear traps are also depressed; however, there is a raised portion in the center that is painted grey and the vent lines are cut out (engraved) in this raised portion. I suspect on the screen used helmets the depression is painted black and the raised portion is a glued in part that has the vent lines cut out. On my helmet, I cut the vents out completely and backed them black breathable fabric. The temple boxes on the RO helmet also have a raised portion that is painted grey and just like the OT, there are no vent lines. I have seen a gap between the end of the brown trim and the top of the ear cap on some OT helmets. On the RO, the brow trim comes past the temple box and terminates at the center of the ear cap. There is no gap between the brow trim and the ear cap and the brow trim terminates at an angle. The OT ear caps have visible flat head pan screws (3 of them) and the CRLs require them. These screws actually hold the helmet together connecting the front and back halves and attaching the ear caps over the seams. On the RO ear caps, the screws (2 of them) are molded in and are non-functional. Additionally, the ear bumps on the OT helmets are different. The RO ear bumps are all the same and a very different design from the OT. The outer circle of the ear cap as well as the ear bumps are more detailed and defined on the RO helmet. Lastly, the blue tube stripes on the OT helmet is either a decal or painted on. On the RO helmet the tube stripes are completely cut out and for the screen used helmets, they were backed with blue painters’ tape. On my helmet I backed the stripes with a blue breathable fabric. The back of both helmets are very similar. On the OT helmet the rear boxes are more trapezoidal rounded in the corners, the box is a depression that is painted grey and again the vent lines are painted. On the RO helmet, the boxes are more rectangular and again they are depressed with a raised portion that is painted grey with vent lines cut out. Again, I believe the screen used helmets had a depression that was painted black and additional parts with the vent lines cut out was painted grey and glued in place. On my helmet, these vent lines are cut out and backed with a black fabric. On the black series helmet, there is a battery box and speaker that must be modified for approval. Although the shape of both helmets are very similar, there are some minor differences. The RO helmet looks thinner overall. On the black series I had to extend the jaw line about 1.5” to fit a proper RO V-coder. The Hovi mics on the RO are exactly the same as the ANH Hovi mics with white interiors and the proper mesh screen. The lenses on the RO are also the same as the ANH lenses, green. If you are considering a ROTK, there are several options for helmets available to you. The least amount of work would be a Jimmiroquai helmet and the largest about of work would be modifying a black series helmet. I have a tutorial for the modifications I recommend in the RO thread. I do not recommend attempting to convert an OT helmet to a RO helmet, but I guess anything is possible. Next, I will be comparing the upper torso and arms. Thanks for the interest.3 points
-
I can see it yes, but do we currently have an R1 helmet maker that has this asymmetry of the eyes? Effectively anyone wishing to go to Centurion is hamstrung until such time. We are not about making something unachievable for members to reach, and at this stage that's what could well occur. The best we can hope for is the few makers of R1 helmets see this thread and modify their molds to suit. (perfect scenario) Perhaps Reese you can contact them directly if you haven't already and plant the seed.( Jimmi is the main one that comes to mind) Don't get me wrong, you have something very tangible here for sure, and something that can be added to the CRL when it is fare and attainable by applicants. In fact if makers do the modification and produce the eyes asymmetrically, then it would become a standard and potentially be included at basic. Thank you for posting this.3 points
-
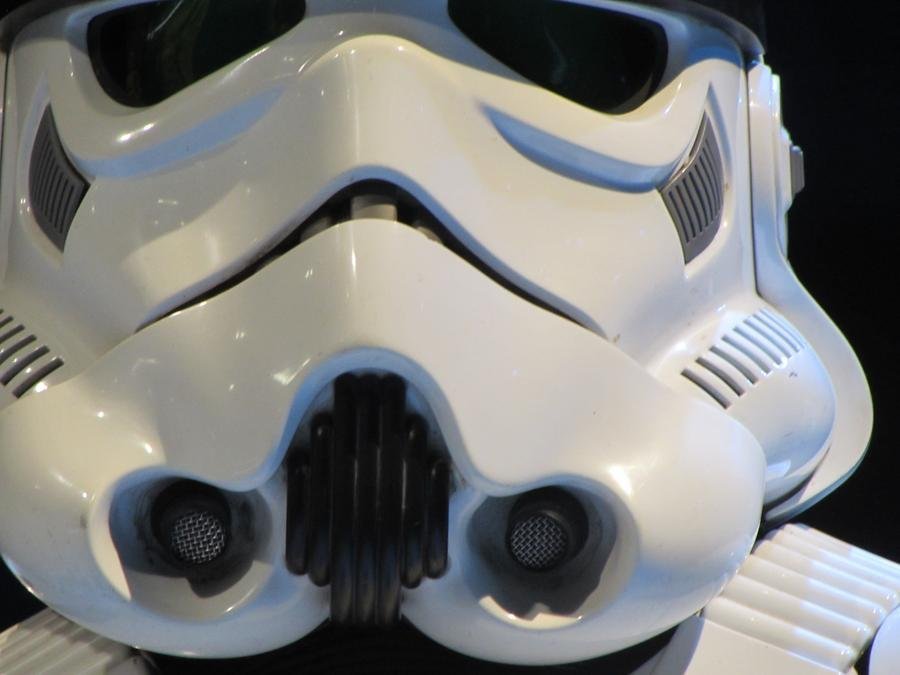
Hey all! As everyone knows, I've argued for a long time that the R1TK helmets were indeed asymmetrical. However, I wasn't able to develop a way to actually proof this outside of describing where to look. However, Sam Williams (one of the 3d designers) who worked with Glyn Dillon (the official costume designer for the Antholoy TK's) confirmed that the eyes were made to be "off," to pay tribute to the original sculptors. He even went so far as to share what the 3d render files for the helmet were when he was working on Solo designing the Mimban TK's. ----------- Then I reversed the image to show how the eyes are off. Flipped: Screen used costumes: Original shot: Original: Flipped: Final shot: This is form the LFL BTS archival footage recently released last year. ------------ Flipped:
.jpg.1297f7ac87920a00b2eea55dd49adcac.jpg)
.jpg.4cf64364e03e7f965fc71be15c955dc2.jpg)
.thumb.jpg.ff5e8ffee5267eb38d1cacb5d3920afe.jpg)
.jpg.a6ef15285950cfcb7af4a78d112ae8be.jpg) 2 points
2 points -
So, my package from Dave arrived today! In it was some items he had over from his own build; leather strips for the holster, aluminum strips for the TD etc. THANK YOU DAVE! But it also included something unexpected... A suprise to be sure, but a welcome one! Maybe a start to a new collection? Once again, I would like to thank Dave/ @Helotech for everything. His build inspired me to fix mine up and he has given me a lot of info on how he did it. And sending a package with leftovers all the way from Canada? Above and beyond! When I maybe get a coin for myself from here, I will be sure to send him one too! I would also like to thank @gmrhodes13, @justjoseph63, @TKSpartan and everybody else for getting me this far! This is truly a blessed forum! That's it for now, move along!2 points
-
I now have definitive PROOF the helmets are asymmetrical!!! Below is my thread breaking down (with photos) how they are actually assymetrical, confirmed by Ian Reach who found out that Glyn Dillon STATED he did this intentionally. I would like to propose that we make this EIB and/or Centurion, for the most accurate details possible.2 points
-
teeth all cleaned up resubmits, left side.
 2 points
 -
Come on over to Pathfinders we’ll help you out. And yes we have gotten quite a bad name due to that damn child provoking us innocent scouts just trying to do our job. Sent from my iPhone using Tapatalk2 points
-
I will be checking over there then, Thank you I am now in the process of creating an account. Baby Yoda will be an issue. (i can already hear the crickets)2 points
-
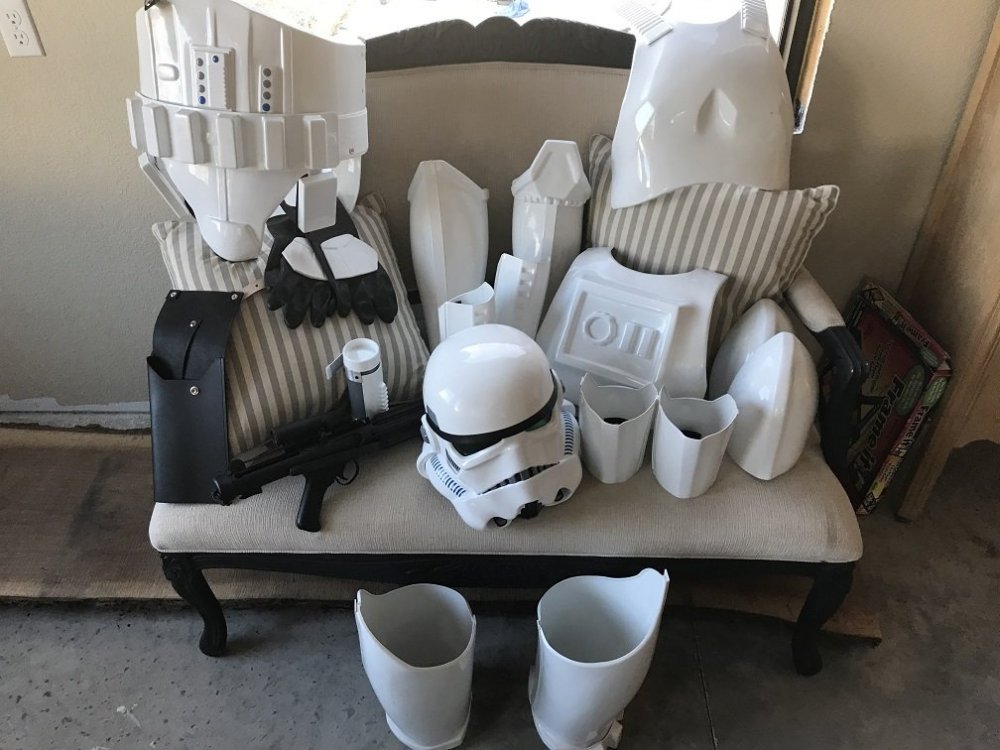
Armor is in!!! Woot.. So I now have everything and am super pumped. Mark did a fantastic job, everything looks awesome. My first attempt to wear it didn't go great tho. There is some strapping issues which I totally anticipated. The only thing really slowing me down now is the gauntlets, apparently my Popeye forearms are too big and I can get them all the way on. Mark and I spoke and I am in the process of reworking those a bit, I'm trying to take my time and do it well so I don't jeopardize Centurion status. I hope to post some pictures for comment by all you experts some time next week. I'll make a new thread as Joseph recommended. Thanks for the support everyone! Fox out
 2 points
 -
Thanks! I added it! Hopefully I did it right!1 point
-
Seems like the force wanted to prevent that delay by getting that offer onto your radar1 point
-
OP Post #2 Thanks guys for the encouragement, kind words, and helpful insights! I'm perhaps as excited about this part of my Legion journey as my actual TK armor build! By the way, be forewarned that this post is picture-heavy, and is formatted to best display on the computer web browser view of this forum. So I did something bad—or not. One single GarageBOSS 16qt oil pan came back in stock for the clearance price at Walmart, so I purchased it... along with the normal 12.5pt version AND the Midwest handle-less pan. Now I can literally compare them all side-by-side, and as previously alluded to, I may simply make several versions of the pack with the three pans. Below are the comparison photos. Note that the pan without the handle (to be added later) is the Midwest, the one with the circle cutout is the mid-sized 12.5qt, and the largest one is the 16qt. The last two photos are with the smaller and larger pans laid with the standard mid-sized. I also found several more pull handle options to add to the Midwest pan (a need which makes it a more pricey option than the other pans), and purchased the SouthCo one from the Walmart marketplace since I believe it most resembles those in the Battlefront games. Below are some other handle links for reference. Note that several vendors sell what appear to be the same handle as the one I purchased, shown larger in this first image. Click on the later three photos for links to the purchase websites. Purchase links to the "boxy" handle above: Walmart | Grainger | Bisco | Zorro Moving on. I've been on a purchase spree this past week, and have ordered two sets of MP40 LEATHER pouches, an orange pauldron from Trooper1, two sets of Popit container sets, and the button box bumpers from Amazon. With help from several forum members I came to the conclusion that I'd need to resort to an international purchase for the leather MP40 pouches, and having had good experiences on Aliexpress in the past, I went that route. If all looks well when they arrive in three or so weeks I will post the seller and item link I used, and several (aka many) photos. As for the Popit boxes, I was literally about to click and finalize the purchase on Amazon when I thought I'd do one last google search and came across the Popit Shop website. Fortuitously, they had the 6 container stackit set in stock, priced cheaper than Amazon, and the new user coupon code "MYFIRSTPOPIT" netted me an additional 25% off and free shipping! A single set was going to be $14.99 shipped, so I decided to get two sets to give me a margin for error and to use on the extra backpacks I might make. I never knew I could be so excited about a food storage container manufacturer's website. Interestingly enough, my order arrived in two days via Amazon, so there must be a Popit / Amazon partnership. Before I get too much further and lose some readers — QUESTIONS! Which of the four largest Popit containers should be used? Based on Ukswrath's 2nd thread, it appears that the button panel should be the Xe 041 (6.6" x 4.75"), the vent panel the Xe 051 (8" x 5.6"), and the right arched panel the Xe 061 (9.1" x 6.6") container. If that's accurate, then I'd be using the first three boxes in the photo above, but with my plan to angle the front of the arched box, I may consider using the Xe 062 box—the fourth one in the photo—which has the same length and width dimensions, and is simply deeper/taller than the Xe 061. That extra depth with enable me to cut off the top and create a new angled surface. What are the preferred primer and paint brands and colors you all use for your backpacks? Always prime before main coat, correct? Any clear sealant on top of it all? I'm going with the 1" nylon for the backpack straps; what are your preferred purchase sources for the material? Radio bottle cap question; see notes several paragraphs below. Be prepared to overthink little plastic cylinders. To continue, I've also started a reference guide folder for my HWT build, and so far it contains printouts of the CRL and some reference guides and images. I will also be adding some backpack, T-21, and DLT-19 build threads and instructions. The OCD part of me has been pushing to find flat-topped 2" PVC end caps for the antenna tube, rather than cut off the rounded tops of some caps and leave the tube end open. Thus far my search has yielded the following, and I believe the last two are likely the same product (click the images to navigate to the purchase websites): Similarly, I've been pondering what type of caps to use as the knobs on the radio, and have secretly been eyeing all the caps on every type of vessel present in our house (shhh, don't tell my wife). At first I thought these small 16oz naglene bottle caps would be perfect, with their deep-grooved outer edge and the circular disc on top, but alas they are too wide at 2-5/8". Then I found these Dr. Brown's baby bottle caps in a three-pack for less than $3 shipped on Amazon, and they seem to fit the bill perfectly with the ridges on the outside and the recessed interior. I'll know whether or not they're the proper size ratio after I print out a radio box template. Cap dilemma continued after these first images. Ukswrath's thread says to use 2-1/4" caps, but Joseph's spec thread diagrams indicate that the height of the small window which houses each knob is only 2" tall, and that the knobs should be 1.5". I've seen in multiple threads the use of "milk caps," which I believe would be closer to 1.5" figure. Should I simply choose once I've laid out my framing template on the photo box? @justjoseph63 - It looks like you use something like this (also first photo below) in your CRL photo, correct? Here are some additional options I've found. Yes, I've spent far too much time researching bottle caps. Click the images for links to the purchase websites. Here are some additional items I've been collecting for my builds, including an excessive amount of black button bumper pads, the 35-count wipes container (the caps are now clear, not colored, so no green or yellow showing if the tube gets scratched!), and a nalgene hopefully for the top portion of the siphon funnel. I have so many old bottles needing new purpose in life. Time to serve the Empire. Finally, as far as purchases go, I jumped on these spare ABS parts for this build. Specifically I got the main belt (for a dedicated HWT) and the shoulder bridges to use on the antenna tube. I know I'll need to make three buttons for the belt, so I had Mark send me some ABS scraps which I will use to fashion into buttons. My plan is to use @Cricket's Step 1 procedure on her magnetic calf closures thread to create the raised round area on the square cutouts. Can anybody tell me the dimensions of the square and round portions? If not, worst case I measure the ones which will arrive with my ATA armor. I've also been browsing old HWT pre-approval, EIB, and Centurion request threads, and I've been quite shocked at the lack of consistency which existed a decade ago. Most of the builds appeared to be Sandie packs, and Troopers seemed to have different interpretations and a lot of latitude. No wonder the DOs created the General Guide for packs and updated the pack CRL. Here are some of the more recent threads which I poured over: Charles (Templar726) | Tony (ukswrath) | Shawn (CrookKnight) Dave (PBTrooper) | Derek (DZFireMedic) | Jim (Engineering trooper) Sarah (Alay) | Christopher (Chewy) | Randy (magni) For your viewing pleasure, here is one of the old, non-standard, crazy ones: JBOD70 3D Printing So I have a friend who has the ability to print in PLA, but I don't think it will be realistic to utilize that route, so I'm wondering if Shapeways might be a good solution for any random 3D printing I may need, particularly related to my BFG scratch builds. I know a lot Troopers on here have your own printers, but can anybody speak to their experiences using Shapeways or other 3D print services? To conclude, I guess I need to go to Home Depot to pick up some power conver... I mean, this stuff: 2" antenna tube (24") Nibco 2" PVC hub caps Black sticky floor tiles pine lumber for T-21 and DLT-19 scratch builds PVC pipes, adapters, and connections for blaster builds PVC for my thermal detonator (no, I will not wear this as a HWT) There were several other sections I wanted to add to this thread, but it's lengthy enough already. So until next time, heavies, take care. Quote Responses: Randy - I'm definitely going to make the angled arch box, and if my GLM frowns upon it I'll spin up a backup box, which I may make from the get-go anyway. I had already looked BMW and other German and UK vehicle plan, to no avail. With the pans being such a disposable item, even ECS Tuning, who took over brand legacy for BavAuto doesn't have them. I probably could have searched deeper into Euro options, but I figure that shipping might be a bit prohibitive to the US. Joseph - Thanks for the tip on the floor tiles. I will also be experimenting with cheap cutting boards for protecting the photo box. I also like your idea for the placement of the straps in the recess of the oil pan, and I'll definitely be getting screw head covers. Thanks, too, for pointing me to Anthony's T-21s. Those are a bit out of my price range, but I may see if he'll sell me just some of the cast parts. Shawn - If my floral vase cone doesn't work, I may take you up on your 3D print template offer. Thanks!1 point
-
As Andrew points out there can be some back and forth between the prop makers we rely on and our standards. There is no point in making a standard that it impossible or extremely hard to achieve without a lot of money or custom work. On the other hand, the prop makers have certainly responded to the increase in our CRL and EI requirements over time. They do not ship plastic belts, oversized black ab-plate buttons, and single piece back plates like they used to because we no longer allowed them at L1 CRL. So Andrew is correct that the positive path is to push the state of the art forward in concert with the suppliers as best they can be met.1 point
-
It was a tough sell with the wife but she understood and I don’t troop a ton but I make sure I get use out of both of them. If I went for a third there might be problems. Sent from my iPhone using Tapatalk1 point
-
Best advice I've heard....wish I could win the lottery and fill my closet with armor instead of clothes1 point
-
You're welcome Jonas, we are here to help. and by the way what amazing coin mate , cool!!1 point
-
welp my registration is approved. Wish me luck in building my Scout kit, and thank you all for the warm welcome and support. any advice on dealing with Ewoks??1 point
-
Hey, thanks for those kind words, Joseph! I have bugged her about EI... a lot. If she hasn't submitted for EI, it's definitely not for lack of effort on my end.1 point
-
AWESOME, and thanks for getting those done so quickly! I'l be with ya' shortly, brother...1 point
-
AWESOME job on that kit for your friend, Cricket (and yours as well, of course)! I am totally going to steal that photo for my reference archives to show what can be done for those who may be a bit vertically challenged. My question is: Why haven't we seen an EI submission for her? (Seriously... that armor looks fantastic)!1 point
-
--------------- You can see the brow goes from angled down (above) to perfectly straight (bottom). Angled down. ----------- Straight. -------- Also in this picture, notice how on the eyes are assymetrical, with the helmet's right eye having a "bump" on the bottom, close to the nose. You can see it protrude, and it is indeed very key aspect of the R1TK. However I believe this to be of higher tier in either EIB or Centurion, but that's not needed for basic. Glen Dillon, the designer of the R1TK helmet models, confirmed this assymetry. As noted by Paul Prentice and Ian Reach (the experts on the Crystal packs): "and most notably the slight squint in the right eye - that Glyn Dillon has confirmed they deliberately added as an homage to Liz Moore (the sculptor of the original ANH TK helmet) - is not present in The Mando opening scene buckets" - Ian Reach --------- BTS Pic, you can see it more clearly in this shot from the LFL archives. Below is the bucket 3d model Glyn Dillon made himself for the Mimban TK's, which deliberately show the assymetry of the eyes. ------- I took the liberty to flip the image to see the assymetry better.
.jpg.e090b9c3f17b3f435a9020dd2ca5bdca.jpg) 1 point
1 point -
I appreciate it. Just waiting for my registration confirmation email1 point
-
This is a great post.1 point
-
As long as the kit you buy is built to a screen accurate level, then, like we say, you should be good to go. Your physical build won't be am issue [emoji846] Sent from my SM-G950F using Tapatalk1 point
-
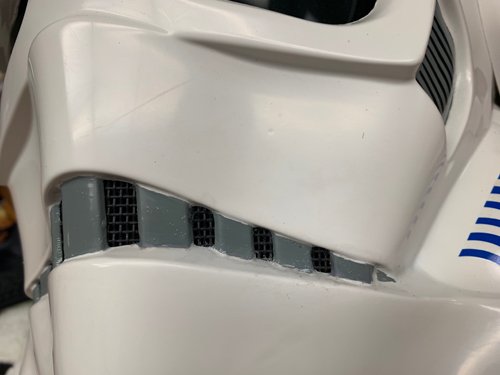
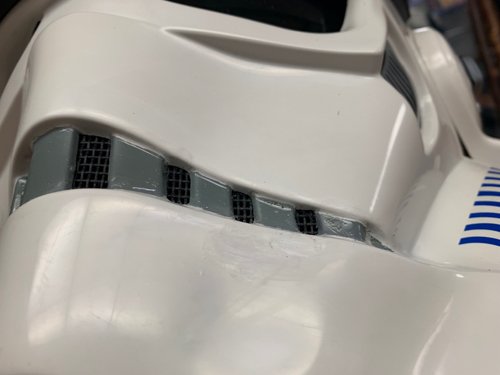
Finally recovering from the Holidays and getting back to this build. Hoping to receive my gaskets this month so I can start fitting parts. In the meantime, I continue with some visual modifications. Unsure of “accurate” measurements here but as I have to fit to the existing armor, I employed some artistic liberties. Forearms Modification: The forearm box edges are quite soft. This is typical with vacuforming so not a complaint against the kit, but I’d like sharper edges. Also, the recess seems too small. I built (2) boxes from ABS sheet. To create the recess, I cut out a square hole in the top layer and backed with another sheet. I also created a smaller recess on the front side. The scribe lines were also quite soft vs. the reference pics so I cut these out using a vinyl stencil. These will get backed by ABS sheet after I get the new rail molded and cast. Question: The thin scribes are white but some reference pics show the thick scribe black while on one arm while the other is white. Is that accurate or a variance from normal?1 point
-
I always wear rubber gloves with cotton gloves and there’s no sweat pouring out, sure you get warm but that goes for the entire suit. I want to Troop as I was approved - A Centurion - This is the way, I have spoken. But...everyone do as they please of course And Justin, hoping all goes well tomorrow.1 point
-
I’ll give it a shot man, cheers! From memory I was hesitant to remove any more material off the bottom of the ears as there just didn’t seem to be enough of it! Of course I 100% admit to making many mistakes when I first trimmed this. So now (with what I feel is greater knowledge, and dare I say skill) I’m just trying to make things as right as I can1 point
-
As far as I know only 850 is currently doing the R1 in ABS. As for comfort, about the same, as for mobility, it's all dependent on how you build it and how it fits you. I know I have more mobility than my ANH, and I can suit up on my own with relative ease. A lot of that came about during assembly and how secure I wanted things, and how parts connected. Sent from my SM-N950U using Tapatalk1 point
-
Twelveravens, glad you liked the armor build. We here at 850 like to see people happy. We love the feedback, totally understand the belt issue. Ken Morse built his into a mimban.. we built one the other day for a client..i have some pics i can post once i figure out how to. If anyone else is interested we have them available on website. We have nine 9 going out and will be starting a collection on a new run in a few weeks if anyone is interested. Minimum of 6-8 weeks turn around once plastic is here and formed. (Times subject to change). UPDATE: Next people to ship out are as follows. Nils from germany Brad from Houston Shara from Cupertino Shawn from canyon country Tom from Belgium Thanks for your continued support. Feel free to email us. [email protected]1 point
-
I’ve removed some posts that were a bit too far. If something no longer makes sense that may be why. If so let me know.1 point
-
Hi Scott, May this info could be usefull. Type: AM (Armor Master) Country: USA Contact: [email protected] Kit: ABS. All body armor components including face piece and ear pieces are .090 ABS. The one piece dome/back is formed using .125 ABS, as this piece is formed over a rather deep mold and anything thinner can cause thin regions which will eventually crack or fracture. White .060 ABS blanks included to cut as cover-strips. Availability: Normally 4-6 weeks or less. Assembly: Comes trimmed out of the box, but you will still be required to adjust for proper fit to your body size. Good choice for large troopers, but can be cut down. Comments: Chest and back molds have been updated to address past concerns, and are now acceptable to Centurion level. They are now including a custom, die-cut Imperial cog themed helmet liner for the helmets, mounting velcro included. They're very comfortable and take three minutes to install. Hovis are professionally cast aluminum. Hero helmets are now available. Cheers and good luck with your project.1 point
-
Hello Sherry! Don't worry! Never too short to be a Stormtrooper! You may have come across Cricket's Build Thread. A legend when it comes to tiny troopers. Her build thread can be found here: I am sure you are studying that. So that would be a great start. Once you start getting your armor, post up tons of pictures! We are here to help!1 point


.jpg.7a4780cdc1e2b16ade6570dd9305aaba.jpg)