Leaderboard


Popular Content
Showing content with the highest reputation on 08/21/2019 in Posts
-
This all sounds very promising. Vacuum pots aren't too expensive for a small that would easily fit scopes mags and many of the smaller parts, and I'm sure well worth the quality difference. I'd happily pay more for bubble free casts that require less time to clean up Cant wait to see some product and pricing.3 points
-
You're right. Waiting is tough. Totally understand the manpower issues.2 points
-
Thanks Q. Hoping I can get it right. Updates to come soon.2 points
-
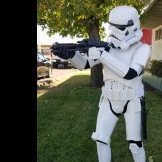
Time for an update. I haven't had much time to work on the armor, but did determine the microphones are worthless for this application. I ended up with a slightly larger mic, with a pre-amp built in: I also finally had a friend over that could get some better photos. The helmet is not complete, so the lens is just sort of placed in there over the screws, and the ears are taped on. But the stripes are looking pretty good! Trooperbay decals. I didn't trim the upper thighs yet. And there seems to be alignment issues with my left limbs. Dying the boots is a tedious process and there is still dye left. I think it they'll need all of it.2 points
-
The way the pictures look I would trim and increase the shim size. Your are going to shim and put PVC paste in to meld it together. That's my suggestion. Good luck!2 points
-
So we had one of those guys that hits neighborhoods this week come through and try to paint house numbers on the curbs. Ours was looking pretty faded and my wife was interested in having it done. Hold the phone! I am self admitted cheap so I said I’ll do it myself. Now the guy did good work and it was pretty cool. Here’s our neighbors. So not to be outdone I got to thinking.... and found an image on google and a StarWars font and made a template. And ultimately had to represent my fellow TK’s.1 point
-
You'll find the right forearm of ATA is a lot rounder compared to the left, as I've had practice with a heat gun I heated both top and bottoms then gently applied some pressure form the side so they became more rounded. With skinny arms I also added a few pieces of foam inside to help them sit central. I have seen people use a hot water bath and still be able to adjust, I just prefer a heat gun as it's a lot quicker BUT it does take some practice. Also agree your thighs need to come up a lot, you will need some space between them and your shins when you attach the sniper plate ant thigh ammo strips1 point
-
Depending on the different makers I've seen the odd sized comparisons on quite a few. You don't want them too tight as they may dig into your ankles while walking, also wear the top coat of the leather. I added a little foam to the insides of mine which also helps keep them a little higher as I had a big gap between shins and thighs. You may need to trim to the V but just do small cuts and try in between, better off too big than too small1 point
-
Nice on the kidney but looks like you may have squashed the ab plate rivets a little too much from that image. Toothpicks are handy to use to help clean up excess paint.1 point
-
Have you thought about shortening your arms? Think about it, that might solve the problem. I think it looks good the way it’s going. Sent from my iPhone using Tapatalk1 point
-
napalmseth, I did the automotive paint myself but if you are not set up for it (and it ironically may be cheaper) to have someone do the paint for you. There is always the option to just rattle can it but I can not say how it will look. The advantage of rattle can is touching up scratches and dings. I have used nail polish and touch up pens for any touch ups I needed to do but its noticeable. LTM, thanks brother. See you soon.1 point
-
Hi, I think you could assemble from botton to top, here are a reference photos,1 point
-
Looking at your forearms, your right forearm compared to the left one, looks a little wide, maybe you can reduce it a little and you can trim the return edge of the the inside of the front of them. OPTIONAL Level three certification (if applicable): No return edge on the inside of the front of the forearm is allowed. cheers1 point
-
Hi Jayke, yes, the gap between the thighs and cod looks a bit much, minimal gap is the ideal . now you can trim the return edge to have more room and bring them up.1 point
-
Got it thanks for the advice! I still need to do that as well as remove a blue strip that is hidden under the ear piece and paint the screws/rivets white.1 point
-
Congratulations Trooper!!!1 point
-
1 point
-
Congrats Rodrigo, good job!!!! Enviado desde mi SM-N950F mediante Tapatalk1 point
-
Very nice, great to see there may be another option for purchasers, at times they can be hard to find. Looking forward to seeing the progress.1 point
-
Nice work trooper, just a couple of things you could do to really shine. Knee ammo strip has some return edge left on the top, you can see the curve and trim line. You could also increase the size of the curve on the bottom of the thigh ammo strip. Teeth should not have any paint on the gums, from the CRL: Frown is painted gray and does not leave the teeth area. Thigh cover strip should be cut straight across not angled Appears you cut the bottom of the sniper plate on angles, should be straight across, but see what the DO's say You could also trim a little more off your smaller ab plate Helmet brow for a "Stunt" is a little low but again up to the DO's. Normally the "Hero" version has a lower brow On a few images your drop boxes don't look like they are in alignment with the end of the belt, you may need to add a couple dabs of E600 to help them stay there. Good luck with approval.1 point
-
It is best when painting tube stripes to use a white first, this way if there is any bleed at least it will be white and it should fill any little gaps before going over with blue. Also it may just be the image but what width is the stripes, should be @16mm .1 point
-
I’ve always used brush on model paint for the tube stripes, and have had the same results you had there. Paint bleed. Some people brush on a white paint first, then follow up with the blue. Reason being that the white will bleed through first, being less noticeable. That being said, you need to clean up those stripes. Get some paint thinner and strong sharp toothpicks. Dip the toothpick in the thinner and start removing the excess. I hope the Rust-Oleum lifts off as nice as Testors does.1 point
-
In addition to what Dave mentioned here's a decent video illustrating how to install kidney shims ---------------1 point
-
That moment when you realize you don't know what you don't know. I see I can take a bunch off of the front sides of the chest plate (leaving the bottom alone as it seems that rivets are mounted underneath. I found myself stuck, so I paused to find a number of great threads on what to trim next, and I think I know how to proceed with the ab plate, kidney, posterior, and codpiece. I can see that after trying on the kidney and ab plate, it looks like I"m in for some shimming :-/ and I am looking for the best tutorial - this one (by MoSc0ut, also with WTF armor) seems quite complete. I am also looking ahead to snaps and strapping, and found some good stuff on strapping, and snap placement. And since have have pieces of this project running in parallel, I'm checking to see if this spray paint works for the thermal detonator. And I was considering sourcing TD clips, though I see they can be made with 1" aluminum strip. (Referenced here.)1 point
-
We did a little troop down the street to see how it all flows and he loves it! Sent from my SM-G955F using Tapatalk1 point
-
Some updates! This may be a long one... Realized that I don't think I ever posted my helmet... but here it is! Arrived safe and sound. The detail is impressive and while it is decently sturdy and very lightweight, I will definitely be reinforcing it - I don't think it would take impact or a fall from any height well. I also mentioned having had my undersuit tailored... well, here's some pics of that too! It fits much better now that a lot of the slack was taken out. It's still a bit loose so I have good mobility, but we'll see if I end up needing to have it taken in more once there's armor on top. I'm wearing a black t-shirt underneath so you can't see where the mesh is that well, but the internet didn't need to see my back and stomach lol I also went and dug around until I found the velcro-based strapping kit that I pulled out of my Anovos suit when I switched to snaps. I will likely use it to help start mocking up fitment for the suit. Sure, I'll waste some Velcro, but I think it'll be worth it to learn and size the kit properly. I will also likely let any of the other group build members try mine on so they can adjust and mark theirs for trimming, if needed. Mine may need some off the top of the barrel, and I will likely be splitting the back of the thighs at the cover strip to overlap them and size them down a bit. The kitten's name is Zero and at 10 weeks old, he was terribly curious about what was going on. I also started playing around with coatings and ended up spraying the back of one of my handguards with Flex Seal to test it out. I was pretty pleased with the finish and it stopped the itchiness that the armor still caused, even after a thorough washing with a red Brillo pad. I'll probably be spraying the entire inside of my kit with this stuff after I have reinforced it (still figuring out how to do so). I was also pleased to see that industrial Velcro still stuck to the finish and was able to attach the handguard to my Endor Finders gloves securely. The gloves are awesome and the lining is very comfortable, if likely a bit warm for us out here in CA. Finally, I started trying to mock up and assemble the forearms and biceps - it's been a topic of much debate how we want to end up attaching the pieces together, but I decided to give 1", regular (non-industrial) Velcro a try. I wasn't super stoked on how it came out - it's pretty visible, though mostly from the back. I may try to reposition it further from the edge and see if that does anything. The thickness is also somewhat concerning, but we need to be able to get these apart, as I confirmed that there's no way my hand will fit through the hole at the wrist without opening them up. I'm hesitant to use glue pretty much anywhere on the suit as a result. There's some discussion of Boba-gauntlet-style magnets, but we'll get to that. Can anyone also confirm that this is how the pieces are supposed to sit? Feels kind of awkward for sure. From the elbow down: And from the wrist down: I also realized that when we distributing all the pieces after the bulk shipping, I ended up with two of the same outside bicep, when I need with a cover strip on each side for it to assemble properly. Gotta figure out which of the 7 other guys has the same problem and switch with them! D'oh! Anyways, more test fitting with some assistance coming soon. I mocked up the chest how it should assemble (except the shoulder straps will go UNDER the chest plate - I just couldn't get it to sit like that for the photo), but I think I'm going to hang the cod, then use that to help position the barrel, then fit the chest OVER that. Gonna need some extra hands though, so not today. Aaaand finally, I was able to take the kit to my paint guy Andrew "Bondo" Babish with Paint by Bondo - he quoted $500 flat to surface prep, prime, and paint the whole kit with flexible automotive quality paint, handpainted color details on the helmet and ab, and clear coat on top. Not too shabby and this is likely the route I'll go. Just for fun, he sent me a pic of a helmet he painted for the big 501st TK Helmet art exhibit they had a while back. At the time, he was painting for West Coast Choppers, so there's Jesse James next to him if anyone remembers that guy. Pretty cool. Plain white paint and a couple helmet details should be no problem for him, I daresay. More updates soon, but things are moving and we're problem solving as we go!1 point
-
Awesome!! Take that house number painter guy1 point
-
Great info. Jeff! I’m working on a clone Airborne now, and I think I’ll be able to carry over some of your strapping methods to my build.1 point
-
I made some more graphics. Doing the red and white together was a bit of a pain, but if I was going to do it, it had to be done right. I'm pretty happy with the way it came out. Eventually I'll cover the Husky logo and move my TK number there.1 point
-
I can attest as an OT TK and trooped together, this armor looks awesome and with the backpack appears very heavy! He gets tons of looks and to anyone with OCD his armor is "correct" compared to our wonkiness.1 point
-
The other factor that drew me to this kit was the size. Jimm built it for 5’7”-5’10”. I’m short. Only 5’6”. 850 builds specifically for taller builds. I’m just going to have to bite the bullet and do an auto shop for paint. Sent from my iPhone using Tapatalk1 point
-
Hi all, Well, I put my new lid with my armour yesterday and I’m really pleased with the colour match. There’s certainly a subtle difference, however, there was also a different in ANH between armour and lid. So, I’m happy with that. And yes - I need to re-paint my ab buttons...;-)1 point
-
Hey Dan Sorry to hijack but this photo makes it look like "he" has mascara or had a very bad night sleep1 point