Leaderboard


Popular Content
Showing content with the highest reputation on 08/02/2019 in all areas
-
Well, what do you guys think? Sent from my iPhone using Tapatalk2 points
-
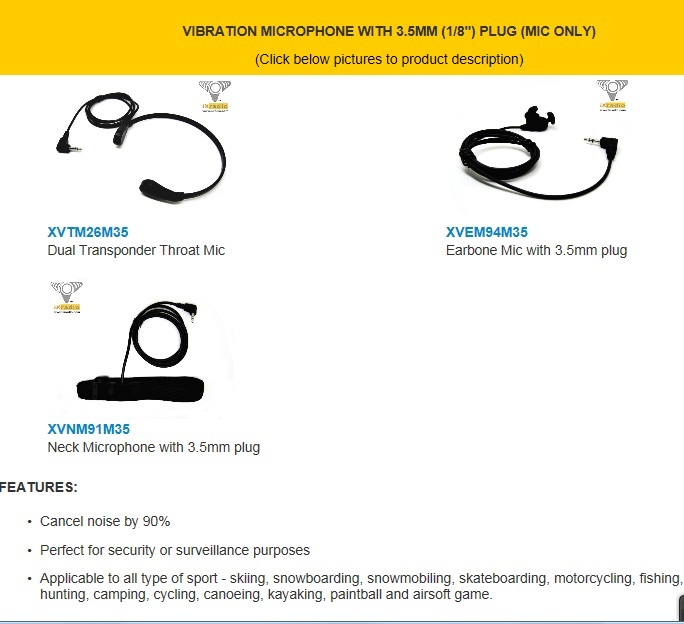
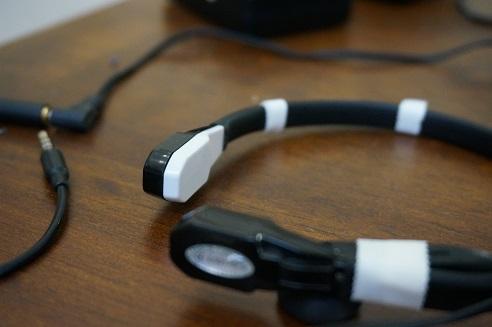
Everyone, There appears to be some interest in finding alternative microphones for use with our armor amp systems. The few users who stated they have used a throat mic did not give too much feedback as to their success, impressions of said microphones or what did they do to make it work. There is a thread on how to rewire a throat mic so it would work with a personal amplifier like an Acker. (thank you for that) I too was one of these people looking for another solution as fitting the unidirectional headset mic that comes the Acker amp worked great for me if the following conditions are met: 1) it actually fits the user's head shape AND inside the helmet comfortably. (I had to rebend the right side of my headset metal holder because the Acker one is TOO big and when I put on my helmet it pushes the mic forward off my ears.) 2) the directional mic doesn't move around or is of the correct proximity to one's mouth. (I used a bandaid to hold the mic to my cheek) 3) when using an iComm, the sound effect level is not user adjustable so if the mic signal to noise ratio is low or inconsistent the squelch noise can be quite a bit louder than the user's voice. Solution? I had a few throat mics that I used with FRS walkie talkies when I used to play airsoft and thought why not try to make them work. Problem was they were all 2.5mm 3 conductor male pin type. Digging through my box of miscellaneous electronics junk and I found a female 2.5mm to 3.5mm adapter I used to use for a wired cell headset back in the day before speakerphones or Bluetooth. I plugged in my 2.5mm pin throat mic into this adapter and then into the Acker and I was in business! I didn't need to wire in a 1.5v power source as mentioned in the other post but that could be beause the Acker supplies power through the mic input port. Of course in this application the ear piece of the throat mic was useless but at least the mic worked. I thought why doesn't someone make a throat mic without the earphone? There would be plenty of other applications for a mic only use right? Since I still had the packaging of the maker of my throat mic, there was the URL of their company and punched up the web browser. Check out the different ones that they offer here at http://www.ixradio.com/shop/computer-accessory/ This vendor seems to change their website every so often. If the above link goes dead just go to their home page http://www.ixradio.com/ and look for the mic only tab. Since it is the same company that makes the one I have and I emailed them about Aker compatibility, they responded shouldn't be any problems. I think we have a viable solution for those looking for an alternative to using an acustic mic. With these no adapters are required since they are 3.5mm male pin. Note that they also carry a few personal amplifiers (albeit pricy) as well, but I could not tell you if they are iComm compatible since the iComm draws some of its power from the Acker. My observations: Using the throat mic with the Acker directly was great. There wasn't any background noise (not that there were any previously using the headset) But the sound level was consistent and I can take off and put on my helmet without any interference or visible wires coming down from my head. The sound quality was a tiny bit hollow sounding so this added some electronic muffled effect to my speech. Not bad and I was pleased. But I'm a Stormtrooper and there should be a squelch click at the beginning and end of my transmission right? Since I also owned the iComm, I plugged it in and gave it another try. Again, I had to experiment a little with the optimum volume level where the squelch effect kind of matched my spoken voice. Here the solution was placement of the mic on my throat as that greatly affected my voice volume. Once I found the sweet spot, I knew I was in business. Now everyone's mileage will vary but for me, I think I found my microphone solution and will try it this weekend at two local Golden Gate Garrison troops and provide additional information. Thanks for your interest.
 1 point
 -
NOTICE- see my 10-1-2020 comments. This thread will not continue to update, you can follow Kyle's WIP thread to see how we are strapping his ROTK. Because I have been asked numerous questions about how I did my strapping, I am making this tutorial on how I strapped my ROTK. First, you need to decide on two things before you do anything with your kit. 1. Do you plan on lining the inside of the armor? I chose to line the inside of my armor with flex seal liquid white that was applied with a paint brush. The decision to line the inside of the armor was made for two reasons. One was that the armor is fiberglass and was very abrasive on the inside. The second reason was because I paid for the under-suit and wanted to prolong it wearing out. 2. How do you plan on attaching the strapping? In most places I adhered the straps to the armor with PC-7 putty. Normal TKs adhere their strapping with Velcro. I was not comfortable with how well this would work so I went with a permanent PC-7. The Velcro may work just fine; however, I cannot attest to this. So, if you plan on lining the inside of the armor, you will want to mask any area you plan on applying Velcro because the Velcro will not stick to the flex seal and removing the flex seal is damn hard. It embeds into the fiberglass and even after sanding and using chemicals, it still was not receptive to apply Velcro. This should also be considered when you are planning out the Velcro to hold the leg and arms pieces closed. While I am talking about this, I would like to suggest that you attempt to use Velcro on the front and back of the lower leg armor. I did not do this, instead I permanently closed the front side of the leg armor and used Velcro for the back and this has caused stress on the leg armor when putting it on and taking it off. This has led to cracks. If I get around to ordering another set of RO armor, I will try to close the legs on the front and back with Velcro, so just a suggestion. I digress… so once you know if you are lining the armor and what attachment method you will go with you will need the following: Note: everything is black unless noted and all Velcro is 3M industrial sticky back Velcro except the drop box Velcro, its 1” “sewn on” Velcro with no backing. Quantity Length Width Use 2 31” 1.5” Nylon Webbing Abdominal Shoulder Straps 2 #24 4 part snaps Abdominal Shoulder Straps 2 1.5” Plastic loop Abdominal Shoulder Straps 2 4” 1.5” Velcro (both sides) Abdominal Shoulder Straps 2 5” 1.5” Nylon Webbing Abdominal Shoulder Straps 2 7” 5/8” Nylon Webbing Abdominal Back Closure 2 5” 5/8” Nylon Webbing Abdominal Back Closure 2 5/8” Plastic side release buckles 2 6” 1” Nylon Webbing Abdominal connecting Posterior Armor 4 #24 4 part snaps Abdominal connecting Posterior Armor 2 5” 1” Nylon Webbing Abdominal connecting Posterior Armor 2 1.5” 1” Velcro both sides Abdominal connecting Posterior Armor 3 5” 1” Nylon Webbing Abdominal connecting Cod Armor 6 #24 4 part snaps Abdominal connecting Cod Armor 1 5” 1” Nylon Webbing Connecting Cod to Posterior 1 11” 1” Elastic Webbing Connecting Cod to Posterior 1 #24 4 part snaps Connecting Cod to Posterior 2 12” 1” Nylon Webbing Abdominal to Legs 2 6” 1” Nylon Webbing Abdominal to Legs 2 1” Plastic side release buckles Abdominal to Legs 2 2.5” 1” Elastic Webbing retention loops Abdominal to Legs 2 15” 2” Elastic Webbing Shoulder straps for chest to back armor 2 10” 2” Velcro hard side Shoulder straps for chest to back armor 4 #24 4 part snaps Shoulder straps for chest to back armor 2 3” 1” Elastic Webbing shoulder armor to shoulder straps 2 #24 4 part snaps shoulder armor to shoulder straps 2 5” 1” Elastic Webbing Shoulder Armor to Bicep Armor 4 #24 4 part snaps shoulder armor to bicep armor 2 6” 1” “Sewn on” soft Velcro drop boxes to box belt 2 6” 2” Velcro hard side drop boxes to box belt So all of these parts considered, this is your shopping list: Quantity Length Width Description 1 72” 1.5” Black Nylon Webbing 1 24” 5/8” Black Nylon Webbing 1 78” 1” Black Nylon Webbing 1 32” 1” Black Elastic Webbing 1 30” 2” Heavy Duty Black Elastic Webbing 23 #24 4 part snaps 2 5/8” Black plastic side release buckles 2 1” Black plastic side release buckles 2 1” Black plastic loops 1 box 15’ 2” Black Industrial Strength sticky back Velcro 1 12” 1” Sew on black Velcro In addition to these materials you will also need the following: Sewing machine (preferably an industrial machine but most of this stuff can be sewn with a standard sewing machine). Black bonded nylon thread, I use #69 bonded nylon thread, but I also have an industrial machine, if you are using a standard sewing machine just get some black nylon thread general purpose. Webbing hot knife/ cutter. You can just cut the webbing with a box cutter or scissors and the melt the end with a lighter but this can be tedious if you are cutting a lot of webbing. I use a hot cutter like this one for $74.99 https://www.ebay.com/itm/Electric-Rope-Cutter-For-Paracord-Cord-Webbing-Belting-and-Blade-/293128089661 Snap setting tool and a hammer. You will need the anvil and the punch set. The anvil should be double sided to accommodate the cap and the eyelet. I recommend this tool set found on Amazon. https://www.amazon.com/Snap-Setting-Snaps-Vaughan-Bros/dp/B074HKBBW1 Most of these materials can be found at Joann’s or a similar craft stores but I would suggest that you purchase these materials from Amazon or webbing supply stores. On amazon you can order smaller rolls of webbing like 10’ in length; however, most webbing supply stores will require you to purchase full rolls which are often 1,000 yards and quite costly. Additionally, you can use polypropylene webbing instead of nylon webbing which is often cheaper but does not have the abrasion and strength of nylon webbing. Ok so that is the list of materials and tools needed. In my next update, I will cut and assemble the straps and show where they go and what they do. Thanks for the interest.1 point
-
Well, today is BBB Day. And I’m officially intimidated and overwhelmed. Haha! Sent from my iPhone using Tapatalk1 point
-
I use a Stanley 50gal job site box because I am too lazy to take the armour apart. It's brilliant but huge. Helmet goes in a motor bike bag just because I want to make sure it's not sat being squashed for any period of time, though it once took a hit in that bag.... Some people use a smaller 120L (about 70L less than the big ones) boxes. I used to but just found the fit a bit more of a faff so got a bigger one. Some use a large suitcase. I need to get one as for some troops the big Stanley is just too big and heavy to get on things like the Tube.1 point
-
I use a suitcase you stack parts inside parts but I do have a seperate helmet bag. Basically it like a bowling ball bag with my TK ID stitched into it and FISD shield patches and rank patches added. [emoji4] Sent from my iPhone using Tapatalk1 point
-
Hey Tony, here it is all installed and working1 point
-
It has admittedly been awhile since i looked over your pistol models but i seem to recall they were based off of the glock 19 frame. I dont personally own a g19 but ive handled many and thats what it closely resembled with the shortness of the grip. Perhaps you have updated the models since. Either way, i'm using a different g17 model to base the grip off of. Theres definitely some differences between the toy and the blasters shown at SDCC. Again, for now i'm heavily basing my model off the toy as i think that's probably the best bet for most of the detail, but definitely taking some of the cues from the pictures ive seen from SDCC as well.1 point
-
Trying to upload the pictures from BBB day, took alot from all angles and so alot of them to put there. Once done will put link here1 point
-
Coming along nicely Craig1 point
-
So, I finally re-submitted for pre-approval!!! I know it's not required, but it gives me a warm and fuzzy feeling to know I'm on the right track to apply to my Garrison. Once that is done, I start some mods to head to Expert status. I did some mods to help the armor fit better: I swapped out the left side elastics I installed and put proper length webbing. This along with an additional snap added to the right side elastic REALLY snugged up the armor! I have to suck in my gut a bit, but the side gaps have been reduced significantly. Right side elastic now has 3 snaps. LOL I will swap this out (or leave it...), depending on how much I have to eat that day... Put two large tabs of hook Velcro on the chest and Ab, far enough apart that when I use a length of 2" elastic stretched almost as far as it will go, it draws the two pieces together. The Velcro tab from the bell to bicep won't work. When I stretch the bell to shoulder attachment elastic and try to do the snap, the Velcro pulls apart. I will install a snap on the strap instead. SO, using my previous to do list: Buy thicker white elastic string for shoulder strapping. I have thin double looped thin elastic to hold ribbed shoulder to white elastic strap underneath. DONE Fix the belt snaps so they don't pop off Ab. I have bent the ABS belt, and replaced one male snap on the Ab, but the snaps still fail after a bit or won't even hold. I'll replace both female snaps on the belt and see if that helps. Belt snaps still popping off. I haven't replaced the female portions on the belt. Is there a link to snap troubleshooting anywhere? Possibly Install interior strapping to help raise the cod. DONE Finish bringing TD to Centurion DONE I still have to trim, paint and install the new Hero ear pieces. I will have to look through threads on how to properly do this so there is a tight fit with little open seam between ears and helmet. The ATS ear pieces, while excellent quality, don't have very good trim lines. Will start on this after Basic approval Finish helmet electronics. Not required but I wanna get it done. Ongoing The biggest (and hopefully only) issue that will keep me from Centurion will be those pesky bells,... This is still an issue. No matter how I position my arms and shoulders, the bells won't move closer to the chest. I may have to order bells from ATA... Next biggest Centurion hold back is the Ab / Kidney opening. I'll leave this to last as I want to hold off filling in the left side holes, adding shims and redoing all that stuff. This has gotten much better after adjusting and replacing some straps. A few more lbs lost and they should close up. The thigh straps to my belt still need to have a loop sewn in them. I just wrapped them around the belt to make sure they were at the proper distance from the cod/Ab. So, just awaiting pre-approval now...1 point
-
The toy looks surprisingly close, but there are a few differences to the on-screen blaster. Fairly minor, but present.1 point
-
Cool, thanks for your replies! So i think i will go for the painting then :-) The painting in general goes very well, unfortunately i forgot to make pictures. So i will add more pictures when the blaster is assembled. Gesendet von iPhone mit Tapatalk1 point
-
Austin --- You don't say where you live, but wherever it is there's sure to be a 501st Garrison that's local to you. In addition to asking questions here, contact your local Garrison. Not only will they be able to give you advice, but by attending your Garrison's event you can get an up-close look at a variety of armors. A.J.1 point
-
Thank you Tony, appreciate it Brother. And thank you for the amazing products and support.1 point
-
Plainsrunner, you hit on the point I was trying to make in the previous post. I permanently closed off the front side of the legs and arms and used Velcro to close the back seam and this has caused stress cracks. My suggestion was to experiment and see if its possible to keep the two halves of the armor separate and close both the front and back with Velcro. I can not do this since I have already welded the two halves together on the front seam on my armor but you or others can try the suggested method and see if it works before going the route I did. Before we get started I wanted to add some helpful information. I recommend you use a hot glue gun when folding the webbing before stitching. Also, I recommend you use a soldering iron to melt the holes in the webbing for the snaps. First, I need to cover a few quick notes. I do not know what level of sewing you (the reader) have so lets hit some basics. Start and end all stiches with a lock stitch. That is when you run a line for 3-5 stitches then reverse over the 3-5 stitches, then resume the stitch going back over the 3-5 stitches. All sewing machines have a reverse level or button, and this is what it is meant for. This ensures the stitch is locked in place and will not pull out. Next, when possible (meaning if you have the available area) do a box stitch. This is where you stitch a rectangle then two crisscross stitches in the center. In the pictures below, look at how I sewed the Velcro, that is a box stitch. Lastly, the 4 part #24 snaps can be a bit confusing if you have not worked with them before. In the picture above from left to right you can see the 1-cap, 2-socket, 3-eyelet, 4-stud. To the left of these 4 parts is a cap and socket correctly assembled but not struck, and right of that is a eyelet and stud correctly assembled but not struck. It is entirely possible to mix these up and assemble the snap incorrectly. Also, note below the snaps are the two tool you will need the two sided anvil (seen here with the cap side up) and the punch. The next picture shows the anvil with the eyelet side up. Ok, so today I will try to explain how I made the two primary shoulder straps for the abdominal armor and the two back straps that close-up the abdominal armor. The sole purpose of the shoulder straps are to support the abdominal armor. On my armor I made these straps out of 1” wide nylon webbing but in this tutorial, I recommend you use 1.5” wide nylon webbing. I honestly do not know if it will make a difference, but I believe it would be more comfortable. My 1” straps are not uncomfortable but if I am doing this again, may as well do it right. If you do your strapping like I did you will end up having three sets of straps on your shoulders. Base layer is the straps I will demonstrate today. The next layer is the shoulder straps that connect the chest and back armor and support the shoulders. The top layer is the exposed shoulder straps that come with the armor and are made of fiberglass or the urethane rubber straps I make. If you look at the list above, you see we will need the following for the Abdominal shoulder straps: Quantity Length Width Use 2 31” 1.5” Nylon Webbing Abdominal Shoulder Straps 2 #24 4 part snaps Abdominal Shoulder Straps 2 1.5” Plastic loop Abdominal Shoulder Straps 2 4” 1.5” Velcro (both sides) Abdominal Shoulder Straps 2 5” 1.5” Nylon Webbing Abdominal Shoulder Straps After cutting all the materials this is what I have. Note: I did not have any black plastic loops in 1.5” so they are green in this picture. Next, I fold the two 5”x 1.5” nylon straps over one end of the plastic loop and use hot glue to hold the nylon closed. Also, I expose the sticky back of the Velcro and apply a 3” hard piece at the end of the 31”x1.5 nylon webbing. I space (the white chalk X) 1” then apply the 4” soft Velcro. Next I sew the Velcro on the 31” straps using a box stitch. I sew the 5” strips closed; however, I do not use a box stitch because we will be punching a hole inside the sewn rectangle for the snap. Next using soldering iron, I melt holes in the 5” nylon webbing. Next I mount the cap and socket set of snaps to the 5” straps. I use a drill to make the holes in the armor and mount the eyelet and stud set of snaps. You will want to be careful to not crack the armor when doing this. I placed the armor around a board I suspended with a vice and hammered the eyelet/stud set closed. The two holes for these snaps need to be on the front of the armor close to where I have them in the first picture of this thread (my armor hanging). Next, I run the 31” straps through the loops and you should have two assembled straps like this. The Velcro we sewed on the front end of the 31” straps allows me to adjust the straps a few inches to get the best fit. The back end of the 31” straps are adhered to the inside of the abdominal armor along the back opening. How you adhere the straps is up to you and you should test fit them and cut any unneeded length of the 31” straps from the back end before finalizing how you mount them. Once the back end of the straps are adhered to the armor, the front side should snap like this. The straps should crisscross in the back. So I hope that was somewhat clear… Next, we will make the two straps that close-up the back of the abdominal. For these straps you will need the following: Quantity Length Width Use 2 7” 5/8” Nylon Webbing Abdominal Back Closure 2 5” 5/8” Nylon Webbing Abdominal Back Closure 2 5/8” Plastic side release buckles After everything is cut you should have a set of parts like in the top of this picture. The bottom strap is a completed strap. There are two sides for plastic side release buckles and some buckles are slightly curved to fit a contour. These 5/8” buckles are curved so how I sew them is important but most of the time any logo or residue mold marks are on the back side. I wrap the 5”x5/8” strap around the female side of the buckle and fold it in half. Again, I use hot glue to hold the webbing closed for easy stitching. On the 7” strap I fold one end twice and run a stitch the width of it. This creates a finger hold to better tighten the strap down and it also prevents the strap from coming out of the male end of the buckle. Note how the strap is threaded. If you thread it incorrectly it will not hold tight when you cinch it down. These two straps are mounted to the inside back of the abdominal armor and should look like this. I made sure I could reach behind and access them so I could put my armor on and take it off myself but it does make life easier if you have someone help you put the armor on. How you adhere these two straps inside the armor is up to you. I permanently adhered these straps and given how tight I cinch these straps, I do not recommend using Velcro. Since the back plate covers this area, you could consider rivets but I felt that would stress the fiberglass. I used PC-7 putty to adhere my straps. See my build for more details on the PC-7 method. Well, I hope this is a good start. Please let me know if this tutorial is unclear or requires more detailed pictures, etc… I have more webbing and Velcro on order so it will be next week before I continue this. As always, thanks for the interest.1 point
-
Feel free to PM me at any time...im on FB Messenger also...always ready to answer any questions...ive built 3 Of the ATA suits over the years...can never ask too many so have at it..1 point
-
That's the tote I use for my TK and Dengar. Fits nicely in the SUV and is easy to get around with. Got it at Target on sale for like $9 can't go wrong!1 point