Leaderboard


Popular Content
Showing content with the highest reputation on 04/04/2019 in all areas
-
Yeah I don´t think so either and I was going to use same set up as you did but this way was easier for me2 points
-
Hi Jared - Yeah, lots more pictures would be great. Take a look at the list for Expert Infantry even and post those. That will give us a good idea of where you are. At a quick glance I'd say you're off to a good start!2 points
-
Although not a requirement listed or stated in the crl my personal opinion is with the legacy the curves on the returns help with the overall look although in the lower shins you can work them back to as little as 3mm and still retain the curve and look Sent from my iPhone using Tapatalk2 points
-
You secure them with screws and they need to be painted as per instructions2 points
-
So the boxes are resin rather than ABS? are those joins also seamless? Also not sure I would trust,say, an E600(0) glue to hold the resin which must be heavier than an ABS counterpart. Are they glossy white resin? so many questions! I want my BBB! -kicks dirt- And my questions were answered by getting past page 2. oops.2 points
-
2 points
-
Hello and welcome Commando Sev would fall under the Clonetrooper Detachment https://501stclonetroopers.com/home/ here is the 501st costume reference for basic approval https://databank.501st.com/databank/Costuming:RC_sev2 points
-
And it’s officially official now! TK 71776 reporting for duty! I can’t thank everyone who helped me through this 8 month journey! I will pay it forward the best I can! Sent from my iPhone using Tapatalk2 points
-
I’ll bring the trampoline Sent from my iPhone using Tapatalk1 point
-
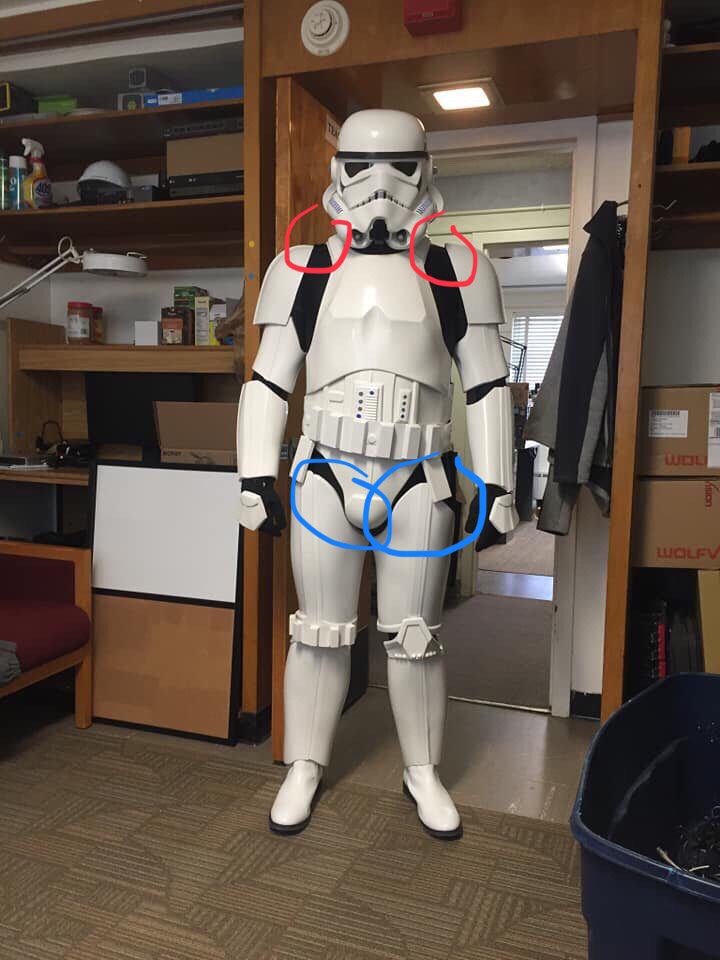
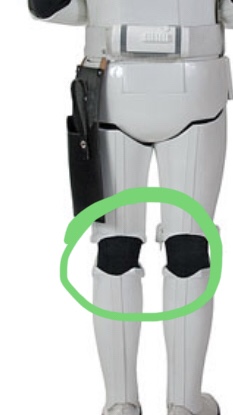
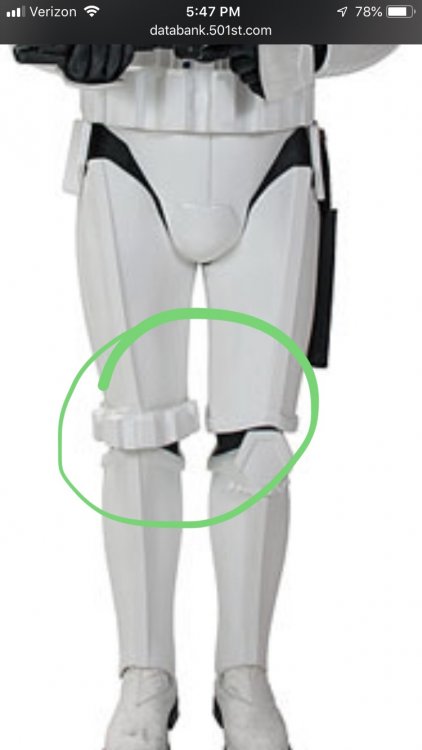
My opinion is move the bells closer to the shoulder bridges and see how that works (marked in red) You can also shave down the tops of the thighs (blue) to raise them up and give you a bit more knee room to walk, just stay with the natural contour. I wouldn’t go too crazy just yet because you still have to velcro the calves which might help a bit. You’ll notice the stock CRL photo has some black around the knee (green), I know some purist say go for minimal black showing everywhere but I’m a firm believer if your not comfortable your not gonna want to wear this for hours on end and you will be walking a lot. You can also see on the back of the CRL pic the calf and bottom rear thigh are cut slightly curved to help bend the knee. So my opinion would be when you get the velcro do another test fit and if it’s still not better then I’d personally adjust the length a bit. Sent from my iPhone using Tapatalk

 1 point
 -
Nice work, as suggested some more photos would help, just a couple of things I can see right away, shoulder bells are too far away from your shoulder straps, thighs could come up a bit, your right shin looks very wide at the base. Cover strips look very narrow and can see a lot of the ridges on the thighs and shins but again better photos would help. Also looks like your forearms have the same issue with the narrow cover strips. AB and belt are on an angle, may be the way you suited up, could be a strapping issue. Throw up some more photos for us and we can give you a better idea of how you are looking1 point
-
Speaking of which, I really wanted to mimic your strapping but that was waaaay out of my league1 point
-
Yea whatever works. Kinda like internal strapping, who cares so long as it's not required to be seen.1 point
-
I’m honoured [emoji3526] Sent from my iPhone using Tapatalk Pro1 point
-
Nope, I made my own also and actually gave you the technical documentation for you to sell yours, remember? lol1 point
-
I use it for mine as well1 point
-
Thanks1 point
-
I use bungie cord and a piece of strapping for my boxes. More flexible that way Sent from my SM-G973U using Tapatalk1 point
-
Sadly to pass basic quite a few the assembly instruction areas will need to be ditched for something more accurate. Hurtle #2 the Ab and Kidney seam. The entry seams are not on the side as per the instructions, it's one seam and it's in the back under the TD. Abdomen Section · The abdomen section must wrap around the wearer's body without a visible seam.1 point
-
Hey Jared, looks good. Only glaring thing I see is your shoulder bells are too far out. They need to be closer to your body/shoulder bridges. Other then that it’s hard to tell but maybe realign the arms. Your thighs and calves look very close, can you walk in that thing? Sent from my iPhone using Tapatalk1 point
-
Yeah it´s gonna be awesome1 point
-
Coming along nicely Lucy , cute puppers lol Not being as knowledgeable when it comes to these kits so excuse me for asking, but is a requirement to retain the lower calf return edge? TK armor it's removed.1 point
-
Not to be a Debbie downer here but the instructions tell you to velcro the inner chest to the back/yoke. That means there will be a seam at the shoulders, and I've seen no seams on the screen armor except for Phasma. Hurdle #11 point
-
This is a good sign https://cdn.shopify.com/s/files/1/0346/5761/files/FO-Armor-KIT-Instructions_VER1.1_040419.pdf?441 point
-
Nice job on the ears!1 point
-
Still just trimming parts as time allows. I did go ahead and coat the interior of the helmet with Plastidip so it will have time to cure and stop smelling. Like my own TK bucket I gave the finish a rough texture, this helps with any adhesion needs. I also painted the frown & vocoder and installed the hovi tips:1 point
-
Had help with the sizing of my calves. Was advised to make wider finishing strips, so we measured and I cut 2 strips, 1 3/4 inches wide. Because the calf is so curvy on this kit, I dipped the finishing strips in boiling water and shaped them into a loose "S" shape. That worked beautifully. Was able to glue them on with little effort. Oh, and I got to meet this cute pup named Winnie. She didn't like me at first, but she accepted me eventually.1 point
-
Good to see you back on the armor! Looks good. As you mentioned, may need to re-set the snap placement on the either the shoulder/backplate or the snaps between the backplate and kidney piece. But Greg made a really important point that the belt, when worn pushing things together a bit and will give you a better idea of how the parts fit on you. It may reveal that it pulls the lower armor parts up a touch and help decrease the gap between backplate and kidney. My butt plate flares out quite a bit but when you have the whole suit on, especially the belt, you really cant notice it.1 point
-
It's coming along, Robert. For the back to kidney, I had to use a combination of nylon webbing and elastic to keep it looking flush. I had nylon on the outside connections to keep things in place and elastic in the middle to allow some more movement when bending over and such. The butt piece will want to flare out a bit. This is common on most kits and often seen in the movies too. I moved my outside connections closer to the edge and gave the butt piece a quick hot both to reshape it (just a little). This worked really well - no more butt flare. Also, keep in mind these pieces will fit a little differently when you have your belt on. Certainly worth wrapping your belt around and seeing what it does to the placement of the various pieces. Keep up the good work!1 point
-
Thank you Chris! I unintentionally got carried away, so thanks for stepping in.1 point
-
Sorry to be the party pooper but you can't sell things in this forum, please use the Sales Sections. I'll be editing out the link after I post this. Also you are walking the line of "merch" with these by mentioning det names on the table one so you might want to consider that as well if you post them to the sales forum.1 point
-
Congratulations once again, you can request higher access here1 point
-
Really going all-out with the blaster!!! Re: the clips it's true the screen-used had squared off corners, but this is not something we require. And take your time with the photos - we'll be here when you're ready.1 point
-
I received my kit is 3 shipments and with most the Beta group.1 point
-
Congratulations Arthur, never doubted you for a moment1 point
-
I do have a little foam inside my forearms to stop them rotating but find I don't need any on my thighs as the strapping will hold them quite straight, I do have some return edge underneath the thigh lower ridge as well which helps, you may find a little foam will help a lot.1 point
-
Nice work, just trim that smaller ab plate and you're done1 point
-
Just note that the TD clips shouldn't have rounded corners but see what the DO's have say1 point
-
Nice idea with the tube insert.1 point
-
Thank you. Took few more pictures yesterday. Pan head slotted screws : Old picture from before I glued the pieces.1 point
-
I updated my request - could you actually post all new full-body photos (not just the action photo) since they're all done with the Stunt helmet. Thanks!1 point
-
If you have any questions regarding my aluminum version bell supports feel free to shoot me a PM Edwin. As Glen mentioned his ABS version are something you can make yourself. Oh and congratulations Kris1 point
-
Um. Want.1 point
-
It’s quick and dirty, but here you go. Sent from my iPhone using Tapatalk1 point
-
One last post here. I’ve started a new build for a sandtrooper. But before I bail on this thread, I wanted to share one last image. I have this on order from Karbonite Kustoms. You can find him on Facebook. So sweet. Sent from my iPhone using Tapatalk1 point