Leaderboard


Popular Content
Showing content with the highest reputation on 02/28/2019 in Posts
-
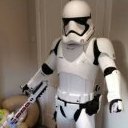
This is my Anovos forearm in an RWA bicep. IMO close enough for government work, especially in natural light. RWA ABS (flash) by Christopher Pearson, on Flickr RWA ABS (indoor shade) by Christopher Pearson, on Flickr TM is also pretty close (disclosure he sent me those hand guards purely to do the colour comparison, I still have them if you want more photos) Troopermaster ABS (direct sun) by Christopher Pearson, on Flickr Troopermaster ABS (Indoor shade light) by Christopher Pearson, on Flickr The TM is probably a touch closer, but you do need to remember the white will change for each batch and also how long your armour has been in the sun.3 points
-
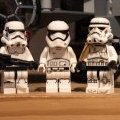
Yeah it can be hard to take it slow... Just get lots of clamps and magnets so you can have multiple parts going at the same time.2 points
-
Lots of good advice coming in :-) Gluing my forearms together was a several-day process. It was difficult to be patient, but paid off in the end. For clarity, I'll detail my steps here—you may already be doing them, but just in case. Day 1: Glued the inner coverstrips to the the outer forearm, let cure for 24 hours Day 2: Glued one edge of the inner forearm to the matching inner coverstrip, let cure for 24 hours Day 3: Glued the other edge of the inner forearm to the matching inner coverstrip, closing the forearm, and let cure for 24 hours Day 4: Aligned and glued the first finishing strip, let cure for 24 hours Day 5: Aligned and glued the second finishing strip, let cure for 24 hours And done! The E6000 has held very strong for me by following this method. I did my biceps, thighs and shins the same way. Keep it up trooper!2 points
-
I have had a LOT of experience gluing hand guards to gloves, lol. I have experimented with CA (super) glue, rubber cement, and even Elmer's. The one that I found that works the best (pardon the pun) hands down is good ol' E-6000. CA glue can (and will) get brittle over time, and can peel off. E-6000 has the bonding and flexibility that I found works best. After scuffing up and them thoroughly cleaning/drying the rubber gloves, apply it just to the back of the hand guards. Smear it around evenly, making sure not to go too heavy near the edges. Lay the gloves flat, place the guards in the correct positions and then add a substantial amount of weight on top of each. (Several pounds). Wait 12-24 hours and that should do the trick.2 points
-
Going for clearance]2 points
-
Thank you guys, knew it smelled like Bantha Poodoo.1 point
-
Hi Brendan I know Andy is hard at work on your application but I just want to confirm that your belt hight is good to go1 point
-
Just don't purchase from eBay, so many vetted sellers out there with tried and tested armor available.1 point
-
Red flag 1: ebay Red flag 2: multiples of multiple parts in at least 2 different whites screams recast. I also suspect the lighter colour parts are HIPS just from the colour. Problem the third: parts are already made using who knows what glue something 4: it’s trimmed, how well?1 point
-
Blue tape is always handy when building and test fitting, looking good.1 point
-
As long as you are not applying pressure to the pieces then 24 hrs will be fine, anything that needs pressure to close then wait the full 48 hours. Make sure you rough up both pieces with sandpaper before gluing and it will help adhere. Can never have enough magnets, clamps or blue tape when building, I've doubled up on magnets since this photo1 point
-
Looking good! Always exciting to see pieces start coming together, even if only for test fits.1 point
-
Wow!!!! Thank you!!!! Now to get going on Centurion!1 point
-
Thank you. Makes sense about return edges at top. I’ll be losing more of the elbow end return edge to allow a bit more movement too. Glad others had those moments, stupid mistake but easily fixed. Did a basic test fit of body parts and think I’ll need to lose some of width from torso and kidney as currently overlap but rest feels like a good fit for my height/width. I’m 6’4” tall, slim to medium build which is why I went for AM armour but it also caters for the wider trooper so fair bit to trim. Blue tape trooper slowly taking shape Sent from my iPhone using Tapatalk1 point
-
I upgraded my undersuit Sent from my LYA-L09 using Tapatalk1 point
-
So late in the day I glued inner strips to biceps. Delighted when I took the clamps off the following day to see how well the glue had stuck to then realise my mistake. I’d glued 4 inner strips to one bicep All corrected now and will glue all cover strips at the end. Lesson learnt, know when to call it a day Currently glueing inner strips to lower arms after trimming a little width off Sent from my iPhone using Tapatalk1 point
-
Thanks Q! I appreciate the feedback! I see what you mean with the drop boxes—I'll get those fixed asap! The E-11 counter is something that was pointed out to me but that I'm nervous about attempting to fix. :-( The blaster came as a single, resin model and I'd be afraid to start cutting pieces off. If necessary, though, I'd take the plunge! In regards to the belt, I had it sitting a little lower before, but was advised to raise it up. I've read different opinions about the correct belt position relative to the ab buttons, so I'm not sure which is better—however, the gaps between my ab and my thighs were noticeably improved by raising the belt. I will certainly make a change if necessary, but raising it did seem like the right call. :-) And finally, no problem, I can produce photos of my ear screws by tomorrow if needed! Thanks for your thoughts! :-)1 point
-
Let this dry over night Sent from my iPhone using Tapatalk1 point
-
Counter modified. Enviado desde mi SM-G960F mediante Tapatalk1 point
-
A por ello Candy !!! ya lo tienes ... par de cositas y Centu !!!!!!!1 point
-
That's the way it was done in the films, and you can certainly do it if you like... BUT, those were not really meant for long-term use. Elastic will wear and stretch out over time, so I suggest attaching them using snaps. That way, you can replace the elastic as needed in the future instead of trying to peel it off the armor. I also suggest using snap/strap connection for all areas.1 point
-
As Tony mentioned, GREAT job so far.. keep it up, and and this rate you will be trooping before you know it! If you haven't been there yet, I would highly recommend checking out the FISD blaster reference thread. TONS of detailed info there.. https://www.whitearmor.net/forum/topic/32111-fisd-e-11-blaster-reference/ Also, it looks as if you have been bitten by the "accuracy bug". Before starting on your Doopydoos E-11, I would suggest getting one of Tino's @T-Jayfinishing kits. Lots of items to bring you to the next levels of realism. https://www.whitearmor.net/forum/topic/28444-fs-completion-sets-for-e-11-resin-kits-with-worldwide-tracked-shipping-and-paypal/1 point
-
If you ever have a question on how something should ideally look, Eric, always feel free to either post up a pic of the item in question and I assure you that you will get the correct answer here on the FISD.1 point
-
Can confirm, anovos is an off white creamy color in natural lighting. You could always leave another makers shins in the car until they yellow (only joking).1 point
-
I used the electronics from one of these blasters to install in me F-11D. Good cheap option.1 point
-
Awww snap. Ok, i'll try that. Thanks!!! Sent from my SM-G950U using Tapatalk1 point
-
With the stripes you don't want them on an angle, should really be a pencil width all the way. You could if careful peel them off, I'd apply some tape over the top first to keep the spacing then gently peel backwards For cleaning any excess paint I find toothpicks really helpful.1 point
-
Thanks - just new to the process and was confused getting feedback from multiple people. cheers1 point
-
Ultimately you should follow the Deployment Officer, other comments are offered so you could make adjustments before the DO's ask you too, the thigh cover strip is a definite and should have been picked up at basic approval CRL Image:1 point
-
Nice work. Looks like your counter could come further forward and a slightly downward. Just to make the build stand out your TD clips should be square on the ends not rounded You could also add a little white paint to the rims of the mic tips Large ab plate is a little over trimmed, you could take off a little more material from your smaller plate. You could also bring up your sniper plate so it covers the angle of the shin. Good luck with approval1 point
-
Nice work, just a couple of things that you could improve on, your drop boxes aren't aligned to the edge of the belt in a lot of photos, a dab of E6000 on the elastic loops can stop them moving, also looks like your counter may be a tad low Could drop the belt just a little, should line up just under the bottom button, yours appears to be covering the bottom of the button. You may also need to supply photos of your bottom helmet screws Good luck trooper1 point
-
To get a nice straight line you can use sandpaper wrapped a round a piece of wood, it's mainly the ends you need to be fit flush together though as the rest is covered with the strips. Nice work, keep it up1 point
-
Looking good so far Keith1 point
-
Went to Tokyo Disneyland and picked up some new swag The popcorn bucket is added to the already purchased R2-D2 and BB-8 buckets. The blaster has 2 light and sound modes, which is fun to play with, for only 2,500yen ( about $23USD). There is build logs existing showing some nice mod work which I might follow to make this a backup and more kid-friendly blaster for non-canon events. Will still focus on accuracy for my 3D printed blaster. I even have some spare parts that might find a use for this blaster.1 point
-
You'll still need to update your cover strip: Thigh cover strip should stop before the lower ridge1 point
-
Hi Eric, Unless my eyes our deceiving me, you'll need to replace your TD screws before we can proceed with your application. The L2 CRL states: Clips shall be attached with slotted, pan head style screws, and be black (two per clip). Yours appear to be dome-headed: Reference: Note that when you're at the hardware store to get new screws, to make sure they are pan-headed, not V-headed. Please reach out if you're having trouble locating the correct screws; @justjoseph63 sells the correct screws if you're having trouble finding them locally.1 point
-
I have been using the chat quite a bit lately and it sounds like the customer service department is very limited and they don’t get much information at all. As we know Anovos in general has a horrible communication problem with customers and apparently within too. The CSR’s always say they are asking for the information and can only give what the production department is giving to them. In my opinion it’s the production department and their lack of communication with everyone that is driving Anovos down. It sure would be nice if upper management would address customers and fans at a Con or something. I wonder if a small group of customers went to an Anovos booth at an event with posters listing our first hand experiences with Anovos, wait times and lack of communication. Something civil and factual like “Hello I am an Anovos customer and am still waiting on my order/refund for 2 years now and still no hard shipping dates”. Maybe that would get their attention.1 point
-
Looking smart Kris, good luck with approval, not that I think you will need it1 point
-
Hi Robert. One thing that worked for me when gluing the outer strips was to glue only one half of the strip at a time. First I made sure where I wanted the strip to be, then I sanded the area on the armor part & the glue side of the strip. Again, I glued only half the strip down let it set properly and then I glued the other half afterwRds. This helped keep things in place better for more and much easier to work with than trying to get both halves to stay aligned& under stress while setting.1 point
-
Good job on that armor trooper !! Glodluck with your application!!1 point
-
Approval email received! Just need to wait for the election dust to settle and I'll have my TKID!1 point
-
Thanks, Rat! Still alive over here. Garrison elections have finally gotten sorted and I've soft-picked my debut troop in April so all that remains is to get approved by then. which shouldn't be TOO hard, considering how much I'm beginning to look like a tk... another armor party on Saturday afforded the opportunity to finalize some strapping lengths and shave down some armor-bitey areas around the cod, as well as pass on some paint and advice to a couple fellow cadets who recently started their TK builds. Turns out I know a decent bit now, y'all... and what I can't remember off the top of my head, I can find in my reference photo album. Anyway, here's the (SHOULDER STRAPPING NOT IN) look: Also, pardon the lighting. This was before I reshaped the inner thighs. They're currently slimmer (but with the same curves). Forgot my holster hanging straps so no holster in pic. Loving the hinge on that side though! The other side, not so much. It has elastic strapping which is stretching far too readily, and then when it would go back together, the tab system provides just enough pressure to keep it spread apart. Also the lower snap hits my hip bone. I will be rethinking that closure. Ignore the black everywhere up top. Bib needs to be hemmed/tamed, had it on for sizing purposes. Think I'll trim my shoulder straps in the back. Anybody have input on how much I take off? Then I had to run upstairs to get cell signal. So I did. I sounded like a pile of Tupperware in a large mixer, but it was perfectly comfortable and I came downstairs with no problems. Only snag was that my left chest snaps came undone then, and whenever else I moved much. I'll have to readdress them. Then, when nobody was watching my potentially really really stupid move, I set up my camera on a timer and tried to sit down. And boy was it fun! I'll reinforce my butt plate with fiberglass tape and monitor for cracks. And try not to sit a lot. Maybe. Left to do: Sew in second halves of shoulder strap snaps (say that five times fast) Create shoulder bell-bicep wrap strap and bell-bicep hang strap Make elastic boot top cinchers Pad back thigh Rethink right ab-kidney connection Reshape lower calf openings Make strap from gloves to upper edge of forearm armor to keep cuffs from slipping down Repaint tube stripes with new brushes Mount ears, hovi mics, pad bucket Paint various hardware white Purchase ski mask/helmet liner Finish edges of neck seal bib And, longer term, I have to refinish my blaster and mess with helmet electronics. But the stuff above is more immediately necessary for approval. So.1 point
-
Hi all, I've gone and captured the final details of my power cylinders. I added the wing stubs and also dabs of grey on the ends of my resisters to mimic wiring. Also black washed my central capacitors. This isn't screen accurate but I do like how they POP especially how 'dirty' they've become. It was a complete joy getting the insulation sleeve black washed, leaving the large hint of exposed red on top to keep that part screen accurate. Sprayed Matt clear coat to seal everything. I'm FINALLY ready to walk away from this E-11 component, thanks for following me =)1 point
-
Once you get strapping on a lot of pieces will hang a lot better, I am skinny and didn't trim the sides of the ab/kidney, if I had the butt plate would have stuck out, you can just see in your side photo the same is happening. I do have room in the armor but once the strapping is on it doesn't feel loose. Also when test fitting, especially legs and arms try to wear your undersuit, it does make a difference1 point
-
I think you could pull the chest up a little. I almost had both my bridges touching. but yes you will need to trim. Everything else is looking pretty good so far.1 point
-
Occasionally a little heat is needed to adjust the angle of the edges which will come in to contact with the cover strips, you'll notice they are angled at the moment. Glue your front facing sides first and wait for the glue to fully cure before trying to glue the opposite sides and with force they should come down and curve the sides a little more.1 point
-
I'm jealous... You've labels on your strapping pack. Mine came with numbers only two weeks ago1 point
-
Jeklyn... You were asking about Drop Box thickness. Here you go. The "Billhag diagrams" -- of which this is just but a tiny sampling -- are fantastic aids for any build. Hope this helps. A.J.1 point
-
Really nice work so far!! Have you glued the forearms or biceps yet? If not, you should post up a few pics of the openings before doing so.1 point
-
Great news. With posting images to the forum most of use a 3rd party imaging host like Imgur, you can upload to Imgur, then right click on the image, select copy and paste directly into your posts, or use the "direct link" to the image, both ways work. BTW yes I can see the one image you posted1 point