Leaderboard


Popular Content
Showing content with the highest reputation on 11/27/2018 in all areas
-
It gives me great pleasure to announce the promotion of ShaSha from the attache ranks to the position of Deputy Deployment Officer. Shasha brings with her experience in assisting our vertically challenged troopers in armour modification and assembly plus a keen eye for attention to detail. Congratulations Shasha, we have every confidence you will do a fantastic job.11 points
-
Already approved by my GML, but I know there's a few things to tweak (i.e. elbows, thigh cover strips, and drop boxes have all been mentioned previously). All input appreciated. Detail shots can be supplied if needed.2 points
-
Yeah, the arms gave me fits. I didn't like the look, but was tired of fighting them. Should be an easy fix. Return edge on the chest armor is an area I noted that needed trimmed back after wearing it for a few hours. Minor trimming. Thanks for pointing it out!2 points
-
Hey Jim, Looks great. The Dans already mentioned the main items. There is not much else to pick on. Looks like your forearms could come up a bit - you have more black area at your elbow and very little at your wrist. Also, you have a lot of return edge on the sides of your chest (next to your arms). It is noticeable on the front shots as well. I don't think this would hinder acceptace at any level, but it is more of a what-looks-best kind of thing.2 points
-
So, after a LONG time I finally got back to the build. I finished it a couple weeks back, debuted it "unofficially" at two troops to work out the kinks. I was approved tonight!2 points
-
Ohh. I see. It makes sense now! Phew, thanks! This is where they currently stand. About to try them on all booted and suited up and see if I need to take more off. The left needs to be heat formed to a tighter curve, and the right needs to be made to meet better (and also trimmed, I suspect). At least you know it1 point
-
As well as shoulder elastic and the bigger rear bump on the shoulder bridges (for screen accuracy) and gap between bells and chest/back1 point
-
They told me that they are hoping to get the first ones out till Christmas and the rest till celebration Chicago. Its so crazy that they told us September 2016 was the date for the premium kits and the weeks after the pre order back in the day they told us that this much higher price is also because of the clearly earlier delivery compared to the Standard kits. Hopefully this will be the last delay for all of us who preordered1 point
-
I actually see a few thing but then again I´m mean and quite often refered to as an accuracy nut so....And Jim as you are fairly new to me I just want to say that I kid around alot so take things with a bit of salt Now I´m beeing serious though - your armor looks as stated earlier great but the new pics show some room for improvment, however minor, they still matter. Greg mentioned the chest and elbows, first pics indicated that the bicep could come down to close the gap but now I´m more inclined to agree with raising the forearms would be best or possible a combination of both. Question: how did you connect the back and chest at the shoulders? I can´t see any white fabric...which also brings me to: CRL The plastic shoulder straps need to be held down in the back via a white elastic band to the white fabric that connects/bridges the chest and back piece. On this pic you can also see that there is no big end tab on the shoulder bridges so if it were me I would chop that off - it is however allowed to keep it but none of the Troopers in the Movie had that. There is actually a topic on that matter as I got some friendly suggestions to stop giving this advise…...and now Dan replied but I failed to show reply as I was on imgur…..oh well…….anyway I keep typing and here`s the link to said topic (had to go find it....)1 point
-
ooooh boy, here it comes...1 point
-
The Dans!! [emoji1][emoji1303]1 point
-
Okey......turns out I saved to pics to Imgur so here we go CRL (for Centurion) There should be a minimal gap between the shoulder armor and the chest/back plate. Drawing the bells closer to the chest will not only make you look like these guys below but also make you a candidate for Centurion, suggested fixes are to shorten the elastic at the shoulders, remove more/all return edge att bottom of the bells. Not a required fix just, but for a cleaner look would be to lower the bicep a tad to close the gap at the elbow In the pic above you can also see the dropboxes sitting pretty much flush to the ammobelt so shorten the elastic is an easy fix. That is a CRL requriment for Centurion and also looks so much better. Drop boxes are vertically aligned with the end of the ammo belt with minimal gap between belt and box. Lastly we have the thigh cover strip that should end at the ridge Overall you did a great job1 point
-
Nice work, Jim! Just looked back over your thread, (wow, Sept 2016!!) and you’ve made a really nice job of that lid. :-) Your armour is also looking really good. A lovely fit on you. [emoji1303] As the topic of suggestions and EIB/Centurion came up, I hope you don’t mind me making a couple of suggestions. These are simple changes that will go a long way. :-) Firstly, the coverstrips on the front and rear of the thighs stop at the ridge; The drop boxes should be touching the plastic ammo belt, and the outer edges of the drop boxes aligned with the outer edges of the ammo belt - shortening your elastics should sort this; Finally, it looks like your smaller ab button might be a little large. A simple trim would take this up a notch; Really simple changes, but you’re looking smart! I’m sure basic will be a breeze for you, then on to EIB and Centurion! Keep up the great work, Jim. :-) Dan1 point
-
Will do, only hickup is that I made the suggestions during my lunchbreak so it`s on my computer at work, just got home and like the nerd I am immediately loged on but have a read in the links Mat provided in the meantime and I´ll have it uploded in the next 12 hours *yeez there´s not much downtime including sleep*1 point
-
Nice work! Sent from my iPhone using Tapatalk1 point
-
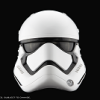
Hi Dan Echoing our other fellow Dan you have a very nice clean build I also have some small suggestions that I feel would ad to your awesomness - You have very nice painting on the helmet but I would go a bit thinner on the black outline to match screen used ones. Your pinstriping for tears and traps look spot on Regarding the tube stripes they look reversed, they normally lean forward, not something that will hinder any application but thought I mention it. You can read all about the tubes stripes here and compare to your helmet:1 point
-
Can't wait to see the Centurion application. I sincerely hope that you actually recieve good, quality, beautiful armor. Just so you can rub it in to everyone here.1 point
-
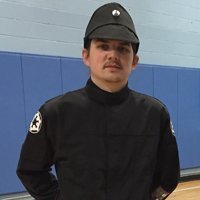
Well it’s not a trooper but if it makes you feel better Matt. This was my Halloween costume last year. Yes I bought fuzzy fabric and glued it to boots and yes you can’t see it but I sewed a bag which is hanging on my right side. It was full of beer bottles so I wouldn’t get thirsty. Pretty much it was done as a joke but the onsie was super warm and Halloween in Pa was cold last year so I got the last laugh. Sent from my iPhone using Tapatalk1 point
-
Congrats Chris and welcome to EIB!1 point
-
Yeah, they don't fit without the raised edges, but I think I've figured out my solution for that. I'm now trying to figure out if I should taper the gap from the lower to the upper parts of the forearms, or not. I didn't explain it well, so what I'll do is cut some 15mm strips, clamp them on for both options, and post them back up here. It may help with that visual. Phew. That's what I've been doing as it just looks nicer hehe. Thanks, Mark!1 point
-
Thanks! I got impatient and did some snap plate installation with E6000 night before last in the garage with a space heater. After an hour or so, I moved the pieces into the basement in a Rubbermaid which I taped up to be nearly airtight. Kept them warm enough to cure. Slaved away on my right ear for a couple hours. Seem to have gotten nowhere, but am optimistic about my next attempt IF thinning out the lower front of this one doesn't fix it . By "optimistic about my next attempt", I mean that I know the curves well enough by now to carve the proper shape out of a block of wood - it just remains to transfer that skill to the odd hollow shape of the ear. With yesterday's delightful warmth, I started on the cover strip learning curve by applying two thigh cover strips rather poorly. The second two went better. Worst comes to worst I'll pop em off and try again. I also whipped up some new nylon snap plates in record speed and threw those on my ab and chest. I am very, very excited about strapping my torso together for the final trimming! Looking ahead, I have the most work to do on my bucket and shins. When trimming the back of the left shin, I somehow ended up with the line on a slight diagonal. It might not be enough to bother with, but I'm just not sure. My phone's camera died but I'll borrow a phone and get some pics tonight to get y'all's opinion on it. Current top goals: right ear, shin resizing. Still want to sit by the Christmas tree in my completed armor!1 point
-
Congratulations trooper and welcome to the EI ranks, looking forward to seeing your centurion application in the not too distant future.1 point
-
Well done, Chris. Welcome to EI. [emoji1303]1 point
-
I have a Walt’s kit and it has everything need to assemble a complete helmet minus whatever type of padding you are planning to go with. You will need to purchase whatever type of strapping material in order to complete the actual armor. (The nylon webbing, elastic, split rivets, brackets, etc.) The rest is common to all as far as belt, under suit, holster and boots.m, you’ll need to buy those separately. You can always reach out to an attaché with any additional questions and we’ll get back to you ASAP with an answer. Welcome to the world of white armor! Jim TK-508991 point
-
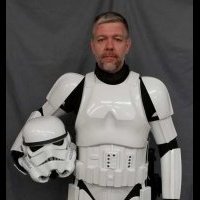
Gave it a test run last weekend at a zombie walk Found some chafing spots and minor pinches. Also got my new boots so I'll be able to weather the new ones (the ones in this photo are half a size too small)1 point
-
Finally got to a point I could wear it. So excited!! Still lots to do. Shorten forearms, paint and figure out how to lengthen the cod area. Sent from my SM-G955U using Tapatalk1 point
-
Great ! I was worried I would sand too much off. I have ordered the Mr No Strips Brackets I hope there is enough space on my kit for them.1 point
-
Hi Rat thanks! Am I thinking right that I can take another 3mm off and be ok? On the top part I was going to sand so its flat but still have the lip. I also sanded the TD caps 20mm I was going to do more but then the power went out... turns out was a massive fire near me..... helped some old couple get out the way... All good now and no one was hurt..1 point
-
Sanding totally depends on you, but no more than 5mm. Sent from my 5054N using Tapatalk1 point
-
I'd love to hear about the procedures and what you used for the removal process!1 point
-
Thinned down the black lines a bit, but I think a little more is necessary. Also need to clean up the edges. Shouldn't have done this right after drinking coffee.1 point