Leaderboard


Popular Content
Showing content with the highest reputation on 09/05/2018 in Posts
-
The plastic can be a real pain to get paint to adhere, so I opted for self adhesive vinyl. A light spray of soapy water and a hair dryer to mold the vinyl. Sent from my SM-G950F using Tapatalk4 points
-
Well, you've all convinced me to at least give nylon snap attachments a try. Still have a while til I get to that stage though I'm afraid, as I found out yesterday while learning to put my armor together(!). As it turns out, a fellow Garrison Carida cadet got his BBB two days before I did last week, and we managed to coordinate a time to get together yesterday and take our first steps down the long path ahead. A few Carida vets were free and came by to help us learn how to properly fit things (and form pieces with a hot water bath, in my case), which was so (so) helpful. I got less done yesterday than expected, but came away from our build time much more confident than expected. For good or ill, I believe I have a shot at putting together much of my armor now. I'll need a hand, literally and figuratively, fitting pieces, but I can get things to that point now which is pretty thrilling. I totally forgot to take pictures of my biceps before all the work I did on them, but here they are as they stand now! It was crazy how bad the shape was for me before the hot water bath. Which, by the way, requires water at a rolling boil, no less, for at LEAST 30 seconds to soften that thick ATA ABS. Looks like a pretty respectable shape, right? At least the cover strips will go on! I ended up having to take off much more of the return edges all over than (I guess) ideal in order to bend the curves right. I suspect that will be a theme for this build... This one (right) looks a lot wider but is actually much more comfortable. I will likely reshape the left to be more similar to the right. I was reminded yesterday to check Cricket's build thread religiously. Boy is that a good idea. Especially moving on to the forearms, and trimming the wrists which is totally nerve wracking... confident about this build?? Who, where??3 points
-
Submitted my centurion application today3 points
-
Hiya Tapatalk is a simple way to upload your posts, including pictures. Otherwise, a service like Imgur would work well. Upload your pics to your Imgur account, then copy and paste the “BBCode” link into your post. Here’s a great tutorial; https://www.whitearmor.net/forum/topic/42381-howto-post-images-in-threads-using-imgur-easy/ Hope that helps. Dan :-)2 points
-
Went ahead and attached a good length of elastic strapping to the chest piece to prepare for sizing it to the back. I'm officially out of good snaps so I'll have to wait for my order to arrive before continuing that step, that should be tomorrow though. Something else I picked up from Christine was at the armor party, I watched her setting some snaps in elastic and she was using ABS sandwiched where the elastic was doubled over for reinforcement. Definitely seems smart for a junction like this, so in some ABS went. Now pulling this apart pulls against the plastic rather than the elastic.2 points
-
Boots came! Sent from my iPhone using Tapatalk2 points
-
I got a brown box yesterday. Not THE Brown Box, but A brown box, it had my boots in it, and my heart fluttered when I saw it. I can hardly imagine how I'm going to feel when I see *the* BBB if just this little one made me feel so many feelings. I can't wait even more now. (Grubby work bench didn't seem worthy of holding it - but such is work) As seen in the title, I'm Lorelei, and Cricket's build thread has left me quite confident that I can attain Centurion as an ANH stunt TK despite being 5'4", 120lbs (thank you, Cricket!). I hope to make this an inspirational thread... or maybe it will all go to pot, and we can have a jolly good laugh while I order replacement parts. I can see it going either way. Regardless, I'm not going to quit until it's up to snuff. Join me! Joseph's list of required build items seems quite daunting, but I'm working on it. My build notes are getting longer and longer... but here's what's what with anything that's anything. Starting with the easy one: BOOTS Totally Killer Boots. Got my small female foot sized in a large men's Brannock device at a shoe store to have the best shot at a good fit despite the men's-only custom-ish nature of TK Boots' boots. They fit perfectly! I got some of their "less than perfect" ones, available upon request, and they're *hardly* less than perfect. So I'd say if they're out of your size, definitely investigate the "less than perfect" option. ARMOR On the ATA wait list as of 5/25. I read good things about ATA and the price was pretty good, too. Since I'm still working on my Seventh Sister garb, I'm fine with the longer wait time. I'm fine with it. I'm fine with it. Maybe if I repeat it enough, it'll be true... SOFT GOODS I'm going to make my own neck seal. Once I draft the pattern, I'll start the fabric hunt. I've read a couple posts with recommendations on fabric types - think I have a good idea of the desired effect. I'll also make my own belt. I need small rubber gloves. Heard there were some at Walmart a couple years ago. May add nomex later, but need rubber for sure. I have had the worst time finding an undersuit! I don't want to spend a small fortune on UnderArmour, and the EastBay shirt I got was baggy around the elbows. I think my best bet will be getting a dancewear catsuit. I have these tiny little stick figure arms and I'm petrified of having baggy elbows showing between my armor... I've also heard good things about Lycra dive skins, but I'm sick of paying return shipping charges and am, sadly, not in surf shop country. Recommendations from other skinny-armed folks greatly appreciated! BLASTER What's the deal with the blaster, anyway? The 501st doesn't require them for admission, but do the EIB and Centurion qualifications require them? If they ARE a must then I'll pour more research into options and all. Frankly, I really like the DLT-19s, but are they only for heavy weapons troopers or something? I'm having a tough time finding info on that. Lorelei out.1 point
-
Hello everyone, Referencing the pinned post in this thread, I'll start out by offering some advice that I wish I had known myself when I first purchased my first TK kit: The price you see on the ANOVOS website is not the price of the kit. There have been a lot of purchases since then that were needed to complete my build. Next, a top five list of things I have learned: There will always be something that can be improved on the kit. Especially as a first build, no kit is perfect and relentlessly striving for perfection, although admirable, can sometimes create unnecessary stress that soils what should be a fun experience. Plus, sometimes being madly driven by a desire for perfection can actually have the opposite result (i.e. maybe you took a bit too much off an edge that didn't really need trimming in the first place. Buy these Du-Bro scissors: Amazon I cannot iterate enough just how much of a luxury these scissors are. They are designed for cutting plastic and, to me, offer an advantage to first-time builders who may be wary of the score and snap method. It is unlikely that, especially if a TK is your first costume build, you'll be approved in the first go when you submit for basic approval. There probably will be changes that need to be made. Maybe others will dispute this one or had an easier time getting approved. I had to resubmit once myself and rebuild the thighs. Measure thrice, cut once. Enough said. Wear PPE! Despite yet another cost, it is worth it to get a respirator like this. I was hesitant to get one myself because of the price tag, but, reading of some of the symptoms and long-term complications of E6000, I am glad I did. Most come with the organic vapor cartridges which is what you need. And one extra thing I learned: Accuracy isn't everything. Yes, I said it. I am an accuracy hag myself, but if getting that belt rivet cover just right or aligning the belt takes a toll on your happiness while building, take a breather and realize that, at the end of the day, enjoyment comes first. As for challenges, I've already mentioned the thighs. My legs still continue to give me problems despite being approved. I am 5' 8" at ~145 lbs., so I have had some difficulty getting the thighs to not only close in the rear with no gaps (I used ABS paste; shoutout to Kalani for his tutorial here: https://www.whitearmor.net/forum/topic/42866-how-to-make-abs-paste/), but also some difficulty to keep them from hitting my posterior plate. More work to be done. Like I said, always something you can improve somewhere on the armor. I received countless warnings while building, so please simply consider all my acknowledgements later on as thanks for said innumerable warnings. To give some anecdotes, I'll provide just two to keep this short of a master's thesis. Firstly, my most embarrassing one stems from an acetone accident. I did not attempt to intentionally clean or even touch the armor with acetone, but I was cleaning some paintbrushes with my ab plate nearby and, unfortunately, splashed some on the armor after the lid came off surprisingly fast causing acetone to splash out of the top, in the air, and then down onto the surface of the armor. Long story short, I have managed to restore the finish using Novus products, sanding, and extensive buffing, but it was still a setback/scare nonetheless. To close my post, I'll offer my inspiration for joining the 501st and offer thanks to everyone who helped me get here. Upon attending my first Star Wars celebration with my father, I was fascinated with the atmosphere. The franchise of which I had been a lifelong fan of, albeit only being seven years old at the time, was literally standing in front of me on the show floor manifested in armor-clad people that seemed to have jumped right off the screen. So when my dad purchased a child's Jango Fett costume (nothing fancy; probably ripped off honestly) from a vendor, I was proud to wear it and walk among those who I quite literally looked up to. And then I found it. The 501st room full of costumes and members, and, ever since then, I've been dead set on joining once I mustered enough savings that I could spend on a kit without jeopardizing my financial integrity. This story is not even to mention the time when Marvel superheroes visited my younger brother in an oncology ward at a Florida children's hospital. The way terminally ill children light up when they see their heroes in front of them, despite all their adversity, is enough to even bring a grown man to tears. It was at this time that I knew I'd be joining the 501st sooner than later. A year later and here I am. I would definitely like to thank @justjoseph63 and @ukswrath for all their help with the latter providing an amazing build thread suited for beginners. I would also like to thank @Commander Gree @menschie @BrinkHouse and @kman to name just a few in addition to the countless members who made a dream a reality. And a huge shoutout to members of the Florida Garrison Everglades Squad who are a joy to be around and have provided invaluable pointers and recommendations. I know I could not have made it here without them. Thanks for reading. For the Empire!, Eric
 1 point
 -
Nice work, if it was me I'd go a little bigger on your smaller plate. Every little bit adds up in the end, it is not a race so take your time1 point
-
Thanks, Craig! You must've been just a name or two behind me on the ATA list. Terrell makes good stuff - you should be excited. I have yet to hit your build thread but if you haven't seen it mentioned anywhere yet, ATA is one of the kits in which all the left side pieces are appreciably smaller than the right side pieces. It's handy for figuring out which limb pieces go where, but makes sizing a bit of a pain. Of course you'll be on the other side of the spectrum, probably shimming more than hot water bathing... gotta say I'm jealous! (or is it envious? either way.) But not as jealous as I am that you're in the SoCal garrison. I used to live down there before I had an appreciation for the finer (Star Wars) side of life.1 point
-
For sure! I'll likely need to take an entire bump off the forearms anyway. I'm quite glad I don't have to recreate those return edges.1 point
-
That's the plan, a little a a time, don't want to cut to much. I don't want any problems with missing material. I just wanted a first estimate at how much space is on both sides.1 point
-
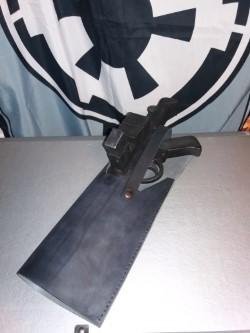
Made a holster!
 1 point
 -
1 point
-
You can never use too many clamps and magnets mate [emoji6] Sent from my SM-G950F using Tapatalk1 point
-
Nice work looks like you could go just a bit thicker on the black though And Sweden you say, Heros Comic Con by any chance?1 point
-
Sent from my iPhone using Tapatalk1 point
-
Good start. [emoji1303] Here’s a lovely reference pic for the plate sizes. :-)1 point
-
Goodluck with your centurion app !!!1 point
-
Congrats on obtaining your EIB!1 point
-
Congrats on your EIB!1 point
-
Thanks, Luc! It's pretty daunting but I keep reminding myself it's just plastic and I can either fix it with shims and ABS paste or just get a few new pieces. This brand of low-stress thinking is brand new for me.1 point
-
Like Lou mentioned, you can sew the end of the elastic closed. Or if you're lazy like me, you can just run a lighter quickly over the ends of the elastic. It will melt the elastic just enough to prevent any fraying issues. I've never had any elastics that have been 'sealed' like that fray apart on me.1 point
-
Hey Eric, That was a great idea and should help with long term usage. I am going one step further and sewing the end of the elastic to stop fraying or wear/tear. Basically encapsulating the plastic. By the way, great build log!1 point
-
Make way for another Centurion1 point
-
I want to be optimistic... I really do....1 point
-
This is how I did mine too. Helps a lot. Nice tote.1 point
-
The problem? That starship captain ("Federation", I think) appears to be worried about the crate.1 point
-
Looking good so far.1 point
-
Looking forward to the progress, good luck1 point
-
Yes but it will all be worthwhile for that certificate and banner on your forum profile Good luck1 point
-
1 point
-
Where are you based? Remember this is a world wide forum.1 point
-
1 point
-
Hey Joey, Personally, I’ve not heard of TM being hard to build, and it’s certainly beautiful armour; however there are lots of good TM and ATA builds here on the forum, including a couple of great TM builds by @TheSwede, that are worth having a look through. I’d also suggest checking out some cleared EIB and Centurion applications for those armour makers. Most applications include the applicants height and weight so you can look for someone with a similar frame and see how the fitting went for them. Hope that helps a little. :-) Dan1 point
-
Good to see you on the FISD, Mason. Perhaps another RWA Centurion in the family? ;-)1 point
-
I have a bin like it. I painted the raised areas of the lid white and left the lowered areas black.1 point
-
First coat of primer down. There's some issues, but I sort of like it as it can play into the whole re-issued weapon thing that we see in most militaries. You rarely ever get something new. Sent from my VK815 using Tapatalk1 point
-
Great looking bucket Sven! Keep up the good work!1 point
-
JEALOUS!!1 point
-
Looking very nice Sven, keep up the great work1 point
-
RS are just down the road from me, visited them a few times. Always love playing with their toys! I recently sent a fan system over your way, by any chance was that your order? Sent from my SM-G950F using Tapatalk1 point
-
Nice work, looking forward to the progress1 point
-
Not to worry I just made the suggestions to make you look even more awesome, I doubt it will hold you even from Centurion...most likely it will be brought up but as something that will be upp to you. Some GML are more strict than others so that`s why I said that, you could always pop a question to said GML to see what they think1 point
-
If you keep up this level of detail, I hope to see you applying for EI and Centurion after your approval!1 point
-
Wow, you beat me to it, sir. Looking SHARP!1 point
-
Looking good so far, Sven! PHENOMENAL job on painting those rear traps! In addition to the other suggestions, when you paint the tears try to make sure that the paint covers most of the recessed area as seen below:1 point
-
And here`s a great read about tube stripes1 point
-
Great work on the vocoder and general paintwork For the ultimate Stunt-look you might want to consider extending the frown beyond that last cut tooth Another small note would be the tube stripes. although approvable they idealy are about a pencil widht from the cheeks and they seem to be reversed, meaning you have the left on the right side and vice versa, again not something that would hold you back (unless your GML says otherwise as they have final say) but if you want you could look into that Looking forward seeing more1 point
-
Submission Photos: I'm very happy with how it all turned out. As you can see in the rear photo, the belt still rides up a little bit and I am working on a fix for that. That didn't stop me from getting approved however. I've been on active duty for the First Order since May 14th! A BIG HUGE GINORMOUS thank you to all who helped me along the way! I hope this thread will help future builders in some way. Hit me up in this thread or via PM with any questions. I have added a table of contents to the OP for easier navigation and still have to finish my Executioner pieces. So I'm not done yet! I'll update with progress on those at a later date after I finish them. For now I am enjoying the fruits of my labor and resting for a bit!1 point