Leaderboard


Popular Content
Showing content with the highest reputation on 07/30/2018 in Posts
-
http://501st.com/members/displaymemberdetails.php?userID=28607 I started my Jimmiroquai Rogue One TK on April 2nd and was approved on July 22nd. I got this kit to celebrate my 50th birthday. This kit is very different from OT TKs in many ways but perhaps the single largest difference (from a construction perspective) is that it is made of flexible fiberglass rather than HIPS. It must be painted and most of the problems I have run into have been centered on paint more than any other aspect. I have been told that my build thread here in FISD is pretty extensive and comprehensive so I will not rehash all the good and bad things that came from the build. I will simply provide a link to the thread and anyone wanting to read through it can do so. https://www.whitearmor.net/forum/topic/44463-11b30b4’s-rotk-build/ I chose the Rogue One TK because of the detail and I loved Rogue One. This is not my first costume. I have been an active member of the Mandalorian Mercs since January 2018 and have been told that my Mando build was equally extensive. So now I will be seeking EIB and Centurion for my ROTK. I am very excited to be an official member of the 501st and I have been blown away with the support of all the members who helped me along the way. I would like to thank the following members for all their help and assistance: 6306 Thumpy~ Support and recommendations on FISD 42114 Bulldog44 Support and recommendations on FISD and making an awesome scope. 3276 zv288bot Support and recommendations on FISD and in GA Garrison ????? LTM Support and recommendations on FISD and in GA Garrison ????? sskunky Support and recommendations on FISD ????? Zeddy Support and recommendations on FISD ????? GilFran007 Support and recommendations on FISD 10911 themaninthesuitcase Support and recommendations on FISD 72822 Dragon_a Support and recommendations on FISD ????? cbrant Support and recommendations on FISD ????? THMAustin Support and recommendations on FISD 8867 sandtrooper Support and recommendations on FISD 76253 TKSnake Support and recommendations on FISD 55550 Ripper_L Support and recommendations on FISD ????? mikebrierly Support and recommendations on FISD ????? Zsherman Support and recommendations on FISD And a very special thanks to the following members for their selfless contributions and most constructive assistance, without your input, I would not have been able to complete this kit. 8198 Ramblin Trooper For all his assistance and hosting Armor Parties 1183 Lonewolf For all his assistance and hosting Armor Parties ????? Big Deal Support and recommendations on FISD 82214 DEVOLVER Support and recommendations on FISD 10116 ukswrath Support and recommendations on FISD 35679 darthcue Support and recommendations on FISD 18545 Azrok (GA Garrison GML) Thanks for approving my kit and your humbling complements.3 points
-
I feel like I made some decent progress with the time that I got today. First I peeled off the excess glue from the forearm inner strip and then glued on the next cover strip, the cover strip wanted to shift a bit when clamped so I used some tape to anchor/pull it back into its proper position. I also cut out and glued on both bicep cover strips and have some inner strips lined up & ready to go when it's time for them. Then I did some fine trimming to the first shoulder bell: I went ahead and cleaned up the sniper plate too: And then I trimmed up the pieces & pipe for the thermal detonator and mocked it up (need to go buy some gray spray paint now to finish it off): Clocks in at exactly 7 1/4" (184mm) long, which matches the reference picture I was using (borrowed from Wook's build thread): I thought I'd share my method of trimming the end caps but I forgot to take a picture while I was doing this. Basically the rough trimmed edges were not even, so I clamped a pencil so the tip was 3/4" (19mm) off my work surface and laid the cap on its finished end and spun it, while applying light pressure against the pencil to make the mark all the way around. A good, strong clamp will ensure that the pencil doesn't move as you work. Like so: I finished off the evening by beginning to fine trim the back plate, got about half of it done before I finally decided to call it and get some rest before work tomorrow.3 points
-
They do not have to be angled or rounded. Just depends on the look you are going for. The film they are all 45 degree cuts2 points
-
Silicone on the way2 points
-
Alright guys, I feel like it's time for another massive post today. Since my lectures stopped two weeks ago I had tons of time to work on my armor, and with Power of the Force Con in Oberhausen, Germany around the corner (the event where I talked to a couple of 501st members and decided I was going to get an armor) I spent every free minute working on the armor. Sadly I failed to capture everything with my phone (in fact, what follows is a very small number of random shots I took in between), but anyway, here is what I got up to, sometimes supported by pictures: Carried on glueing all the appropriate parts together which usually made my basement look like this: Went on to the strapping: Which also made my living-room look like this: However, it turned out pretty nicely so far, so I tried to take some pictures with the parts of the armor that held together already: Finally, I would like to apologize to everyone who is reading this build trying to find some helpful hints because I really didn't take enough pictures with enough details However, I would like to point out three builds that were really helpful for me when I built this RS kit: 1. Build by @AsBlondeAsLuke which was an RS kit (like mine) and is also great fun to read, 2. Build by @ukswrath which is incredibly detailed and very easy to follow, 3. Build by @CableGuy which pretty much uses the same strapping system as mine and also offered a couple of interesting hints for building. Right now, I am waiting for a couple of other things to dry, then I will carry on glueing the thighs, and then all that's left is a couple of straps and the ammo belt. So stay tuned Cheers, Freddy P.S.: If you notice something I should change (hopefully it's not too late), hit me up!2 points
-
Your trim lines are all wrong. You do not want to mark off an equal amount all the way around the armour. You just want to take off the length/height - not the girth/sides which makes you lose the original shape, eventually. I have seen it done here a thousand times when people trim down parts. To make it easy to explain, imagine you wanted to trim down a simple box shape, you would just trim the top to make it shorter. You would not trim the sides as well. Does that make sense? That is why you would lose the notch by trimming the sides.2 points
-
Small update, decided to cushion the back with some foam....so I hot glued some fabric to a sheet of foam and then hot glued that to the pack and voilà also decided (not done yet though) to move the top straps closer together, although they are at the right position, moving them closer will make them sit better over the back/chest tabs not pushing the bells down over the biceps how screen accurate as that may be I don’t want that1 point
-
The screws at the bottom of the ears will not affect your EI application, Andy, but will need to be replaced for when you take the new pics of this awesome set of armor for Centurion!. Although it may seem like a trivial matter, the typical "Anovos overspray" on your frown is not in keeping with the CRL, which is why I asked for a close-up pic. As you know, the higher levels are all about accuracy and the pursuit of "TK perfection". Were there variations in paint jobs in the films? Of course! But for our purposes we have to follow the CRLs, which state Frown is painted gray and does not leave the teeth area I suggest using a toothpick and some non-acetone paint remover (like Goo Gone) to clean them up, and then you will be golden!1 point
-
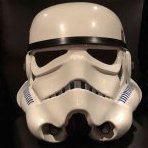
I also forgot to post pictures of this finished beauty. Only thing this bucket is missing (but soon won't be) is a nice audio system.1 point
-
ROTJ is completely different helmet, its basically a reworked ANH so yes it has one side collapsed per original ANH. My AP helmet is basically a sanitized ANH stunt version which many prefer including me, has all the same asymetries minus all the bumps and surface imperfections to better represent the high tech Star Wars universe when seen in person. Mark (AP)1 point
-
Cutting cover strips, does the strip go even with the top and bottom (where the return starts)? In this picture, does the strip need to go up (also a general question for all the other cover strips) Bottom of bicep1 point
-
Darthcue, thank you for bringing these issues to my attention. I have posted a request for this to be address on the CRL thread. As for the overlap method, Jimmiroquai’s armor is designed to give the look of the butt-joint and cover strip. Since Jimmiroquai is the only armor available, I do not see this being a determining issue for EIB and/ or centurion. Further, the only two parts of armor that address the butt-joint are the bicep and the forearm. From what I can see, it looks like most of the CRLs were copied from another TK and then modified for the ROTK. I think the butt-joint was removed from the leg armor pieces and the arms armor got overlooked. Additionally, the butt-joint requirement is only for level 3 centurion and should not affect EIB. As for the hand plates, the hand plates included in Jimmiroquai’s kit have the indention and are the correct Rogue One hand plates. Please see the picture below. Also, thank you for the suggestion about the velcro on the boots. I will be playing around with that and another idea I had to see if the stop the rotation. Update… So I stated in a previous post that I was making individual bags for each piece of armor. Here is an example of these bags. I purchased several micro fleece blankets from Walmart for 2.50 each. I cut them to fit and uses para-cord to close them off. I have since gone back and replaced the brown para-cord with black para-cord and used black plastic slide locks on the para-cord to close the bags. So this picture is one of the forearms bags and a lower leg bag. Also I do not recall if I mentioned that I did cut down the sides of the abdominal armor but here is a picture where you can see that it no longer protrudes above the side plate. And that is the update. Thank you for the interest.1 point
-
Your picture above shows the circular base of the bayonet lug and that is correct. In my resin build, the bayonet lug came with a very thin base. Maybe it had been sanded a bit too much after it was taken out of the mold. I simply filled the surrounding gap with green stuff and this led to the slightly different shape.1 point
-
Thanks Tino! I would've been off by nearly 4mm for eye-balling the length1 point
-
The tops of the forearms are shaped funny. You could give it a hot bath to reshape, but trimming the return edge is the easiest fix and it will make the forearms much more comfortable to wear for long troops. Removing the return edge is approved at all levels. Your build is looking very good. Nice work!1 point
-
Makes allot of sense Chris - thanks for chiming in. Swpropman provides lots of pictures from his plastic replica smg parts - his bayonet lug nut looks good! It's following much after Aaron's lug nut from the photo compendium. I think I will mimic this mod cheers!!1 point
-
I would trim something like this, you can of course trim more or less if you like1 point
-
AWESOME!!! Thank you so much! I will definitely clean up that E-6000 and adjust my shoulder straps. That connection was puzzling - I knew it was weird but couldn't figure out how to modify it. I really appreciate the advice. I'll fix those boxes and get my new pics soon! On to Centurion1 point
-
This was test to embed a full size image.1 point
-
Nice work trooper!1 point
-
Everything looks pretty good. I would suggest getting those shins on first, before you make anything permanent. doesn't look like you will have issues but just to be sure. Also with the hot water bath, you may have some issue with the glue, but if it comes apart just redo it. getting the fitment is more important than trying not to redo something one other thing, you wont be able to wear that compression top, because you can see the underarmor log in the back...1 point
-
Looking great Freddy! Job well done.1 point
-
Update time! This weekend made a lot of progress. First and foremost, thanks to @VulpX for the help, support, guidance and steady hands with making my bucket awesome! Vocoder is nice and black as well now: Still need to install the mesh behind the teeth and in the hovi-tips. Next up: I finally prepped the dropboxes. Got the elastic band attached: They are all pretty and closed, although not glued closed yet, since I ran out of e-6000 this weekend. Drilled some holes and installed the rivets in the stomach plate: Nice authentic split rivets from trooperbay Removed the last bit of edge from the ammo pouch for the belt. Cut the corners, without cutting corners The ammo pouch is connected with chicago screws to the canvas belt. Next up, get the cover buttons a bit smaller and put them over it. But again, need some e-6000 first Placed the shoulder straps on the chest plate. Fixed the strapping for chest and back plate, added all strapping from shoulders down to the lower arms. Added the snaps in the chest plate for connecting to the ab-plate. Added the first snap on the left side of the ab plate and again, ran out of glue to awaiting more glue to finish placing all snaps. Also fixed the belt for my upper legs, attached the strapping to the upperlegs and belt so I now have wearable upperlegs. Todo this week: finish closing the calves with velcro, add more snaps all over the place so I can finish the strapping. Get a bit more help from our Attache to get the ammo pouch properly on the upperleg. Hopefully we will have a chance this week or next week to finish the stripes on the bucket as well, so that one is just checked off.1 point
-
I'm beginning to find my own lack of faith disturbing...1 point
-
The cut off a la DD is probably just to make moulding easier. As for the other two, could be down to differences between minor variations of the sterling.1 point
-
Nice work1 point
-
Just replicate the original line. Return edge is not required.1 point
-
Look in the build sections for "shim"1 point
-
I’m 5’10 and 205 Lbs, this is TM armor and no shiming, you can also check EIB/Centurion applications, most include hight/weight1 point
-
The ”ultra strong” was the bad one so to speak - easily washed - and you don’t want that Sounds like that’s the one to use And the field pack is approved1 point
-
Yes, it is always a challenge to combine electronics and a movable bolt in the same build. Had this problem too with my pipe build. Meaning, this was somewhat easier for me to solve. I might be wrong now, but since being a member on this board, I can not think of any full resin build with an operational charging handle. 'loving this' (LT)1 point
-
Sskunky, thank you. Zsherman, thank you. Ok guys, I have a question for those of you who have a Rogue One kit. Do you have issues with the lewer leg armor (shin/calf armor) rotating outwards when you walk? Even with the flex seal lining on the inside and the foam under the knee, these pieces keep rotating when I walk. They do not fit loosely, so I have no idea why they are rotating and how to stop it. Update, Well I have masked off and painted the two outer teeth on the helmet. After my last group of photos I noticed that when I removed one of the lower leg armors the Velcro pulled away from the armor and took the paint with it. For whatever reason, the paint did not stick to the primer here. So I masked off the area and repainted it. After 45 minutes, I applied a layer of clear gloss and let it dry. Tomorrow, I will reapply Velcro and it will cover most of the area. And here are the new pics of the helmet. Once FISD decides to update my account to Stormtrooper I will be able to apply for EIB and Centurion. And that is it for the update. Thanks for the interest.1 point
-
I haven't been posting but work has continued... I fitted, glued, and rough sanded/shaped the biceps and the forearms. I still have to do some fine tuning with a dremel and sandpaper. I also need to finish cleaning up the squeeze out from the E6000. I'm pleased with how they've turned out so far. I was able to use 15mm strips and everything fits fine. I guess I am "standard Stormtrooper size". : ) Today I trimmed and sized my thighs. After having done the arms, these went together fairly easily. I feel like I'm getting the hang of the process. I will glue with 20mm strips. My plan at this point is to finish all the appendages and then start strapping everything together. I think I'm still on target to be finished by Halloween (October 31). I may not be Centurion approved by then, but will hopefully have a usable costume by then. As always comments, critique, and suggestions are welcome.1 point
-
Wow! Excellent job, Ryan. From the pictures you’ve provided, it looks like a clear shot for basic, probably EIB and with some more detailed photos, not a long way from Centurion. (Might already be there but we’d need more detailed photos for that. :-) Just two small dressing issues for me - easy fix. I’d say, try to rotate the thighs to line up with your shins: And try to line up the closing of the calves a little more: Top job, Ryan. Beautiful armour!! Dan [emoji1][emoji1303][emoji1] Sent from my iPhone using Tapatalk1 point
-
Okay okay. let me preface this by saying that I really intended to be more thorough with this build thread. I felt pretty confident with the techniques, reference materials and the things ive learned. i just kind of barreled through the rest what i had to build and all of a sudden i was pretty much finished. Would you guys be able to tell me how you think it looks? I will for sure make a post in the pre-approval page.1 point
-
So the e6000 got done curing and I tried on my shins. I'm not entirely sure if this is good enough or if I should try to adjust or just rip it off and do velcro. Middle hook of my right shin slid during curing so it's not connected in these pics. What do you think?1 point
-
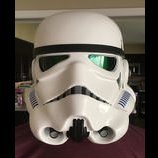
Bucket Assembly and Painting. Need to add the rank stripe and countersink the ear screws a little bit.1 point
-
First cut and more trimming.1 point