Leaderboard


Popular Content
Showing content with the highest reputation on 06/08/2018 in all areas
-
There are people on here with a LOT more expertise than I have! However, I did get there and I want to just give a tip synopsis of things that are valuable to me. These are tips for those just starting. Much of it can be found on here, but here’s what I wish I knew at the start, with my own personal spin on it, from experience or from a lot of digging in the forums. Of course, some things you’ll still have to figure out for yourself…I wouldn’t take that from you! A million thanks to the FISD community. I owe realizing the dream of proper TK armour to you all! Helmet: Don’t rush it. Everyone’s been looking at this helmet for 40 years, and when it’s not perfect it doesn’t look completely right to people, even though they can't peg quite why. The look and consistency of the original costumes was really quite amazing, overall. Things to hyper focus on … the eye holes and the teeth. Eye holes…I often see people not taking enough out, or crooked lines. Slightly crooked can be cannon I guess, in some examples, as some of those eye holes were a bit messier than others. Sand and look. Sand and look. Teeth…people often make them too long and too square. I initially used a dremel, and then refined with hobby files. Compare them constantly to the movie worn helmets. If you make your teeth right, your helmet will likely stand out as an amazing example! Return Edges: People seem to have a desire to keep return edges. This can create fit, shape, and wearability issues…plus it just doesn’t look “cannon.” Again, look for the screen references. The return edges are often much much smaller than we’d all first think, and often there aren’t any at all. For instance, people often want to have too much return edge on the top of the butt plate, or any at all on the other edges of it. This will give you “trooper dumpy butt” I call it. Again, screen reference and look at the best Centurion submissions. Bending ABS: I know some people use a heat gun. This is outside of my comfort zone. Too many horror stories. I did a lot of bending to get things where I wanted them to be. FYI, I was able to accomplish this by pouring boiling water from a kettle on the parts I needed to bend, and applying a plastic clamp for the weight to apply the bend force. When it was where it needed to be, or just past actually (it goes back slightly), I'd immediately put it under cold running tap water. Sometimes I had to repeat this process. This worked perfectly, on 1.5mm ABS. My Favourite Build Resource: Centurion submissions! The build threads were cool, of course. For me, the single biggest help were the Centurion Submissions. So much detail, and real life scrutiny of what you eventually want to have. Specifically, and this is really important, find submissions of your armour make (RS, ATA, etc.) with someone who is approximately your height and weight. That’s a huge help. Glue: I read a lot about E6000. I was unsure about it, as I heard about how bad it smelled and how long it took to cure. The smell does go away quickly. I couldn’t recommend it more. When you wear your armour, it will flex, and there will be times where it may be called up to really flex. CA glue does not allow for any flex at some points on your armour that have a LOT of tension. E6000 is a way safer route to go. Plus, if you make a mistake you’re not hooped. I can’t imagine using anything else. Also, people talk of 12 hour cure times. On anything that has a bit of tension in it you'll need to go 24 hours. Even then, I put it over a forced air heat register (in cold months). If you push short cure times you'll eventually get some separation. Not fun to go backwards! Cover Strips: I did not use interior strips. I’m not saying you shouldn’t do it. It’s all about preference and comfort level. In my experience, if you do your outside cover strips properly, your armour will absolutely be strong enough, and you’ve just saved yourself an incalculable amount of work and curing time, in what is already a long and arduous process. When using E6000, it is VERY important that you glue right to the very edge of the cover strip where it touches your armour. You want some bleeding out. Most of the force is at the edges. When you clean the glue that has pressed out, if you happen to peel even a fraction of a mm from underneath the cover strip, you can expect your cover strip to come away at the edge at some point. For some people that’s not an issue...lots of people with cover strips that aren't consistently flush and in full contact. For me, I need to have my cover strip in complete flush contact. Better to leave a tiny bead of E6000 at the side edges of the strip, than to completely remove it and have separation. Strapping: Tandy snaps are the best. Reading other's horror stories, I'd go as far as to say essential. To keep gaps very minimal, keep the snaps very close to the edge of each piece of armour, and make the strapping tight. It will stretch and it’ll always seem like you’re making the strap to short at first. In fact, even then you’ll likely eventually make them shorter. I tried elastic strapping and I hated it. It flexed better, but the gaps were a mess. So, for back to kidney plate to butt, I changed to nylon/no stretch strapping. Nice and tight with almost no gap! I just used flexible straps from the chest to ab. Even those, make them shorter then you think you need them, or you’ll have issues with your chest plat ending up under your ab plate on troops. They’re expensive, but buy lots of extra snaps. Don’t be afraid to scrap and start again on strapping for bits that aren’t cutting it. Likely will be shortening at some point. Don’t use velcro for anything that has a lot of force, torsion, or will do any pulling away. The only place I have velcro is for my wide white elastic at the shoulder, from my bicep to forearm connection and for my shins. They work great in those applications only. Even then, use the industrial strength velcro and E6000 it to the ABS or to the strap. Don’t rely on the adhesive that’s already on there, especially on the strapping. Armour ABS Thickness: I have 1.5mm ABS. It’s extremely durable. I don’t worry about it cracking or breaking. I’ve felt others' 1mm ABS armour, and I'd be very nervous with it. Cutting your ABS: Score and snap is your friend! Again, it’s comfort level with how close your willing to go to the final line. Take your time (can’t stress this enough). A dremel to clean up a line and shape a little I think is very necessary. Then, I use a 180 grit sand paper to smooth, and finish up with an 800 grit to make the edge shiny and smooth. Boots: You can research and research, and the conclusion that you’ll come to is that Imperial Boots is pretty much it if you want proper high quality boots at the time I’m writing this. The good news is that they are really really good guys and they do an amazing job, and they’re worth the money and wait. On the wait … plan on getting your boots early. You could end up waiting almost a month for an ordering wave, and then another month for processing and shipping. Don’t be sidelined like I was for 2 months because I wasn’t proactive with this. On fitment ... I did the prescribed, order a size bigger. Out of the box they were a tiny bit loose. However, I put in gel insoles, still leaving the original insoles in, and they're absolutely perfect! Wouldn't have them any other way at all. Check out your local fabric store: You’ll be surprised how much of what you’ll need you’ll find there, and for cheap!! Neck Seal: Do not buy one that has rigid metal wire running through it. They’re a nightmare and you won’t even be able to look down while putting your armour on without breaking your neck. Buy a completely soft ribbed one only. Learn from my pain. Literally. On another note, does anyone want to buy a wire ribbed neck seal? Special price! Helmet Cooling: For helmet, like others, I highly recommend dual 5 volt blowers and a usb battery. You can get all of this super cheap on eBay from China. Will last hours on one battery. When the battery is new, charge and discharge it a couple times to make sure it’s not defective. You don’t want a lithium-ion battery lighting on fire when it’s next to your head! Seriously. Audio: Whatever audio solution you choose, it’s imperative that you have sound dampening in your helmet. All plastic surfaces should be covered. I used sticky back 1/4 inch thick x 3/4 inch wide foam. This should almost completely eliminate most feedback for most setups. If you still have issues, put a bit of foam inside your chest plate at the top, to prevent sound from coming up into your helmet (thank you BDWC for this tip!). Lastly, whatever audio solution your pick, it needs to have the static burst after you talk, at a bare minimum. FYI, I use an Aker amp and mic, and the TrooperTalk iPhone app. Blaster: You’ve spent all this time, effort and money on your armour. Amazing! Now don’t fall short on your blaster! The idea of doing your blaster right can be a bit scary, but you can do it. Actually, if you do it right it can be the most fun part of your custume to make! I did DoopyDoos. It’s an amazing resin casting, it’s cheap, the shipping is fast. They have horrible communication but they get it done. The FISD E-11 Blaster Reference thread is amazing and the build threads by Cable Guy and T-Jay were very important to me too. If you do your blaster right, then you really do feel like you’re back on the movie set in ’77…you’ve gone that last mile on your costume! Thermal Detonator Screws: What a freaking pain! Did you know that the planet earth pretty much stopped making slotted screws? And for good reason! If you do find a slotted pan-head screw, it’ll likely be a threaded screw—which means the only way to make it hold in the PVC is to glue it. So, after much much searching, I found a slotted wood/metal screw, but it had a domed head—not CRL Lvl 3 kosher. Again, dremel is your friend! I just dremel’d off the dome and made it into a pan-head. You can do this, or you can order 4 screws from somewhere in the UK and wait a month. Start to build with Centurion as the end goal! If you have Lvl 3 on your mind right from the start, you’ll easily get there. I notice that people who don’t start their builds this way, have a harder journey and seem to be a lot less likely to get there. Furthermore, their armour at the basic approval level can tend to be a little bit of a mess, because they've been lone ranger-ing it, and haven't been using Centurion submission photos as their go to. I'm guessing that those who start this way, most often have far better looking armour right from the start...even if they never progress to EIB or Centurion. Hope that something in here helps someone on their journey!2 points
-
Hello Everyone I'm gonna build an Original Trilogy Stormtrooper soon , and I already on the waiting list in ATA Anyone here bought ATA kit? Do you guys get the screw for the helmet? Thanks TK-32294 Bas Helmet : ATA Armor : ATA Undersuit : Underarmour Boots : Local made ( WIP ) Gloves : Local made ( From hardware store ) Strapping : @Alay Strapping kit Blaster : Doopy doos + @T-Jay completion kit1 point
-
Alrighty then, so I dabbled in a build (well helmet) a couple of years ago, but then got caught up in life and such. I finally pulled the trigger on an AM 2.0 lite kit a couple of weeks ago, and a starting the build process now. Have spent the past few nights pouring through build threads, so here we go, aiming for EIB, and eventually Centurion. Starting with the biceps.... Last night, and now, is work on the return edges. Hoping to keep a little return edge on the outer biceps, and am now in the process of removing the rest. My first worry is how much to remove from the upper inner bicep as it's hard to tell, what is a return edge, and what is part of that smooth curve. Obligatory BBB, then the right outer bicep, and a couple of pics of the left inner (the top being my biggest concern) Sent from my HTC One M9 using Tapatalk1 point
-
Hey Everyone I ran into an amazing tattoo artist at Megacon Orlando and after talking with him about our love for the Empire and how both He and his client getting tattooed has always wanted to join the 501st but wasn't sure what steps to take I also discovered that he's had a set of ATA just sitting in his shop collecting dust. He was just hoping to get it propped up on display in his shop and when I told him he'll be able to display it after he's worn it his face lit up like all of ours did, like a kid in a candy store and besides who doesn't want to be a Stormtrooper? I'm pretty excited about this build and will update it sections and when they get finished so it might be a bit slow going. Swung buy the studio and heres the obligatory BBB photo once I got it home. Started with the Helmet. Marked up the face plate and cleaned the eyes and teeth then joined the two halves. Trimmed the ears, repeat and attach with 3 flat head brass screws. I will say that this tool is a huge timesaver when it comes to fine tuning the trim of the armor and I highly recommend it to anyone. You can pick them up at mcmaster carr or even harbor freight tools With all but plastic dipping the inside i'm considering the bucket finished. No it won't be Mr No Stripes but I will leave the exterior painting to him, I feel its a right of passage and it's what makes your bucket yours, whether you paint it or use stickers. Just my opinion. Next update will be for the shoulders, biceps, forearms and hand plates.1 point
-
Hello; I am ID-41466, from the Georgia Garrison, and excited and very nervous about building my first kit! I will be making A New Hope Stormtrooper, which I purchased from Walt's Trooper Factory. I have no idea what I am doing, so I would be most appreciative of help from anybody who is available!! I am a shorty, so I will be doing a lot of trimming, and I have already watched most of Cricket's threads. I would also like to reach the Expert Infantry and then Centurion Levels. Thank you so much for your time and patience!1 point
-
Tapatalk seems to be working now. Thank you to whichever poor soul has this typically thankless job.1 point
-
Thanks guys I appreciate the help.1 point
-
Boxes! During research a few were noting that the boxes tended to move around and get "stuck", so I added some weight to the bottom (brad nails). Now all I have to do is install the covers1 point
-
For me the 1/8th did not give enough material to make a good set. Once I switched to 1/4 there was plenty of material to compress. Also, when practicing make sure the practice pieces are of the same thickness (I just grabbed some extra plastic that was laying around), so the issues on the practice piece was not an indication of how it would work on the belt. Lesson learned...1 point
-
1 point
-
FYI, I'll be updating the CRL language to have these changes at L3 first. As we refine them and standard the part we can push them to L2 and then L1 as needed. Sound OK? We could really use some good pix that everyone agrees to are the 'best' for the CRL.1 point
-
For this, I can update the text but if there is a good CRL model out there (Centurion), who is willing to supply photos, we can update the CRL. Recall at the time it was our only ICN and not all are L3 at the time. Heck, we didn't even have L3 at the time.1 point
-
Just a quick update. I attended an Armor Party last night and conducted a test fit of most of the armor. I figured out a few other things that I need to change but overall I am pleased with how this looks. One of the items I will be addressing is the undersuit shirt. Where I took in some of the mesh along the zipper to bring the ribbed sections in more to cover all the exposed areas along the sides of the back plate; the material is now bunching (yellow circle). I will need to figure out how to prevent this. Additionally, I need to replace the elastic suspender that hold up my pants, assist in keeping the abdomen at the proper height, and the shoulder bells attach to. I found this behind the scenes photo and notice the webbing suspenders (yellow circle). Another thing I learned is that the Velcro and cut out area of the shoulder straps for the chest armor seems to be working well. Also, a friend was working on his clone trooper armor and I noticed he had silicone rubber shoulder straps (yellow circle). I really like this idea and have considered making some for my TK. If my fiberglass ones become a real issue I will look into this. The only concern I had was painting them to match the armor but Smooth-On has a paint designed for silicone that will stretch with the silicone and not delaminate or crack. Anyway, its nice to see progress on the kit. Thanks for the interest.1 point
-
https://www.facebook.com/BulldogPropsJapan/photos/a.1982700905346988.1073741830.1965760503707695/2112482142368863/?type=3&theater finished new mold for the 1943 M38 scope. Test casting this weekend.1 point
-
Congrats on achieving Centurion!1 point
-
Congrats on achieving Centurion!1 point
-
Congrats on your EIB!1 point
-
That is what I am doing as well. Front cut to the correct dimensions, then work on the back.1 point
-
Looking good1 point
-
So this project stalled due to the issue of the barrel taper and I thought that it wouldn't get off the ground again. Thankfully my friend Sean Fields creator of the Shoretrooper 3D files that I've been using came to my rescue today and whipped me up this! This has basically jump started this project significantly as I have pretty much everything else ready to go on the frame!1 point
-
Tapatalk appears to be working again, FYI. Great progress with your build, btw. :-) Sent from my iPhone using Tapatalk1 point
-
Looks like it might be working again, so I’ll post this question again too: I’ve got the front cuts done on the legs, cover strips & inside support strips cut. Does anyone see any issue with me attaching all the legs in the front with cover strips and then fitting for back cuts? I thought I might get a more accurate line/fit/cut that way. Sent from my iPhone using Tapatalk1 point
-
No go on the ab piece replacement and an boxes. Saturday is a squad armor party so I aim to finish the thighs and forearms. Im going to go seamless on the ab boxes and try and cheat in some sort of line that makes them look not seamless. But there’s no going around the weak pull. It is what it is.1 point
-
Just checked the mail... got it! Sweet!. Thank you sir!1 point
-
This makes me very very happy ...1 point
-
Oh no - what’s happening to the Tapatalk images? PS - Your TK goodie should be showing up in your mail any day now mate!1 point
-
EIB Approved! Number 837. Next up, Centurion application for ANH Stunt!1 point
-
Testing tapatalk Sent from my iPhone using Tapatalk1 point
-
That’s good news. Somehow the pics looked stretched in my screen so I could really get a good sense for the proportions. It’s all looking good so far. I don’t think it’s a problem but when applying for 2nd or 3rd level clearance, the snaps fixing your holster to the belt might be pointed out since they are white capped. I didn’t read anything in the CRL that says you can’t have them other than silver but not sure exactly on that. In the films they were silver rivets. I used Chicago screws on mine.1 point
-
Well done, Carl. Welcome to Centurion.1 point
-
Congrats Carl.1 point
-
Congratulations trooper1 point
-
Best of luck!1 point
-
Did som more weathering and took it on a test-drive1 point
-
Cricket you’re a genius! I took off the tiniest amount and changed the shape of curve. It wasn’t so much where the dip was between the thighs, but the convex curve that was very unnatural against my cheek. I made it concave and it seems to be staying perfectly in place now. (Can’t share a direct Imgur link on my phone). https://imgur.com/a/jnOnagw1 point
-
Shins complete (I think)1 point
-
Helmet and ab button paint done... I think. Glad that’s over!1 point
-
Spent some more time on the ears trying to get the gaps a little closer. Drilled holes for ukswrath’s Hovi tip speakers, and installed tube stripes. Sent from my iPhone using Tapatalk1 point
-
Happy to report that my T-nut lens mount fix worked! I can finally move forward with a few days at home. Sent from my iPhone using Tapatalk1 point
-
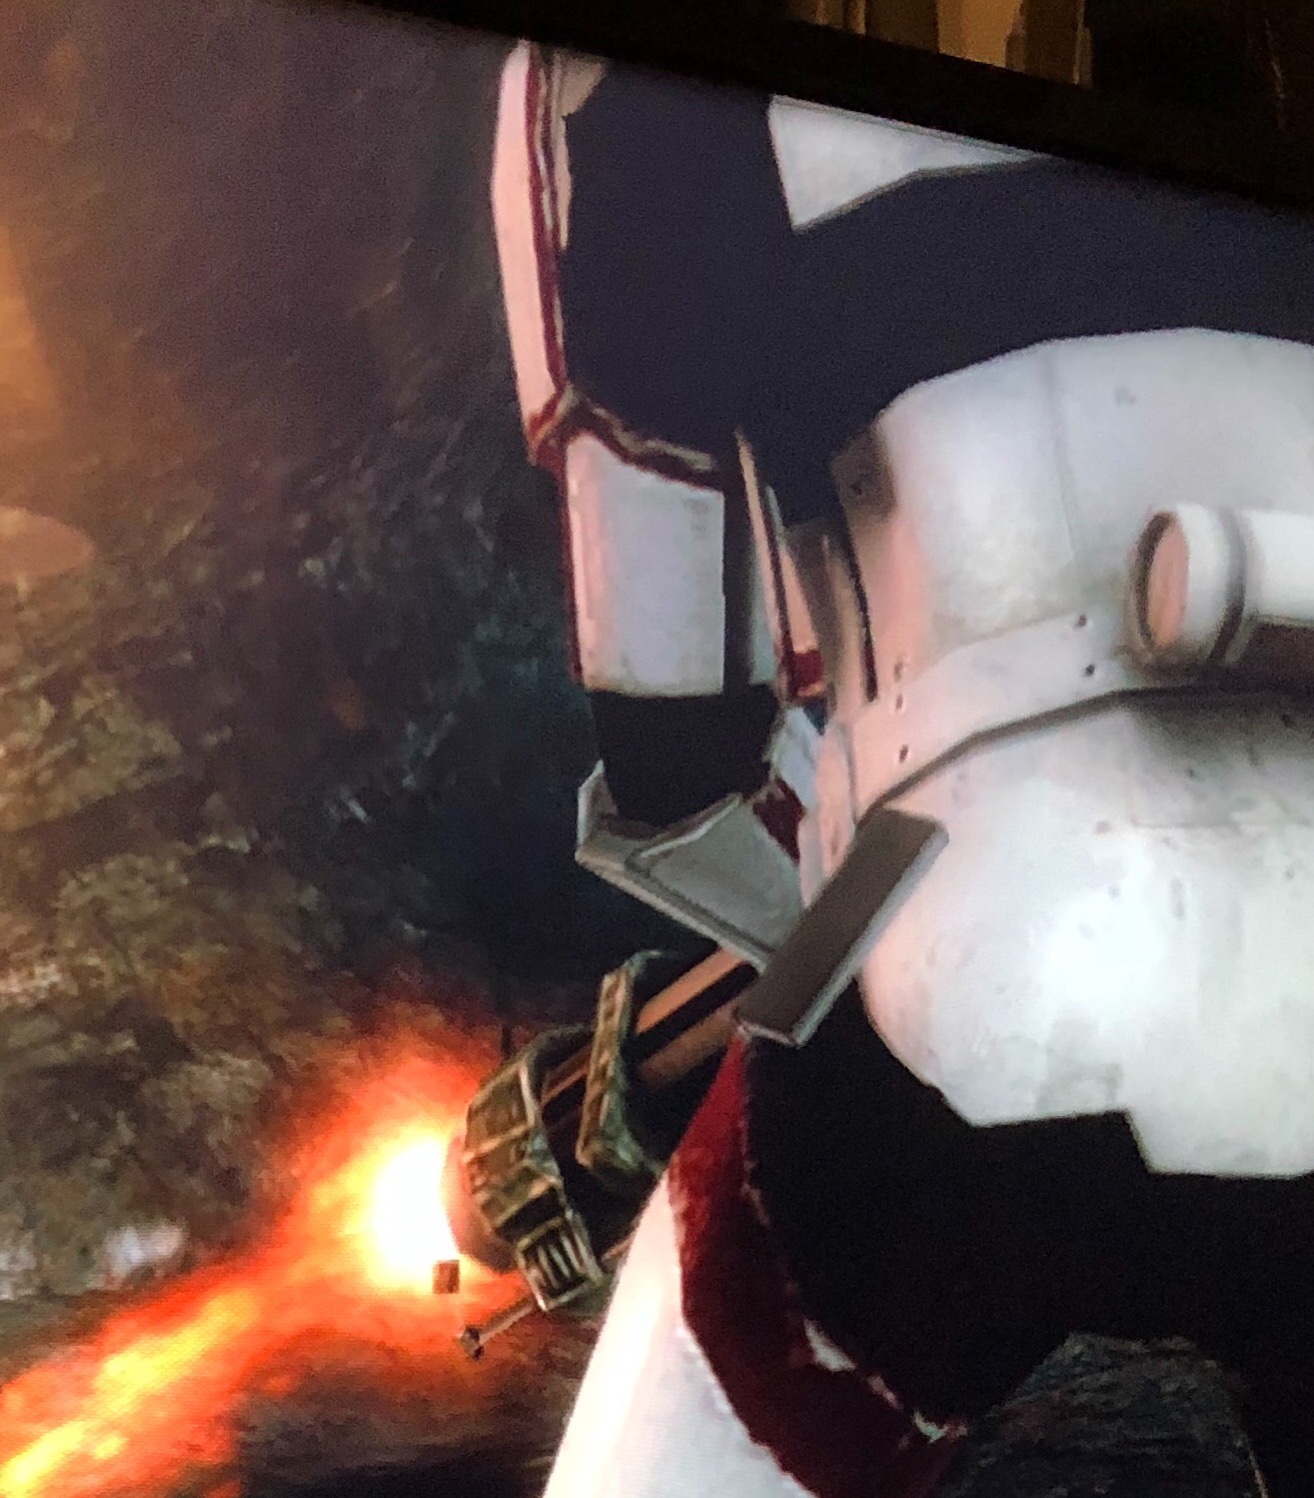
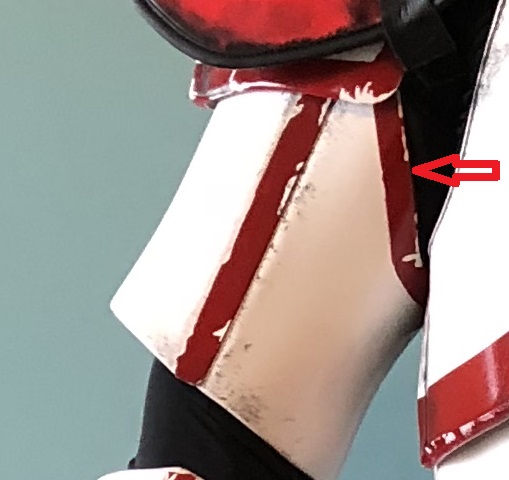
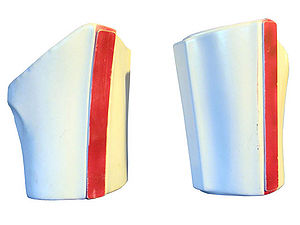
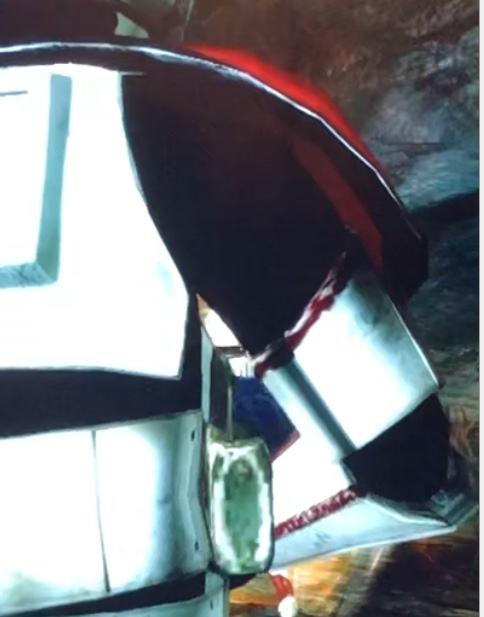
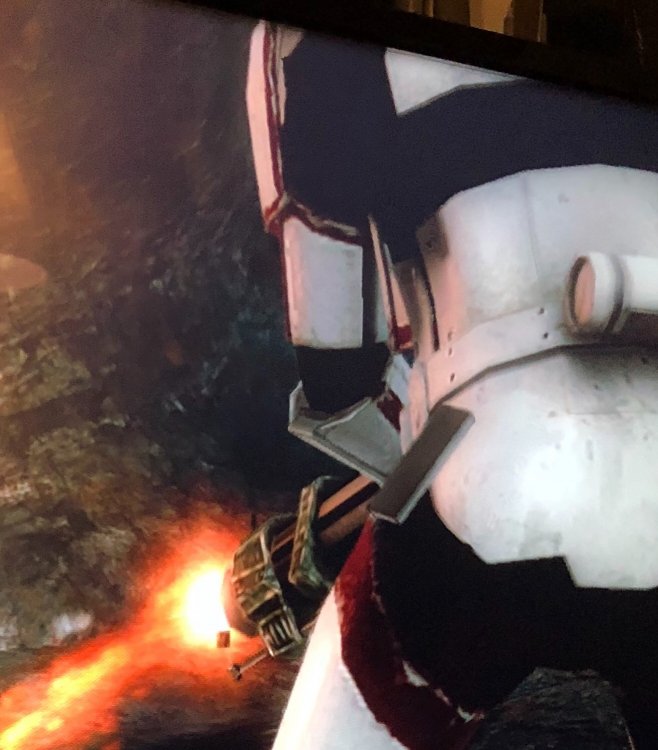
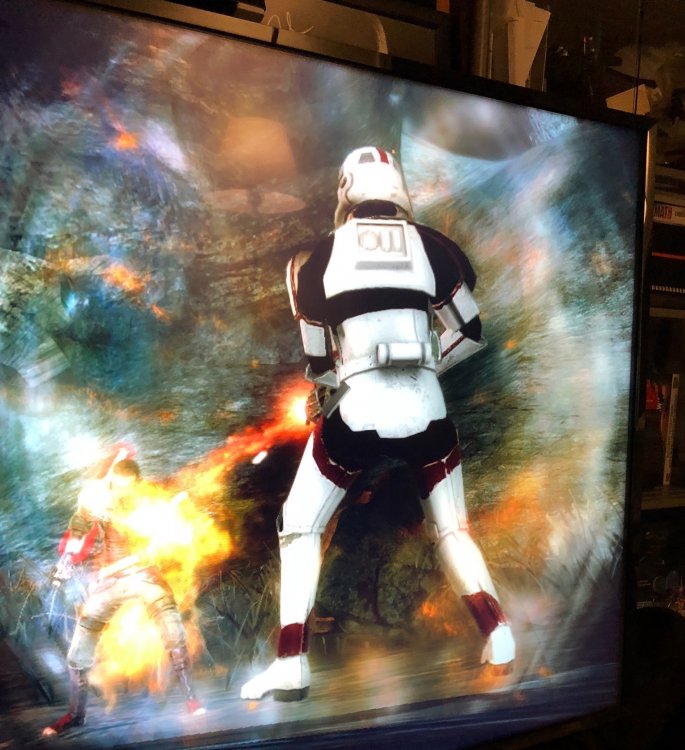
I received submission photos for approval for an Incinerator Trooper. He had a red stripe around the top of his bicep. Applicant CRL I called him on it, and he turned around and provided these screen grabs from the game. Based on these photos, I think perhaps this is enough evidence to update the CRL? -Pete
 1 point
 -
For anyone still interested in any progress on these scopes,etc. please go to my Facebook Bulldog Props Page. Due to the photobucket fiasco, I haven’t found a reliable way to post pics so I am using the Facebook page for now. https://www.facebook.com/BulldogPropsJapan/1 point
-
Sometimes you think they would be better off just saying "don't know, eventually" at least then it's not a lie and people don't get upset when a delivery date comes and goes. Anovos "the one day you'll definitely maybe get your order"1 point