Leaderboard


Popular Content
Showing content with the highest reputation on 05/30/2018 in all areas
-
Rear sight work4 points
-
Fully approved and ready for my first troop this weekend! Thanks for all the advice and support. I couldn't have done it without you guys!3 points
-
Happy to report that my T-nut lens mount fix worked! I can finally move forward with a few days at home. Sent from my iPhone using Tapatalk3 points
-
Flip sight op22 points
-
Definitely more apprehensive on using it again. I think its more since I am using the elastic hooks I just need to come to terms of what my expectation is for closing them in the back will be. I'm in the process of reassembling the new ones now and should have some pics posted up in the coming days2 points
-
When I was working on my WTF kit, I had pretty big misalignments on the calf openings. I banged my head on it for a while before realizing that I had to heat and shape the *fronts* of the shins in order to get the calves to close properly, not the back. I did use a heat gun, but I'd used it a bunch at that point in my build and was pretty confident with it. I assume you might have gotten scared off of it, but if you do use a heat gun again, maintain a decent distance, keep the heat gun moving, and be patient. A great tip I got from another build thread here is to heat the plastic just to the point that the plastic starts to lose its 'spring', then remove the heat immediately. Then hold the plastic in place until it cools. Here is a shin before heat shaping: And after (this is with no velcro yet):2 points
-
For the shoulder spacing, there's no required gap. I am so small that initially the front and back plates overlapped at the shoulder, so I had to trim them back. I also attached both sets of shoulder straps with snaps, but I have basically never unsnapped the left side, so it could easily be glued.2 points
-
Neck seal, holster, and blaster came in! Woohoo!!! Pew pew!! Sent from my iPhone using Tapatalk2 points
-
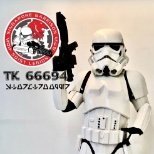
I got my official Legion TK ID yesterday, and I am extremely glad to be part of that wonderful group! Thanks to everybody contributing to this forum - you are all so great and always helpful! I can't wait to troop and represent the Empire everywhere I'll be going. I have had a really great experience building my armor and meeting you all here on the FISD forums, and I pretty much think I'll be building some more stuff someday. For now, I've got a troop tomorrow for the premiere of Solo - what a great first official troop! So once again, thanks a lot to all of you and I hope you have as much of a great time as I've had! <31 point
-
Hyperfirm Sent from my iPhone using Tapatalk1 point
-
Thank you. I am guessing that the ABS is my better option, more screen accurate, won't stand out.1 point
-
I've done some of my armor with plasti-dip and I've also done a few pieces with gaffers tape. Both seem to work pretty. well. I'm expecting some overspray to help add another layer as well.1 point
-
Cbrant, thank you for the compliment. Ok so last night I learned something new about my build. I thought my abdominal armor was relatively un-moving once it was tightened down with the two back straps. This is not the case and it has been moving up or down 1-2 inches every time I put the armor on. This means that when I mark something, then cut it (abdominal armor), the next time I put it on, I will probably get a different fit. So, I think I may have been a bit premature in cutting down the abdominal armor but all is not lost. Based on how I put my armor on, it looks like I will have a 1 or more inch overlap from the chest plate in the center. Anyway, considering this issue, I need to find a way that will force all the armor to sit where it need to be when I put it on. While I stew over this, let move on… Lower leg armor. Well I was correct, the lower legs are about 1” longer than they need to be. I determined this by bending my leg in a 90 degree angle and the armor prevents me from completing the bend. It is striking at the back side of my knee and on the top of foot. Looking down at the armor it looks like the flair of the leg armor (bell bottoms) is a bit extreme; however, when I look at these pictures, it look very normal and correct. Anyway, I did not want to rebuild all the detail at the top of the leg armor and feeling that the flair was too big, I decided to cut off 1 inch from the bottom of each leg. So here are some pictures before I cut the 1 inch off. Ok, so once I cut the legs down and sanded them, I decided to put mostly everything on and see how it all fit together. At one point, I dropped the back plate cover strip and bent down to get it. This is the reason that both of my bicep armor came loose from the tape on the back side. So that is the update at this time, thanks for the interest.1 point
-
So after a couple of troops this suit has held up pretty well. The foam chest plate tends to get a bit beat up, so I've started to replace this part with a pepakura cardboard/fibreglass resin piece using the same method as the helmet. Some trooping pics: And I've started on the first major upgrade...replacement of the chest plate. I modified the template for this so that it has a better sweep at the back, and a good taper from the neck to the shoulders when looking front on. For this part, I used 200gsm card, and some thicker cardboard in order to build up the ridges better. Just used some Bostic paper glue to glue it all together. I'll put up more pics of the process as I go. These pics are just after I've finished putting the card pieces together, and before layering on fibre resin on the outside, with fibre resin/matting on the inside. This part should have the same finished result as the helmet/mask: ...A much better taper to the shoulders in this version...1 point
-
I see an EIB Award i the near future1 point
-
Excellent build, Zak. Best of luck for clearance.1 point
-
Just some random black spray paint I had at home; I just very lightly went over the scope area. If you look at the pics in my EIB vs Centurion application, you'll see the difference: https://www.whitearmor.net/forum/topic/43133-tk-19233-requesting-anh-stunt-eib-status-wtf-766/ https://www.whitearmor.net/forum/topic/43656-tk-19233-requesting-anh-stunt-centurion-status-wtf-367/1 point
-
Semi gloss it is. I should have the helmet completed tonight. The body completely attached on the armor and all of the final sanding done. Thanks for the advice on the forearms. They fit over my hand now and are comfortable to wear.1 point
-
Thanks for this heads up Daniel, the pack arrived today and it did have a belt included Came up with another question though, where did you guys get the templates for painting the helmet from? Preferably from Europe, again Thanks in advance lads!1 point
-
Looking good. Yes, cut your back cover strips the same width as the raised return edge. The cover strip should cover all the flat part of the return edge. Like you mentioned, the top of the vocoder needs some definition, but otherwise things are looking great. Keep it up! Also, if you did use a slightly wider cover strip on the back of your forearms, you are going to want to do the same for the back of your biceps - just so they look uniform from the back.1 point
-
A little late, but Congratulations! Have fun out there!1 point
-
Congrats & Welcome to the Legion trooper!1 point
-
EWTN? Wow that's actually pretty big, I think they are an international network, so you must be doing something right. Congrats on that! Anyways, I'm quite excited to watch this film when it comes out, your inspirations appear to be placed in the right stuff! Short film is a completely different rodeo than a documentary, but based on that trailer, you seem to be doing just fine! As long as you keep making movies, and maybe watch some rocket jump film school, you can only get better!1 point
-
Hey guys thanks for the tips! spoke to one of my local member about singapore's law for the blaster. He told me to be safe just get the DoopyDoos/hasbro/disney parks. High chance im gonna go with DoopyDoos. Thanks again fellow troopers!1 point
-
1 point
-
1 point
-
VERY cooll part sample came today ,,,, the alum cast saflty lever. I made it to slip over the rotary threeway switch that will be in the Grip.1 point
-
I'll back this up and say that Culp helps a ton of our new TKs every year with their builds, often offering his own hardware and using his own tools, and always shoots for the higher levels of accuracy. It's a shoe-in.1 point
-
Michael "Highway" Culp, TK-1636, assisted me in every step of my armor creation. From the ground up to the final touches to reach EIB status here and for the Dune Sea Garrisson. I'd like to extend a huge thank you for all his help and assistance! In the time I've known him he's helped others complete countless suits of armor. He's most definitely a Master Armorer.1 point
-
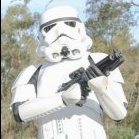
Nice work! This has always been my idealized trooper. When I think of Stormtroopers, I picture this one. Can you share more about how you reworked the scope and mount on the blaster? Sent from my VS996 using Tapatalk1 point
-
Michael "Highway" Culp, TK-1636, assisted me with my TK build in Arizona. He assisted me with the process of joining the 501st (DuneSea Garrision--Arizona) and modified the armor to standard. His detail and knowledge in Star Wars greatly assisted me in the process. He put in long hours and got the armor done within a seemly fast period. Thanks for all your hours of help Mike!1 point
-
Here is a full kit I made for someone recently. I will get some work done on my parts soon and post detailed photos.1 point
-
Thanks for the kind words on my videos1 point