

Haso
-
Posts
303 -
Joined
-
Last visited
-
Days Won
1
About Haso

Recent Profile Visitors
2,309 profile views


-
So here you are Mark. It is more active here than on the KFG forum, though you will get feedback there as well, it won't be from as diverse a bunch. The build is progressing well, glad you're going for Centurion from the get go.
-
EVA foam RO TK build
Haso replied to Thrawndike bar's topic in Other Non-Approved Star Wars Costumes
Wow this is an interesting build! Great work! -
Been a while since my last update, but here's the latest pics of the in progress Vader helmet sculpt. To rehash, although this is meant for the Kid Vader suit, this helmet can also fit an adult head as it's not 1:1 scale but a bit smaller; still enough to get my head into it... This is the third iteration of the mask, so in these pics it has only been roughed in - the details and smoothing are still to be done. The helmet is a little more advanced, it's further along in the smoothing stage. The tusk tubes are just placeholders; they help me to determine the cheek shaping and angles, but the proper tubes will be added in much later. The sculpt will then be cast so that I can make fibre resin helmets from it - this is the ANH version but I'm planning to then make ESB and ROTJ versions, as well as chest and shin armour; for a kid size say age 10 upwards. I'll then hopefully continue to scale up the molds as needed. I'm also talking with one of the guys in my Garrison to be able to vacuum-form these on his machine.
-
OK....sith just got serious! Meet fun-sized Vader....the newest upgrade to Kid Vader. However, this helmet fits both kids and adults, as it's undersized. This is the clay sculpt I am working on, and have been for several weeks. My biggest go to source for this is Bookface's and CSMacLaren's FB page here, I study these pics incessantly and these are true works of art: https://www.facebook.com/pg/SculptingVader/photos/?ref=page_internal I'm inspired by how these guys make fully integrated helmets and chest pieces, and want to try this for the Kid Vader suit (and of course, I want one too!) Because I've not done this before, the different colours are due to the different oil-based clays I'm using; green is hard clay, red is medium - I needed to order more, but the hard stuff was out of stock. So I'm learning as I go here. I'm at a stage of refining the shape, then I can finish the details and smooth it out. This will then be used to make a cast, and then I can produce fibreglass resin helmets from that, but I'll also then modify this sculpt to get ESB and ROTJ versions, with a different helmet for each. So my son (and I) will have helmets that should last for years as there's plenty of growing space - even I can wear it! I'll also do a chest armour, shoulder armour and shin sculpts over time so that I've got all the hard armour pieces. I'll keep you all posted with progress. Currently working out how I'll get the helmets sculpted, I need to make the armatures first.
-
Being a cold, wet weekend I've spent it powering through the chest armour upgrade, and modded the mask a little bit. The chest armour has now been sprayed with black and gunmetal gloss. But the process to get there looked something like this. Spraying a coat of primer like in the above pic helps to pick out big areas that need attention. Then after some further filling and sanding it starts to look more like the final piece... I used some 120, 240 and 1200 grit wet paper to get it ready for the first coat of primer, then a coat of spray putty, then a coat of black Rustoleum (primer is incorporated into that paint)... The next day, I masked it off and sprayed two thin coats of gunmetal. I wanted a bit of a brushed look so painting the black first, then thinly with the gunmetal, helps to get the look similar to the finish of the ANH chest piece, which is the finish I prefer. It's not finished yet, I need to hand paint along the edges to improve the finish, then I'll give it a week or so for the black to harden, wet sand the black areas with 1200 grit, and hand paint the black areas, as the masking tape left some minor residue. Also, I modded the neck line of the mask by cutting it with a dremel. Basically I cut about an inch up at the back of the neck, then tapered it down towards the bottom of the chin, so that it angles more sharply into the helmet more like the screen used ones.
-
Haso changed their profile photo
-
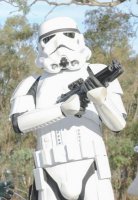
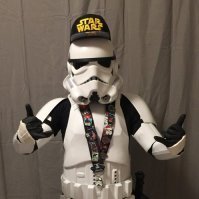
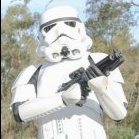
So after a couple of troops this suit has held up pretty well. The foam chest plate tends to get a bit beat up, so I've started to replace this part with a pepakura cardboard/fibreglass resin piece using the same method as the helmet. Some trooping pics: And I've started on the first major upgrade...replacement of the chest plate. I modified the template for this so that it has a better sweep at the back, and a good taper from the neck to the shoulders when looking front on. For this part, I used 200gsm card, and some thicker cardboard in order to build up the ridges better. Just used some Bostic paper glue to glue it all together. I'll put up more pics of the process as I go. These pics are just after I've finished putting the card pieces together, and before layering on fibre resin on the outside, with fibre resin/matting on the inside. This part should have the same finished result as the helmet/mask: ...A much better taper to the shoulders in this version...
-
Here we go, a pic heavy update of the very first full fitting we did today. So I really didn't know how it would all look as one coherent costume. There are some finishing touches to do; hem the bottom of the cape, add pleats to the inner robe, new boots, finish the reveal mask greeblies and clips joining the two halves, and other little fitting tweaks, but it is otherwise pretty close to finished. It's two weeks until we debut this one at Supanova, so plenty of time to finish those extras. Pics with both the full mask, and reveal mask... Although we were larking about in this last shot (it was the end of our photo shoot!), it shows the undersuit which is a layer of faux leather over fleece wadding, then spandex underneath. It was hell on earth to sew this and is very rough inside...
-
I'm declaring the helmet finished... Today I added some more clear gloss, the harness strapping and the tusks to this bucket. This post is pic heavy so I'll let those do the talking, I found it hard to get shots in good light as it's night now and I don't have natural light, so the gunmetal has a slightly blueish tint to it in these pics... A close up showing the lens - I used an old tinted, clear lampshade for the lens itself, then backed it with some mesh from computer parts, to block out the eyes. For the paint scheme, I referenced a LOT from online, as well as the Vader CRLs. The colours used are gloss gunmetal and gloss black. I sprayed the gunmetal all over, then after about 5 days I masked it off with blue painters tape to spray the black. This took about an hour to mask up, and once the black was painted, fixed up parts by touching up with a small brush... Similar to the screen buckets, the helmet uses a cylinder on top, in this case a pvc pipe, and has been attached to the mask with epoxy. The inside of the helmet has the corresponding housing to take it. No magnets used in this version. To keep the helmet from swinging side to side, thick foam padding is e6000'd to the inside of the helmet. Also took inspiration from the screen-used buckets with the harness strapping system...in this case I used 20mm nylon. Inside of that bucket has a thin layer of rondo (fibre resin and bondo mix), and has also been fibreglassed with fibre sheets. Then platidipped a gunmetal colour... It seemed to me that getting a front-on shot seemed to distort the helmet proportions when going up close with my camera, so I found that taking it from a bit of a distance seems to keep the helmet in proportion within the shot...the neck is based on a ROTS mask, however the build is OT-inspired. I'm keeping the larger, flared neck for now until I can do proper fitting tests with the full armour. It can always be reshaped as needed... Left side... And right... Close up of chin and mouth grill. The mouth also has a mesh backing behind the grill. I'd prefer not to do that for the chin one for now, pending how visible the wearer is, in order to keep as much ventilation available...took me a while to decide what colour the grills would be - silver or black, I keep seeing versions of both. In the end, settled on black for both, referencing the CRL as well as it seeming to sit better within the look of the rest of the bucket; silver looked to stand out too much, especially the mouth... Eye lens up close - the grill screen is pretty much not visible when worn. However I've seen this grill used in Vader helmets as well so went with it... Another bit that took a while for me to determine through research was the colours around the mouth piece, which in the end has been painted black like the screen helmets... Back of helmet... That's all for now, I need to finish one leg on the undersuit, then on to fitting it and adjusting from there...
-
Now starting to see the end of this build, but there's still a bit to do: finish the leg's (I've done the right undersuit leg, still to do the left), strapping on the shin guards, finish painting and detailing the helmet, including lenses and installing the mouth & chin grills, and filling in the indentation in the middle of the circle shape on the belt buckle. I also need to buy boots and am hunting around for suitable ones, otherwise I'll make something up for them. Everything else is essentially done, so I couldn't resist just propping it up on the couch and balancing the helmet on top, hoping it wouldn't roll off. Here's were it's at now, I'm still aiming for Supanova in 3 weeks, which gives me two more weekends to finish.
-
Thanks! Honestly I'd never made any pepakura helmet or used a sewing machine before this project. It's just a matter of learning the skills, plenty of watching youtube and putting all those new skills together. The sewing especially is very rough, but I'm learning that success isnt necessarily about getting it perfect, it's often just about getting it done without ruining it. The cape for instance, it's a wool blend, heavy material and expensive to just buy more and start again if you do it wrong. I just think that the replacement parts will be better as it slowly gets upgraded.
-
Getting there...starting to see it all come together now. Reveal mask is pretty much done, just need to finish the clips that connect the neck seal and front. And the full mask is coming along as you can see in the pics. The upper leather body suit is also finished, and one leg is done, just need to make the other leg and all the undersuit is done. Shin armour is also done. I just haven't yet put it all together for a test fitting on Ash yet, should do over the next couple of weeks as it all gets finished. "Reveal" Mask Full pepakura mask during sanding/priming: Pic of full helmet after a coat of gunmetal paint: Cape and chest piece fitting, I still need to hem the bottom of the cape but that will come near the end: And just for a bit of fun, I'm accessorising with a 'stump' of Vader's severed hand that he can carry around: And that's it for now.
-
Update...here's the latest pics of this build so far. I'm still aiming for Supanova in April to debut this one. Here is everything so far mocked up, I've just stuffed it with batting to fill it out. I completely rebuilt new chest and shoulder armour, and shin guards as Ash is growing out of what I'd done already! Top undersuit is done. Cape is still to be finished; the inner lining, hemming and neck collar still all to be finished, I've only started with the inner lining on one side. The chain is garden cable tie just like the OT screen used suits. The reveal mask, I completely stripped that back and rebuilt more to ROTJ style as well, here it is mocked up on Ash...I've still got to finish the vocoder part and microphones, they are started but not yet ready to be installed...I've just recreated the parts as best I could from found parts or closest match from car shops etc... The suit so far... This has been much harder than building a TK suit, as I can't find anything I can follow for this build. The chest plate, shoulder armour and shin guards are my templates. The undersuit was done from scratch, using existing clothing as templates that I created custom ones from, that's why the legs aren't done yet; I'll start working on those patterns this week. There is a full vader helmet and mask, but that's been completely rebuilt too; the mask anyway, the first one I dropped and damaged too much to try to repair. Lesson learnt, but the second one is better built.
-
The reveal mask, now pretty much done. I just need to finish the greeblies on the neck seal, add the clasps to join the two, then complete the repainting of the rest of the mask (I decided it needed a new paint job). Sewing machine this week so that I can continue with the quilted leather suit and robes. Scratch built the vocoder unit and microphones with found parts and collecting bits from visits to the hardware store; and Lego! Any Lego enthusiasts might recognise some pieces. It's fun hunting around for parts to replicate this piece. It's inspired by the ROTS version, as it's more colourful than the ROTJ one. I ditched the pepakura neck seal and decided to build a better one with craft foam instead. Best find of all - that chin mesh, it's guttering grating, found at Bunnings. That stuff will also go on the mouth piece grill. Supanova (in April) awaits!!
-
Neckron666 Requesting Pre Approval (RS ANH Stunt)
Haso replied to Neckron666's topic in Request TK Pre-Approval
Shay your thermal det is upside down. Overall pretty good, perhaps bring your shoulder bells closer in. -
More progress and new developments.... Trying on the chest armour and helmet pieces today, and there was a big gap between the top of the chest armour and the mask. I tried to bring the chest armour up higher over his shoulders, but it creates fitting issues and puts other parts out. So at first I decided to discard the mask I made and start a new one, with a longer neck. Then I took a risk. I had the lower jaw and neck seal parts of a new Vader pepakura build I was making, all done. This was, however, from another pepakura plan; not the same as the existing helmet & mask I'm using now. This new build was to enable the kids to upgrade to a bigger bucket as they grow, however, by eyeballing the newly started jaw/neck assembly with the existing mask, they SEEMED to fit pretty closely. I had the idea to cut the existing mask pretty much as per the reveal mask in ROTJ, and add the new pepajura pieces - because these new parts have a neck that goes much lower than that on the existing (which I'd cut shorter to mimic ANH). So, after umming and ahhing for a few minutes, I took the plunge. I removed the mouth and chin grills, then cut the Vader mask along the jaw line using my dremel and a cutting wheel, and HOPED that the new pieces would fit.....which they DID! So I promptly added some fibreglass resin to the new parts while attached to the face mask, to give the new piece the best chance to harden to the shape of the existing, and to start the process of bondo/filling/sanding/painting. Pics of this below: Now I don't know yet how I will have these parts clasp together, I'll work this out at that time. I'm just relieved that this has worked. It also fixes the gap issue between chest armour and mask. So mission accomplished. Other news.... The chest part of the leather undersuit is a bib, that attaches to the inside of the chest armour using one snap. The reason I've done it this way is to allow the inner robes to be laid over the chest leather, but under the chest armour; so ANH or ESB/ROTJ style depending on whim. Perhaps some pics will help...imaging that dirty old rag is the inner robe... The chest box is hot glued to the bottom of the chest armour via two leather straps... One arm is done, hand sewn as I don't have a sewing machine, and pictured next to the gloves which I sourced and bought on Ebay. I'm thinking that I need a sewing machine. Happy with these gloves, although I may, if I really feel like it, attach my quilted pattern over the top to match even better... Cod and belt assembly and strapping. The cod is attached via hot glue to the belt assembly - there's two small strips of nylon either side of the buckle that join the two. The inner robe is then threaded behind the belt, and over the cod to drape down. both cod and belt are fastened individually via snaps at the back of the wearer... Lenses at this point are simply spare bits of TK lens...good enough for this build. I'd like to source some tinted reddish lenses at some point. And there we go, till next time...
