Leaderboard


Popular Content
Showing content with the highest reputation on 04/25/2018 in all areas
-
No it wasn't for mobility - it's cuz I'm 5'2". Definitely needed some modifications to make it hobbit-sized2 points
-
Over my time coveting, building and then being a TK I've built up a large collection of 'Billgrams'. I keep getting asked for where they come from (anywhere I saw them, a couple direct from him on my WIP). So to save people the hunting I present to thee my collection. I'll try keep it updated as I find them. In a few cases there's multiple version, in these cases I will only have the most up to date version to save on confusion. I'm also providing the click through links to flickr so you can get at the original files as I have (some will be 3rd or 4th hand I am sure!) Finally, some of these have exact measurements on them. Don't blindly follow them, check them on your armour brand, ensure it looks right. If in doubt ask. To quote the man himself: Paint colours (though see this thread for a more up to date one I did: http://www.whitearmor.net/forum/topic/39650-anh-paint-colour-guide/) Helmet - Colours Helmet - ANH vs ESB Helmet - Padding Helmet - Frown_Mesh Strapping suggestions Snap positions - Front Snap positions - Rear Snap positions - Limbs Snap positions - Arm Arm - Strapping Armour Ab - Kidney Rivets Single Snap Thigh - Single cap rivets Thigh - Ammo Pack Bicep - Adjustment Armour - repair Belt Belt- Trim dimensions Belt - holster position Belt - drop boxes Belt - snap mounts Belt - Popper holster mount Belt - which side Belt - corners Belt-Popper Locations Drop Box - Dimensions Misc Ab Plate - Dimensions TD sizes1 point
-
OK, future Troopers, many of you have asked about how to set snaps for your armor connections, so I thought I'd whip up a little tutorial. Please note that the example that I am making is based on using the "double snap" connection system (see last photo). I highly recommend this method, especially on the back/kidney, kidney/butt, and ab/kidney connections, as it provides an extra layer of confidence. Yes, it costs a bit more to do due to the extra snaps involved, but you can be sure that no matter what happens, you will NEVER have a piece come loose or fall off on a troop. Some builders may have used others, but after countless troops I have experienced no problems. So here we go.... Materials needed: 1. Hammer 2. Soldering (woodburning) iron. (Available at home improvement and craft stores. WELL worth the $10-$12.00 investment). NOTE: The tip of this thing gets CRAZY hot, so be very careful where you set it. Many come with multiple tips, but I suggest the pointed one. 3. Snap setting kit. (Available at all craft stores). Please note that I am showing both sides of the base... more on that later. Convex side Concave side 4. For this purpose, I am using 2 inch (5cm) wide black nylon and 1 inch (2cm) black nylon. The 1 inch strips will be attached directly to your armor. I suggest using E-6000 glue and clamps for this. 5. Snaps, of course! Don't "cheap-out" when buying these. The cheap ones come undone very easily and are garbage. For this tutorial, I am labeling the 4 parts as such: STEP ONE Cut the 2 inch strapping to about 4 inches long** (or as needed) for the particular connection. Cut the 1 inch nylon into 2 inch lengths as seen below. **NOTE: The actual length will depend on there you are using them, i.e. the kidney to posterior plate connections will be shorter. Just be sure there are no gaps, and that the 1 inch wide base pieces are in the correct position before attaching them. Example: The ends will be a bit ragged and will fray. Use the soldering tool to seal them. Again, using the soldering gun, make 4 holes in the 2 inch wide nylon as seen below. Be careful not to make them too large (just larger than the shaft of the snap base) or the snap may eventually pull out. Take one of the 1 inch wide nylon pieces and slide it up under one end of the 2 inch wide piece, even with the end. Once it is lined up, use the soldering iron to make holes in the 1 inch wide piece. This will assure that the holes for the snaps line up correctly. (VERY important)! You should end up with this: Repeat for other side, but be sure not to get the sides mixed up, as one set of holes may be farther apart. Insert one of the male bases into one of the holes in the 2 inch wide piece. Flip it over and place one of the male snaps on the post. Place the base in the concave side of the snap setting kit base. Place the striking rod in the center (straight up and down) and strike it several times firmly with the hammer. The inside shaft should be sufficiently widened to keep the top from coming off. There... your snap is set! NOTE: Do not attempt to do this step on a regular table. You need a hard surface, and a heavy duty workbench or concrete surface works best. Repeat this step for the remaining 3 holes. Now onto the 1 inch wide strips.. Insert one of the female bases into one of the holes, then (as above) place one of the female snaps on top. Place the female snap base into the convex side of the snap setting base. Again, using the striking rod, give it a few good whacks. (Getting the hang of this now)? This is what you should have at this point (only one end shown) CONGRATULATIONS, you have one strap completed! Now that you realize how easy this is and have it down to a science, repeat as necessary. NOTES 1. For added security, the double snap system can be applied to other areas as well, including shoulder bridge attachments and bicep to shoulder bridge, (example below) This is especially good for those who wear packs (HWT, Sandie, Spacetrooper). 2. Snaps set in elastic (as seen above) can pull out over time with repeated use. For added strength I recommend doubling the elastic over before attaching the snaps. 3. Be sure to use the female base on all the straps that will be glued to your armor. The reason being is that the bottoms are flat, insuring a tight seal. 4. Some folks set the female snaps in ABS instead of nylon when gluing them to the armor. There is absolutely nothing wrong with this, it's just a different way of accomplishing the same goal. The reason I use nylon is that I find it conforms to the curved parts of the armor better, and gives a larger surface area for the glue to adhere to. 5. Some use CA (super) glue to attach the 1 inch nylon to their armor. I have found that it can get brittle and break off or even cause warping on ABS due to the heat it puts off while drying. E-6000 needs to be clamped and takes more time, but trust me, it's worth the wait. 6. When gluing the 1 inch nylon to your armor, do NOT keep the 2 inch wide nylon attached with the snaps. Some of the glue may seep through the hole in the snap and glue the whole connection together. Not a good thing. If you should have any questions, just ask here or PM me, and best of luck on your build! Photo 1 (Double snap system.. note clamps). SHOUT OUTS: Gary jr. ( @flashpoint0214 ) The guy who introduced me to the double snap system! Jeremy (Copper) who supplied the nice clean photo of the double snap system.1 point
-
Here we go again. After dry fitting the WTF kit to my frame (6'1" 195 pounds) I was not happy with the fit (too much under-suit showing). So, after following Sean and his build of both (WTF and AM) I decided that the AM would be a better fit. Lots of tips and tricks were learned, so I have a little more confidence in this build. My WTF armor will go to my wife after I finish this kit. The family that troops together, something something something... Just got the tracking number, so now the BBB day is fast approaching.1 point
-
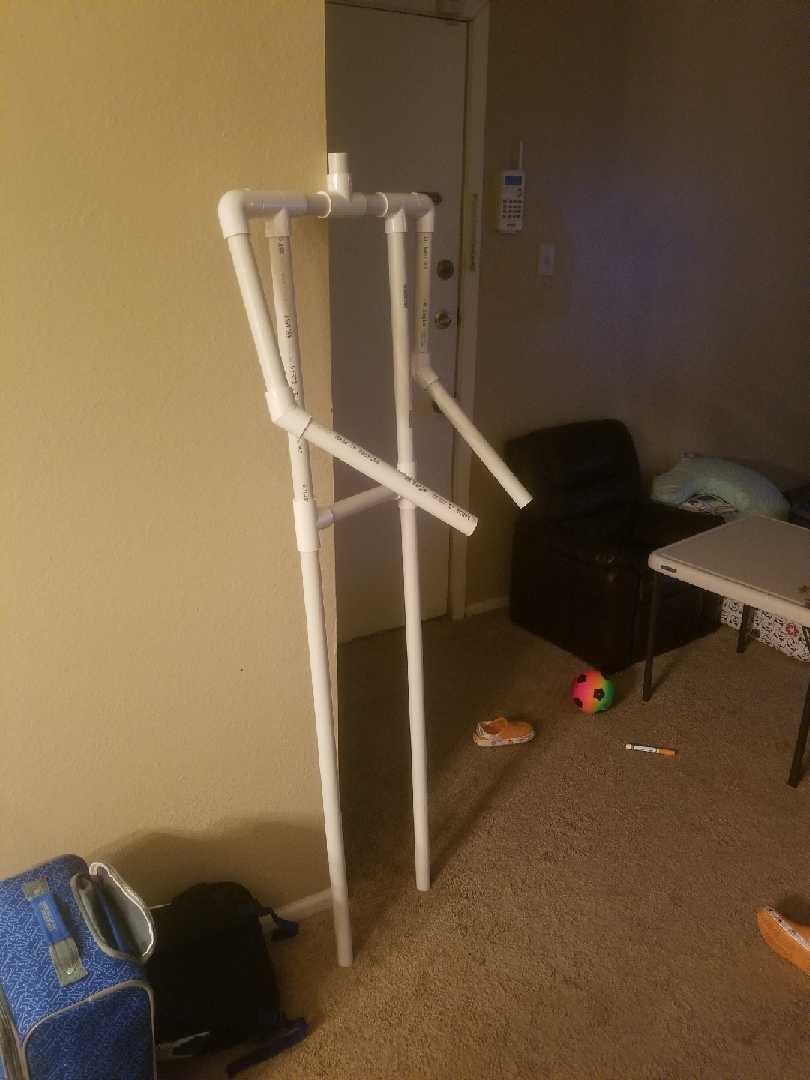
Alight guys and gals, I figured I would go ahead and start this before it gets too far out and have too much at once. I am starting my TK ANH build. currently waiting on AM Armor to have something available to be able to ship me a kit, super excited. But here is what I have and am doing so far. I am a big visual guy, seeing it will help me a lot more than just reading stuff alone, but in order for me to kill 2 rebels with 1 blast, I decided to make a "Duct Tape" Mannequin. Also got my TK's Boots in from, well, TK Boots. IF YOU ARE LOOKING FOR TK BOOTS, SEARCH NO FURTHER, THESE ARE AMAZING!!!! the fit of these boots are great and OMG the quality is something else. As far as the mannequin goes, I am going to use it to view my progress and as a working partner when I'm solo, but also as a display once we are done. The mannequin is being set up the have removable arms and legs for ease of display and setup, along with allowing me to position it while holding a blaster. Let me know what you guys think and if you have any tips on what I could work on next while waiting for the armor that would be great. Currently have my snaps, my level 3 helmet hardware & level 3 gloves with correct hand guards (Major thanks to @justjoseph63), and under suit.

 1 point
 -
Hyperfirm DLT-191 point
-
Tandy does indeed sell them (they call them rapid rivets), I just bought a pack last week.1 point
-
Thanks Robert. I actually picked this idea up from a couple other build threads I have seen. Works great! Hope your build is going well!1 point
-
I really like your “slotted scrap ABS connection to keep everything lined up,” and I think I’ll do the same thing when I get to that step.1 point
-
Hi Chris, Coming on nicely. :-) When you say vents, do you mean the vertical lines in the traps and tears? If so, they have to be painted or decals. CRL: “Tears, traps, and tube stripes may be hand painted, decals, or decals that replicate hand painted.” If I’m honest, I don’t think you’d get much ventilation through there anyway. :-) Just a couple of observations. If you’re going for ANH Stunt, you have the option to extend the frown paint a little beyond the un-drilled 5th hole, if you wanted to. Here’s some examples of frown paint from ANH. There are also variations on the vocoder shape. The main difference is in the height of the 2nd and 6th vertical lines. Stunt helmets tend to have slightly higher 2nd and 6th lines, whereas ‘hero’ and ROTJ have lower 2nd and 6th. As I say, just observations and not reflective of clearance - just personal preference. Best wishes, Dan1 point
-
Oh I see makes sense now. Mark (AP)1 point
-
Battery too big (sizewise) for my mag. clip, but will fit just fine in my tie pilot chestbox so not wasted.. got a 3400 mah on the way.. just hope the battery holder works on these weird flat end bats. The Gonk says he has no power issues... Sent from my SM-J700T using Tapatalk1 point
-
Aw man! I do not like working with electronics ! Yea I sent it back and he had to just replace it .. ka-ching! My husband says I crossed the power wires probably, but I am pretty sure it was the stupid lipo battery. It was puffy... Troopramp said hes blown his share as well haha So now I got the new scope to re-install. Scared the other part will do the same after I glue it up, especially the trigger mech... My china battery finally arrived but is mega huge ! At least I can use it in my mouse droid or tie pilot chestbox. Smaller one coming at end of week so hopefully over the weekend I can get this puppy booted up! Sent from my SM-J700T using Tapatalk1 point
-
I believe you want that ridge detail on the bottom of the small button to be shown. With the small amount shown it should be good1 point
-
Like any CRL there needs to be evidence/proof of a particular item not just assumption, in the case of the RO baton there are only very dark images so it does make it difficult to give exact information in the CRL, general info on it's appearance for L1 and when/if more references become available they could be added to L2 and L3.1 point
-
Hi Freddy, I think Bob must be referring to this part of the magazine (Correct me if I'm wrong Bob): ps, keep up the good work; looking fabulous!1 point
-
Cool.. I think I'm going to order one. I stopped by Andrew's house today with my kit and he thinks I'm on point so far.. also, also gave me some great pointers. But yeah when I get the belt in hand... I would be down!1 point
-
This is really coming together now buddy. Looks great. Sent from my iPhone using Tapatalk1 point
-
IMHO its an ASP baton or a knock-off. As for the baton being round or square, I would think that engineering a telescoping square baton would be difficult and why bother when there is already a reliable and effective telescoping round baton (The ASP) available in a variety of sizes and colors. As with so many other props for Rogue One, the prop masters have opted for already existing items rather than making most stuff from scratch. I am confident that the TK's in Rogue One used the ASP baton or a knock off of it. Jyn's telescoping tonfa is a different matter entirely, possibly based on this: https://www.karatemart.com/collapsible-nightstick Just my 2cents1 point
-
I had my kit out for a pre season check up at the end of last week, and well curiosity of the better of us. She's lost about 4 stone in the last year and so now is smaller than me in almost all dimensions. Who's in my suit! by Christopher Pearson, on Flickr Wife stole my suit! by Christopher Pearson, on Flickr She couldn't see a thing as she couldn't get her glasses in but she quite enjoyed it! The photos are above are with no effort made to fit it to her. A few straps would need to be shorter but not a huge amount.1 point
-
So, I guess I still have more to post. After not wearing the armour for a bit, I put everything on this weekend in preparation for a big troop this weekend. I knew I’ve been losing a little weight, but I am now swimming in my armour. Not awesome. So, added a bunch of temporary padding. I also added extra straps to my biceps/shoulder bells to keep the biceps from popping out. Thighs were the worst. Also picked up some liners for my gloves. They can be tough to get off when all sweaty. Then I packed everything up forgetting I wanted to cut some ABS from off the back of my thighs. Rats. I’ll do that tomorrow when I weather my new E-11 from Quest Designs. I also need to add a spring to the action. My 3D print and the Quest Design E-11. Packing - arms go in shins which go into the thighs which go into the torso. Temp lining in my tote. Wife hasn’t got around to doing some sewing for me. I think she is protesting the whole thing. Sent from my iPhone using Tapatalk1 point
-
Todays mission was shoulder bells...used my TM:s as a guide and well not much to it, draw a line, cut, sand and glue som elastic and you’re done And that’s it, time to shower and head home to watch football or soccer as some of you call it - it’s a derby - veeeeery important game1 point
-
Fold the belt in half to find the center and then lat it on the ab plate, making sure it’s at the right hight so that when the plastic portion of the belt is added it look something like this: To locate were to put the snaps on the belt use a marker on the snaps on the ab plate and it will rub of showing were to make the holes or push down to make an indention. While on the ab plate, if you used E6000 I would suggest removing the button plates and making the corners straight for that screen accurate look Great work on the helmet the vocoder could however benefit some TLC making the lines a bit sharper Just long enough to connect the chest and back, I recommend looking at some Centurion applications to see strapping options And on a sidenote: I’m also working on an RS kit at the moment, coulden’t resist the temptation and...look at the RS reference in the gallery section here alot of great info there1 point
-
Hi everyone, Tried to get some work done this week. Not as much as I had hoped but very happy with my counter! Found a Hengstler 400 on the internet this week. Put it together with the parts from Dennis Blue Snaggletooth this evening. I also started to modify and hollow the folding stock. Untill next time! Verstuurd vanaf mijn SM-A520F met Tapatalk1 point
-
Hey Nick. The screws are technically not a requirement for Centurion, just a recommendation for screen accuracy. That said, those are the wrong screws (I had the same issue in my Centurion application ). You need the pan head screws - so yeah, flat. EDIT: oops, they are required now.1 point
-
What a beautiful set of RS armour. Just s little thing. You will need to add a picture showing the inside of the thigh ammo pack attachment. Also, can't quite tell from the picture if those are pan head slotted screws [highly recommended] or domed for the thermal detonator. Superb job, Nick.1 point
-
Hey guys and gals, I finally finished my Stormtrooper blaster and I've been searching all over the internet for a suitable blaster stand to put it on display. I'm not really a fan of the transparent acrylic ones and any other stands I saw were either no longer being made, out of stock, or just too darn expensive. That's when I stumbled across Matt's Shack (click for the original blog article). Matt has created a great little stand that you can do on a budget. Parts were about $20 and the data plate was about $20, although I did have some paint and a wooden dowel left over from my blaster build so I didn't have to buy those. You can certainly follow Matt's article but I thought I'd post my build here since I made a few modification to the dimensions and hole spacing. Here's the completed stand: It's really easy to put together and something I built in a few days. Most of that time was waiting for paint to dry. Materials: Base : An oak board I got from Home Depot. 3/4" thick, 3 1/2" wide, 4 feet long, but you really only need 2 feet. Poles : 5/8" Wooden Dowel. 10 inches long is fine. Holder : 1 1/2" ABS Plastic Pipe Coupling cut in half Plaque : E-Bay (captain-america-tfa) Misc - 2 small screws for the data plate, 4 drywall screws for the dowel ends, black EVA crafting foam and contact cement for the padding. Build: Starting with the base. The 3/4" thick by 3 1/2" wide were already perfect. I just needed to trim the length to 2 feet. I used a router with a roman ogee bit to give some detail to the edges. Give it a quick hit with sandpaper to clean up the edges so there are no little bits of wood left hanging on. Next I painted the base with wood primer. My original idea was to get rid of the wood grain. I thought if I painted on several coats of primer and then sanded it down I would get rid of the grain and leave a smooth surface. That wasn't the case. After 4 coats and sanding, it pretty much did nothing to hide the grain and wasted a lot of time. Then I switched to filler/primer I had leftover from my blaster build and still no change to the grain. I figured fine, I'll keep the wood grain look. :-) Next I moved onto the pipe coupling... Using the grid guide on my cutting mat, I found the center point and cut the coupling in half. I sanded down the cut areas so they were nice and smooth and used a Dremel with a sanding drum to take off the little ridge in the center of the coupling. I marked the center point where the dowels would attach and drilled a small pilot hole. Then I used a 5/8" spade bit to make a recess for the dowel to fit into. Be careful not to drill right through your coupling. I cut a 5/8" wooden dowel into two segments. One 4 inches long and one 5 inches long. I painted the wooden dowels with primer and sanded them down with 400 grit for a slightly smoother finish. Next I drilled a pilot hole into the ends and used a black drywall screw to attach the pipe couplings to the wooden dowels. Next I used masking tape to mask off the center part of the coupling where the crafting foam will be glued. Then I used some leftover spray paint. I used Tamiya Grey Primer to prime the dowels and couplings and painted them with some Rust-oleum Silver I found in the cupboard. I then removed the masking tape from the couplings and cut two rectangles of black crafting foam which were glued onto the coupling with contact cement. Next I drilled the holes for the dowels in the base. I used the same 5/8" spade bit to drill a recess where the dowels will fit into. Maybe 1/4" deep. Again, be careful not to drill right through the base. These are the spacings I used for the holes. Measurements are taken from the outer edge of the board (not the edge of the routering) to the center of the hole. Then I painted the base. I had quite a bit of spray paint leftover from my blaster build. So even though it's not really meant for wood. I primed the base (again) with Tamiya Grey Primer and gave the base 3 coats of Tamiya TS-14 Black Gloss and 2 coats of Tamiya TS-13 Gloss Clear. These are the same paints I used for the handle (grip) of my E-11 so I had lots left over. Sorry, no photos of the painting in-progress. Once everything was completely dry flipped the board over to work on the bottom. The spade bit I used for countersinking the dowels on the top left a nice (smaller) hole in the bottom for the drywall screw. I just had to countersink this hole so that the base would sit completely flat. I drilled a pilot hole in the bottom of the wooden dowels and screwed the drywall screws in from the bottom to hold the dowels in place. (There's lots of overspray but I didn't care what the bottom looks like) Lastly I attached the E-11 Plaque I found on ebay from Captain-America-TFA. If you click this link it should take you to the purchase page but in case the listing changes, just search ebay for "Custom E-11 Blaster Plate" and you should find it. I think he's on ETSY too. I just used some small black screws I had leftover. That's it. I'm pretty happy with the way it came out. Mark1 point
-
A nice and slim stand. Good job Mark. That plaque really adds something to it.1 point
-
Hey Krill there are a few different audio systems out there. As you mentioned there's Troopertalk - My system - https://www.etsy.com/listing/525718278/ukswraths-stormtrooper-helmet-audio ROM/FX - http://www.romfx.com/ and more1 point
-
Germain, yep, that's exactly what my son did with the box! Taking a break from making cover strips, I decided that the next easiest thing for this short TK to build would be some shins. Actually, any arm or leg part will do at this point. I don't intend on fitting them to me right now, just assembling them. Make sense? I grabbed all four shin pieces and gave them a good once-over. The WTF shins are different from the RS Props shins, so I had to figure out what part went with what part. In the pic below, you can see how the left half is longer than the right half. In the next pic, you can see how the halves are roughly the same length. They fit together end-to-end nicely, and the other halves do the same. Now that the correct halves have been identified, let's cut! The fronts of all limb pieces should be assembled first because their size is constant no matter what size you are. For the shins, I'll be using a 20mm cover strip to cover the butt joint. I don't want the cover strip to completely cover the side ridges, though. I decided to measure 12mm from the narrowest part of the raised center ridge of the shin. This should leave 2mm on each side of the cover strip at the narrowest part of the front ridge of the shin. Then I clamped a ruler to the shin and made sure that the ruler was straight. I scored a bunch of times along the ruler with an exacto knife to make my straight cut. Then snap! I did this with both halves. Here you can see how straight my cuts turned out. Much better than my very first pair of shins! Since I like to add my inner cover strips first, I taped the butt joint together from the outside. This not only keeps the seam straight and tight together, but it also keeps the e6000 from making a mess on the outside. You can see how well it all fits together in there. Liberal application of e6000 to the inner cover strip (made from scrap ABS) and let it sit out for a few minutes before application. It makes the glue a little more tacky and less prone to oozing around in there. Add lots of magnets to both sides and let it cure. With my last build, I fit each part to my body as I assembled each piece. Not this time. This round, I'll be assembling inner cover strips on the fixed front seams on all the limb parts before diving into the fitting part of the build. The WTF armor is smaller than my RS armor, so it'll be interesting to see how much (or how little!) needs to be removed and reshaped. Oh, and I've already decided that I will be installing magnets on these shins as closures as well. The magnet method I used in my other TK works perfectly, and I've not had any issues whatsoever while trooping with them coming apart or anything. They're more work to install, but, man... totally worth it.1 point