Leaderboard


Popular Content
Showing content with the highest reputation on 03/24/2018 in all areas
-
Tubes are getting clean up and prep for ano....... so close now2 points
-
Keeping tabs, like to know how many (DA props) BFA armor troopers there are out there2 points
-
Keep the gaps to a minimum and you should be good From the looks of it the chest piece might benefit from coming down some and/or the ab-cod beeing raised if possible (just be sure the sides line up as well) - keep it up and stay on budget1 point
-
Quick update about my build. I have worked on a few things this week. One of them is the shins - I've started fitting them. And before I go further, I just wanted to make sure the correct parts are put together. They were marked from the trimmed kit I received, but still asking just to make sure. Here is how I'd assemble them : From what I've looked at, the correct parts seem to be together... Am I right? 8-) Also, on another note, I re-did my vocoder because I thought it was way too glossy. This time I really did stir the paint from the inside - not just shaking the tin like a mad guy - and the result I amazing. It's completely different - all satin - and I like it so much! Was worth re-doing it all over again. Here's a picture of how the paint looks now : As always, thanks for your so valuable tips guys! And have a good day!1 point
-
+1 Tony speaks the truth!1 point
-
Thanks for the advice. I went ahead and fully trimmed wrist sides of the forearms. So far I've got one side of the right forearm covered and curing- will do the other side once it dries. First time dealing with ABS, my lexan scissor skills improved as I went along, and my first cuts required a lot of sanding. I went ahead and fit and trimmed the left forearm, and ran into a snag, as I have this gap where the curved part is. Maybe an inner cover strip will help? Edit- It looks like one of my cuts wasn't all the way straight on the forearm so that could be the reason.1 point
-
I want these on my wall1 point
-
Congratulations:) Sent from my iPhone using Tapatalk1 point
-
Looking good and that scrap piece you have on the thigh fits perfect that should come out like it never happened. Sent from my iPhone using Tapatalk1 point
-
He isn’t on the forum. Google and you’ll find his FB/eBay.1 point
-
I think I got most of the Rogue One ones done. For any other R1 changes, please post at the bottom of this thread: This way at least all R1 stuff is in one place. Yes, some items weren't done, but that is because I wasn't clear on what the "should be" text should be.1 point
-
Centurion class Hero from DA Props1 point
-
I have a BFA/ DA Props and love it. TK-21799 Centurion. Sent from my iPad using Tapatalk1 point
-
Congratulations trooper1 point
-
CONGRATS JIM!!!!! Sorry it took so long to get over here lol I’ve been a tad busy. Anyway, glad to see you joined the ranks man! Third Bama Centurion!!!! Sent from my iPhone using Tapatalk1 point
-
Nice clean build there Trooper! You should have no trouble passing approval. See you at EIB soon after!1 point
-
If that’s the top of your bicep just cut that mismatched edge and it’s return off altogether. It’s not going to show anyway since your shoulder is going to cover it up. Sent from my iPhone using Tapatalk1 point
-
Looks like a pretty easy approval! Very nice! Good luck.1 point
-
What it looks like so far, all fiberglass. Sent from my SAMSUNG-SM-N915A using Tapatalk1 point
-
Your approved ! Sent from my iPhone using Tapatalk1 point
-
There are a lot of us who have built the RS kit and we are happy to help. Any kit is daunting when you first start out but it is totally worth the effort. Baby steps is how you get thru it. Sent from my SM-G935V using Tapatalk1 point
-
Welcome back trooper! Sent from my iPhone using Tapatalk1 point
-
Did you weld those pieces on? Sent from my SAMSUNG-SGH-I257 using Tapatalk1 point
-
I love it.1 point
-
Completed back of right thigh gap fix Before: After:1 point
-
In my experience, if you put it back into the boiling water all by itself for a short time, it should go back to its original shape! The hot water will allow the ABS to 'relax' back to a semblance of its original shape. I've done this many times with success when I've 'overshaped' my armor. I would give that a try before busting out the heat gun. Good luck!1 point
-
Congratulations on your EIB1 point
-
Second coat I think perhaps one more for the bottom and it be good. So how long should I let it set before sanding? Sent from my VK815 using Tapatalk1 point
-
Anytime, great job again1 point
-
Hey Jim welcome back. Thank you for your Centurion application. CRL and Centurion Application Requirements: All required submission photos are present. You did a fantastic job making all the suggested corrections mentioned during your EIB application. This app is a perfect example of someone who really wanted that Centurion badge. L3 is about looking your best and as accurate and as possible, you really hit the mark Jim. Beautiful job on your build. Andrew and I absolutely delighted to welcome you to Centurion. Great job! Other-Armor Fit/Assembly: We have nothing to add here except for keep an eye on your back plate to kidney gap. Tighten or replace the connecting straps, also maybe replace the velcro with snaps. That's it, time to get out there represent the Empire as its newest Centurion1 point
-
Hengstler Counter time. I wanted a dial on my counter so trashed a $2 skipping rope for the dial and found another to get the six rows of digits.Got handy with the resin and reverse molded a box to match the original, linked my number dials with a small pin, sanded some perspex for the cover and cut a top that will house everthing. Completed. The button does not work but the numbers will spin randomly.1 point
-
I was the first Bfa/DA Props Centurion TK number 54 and still wear the armour today
 1 point
 -
The ears are an exercise in futility. Trim the front and it changes the back , trim the back to help the front , now the top and bottom don't fit any more. so you scratch your head and say maybe it will fit tomorrow. Lol. Good luck with the rest of the build. I'll keep an eye on your build. Looks like it's going to turn out good.1 point
-
Heat guns are something that you practice a lot with before using it on armor, the plastic tends to go from just pliable to melted in the blink of an eye. Great work, coming along nicely1 point
-
The thing is that people tend to look more at photos than read the text, so they see your photo and think that's how it should be done as you are trying the help the guy out. It would have been better (IMO) to show a finished wrist end so there is no confusion So, to be clear on the return edges of your forearms, there should be none on the wrist or inner elbow scoop. Just leave a small amount on the outer elbow.1 point
-
It's always the popcorn around isn't it? I think that's one of my favorite things in here with you lot, the interest and helping attitude.1 point
-
Well, just got my RS kit this friday. This list is going to be my holy grail. Thank you! Sent from my LG-H873 using Tapatalk1 point
-
Just as Tony mentioned, a photo would be really helpful, Steve. If you drilled the holes in the wrong place, no biggie... (honestly). As Shane said, you can whip up a small batch of ABS paste to fill them if they are really out of place and drill the new ones where they belong. Below is a Billhag diagram of some screen used armor that may help, and if you need any questions about making the paste, Kalani has a great tutorial here: https://www.whitearmor.net/forum/topic/42866-how-to-make-abs-paste/?tab=comments#comment-5740861 point
-
That's a very cool box! Now I know what to do with the roll of carbon fiber vinyl I bought a while back.1 point
-
Thanks for inspiring me! Here is my trunk (as you can see my armor is not quite finished, I am currently a DZ working on my TK).
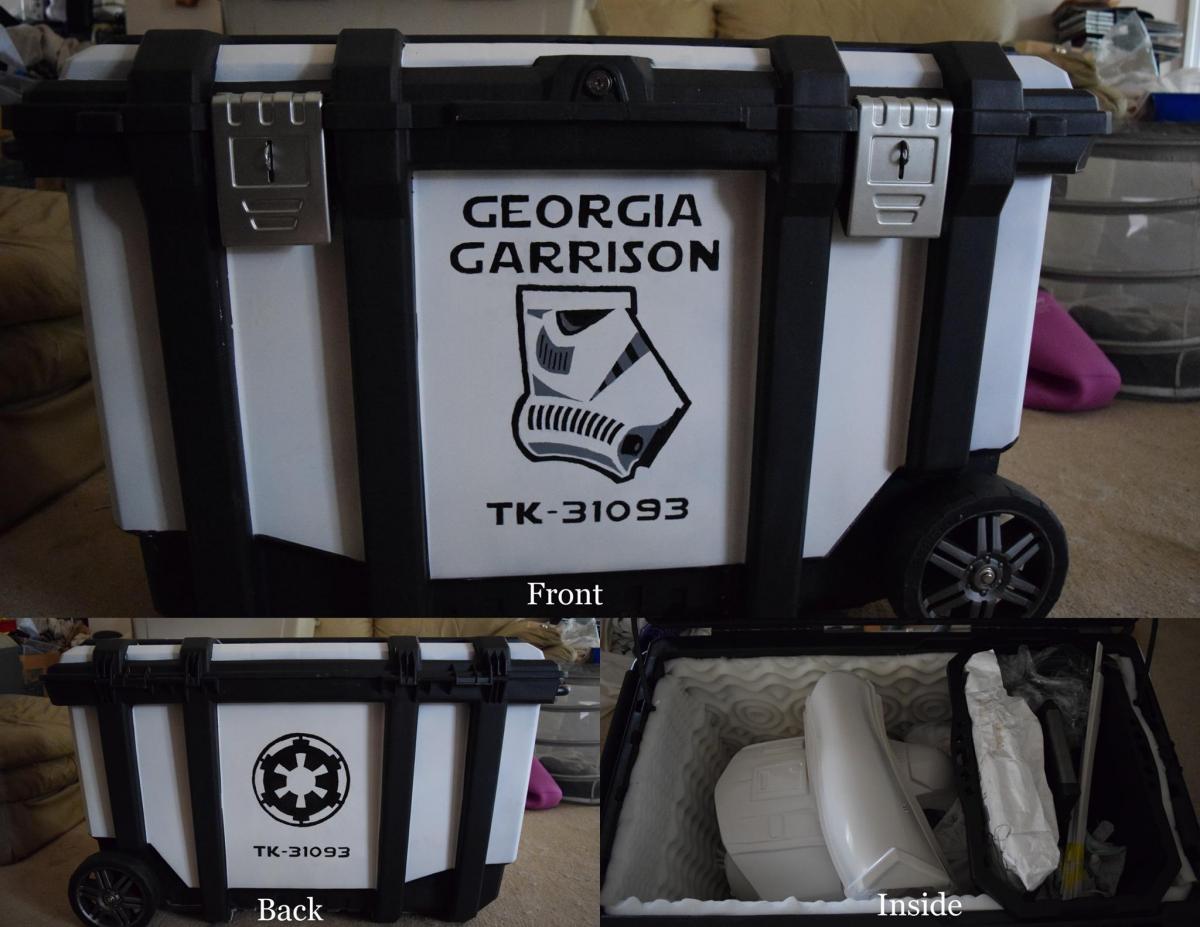 1 point
 -
I have a few questions on acetone. 1. Which store is better to by Acetone from, Wal Mart, Home Depot or Lowes? 2. What percentage of Acetone needs to be in a glass Jar before adding abs scraps. 25%, 30% 40%, 50%? 3. How long do I need to wait before using the Acetone paste on my Armor? 1, 2 days? 4. How long for teh curing time for the Acetone Paste to cure before painting? 5. How long does the Acetone paste last when not in use? Weeks, Months? Thanks. Andy1 point