Leaderboard


Popular Content
Showing content with the highest reputation on 02/12/2018 in Posts
-
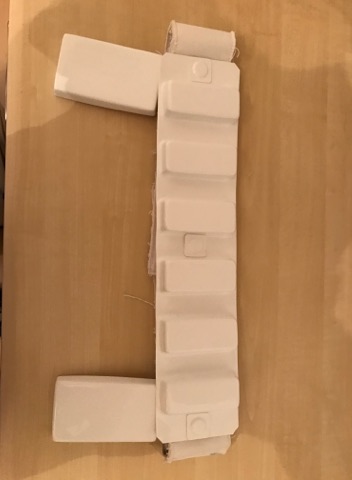
Hi all, I feel an immense sense of accomplishment today as I continued further work on my scratch-build magazine. It's starting to look and feel like the real thing! I installed internal structuring to it and finally shed away the blue tape holding it all together. At this round, I leave behind the magazine cap and latch and will follow up with these additions another time. The assembled panels of the magazine were butt-jointed, (I think that's the term where two pieces are secured without overlap) so I followed through today in applying a coat of putty over the seams and onto the main body - I used Bondo Glaze and Spot putty. It's a thinner, one-part formula that begins hardening in 3 minutes and ready for sanding after 30 minutes. Given how relatively small the magazine is, this was a cost effective, adequate solution opposed to going full Bondo with separate hardener and filler, the Spot putty served it's purpose. Haha, I thought I could apply a light coat to the magazine but with my lack of experience in using it, I ended up laying it down pretty thick; 150, 220, and 320 grit sandpaper came to save me to some degree. Rewarding to see the magazine body with grey primer that's for sure! Mounted aluminum L-shaped supports on two side panels of custom magazine using E-6000 - magnets used to help adhesion. I guess this is practice for when I get working on my armor; whenever that day comes! Set out to glue the panels one by one and test fitted with modified magazine housing as I went Assembled main body of magazine Applied Bondo Glaze and Spot Putty to custom magazine to fill pits, especially on the edges - sandpaper applied to smooth out Various views of sanded bondo spot putty on custom magazine Grey primer applied to sanded custom magazine after bondo spot putty applied Custom magazine with grey primer added - without cap and latch Custom magazine with two coats of grey primer, without cap and latch, inserted into modified magazine housing Main body of custom magazine inside modified housing, before and after Upgraded main body of magazine, inserted in modified doopydoos magazine Ending transmission; until next time friends!3 points
-
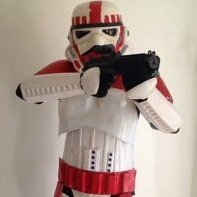
Thanks Andrew and the crew for this! I cannot ask for more but I really appreciate all the help and advice you have given me for this build. Props to Troopermaster for the awesome Hero Helmet. This is one piece of art that I am grateful to own. As always, MTK is one of the armors that are easy to work with. For all the guys, thanks for all the support. I am proud to represent the Philippine Garrison as their first Centurion for my second TK costume just like previously representing Singapore Garrison as their first on my ANH Stunt centurion approval. Eventhough i transferred here in the Philippines, i wont forget where I started and the people that helped me reach where I am today. With that, I want to continually help the newbies, other members who want to pursue the higher levels just like what the veteran guys are doing here, paying it forward. Cheers!3 points
-
BBB day was actually back around Jan 9th, but a vacation and a bout with the flu, amongst other things, have kept me from starting work until now. What I have been up to though is reading build threads, EIB and Centurion submissions, pouring over Billgrams, and watching every relevant video I have been able to find. My work area is still being set up as supplies have been trickling in via the mail. That supplies list has been proving really helpful! In the last few weeks I've changed my mind switched from brackets to double-snap, and this week flirted with doing an ESB build before firmly deciding on ANH. I'm excited and nervous, and looking forward to delving in! https://imgur.com/a/lM7yV2 points
-
This one ought to help pipe builds out!!! the bayonet lug ! attaches with a 8/32 bhscs2 points
-
Cheers Tim and thanks! - always a pleasure to share with the folks here; a really quality bunch Ah, well, I dabbled in primer today Mark; that's a step in the right direction cheers! Oooh yeah - that's my go-to tool for the dremel - I love how the tip of that dremel attachment is also bladed, so valuable for pushing forward and side-to-side removal of resin - here's to shared success with it Dan!2 points
-
Continuing progress on the magnetic shins... Once the glue had cured on the hole strips inside the shins, I removed the magnets and clamps. With a light behind the shins, you can see how the hole strips are mounted, hidden inside. Using that light as my guide, I traced the approximate location of the holes with a pencil. This helps me to get a good idea of where my holes are going to be drilled. Yep. I'm going to make some Swiss cheese of my shins. Using a small Dremel sanding band, I carefully cut a notch out, just large enough for a magnet to fit through. Here's what it looks like at this stage when the shins are closed. I'm just focusing on drilling out the holes on the inside edge, following the holes of the hole strip that was glued in. I'm not ready to drill the outer half of the shins yet. Next to clean up my buttons that will hold my magnets. I rough trimmed them all to start. Then cleaned up the corners with a Dremel. I don't want anything poking at my legs! *Important!* If you want to make sure your magnets stay stuck on your shins, you must use e6000! CA glue will not keep the magnets stuck to the buttons; they will fail. I have heard this from several troopers when I have been contacted about their magnets not holding up. I repeat, use e6000 for this next step! I applied a liberal amount of e6000 to the inside of each button, then put the magnet inside to get all cozy. Make sure that you've got the polarity of all the magnets in the same orientation before gluing! Wipe away any excess glue from the top. To make sure that the magnets are firmly mounted in the buttons, I use the magnet intended on going on the opposite side of the shin to clamp it. In the pic below, you can see how I've got all the matched magnet buttons and magnets together as they cure. Back to the shins now. I like this ridge (where the pencil is pointing) to line up at the tops. For me, it makes the closure in the back look much cleaner if this is lined up. I tape it off there to make sure that the opposite side doesn't shift while I'm making my marks for completing the holes. I have an OttLite that fits nicely inside the shin to provide a clear light so I can make outlines for where I'm going to drill out the rest of the holes. Holes were already present on the left side in the photo below. I made sure that I drilled out the holes very conservatively as I went. I used an extra magnet to make sure that the hole was just the correct size for it to fit through. Now time to attach the outer cover strip! I use a 25mm cover strip on my shins for this. I taped off the edge of the inside half to keep any glue from transferring over. Then making sure that the cover strip was straight, I clamped the heck out of it. Praying to the TK gods that it doesn't shift!!!! Now time to wait for everything to cure really, really well. I am going to give these 3-4 days to fully cure just to be on the safe side!2 points
-
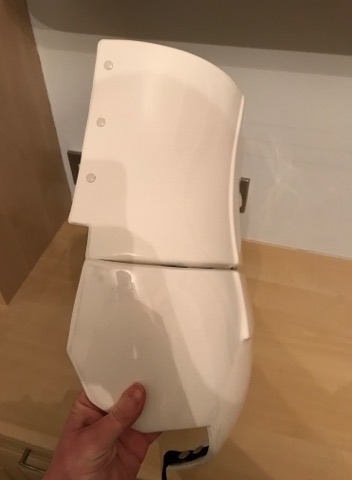
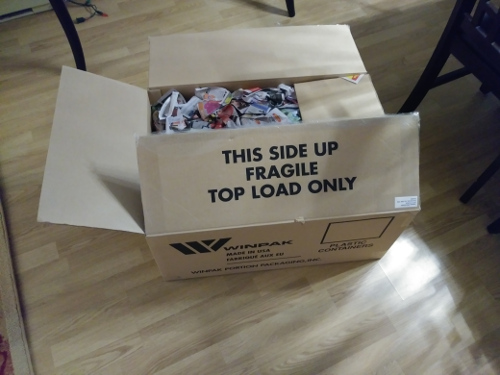
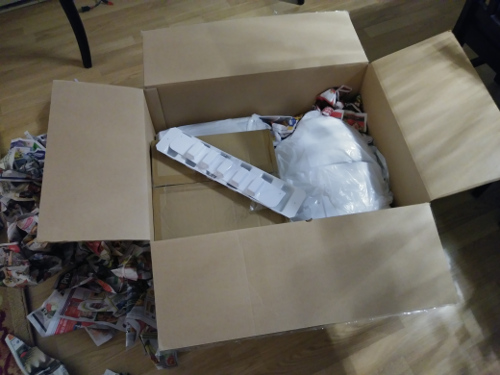
Hi all, so here I am with my BBB already and ready to start building my ANH TK Stunt armor. I've had my AP armor for a little time now, but I've never had the time to start working on it yet because of my peculiar and so busy Schedule. However, right now feels like a good time and I so much can't wait to work on it (and finish it, hopefully!), so I am starting this build thread - and with it, my very first build of course! I have had time to look around these forums for a while and I have gathered so many information I'm prettu sure I can't even keep it all inside my mind haha - I looked at various build threads (AP and not AP), I've watched videos, I've ready threads about tips and tricks and technics, etc. And even with all of that, I am not sure how or where to start! I think I will be tackling the forearms first, as it looks like a good way to start. And as I am a complete newbie at this for now, I am really looking forward to receiving any kind of information/suggestions/help/opinions/advice from you all, so go ahead and feel free to post anything that you think could be useful! Also, I'd like to aim for Centurion as much as possible with my build! So, to start, here are a few pictures of that BBB !!!
 1 point
 -
If Only I Had Known Read Ukswrath’s thread all the way through before you begin. It is filled with tidbits that you will want to know ahead of time. There’s plenty to read until BBD. Get more magnets and clamps. I got 20 thin ones; 20 thick ones would have been better. Read the Centurion approval threads. Learn from other people’s errors. Oopses Peel the protective film off before you glue things together. (Don’t worry: It peels off. Then you can reglue the parts.) If it doesn’t feel like it fits that way, then maybe it doesn’t fit that way! Fo your approval photos, get someone to help. The TK Armor is not easy to put on yourself and get right for inspection. Additional Advice The Anovos strapping system is okay for initial fitting and your submission photos. But you will probably want to upgrade that. The Anovos belt is silly. Get a good one like Imperial Issue. Get Centurion-approved boots even if you don’t now plan on that level. The Sterilite 32 gallon tote is perfect and is a good thing to practice masking and spray-painting on. Thanks To The fine troopers in FISD who encouraged and advised me along the way. My friend Razek the Dragon who took time off from his vacation to help me suit up and pay attention to and fix all those finicky details. He earns a 501st patch!1 point
-
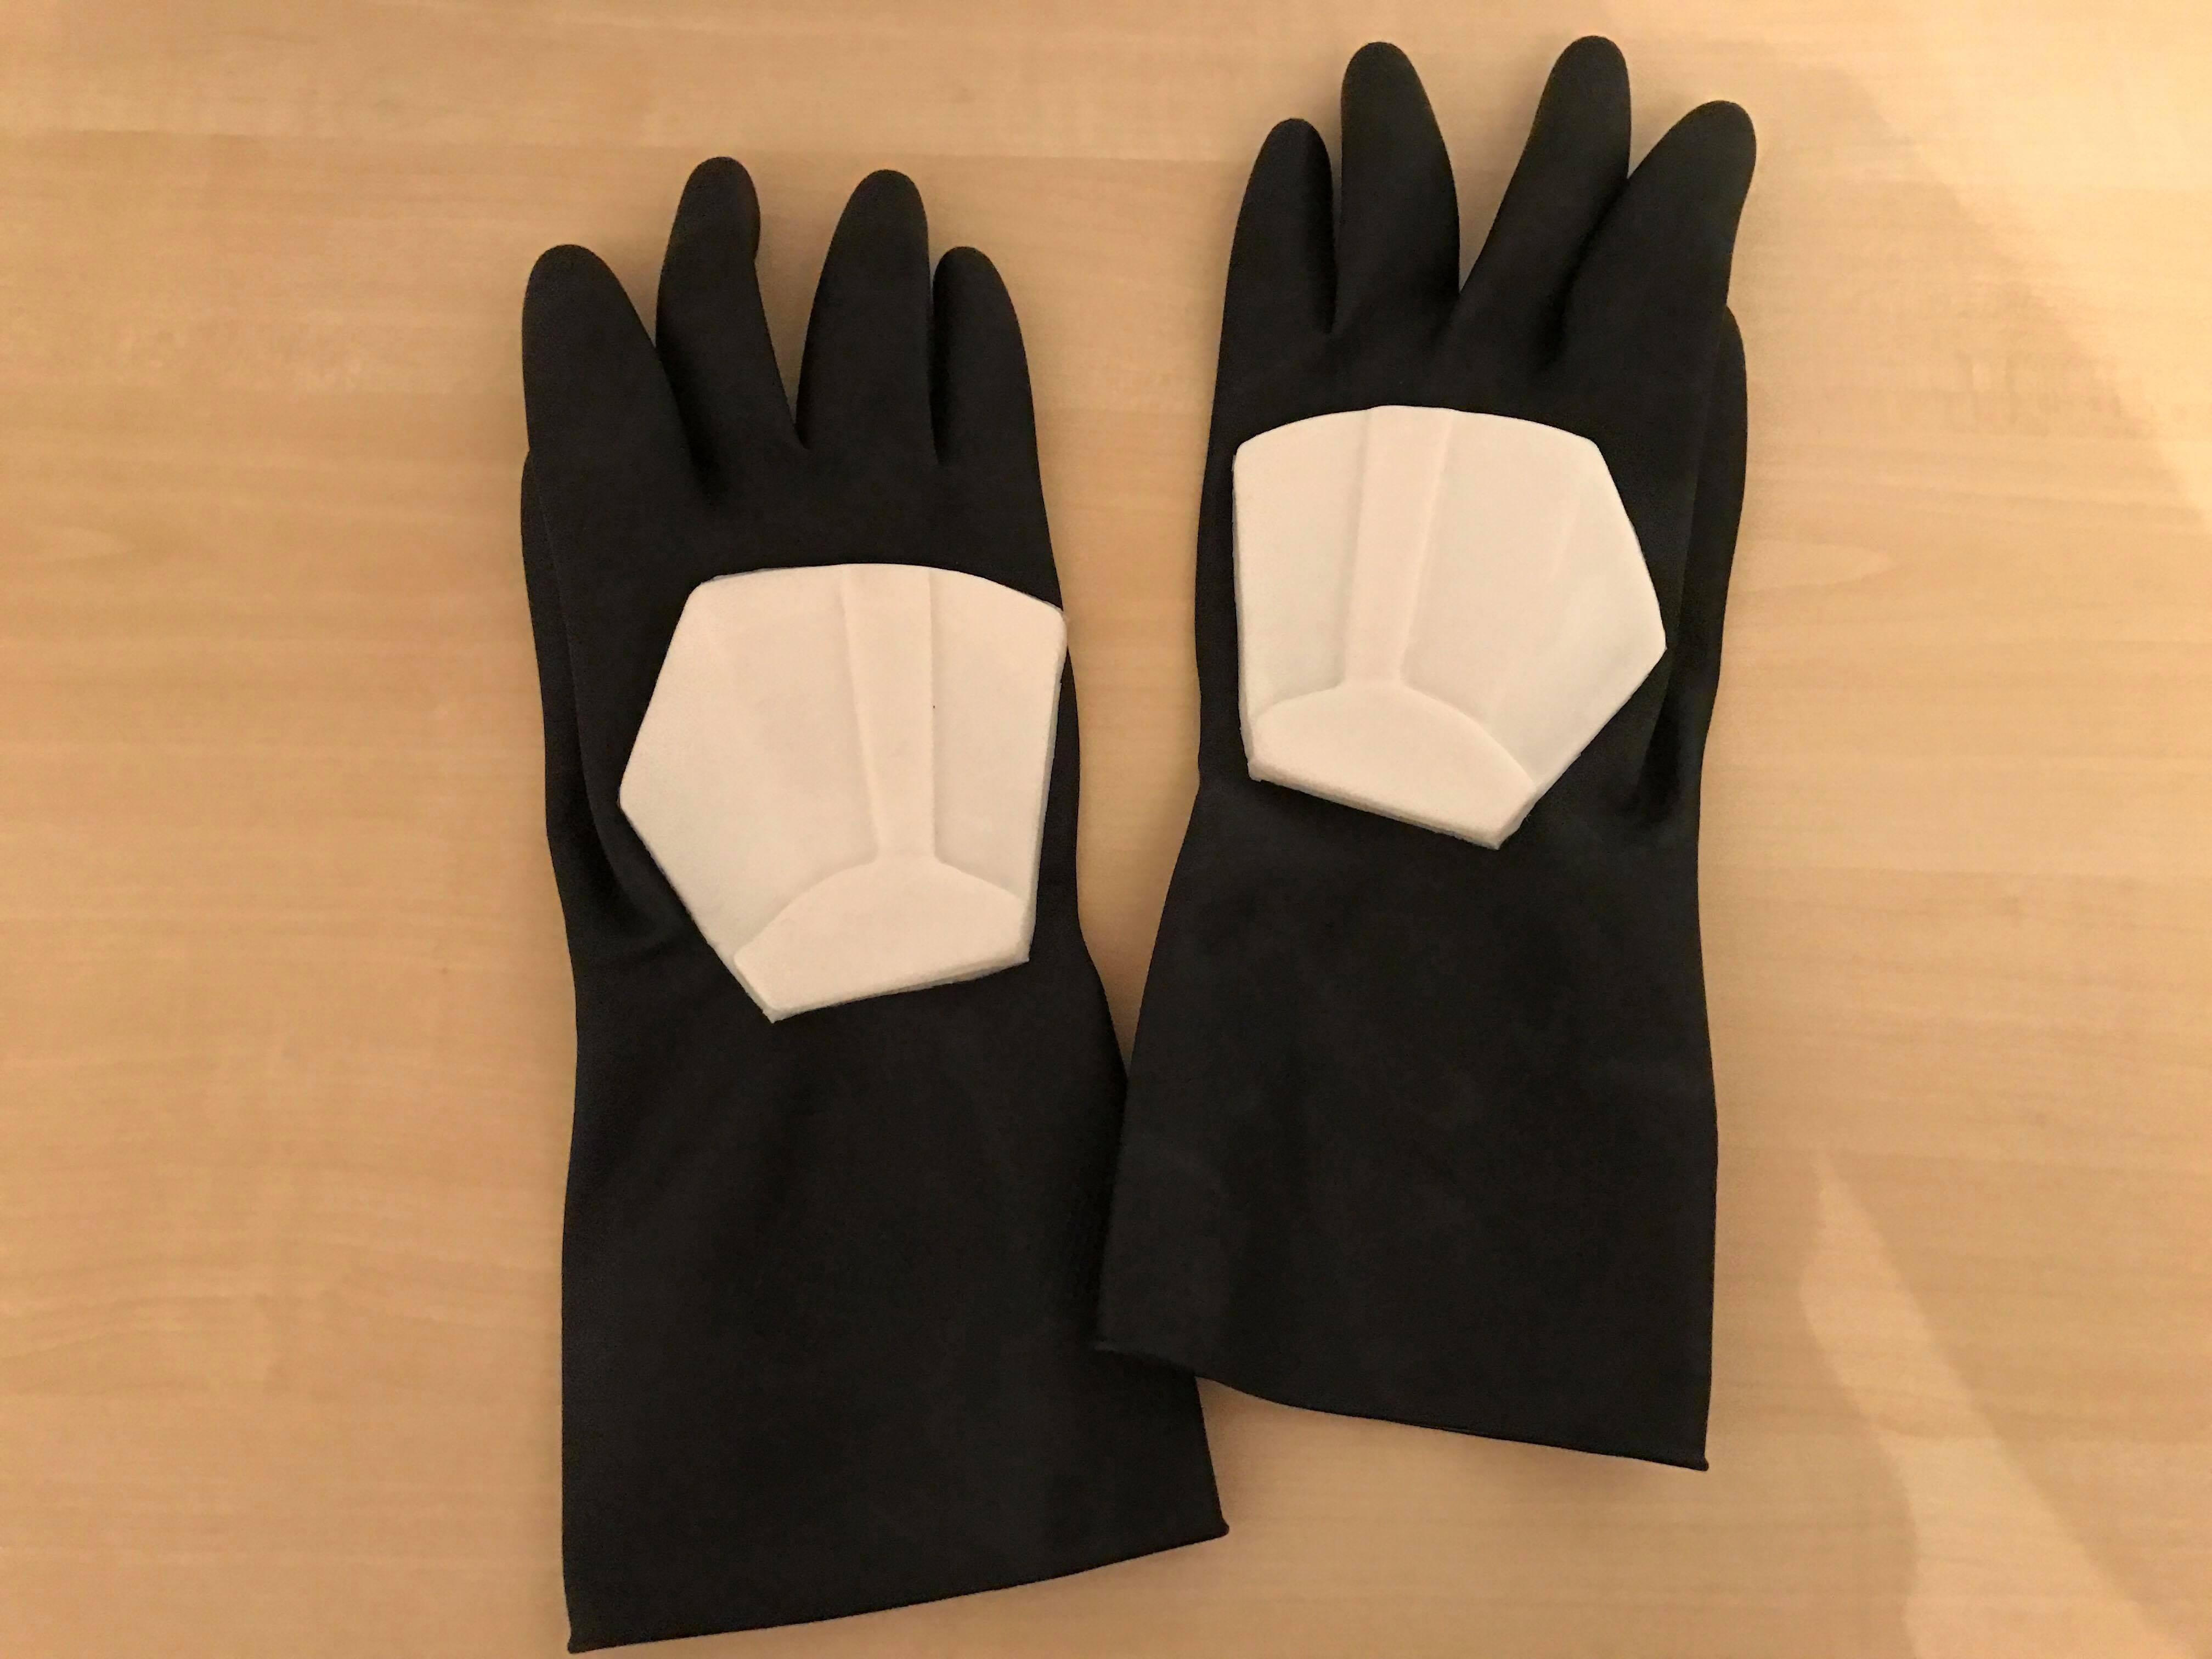
Name: Andreas Engstrom FISD forum name: Coil 501st Member Page: https://www.501st.com/members/displaymemberdetails.php?userID=17434 TK-24269 Costume Information Mandatory Information Armor = TM Helmet= TM Blaster= THG props Optional Height 190 cm/ 6’3” Weight = 85 kg / 187 lb Boots = TK Boots Canvas belt = Trooperbat Hand Plates = white latex from Sonnenschein Electronics= Aker and Troopertalk Neck Seal = Darman Holster = Darman Front Back Left Right Side detail Action Cod-butt Ab details Interior strapping Bucket Neck seal TD back holster attachment Blaster Beginning to see a pattern in some other posts so adding a D-ring pic1 point
-
I you could post a thread in the FOTK build section with some links that would be great, many don't find info in threads as they don't go looking there1 point
-
FISD should be "the" place for HWT discussion, is there anything in particular you are looking for on Facebook?1 point
-
Looking absolutely fantastic! Sent from my iPhone using Tapatalk1 point
-
Sounding typically English, “Blimey!!” Great work with the putty. That’s looking superb. By using the styrene and putty, that’s really opening up the possibilities above and beyond the standard resin + green stuff.1 point
-
Thanks! I'm following your thread, along with a bunch of others. :-)1 point
-
Awesome. Is the grip frame available yet. Thats money in your pocket waiting. Sent from my SAMSUNG-SGH-I257 using Tapatalk1 point
-
Most of the Alpha and Beta Anovos armor owners are very familiar. Hot, sweaty, bulky, restrictive, just to name a few. Mine are roughly 2 years old and have cracks all over. Not sure if they (Anovos) has changed their designs from the originals since nobody has the new suit yet. Most FOTK owners probably have a set of fabric gaskets by now for reasons just the opposite of the rubber. Hope this helps1 point
-
Welcome aboard and great to see another AP build thread! Seems like there is a lot of AP builds going on right now, that's great! Don't hesitate to ask questions if needed... Everything is so huge and overwhelming at the start, but you'll see, things will get less confused everyday! Good luck and, most important, have fun with your build! ^^1 point
-
Happy (delayed) BBB-day and best of luck with your build1 point
-
Wow, another beautiful set of armour Julian. Good luck with your approval [emoji122][emoji122][emoji3][emoji3] Sent from my iPhone using Tapatalk1 point
-
Beautiful armour Andreas [emoji122][emoji122][emoji3][emoji3]. Good luck with your EIB application, as Dan aka cable guy says, see you at Centurion next [emoji3] Sent from my iPhone using Tapatalk1 point
-
General Info · Name = Dennis James Maloom · TK ID = 16112 · FISD Name = NINJAM0VE · Garrison = Philippine Garrison EIB Link: Body Type · Height = 5’10” · Weight = 75 kg Costume · Armor Maker = MTK · Helmet Maker = Troopermaster · Blaster Type = Doopy Doos Full Resin Kit · Boots = TK Boots · Canvas Belt = DIY · Hand Plates Type = Trooperbay ANH Stunt White Rubber · Electronics = None · Neckseal Maker = Darman Props · Holster Maker = Darman Props Note: Existing photos submitted during my EIB application have been re-uploaded here except what was needed to be adjusted like the thigh ammo pack placement. Photos Full Body Front – Arms at side Back - Arms at side Left - Arms raised Right -Arms raised Right side detail - Arms raised Left side detail - Arms raised Action Shot Helmet Off Armor Details Abdomen Details Cod and Butt Plate Attachment Interior Strapping Shoulder Elastic Straps Kidney Plate Notch Ammo Belt and Holster Forearm Details Hand Plates Thigh Pack Attachment Knee Plate Split Rivets Abdomen to Kidney Plate Snap on Abdomen Plate Helmet Details Front Sides Back Hovi Tip Detail Bubble Lens Color Backlit S-Trim Blaster Details Blaster – Left Blaster - Right Correct Rear Sight Placement - D-ring Accessories Neckseal Boots Thank you so much!1 point
-
Nice, mine is boring state-issued random numbers.1 point
-
Great to hear you are aiming for the top straight from the start, I have pieces that I swap out between ANH and ESB, doesn't cost that much extra to do both BTW when you post your image links you want to use the DIRECT link, will post as an image then not just a link Good luck with the build1 point
-
Great work - coming along very nicely!1 point
-
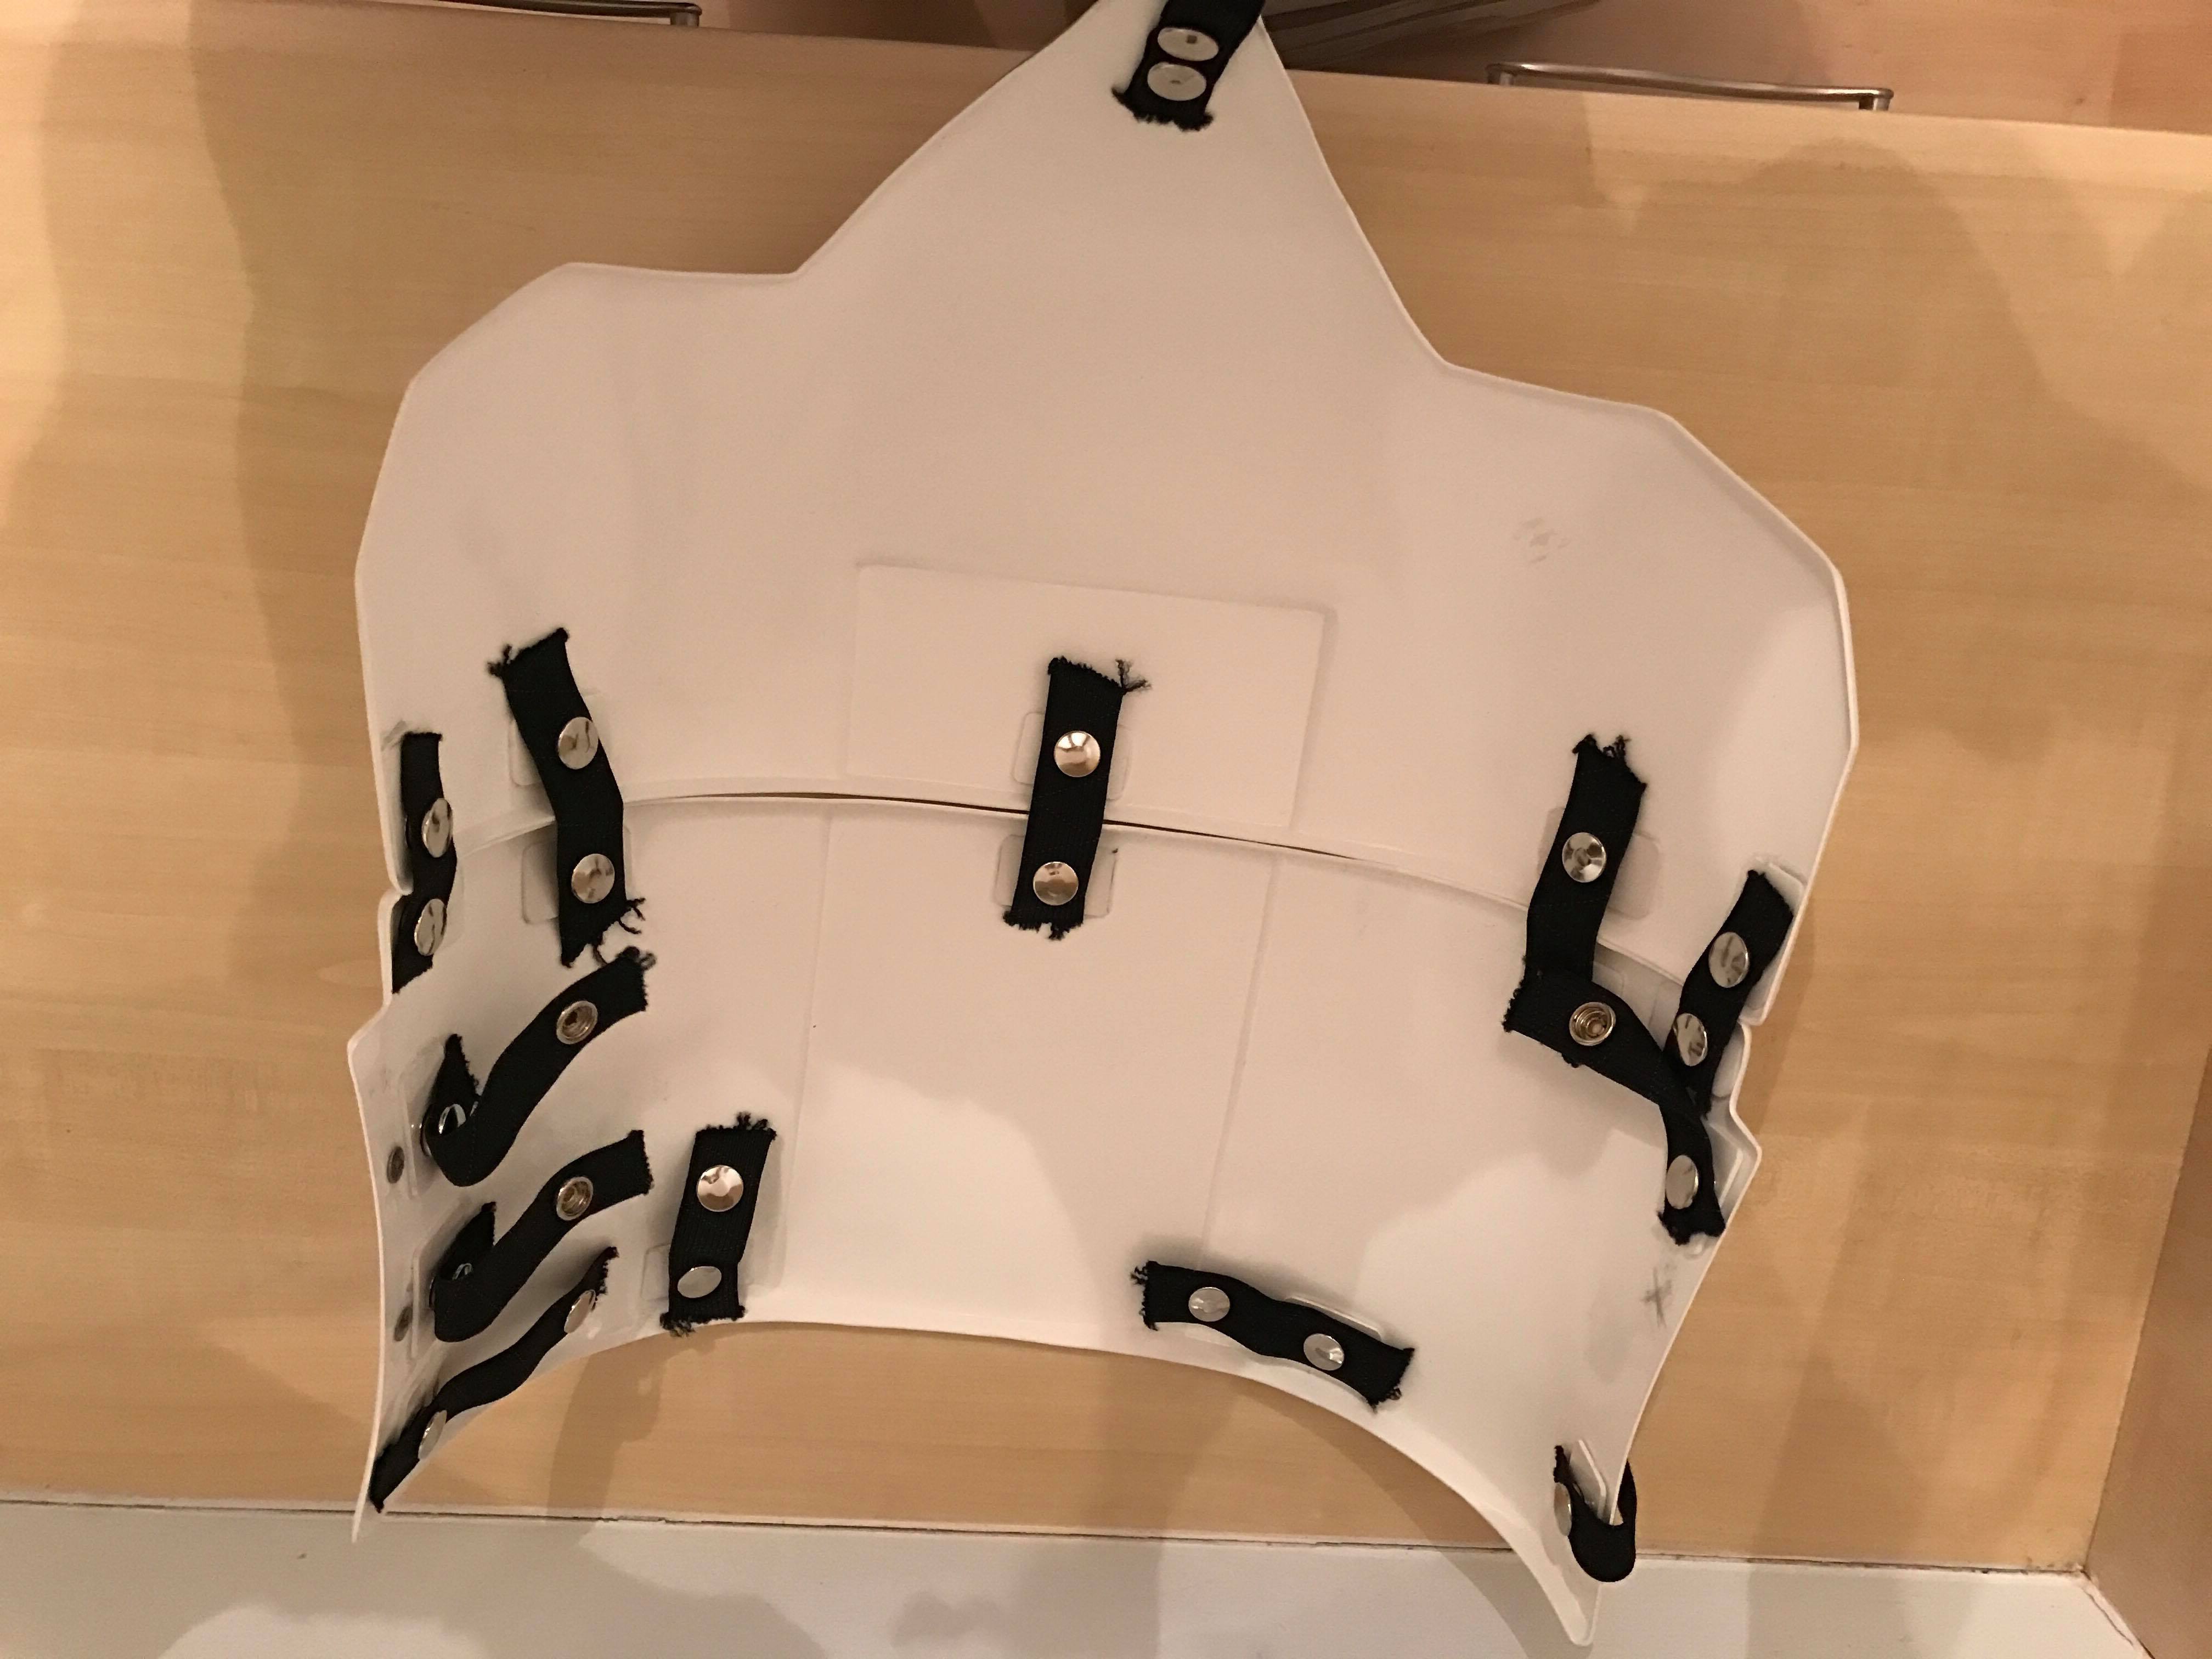
I have finally been able to start putting the torso together. Here's where I started. I used 2" wide elastic to create these loops (similar to the loops that come with the Mr. No Stripes brackets). I felt that the loops had more rigidity than a single flat length of elastic while still remaining flexible under stress. So, I used the sewing machine to stitch one end and the turned it inside out like this: Then I punched holes for the corresponding snap pieces (still using Fasnap stainless snaps). Then a bit of hammering and I had some of these: Here's the back armor all attached using straps: A little note - I did create and install 2 straps using 2" wide nylon (they are pictured above but look SO similar to the elastic straps). These were used to connect the outer edges of the kidney to the posterior in an effort to help keep the posterior edges from flaring. Worked out well. -Dana1 point
-
Just bought a KB kit from a Garrison buddy and will be studying this thread carefully. Thanks for taking the time to put so much detail in!1 point
-
1 point
-
Nice save looking good1 point
-
After being sidelined for a few days with a planned surgery, I'm getting back into the swing of things. I've been having to correct a lot of self-inflicted mistakes lately. Forearms: KB's forearms come as 4 separate pieces, a front and back and two side rails. When cut and formed correctly, they make a completely enclosed piece. I taped up the forearms to wrap my head around how to put them together. Upon doing this, I realized that I made a bit of a mistake during initial trimming. I cut off the side rail on one of the side pieces that the front piece would sit on for assembly. I did this on both forearms. Whoops! In order to fix this, I found some cut pieces out of the heap of scrap ABS I saved and created some faux rails on the missing sides. Hard to tell from the photo but here they are on both pieces. After a TON of fitment, measuring and alignment, I used a dremel to sand down all of the excess return edge so that the side rails would line up with with the back piece. At which point I glued the side rails to the back piece. On the sides that had the mounting rails intact, there are no features in the piece to work around so I used an interior cover strip to hold the pieces together. The other pieces have indents for the greeblies to be applied later. As such they do not fit securely without some modifications. Using tape, I stuck the two pieces together to where I wanted them to be and drew a line where the indents don't overlap and measured the difference. I then backed it off a few mm so that there wasn't any open space when glued together. Using lexan scissors I cut out those indents. I then double checked fitment and glued them together when I saw they were okay. With everything in place on the sides, I then moved to the front pieces. I guess I forgot to take photos here but referencing the CRL, the front piece sits flush on the mounting rails so that it isn't jutting out from the front too much. As originally cut, my pieces were sitting out too far. So I used a belt sander to sand off about 5 mm of edge, checking fitment along the way until the pieces sat more flush on the mounts. Content with fitment I then applied glue onto the sides that had the mounts intact, let them dry, then glued the other sides with a lot of patience, magnets and clamps to get it to sit flush with the sides. It was a chore and I don't recommend it to anyone. Point being, be sure not to trim the side pieces of the forearms too much and leave those rails intact! KB just posted on FB today that he is working on a new mold for the forearms so perhaps this will be ancient history for future KB builders but be sure to ask before cutting too much. The NEXT issue I encountered as a result of my mis-trimming with the forearms is that the upper points of the front piece with the make shift mounting rails jutting out, leaving an unsightly gap. I wracked my brain of the best way to fix this and had a moment of serendipity. Each piece I had to correct was the mirror image of the other. The pieces with the intact rails needed to be trimmed anyway so I took those trimmings and found that they were 90% matches to the opposite piece! So with a bit of glue, some magnets and patience, I fit those trimmings to the opposite side so that the pointy gap was nearly gone! Here are both pieces with the small corrective shims. I'm confident that after filling in the seams up top and painting that you won't even be able to notice. Happy with the work to fix my mistakes, I applied the front "greeblie" after sanding and general clean up to its respective area with E6000 and will let it dry for a few days.1 point
-
Nice work, the DO's are just catching up on a backlog since the Christmas break please standby they will be with you soon1 point
-
I am currently in full swing building mode for my First Order Armour, I await it’s arrival in the mail but in the mean time I too have been researching undersuits and neck seals. My approach thus far has been seeking out the cheaper options (obviously) and here is what I know: I have an early model Anovos neck seal which I have owned for four years now, it works great if you can grab one in your size for 59.99. It retains its shiny nature, and it has the 11 ribs needed for a Centurion build. Anovos has great customer service reps and if you fire them a message they will promptly reply and answer any questions regarding Stock and the Shipping Calendar. I use my shiny long underwear for my TK build and my Trooping. When my TFO Joint Gaskets arrive I will attach them directly to the long underwear. You can find Long Underwear or Tight Fitting Sports esc. pants and long sleeved shirt that is made of a shiny, stretchy, comfortable material; durable enough for sowing and modifying. They are not hard to find, my personal set came from a local outdoorsman store outlet. They range anywhere from 20.00-80.00 depending on where you buy from, I advise caution here because there are many many many varieties and many sellers. I recently have spoken with the lovely folks down at sistermargaretsgasketemporium (all one word) You can look them up on Facebook or Instagram, their Facebook page is preferable because it has a ton of pictures and has all of the pricing listed. Shoot them a message on either social media page and they will supply loads of information on their products. They sell customizable neck seals and customizable undersuits created specifically for whichever Trooper you happen to be making. I am ordering my Joint Gaskets from them as well, these guys have fantastic reviews, I would highly recommend giving them a search if you haven’t already. Hope this helps!1 point
-
Fantastic...after all that faffing over the scope rail I managed to snap it trying to bend the end over! Grrr! I even cut part way through it and heated it to try get it to bend smoothly [emoji20] looks like I’ll have to order the ready made one from Tino now. Also made a start on the counter. Sent from my iPhone using Tapatalk1 point
-
Congratulations trooper and welcome to the EI ranks1 point
-
I haven't shown many pics of my armor so here is my progress shot as of today. I am finished with the left thigh, but my mannequin's foot is too big to slide it on1 point
-
I’m the same... think.... I’ll do that tomorrow.... but then i forget..... my wife says it’s my age...... lol Sent from my iPhone using Tapatalk1 point
-
You’re far more organised than I am. I still haven’t printed anything! I have my certs and a couple of images I really like I need to get printed and framed (IKEA RIBBA FTW)1 point
-
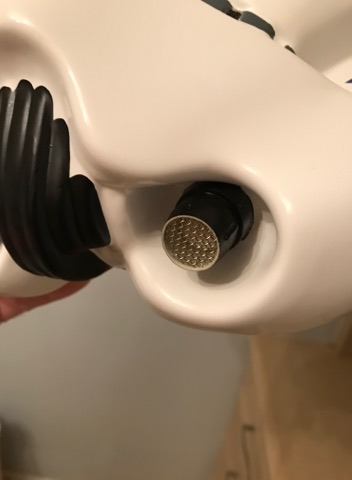
The mics are really sensitive and I noticed that if I use earbuds that its actually too loud. The brow may filter some sound, but the mics are more than adequate to hear outside your helmet. I have not heard any distortion or muffling with the it in its current position, but I could probably hear more sound if nothing was in front of them. I am currently using generic helmet speakers which are not all that great, but still allow me to hear. The hearing assist module is turned up to max when using speakers and only turned up to around 1/2 if using earbuds. Hope this helps.1 point
-
Like the patch BTW [emoji4] Sent from my iPhone using Tapatalk1 point
-
Now that the plasti dip is on its time for the pretty green lenses... Got the idea for the lens install from another builder really liked how he did it so I decided to copy.(Not sure who it was since I follow so much content, but I will try and find the name and edit in the credit deserved ) Finally Bucket almost complete. Just have to trim the bottom and add S seal.1 point
-
Looking sharp. One thing I noticed was your TD clips. Looks like you have significant gaps. For level two certification (if applicable): Thermal detonator belt clips are positioned with little to no gap between the clips and the end caps.1 point
-
I am sure you have seen these diagrams in your research, but it never hurts to see them again. These are only guides, but where extremely useful for me for doing things like sizing and whatnot.1 point
-
In Memoriam From the DL From the XO From the Provost Marshall From the Deployment Office CRL Updates Detachment Affiliation Tech & Money Pre Approval Forum The Last Jedi Premiere Troop Photos Hall of Fame Just For Laughs In The Media EIB & Centurion: What do these terms mean? Obscure Trivia Around the Detachment Broken Links / Images / Pages Notable Troops Imperial Attaché Program Advanced Tactics Awards EIB - The March To 1000 Merchandise Public Relations Follow FISD http://celebrityinsider.org/wp-content/uploads/2017/12/alfie-curtis.jpg Actor Alfie Curtis, has died at the age of 87 (26th December 2017). The London-born actor had a small role in the iconic first Star Wars film 'A New Hope', which was released in 1977, as Dr Evazan. He was also known for his roles in 1980 film The Elephant Man and the Eighties TV series Cribb. Buckets Off Elections. Nothing seems to cause more angst amongst Legion members than elections, except perhaps maybe census time. “Why am I not showing up on the detachment roster” is perhaps the biggest question. The reason for that is in how detachment membership is defined, and how loosely coupled the databases are between the Legion and detachments. For starters, to be a detachment member you must show that you have an approved detachment costume in the Legion database, plus you must have logged on to the detachment’s forums at least once in the past year. Most people get the first part, but wonder on the second. In your garrison, which has a physical geographical boundary, to be a garrison member you must physically troop in a costume once a year to show involvement. If you are not involved, you are not a member. Detachments, being online only, can only emulate that requirement. Technically, and more strictly speaking, that would mean actually posting in that detachment’s forum, but for now the requirement is much easier in just having to log on and “visit”. Where things get sticky is in reconciling the rosters. Sometimes people’s emails are different in the Legion and detachment boards, or they don’t fill out their 501st profile information correctly. This makes trying to match things up challenging. Also, some detachments are pretty small, some big, and they may have different forum software with different databases which makes the reconciliation process even harder. In an ideal world the 501st would have an automated way to match up records, but the Legion web team doesn’t have the resources to make this happen. Fortunately for FISD, some of the same people who help keep our forums running are also on the Legion web team, so they have the necessary access and technical skill to do a bulk update annually. Whew! For the rest of the year though, detachment affiliation isn’t use for any other purpose, which is why we only do the bookkeeping just before elections. I hope that answers everyone’s questions regarding this. If you feel the process can be improved and have excellent mySql, php, and Linux experience – and some hours to donate! - the Legion web team would love to hear from you. Kudos What most people who have never been on a detachment staff don’t know is just how much time and effort people put in to their roles here on FISD. The tiny little ribbon under their profile is in recognition of the countless hours that they have put in making this detachment the best it can be for you, our members. I truly believe FISD has the hardest working staff in the Legion, and we are all indebted for their service. There are a few recent kudos though that I want to highlight of people going above and beyond, and I feel are worth a shout out. Joseph (justjoseph63): In addition to registering on every garrison forum to keep up to date and being a tireless advocate for our attaches, he has been handling our ongoing patch runs for quite a long time. This is a huge amount of work as you guys are very patch hungry! Darth Real Life has been consuming more of his time and he has had to hand over the reigns to our DMBO TK4205, however please do thank him for having had this for so long. If you’ve never done a patch run, it’s hard to understand what a time suck this has been. Glen (gmrhodes13): He has been cranking out the best newsletters we’ve ever seen and been tireless in scouring the boards to make the content useful, enjoyable, and informative. On very short notice he cranked out the design for our 10th Anniversary patch as well, which turned out to be our largest patch run ever with over 400 sold in just a few weeks. Thanks Glen! Trivia: did you know that FISD was started in 2006, so the detachment’s actual 10th anniversary is 2016. Our first patch run however was in 2007, and it had the words “2007 Inaugural” in Arubesh along the top as a commemoration of that event. Only 100 were ever made. Glen’s design is celebrating the 10th anniversary of that first patch, hence the design used. Wyatt (TK4205): Trivia: who is the longest tenured FISD member after myself? Yup, Wyatt was the first person to register on FISD after myself and has been our DMBO for nearly the entire time FISD has been around. He designed the stepping out logo and has come up with many of the designs we’ve used. If you have an FISD coin in your hand, you can thank Wyatt. This month he has truly gone above and beyond. He quickly organized and handled the 10th Anniversary patch on short notice and at the same time came up with perhaps our best challenge coin design ever. The gold EI coin is remarkable. If that weren’t enough, the silver bullion coin that being manufactured and will go on sale soon was 100% his idea, and he had to front a heavy chunk of metal to the mint on his own dime to kick that off. These three gentlemen have done all of this out of their love for FISD and in the spirit of service. While service is its own reward, we’d be remiss in not acknowledging their contributions. Troops helping troopers, truly. Thank you so much! With Unquestioned Loyalty Paul Hoeffer TK8020 “Daetrin” FISD Detachment Leader Fellow Troopers Happy New Year to all. May 2018 bring joy and happiness to you and your love one. I hope you all had a nice and safe holiday. We are getting close to our road to 1000 EIB. With over 5100 TK's in the Legion I think we will be able to reach it in 2018. I for one am working on finally getting approved EIB. Putting some last tweak and sending my application. At the moment I'm writing these words we are at 790, Tony and Andrew are swap and hope we can keep them busy by flooding them to 1000. Here are some stats from the Legion forum With Unquestioned Loyalty Eric Salottolo TK37427 “Tolo” FISD Executive Officer Greetings Troopers! As some of you now know or some of you will find out further below in his newsletter, we have a new program in the forum. The program is called the TK Pre-Approval Program. This is a program that will really make our seasoned members shine while they help new recruits to the best of their ability. I just wanted to make a quick note that the Provost team will be watching this thread very closely. This program should embody the mantra of Troopers Helping Troopers. If there is ever a time where a member of the Detachment feels another member is being unhelpful (to put it lightly), please private message me or Mark (captsafe66) as soon as you can so we can address it. This is a program where every person who is involved should be having fun. I look forward to seeing all of the applications that come in! With Unquestioned Loyalty Steve Sheades TK-10466 starsaber25 FISD Provost Marshall Greetings Troopers! Alright, after a well deserved and enjoyable vacation Andrew and I are ready to begin the 2018 season. Looks like we have quite a few apps waiting so please bare with us as we get started, we should be back to normal running speed once we have taken care of these. With Unquestioned Loyalty Tony Jobe TK-10116 ukswrath FISD Deployment Officer & With Unquestioned Loyalty Andrew Franke TK-11469 Sly11 FISD Deployment Officer ROTJ: Removed from Centurion - There are no visible snaps, rivets or brads on the crotch tab of the Posterior Armor tab, snap is now allowed for Centurion. Please feel free to re-familiarize yourself with the ROTJ CRL here TLJ / TLJ-E: Move correct cod requirement to L3 (as no one is making them now, so it's a custom piece). Please feel free to re-familiarize yourself with the TLJ CRL here & TLJ-E CRL here If you are a full FISD member it is important if you wish to vote in the elections (February 2018), specifically for your detachment that you are affiliated to FISD (or any other detachments depending on your approved costumes). Normally affiliation is set by your GML once a costume is approved (it would then read PENDING) next there is an automatic synchronization on the 501st boards usually once a year (before elections start in February) which approves the affiliation and it would change to (APPROVED), in a few cases though this can be missed. To check if you are affiliated to a specific detachment go to the 501st forum, look on the left side menu, click on the Member DB link, then Your Profile Data, go to the bottom of the page to Your Unit Affiliation and make sure First Imperial Stormtrooper Detachment (Approved) is there, if it is there and marked as (Pending) you can contact the detachment leader of FISD and ask for it to be approved. If you find it is not there at all or any other detachment you should be affiliated too, then contact your GML (garrison membership liaison) and ask to be affiliated to them. PLEASE NOTE to stay affiliated with a detachment and to qualify to participate in detachment elections you need to have logged into our forums at least once during the previous year. We can no longer continue hosting FISD on our current server and will be moving. Most likely, the FISD server will be run by the Legion web team and the FISD team will just be responsible for keeping the software up to date. We give up a little bit in terms of independence, but we gain much in terms of performance and support. I'm finalizing the details with our current server admins Eric (Darth Aloha) and Mathias (Locitus) this month. One other change is that it will mean instead of collecting funds for ourselves, the call for monetary support will go to the Legion. When FISD first started Greg (V'Pier) was our server admin, then I took over those duties for a bit, then it got to be too much. As we always need at least two server admins (a primary and a backup), I truly think long term having the Legion's web team manage the servers centrally could be the best long term action. In any event, there will be some downtime when we move servers, which we have to do one way or another. Stay tuned! For 2018, we still need to pay our last bill to Darth Aloha. Our share of the bill (which runs Aug 2017-Aug 2018) is $816.53. If you enjoy FISD and have spare credits and want to be a Forum Supporter this year, Please pp to [email protected] (me) as family/friends and I'll put a "stop" when we've reached that amount on this thread. For your kind contribution you will receive a supporters badge. The FISD is pleased to announce the addition of a new area in the Advanced Tactics forum dedicated to those ready to submit for basic 501st TK approval. This section will allow future Troopers the opportunity to submit photos of their completed build to be reviewed by the Staff, Imperial Attaches and others in preparation for forwarding it to their GML for approval. Any and all advice/suggestions given will be specific, constructive, helpful and respectful. Please note that this program will NOT take the place of your local GML, as Detachments are not chartered for costume approval and can not override a GMLs decision, but is instead a peer review program designed to help you look your best and offer guidance and positive feedback. You will have the opportunity to ask questions about your completed armor, weapons (if applicable), accessories, etc. and get accurate information from the experts here at the FISD.. the definitive home of TKs worldwide. For more information on this program, please visit the link here http://www.thepicturehouse.org/wp-content/uploads/2017/10/latest.png Here are just a few of the photos, you can find the rest in this thread A massive Thank You to all that took the time to post photos. What an absolutely epic month with the release of “The Last Jedi”, and the buzzing that came about from it. Looking through the pictures, you could see the energy in the field report pictures and some great write-ups making for an awesome read for all to share in the experience. This month honoring TK - 6049 Colin for this phenomenal shot on his premiere night in Dublin. Great shot Trooper!!! With Unquestioned Loyalty Aaron Gibson TK99725 "Pyrates" Imperial Propaganda Department Why Stomrtroopers Miss A-League Star Wars Round Football Federation Australia (FFA) and The Walt Disney Company Australia join forces for the Star Wars Round, which kicks off Friday 8 December, 2017. The Star Wars Round will see Hyundai A-League clubs battle it out on the field ahead of Star Wars: The Last Jedi releasing in cinemas 14 December, 2017. The Star Wars Round will feature character appearances, big screen content, themed activities, special signage and giveaways. To celebrate the Star Wars Round, a limited edition BB-8 supporter ball has been produced, which will be available for purchase through the official Hyundai A-League online store, shop.a-league.com.au, club stores, and selected Rebel stores in Queensland. Western Sydney Wanderers FC and Melbourne City FC will also have a select range of club-specific co-branded merchandise available. FFA chief executive David Gallop said FFA is thrilled to partner with Lucasfilm on this exciting initiative.“Star Wars is one of the world’s most powerful brands and football is the world’s biggest sport. Like football, Star Wars has super fans that span the globe, it’s a hugely successful franchise and to incorporate this into a round of the Hyundai A-League is very exciting. “We are constantly looking to engage with new audiences and expand the football family, and this partnership provides a great way to do so in what is mutually beneficial for both parties,” Mr Gallop said. “We are thrilled to bring Star Wars, and its much-loved characters to Hyundai A-League stadiums across Australia ahead of the release of Star Wars: The Last Jedi on December 14,” Managing Director of The Walt Disney Company, Australia and New Zealand Kylie Watson-Wheeler said. “Competitive sport can produce some of the most enthralling storylines, much like the acclaimed suite of Star Wars films, and we look forward to celebrating the hero’s journey through best-practice activations, content and experiences for families and fans alike.” Western Australia Queensland Victoria New South Wales So what exactly are EIB (Expert Infantry Badge) and Centurion levels? These programs were designed for those who choose to take their armor above and beyond the minimum requirements for basic 501st Legion approval. It gives you the chance to show a level of dedication and pride that takes your armor closer to being as "screen accurate" as possible, without as much extra work as you may realize! It also works on giving a better look to the Legion as an entity, and you can bet others will take notice of your hard work. The 501st has a list of detailed requirements for Basic approval, (level 1), EIB, (level 2) and Centurion, (level 3) which can be found here in the Costume Reference Library, (CRL) http://databank.501st.com/databank/Costuming:FISD_CRL Here are a few of the questions people may be wondering about: 1. "I am a (tall/short/heavy/thin) Trooper. Can I still apply? Of course! These programs are open and encouraged for all sizes of TKs, as long as the costume is correct and meets the guidelines. There are many specific build tutorials to every option, as well as a vast network of fellow TKs on the FISD to help you out and offer suggestions. 2. "How much extra will I have to pay for extra items"? The cost is actually quite reasonable, considering the few extra supplies you will need, which are listed in the requirements area. While it may run you a little more to implement these additions to your costume, they will go a long way to improving accuracy. All needed items can be found for sale on this thread: https://www.whitearmor.net/forum/forum/16-ongoing-sales-project-orders/ While blasters are not required for basic approval, for EIB and Centurion levels they are, and may need upgrades (also listed in the CRL). 3. "I haven't even got my kit yet, is it too early to start planning"? Actually, aiming for Centurion is easiest to do right out of the box. 4. "I have my basic TK approval, can I still get in these programs"? In a word... absolutely! 5. "Are there any "perks" to this extra work and cost"? Besides knowing that you have a great looking set of armor, the 501st and FISD believes you should be deservedly recognized for your achievement(s), and allows you to wear the appropriate embroidered "rocker" badge of rank (available for a very minimum cost) on your shirt, helmet bag, etc., as well as rank decals to put on your armor bin. You will also have access to select "challenge coin" runs, receive (free) a cool certificate for your new rank, and have your title posted below your name in your FISD signature. Plus, once you reach these levels, you will have the extra knowledge to help out those who are looking to apply as well. 6. "Is it hard to apply, and what happens then"? After basic approval, all you do is make sure your armor is up to the standards set forth in the CRL, post a thread with the required photos in the appropriate area (see below), and wait a bit for the D.O.s (Deployment Officers) to address it. (Hint: Studying other people's threads before you submit can be a GREAT help). These are also listed on the main page of the FISD site. While waiting for approval, you will get some comments from others who will offer suggestions and constructive advice to help you out. If you should need any changes, the DOs will let you know, so you can adjust accordingly. Don't be dismayed if you do need changes... it's all for your benefit! After you are approved for EIB, then you can submit for Centurion. EIB https://www.whitearmor.net/forum/forum/19-request-expert-infantryman-status/ Centurion https://www.whitearmor.net/forum/forum/72-request-centurion-status/ Note: You will see some suggestions in the existing submissions/approval requests that, while not actually part of the CRL, are highly suggested items, (for your benefit), such as "flat-head screw heads on the TD (thermal detonator) should be painted black" for Centurion, etc. Those small details all add up to closer screen accuracy. Just remember that the FISD is here to help you every step of the way with whatever other questions you may have, but if you can't seem to find what you are looking for in your research, just post the question, (or PM justjoseph63) and best of luck on your build! With Unquestioned Loyalty Joseph Pedigo TK10963 "justjoseph63" Attache Ambassador A new monthly item that lists a few unusual facts about the SW franchise. This month: TLJ 1. The production name was "Space Bear". 2. The only SW saga film not to feature the phrase "I've got a bad feeling about this.." In EP.VII director Rian Johnson confirmed that BB-8 said this line to Poe Dameron (in droid language, of course). 3. John Boyega confirmed that British Princes William and Harry made cameo appearances as Stormtroopers. It is not known whether the footage made it into the final cut. 4. Tom Hardy (Legend, Star Trek: Nemesis) also donned white armor for a cameo. 5. The mysterious "golden dice" (shown in only one scene in ANH hanging in the Millenium Falcon) made a reappearance. 6. At 152 minutes, this is the longest film in the franchise, beating Ep. II by 10 minutes. 7. Mark Hamill was 64 when he filmed TLJ, (looking a LOT like Alec Guiness who was 63 when he appeared in ANH). Kinda' makes some of us feel really old, LOL. Walt's new vs. Jim's Original Rebels TK Bucket A great thread for those of you interested in the Rebels Stormtrooper version helmets, you can find it here Thanks to Eric TK12282 eqdizzle for the great work The Empire Needs YOU... To update your images! Several months ago, Photobucket changed its policies and no longer allows external linking of images for free. This has resulted in FISD (and much of the internet) being littered with Please Update Your Account to Enable 3rd Party Hosting images. Due to this, there are currently several tutorial/how to/reference threads that are currently less useful than if they were properly displaying images. This is not ideal for prospective members looking for information, so we ask that everyone take a moment to go through their posts and update any missing images. There are several alternatives for image hosting, such as Imgur, Flickr, or Google Photos (I personally use and recommend Imgur). For information on how to use Imgur, see this thread With Unquestioned Loyalty Brien Edick TK92802 "Harbinger" Imperial Attache Want Your Troop to be Included? Post your troop report in the Field Training Exercises section here Those with troop logs please post a separate troop report as it is easier to link too. December Willow Grove, PA - Toy Drive More here By: Preston, Pretzel, TK91488 Clermont, FL. X-Mas parade More here By: Joseph, justjoseph63, TK10963 Armadale Christmas Parade More here By: Glen, gmrhodes13, TK85421 A - League Perth Glory V Newcastle Jets More here By: Glen, gmrhodes13, TK85421 Perth RAC Channel 7 Christmas Pageant 2017 More here By: Glen, gmrhodes13, TK85421 Happy Zoo Year More here By: Glen, gmrhodes13, TK85421 http://i.imgur.com/REASe78.jpg Serve proudly, gentlemen, and and Tim (Dark CMF) says: "Keep doing what it is that got you here"! Are you an approved TK that spends more time on the boards than the average Trooper? Do you enjoy using your knowledge to help out future and existing Troopers? If so, we would like to invite you to join the Imperial Attache program! Members of the I.A. team are chosen to help out not only those here on the boards, but on a local level as well. Our aim is to have at least one in each and every Garrison, Squad and Outpost in the entire legion to be the eyes and ears of the FISD on a local level. A suggested level of EIB or above is preferred, as part of the duties include assisting those aiming for levels 2 and 3, but is not a requirement. Being active on the boards on a regular basis , welcoming new members and helping out where you can is, though. Some of the benefits: 1. Access to exclusive Attache merch., including patches, etc. 2. Having the Imperial Attache title under your name. 3. Being a part of the team that welcomes new and prospective members of the FISD. 4. Being the "go-to" person in your Garrison, Squad or Outpost. 5. Exclusive access to the Attache HQ area, Imperial Propaganda Machine (newsletter) and merchandise discussions. We are currently in need of Attaches in many units, especially International Garrisons/Squads and Outposts. For more information on this program, please head here and if you should have any questions or concerns, feel free to contact me at any time. (justjoseph63) For a complete list of Imperial Attaches, go here This area lists all those who have gone above and beyond basic approval toward screen accuracy. FOR DECEMBER - JANUARY the 1st Imperial Stormtrooper Detachment would like to congratulate: Expert Infantry Badge Award: Daniel Branton "CableGuy" TK 783 EIB 783 Daniel Andersen "Ensi" TK 61514 EIB 784 Rob Rouse "Imperial_TK_Rob" TK 73178 EIB 785 Niccolo Badaglio "Marshall" TK 41210 EIB 786 Nino Rebueno "yo_its_nino" TK 21155 EIB 787 David McIntyre "DamnitDavid" TK 38987 EIB 788 Sean Jensen "Sean" TK 19165 EIB 789 Ralf Schmitt "Ryuk" TK 21182 EIB 790 Anthony Jobe "ukswrath" TK 10116 EIB TFA GREAT job on your approval, now on to Level 3! Request your free EIB certificate here Centurion Badge Award: http://www.whitearmor.net/eib/centurion_badge.png David Sihombing "CommanderRaider" TK 99924 Centurion 362 Brien Edick "Harbinger" TK 92802 Centurion 363 Stephen Edwards "Gwithian" TK 14655 Centurion 364 Antoni Lafont "ToniML" TK 27612 Centurion 365 Daniel Branton "CableGuy" TK 42911 Centurion 366 Sha Sha Chu "shashachu" TK 19233 Centurion 367 Tom Harvey "Poseidon" TK 52811 Centurion 368 Anthony Jobe "ukswrath" TK 10116 Centurion TFA Glen Rhodes "gmrhodes13" TK 85421 Centurion TFA Glen Rhodes "gmrhodes13" TK 85421 Centurion TLJE Congratulations to Glen! With the addition of the latest awards it now takes him to a total of 5 Centurion approved Stormtrooper costumes. Well done, Trooper! Outstanding job on reaching Centurion, troopers! Request your free Centurion certificate here If you see any of these Troopers around your Garrison or Squad, be sure to congratulate them! As many of you are aware, the FISD is currently in our March to 1000 program. Our goal is to reach the one thousand mark of Troopers who have earned their Expert Infantry Badge, and although we are well on our way to this goal, we still have a long way to go! The amount of approved submissions is increasing (over 80 this year alone) thanks to the dedication of those willing to go the "extra mile" toward screen accuracy. Here is a brief description of EIB as written by Paul (Daetrin), our founder: "Expert Infantryman status is not required for members of this detachment. It should be viewed as an optional set of requirements for those who wish to take the accuracy of their costumes to the next level, and be recognized accordingly. We're a costuming club - think of it as an award for costuming excellence and you get the picture. The requirements will not replace or supersede 501st standards, but only serve as an inspiration for the level of accuracy that can be achieved. The standards are meant to be high but achievable..." Besides the added pride you will have in your armor, those reaching this level can purchase exclusive EIB gear (patches, decals, coins etc.) and get a free certificate for your accomplishment. If you are interested or would like more information about the program head here that will help. You can also contact myself or any Imperial Attaché, and we will be more than happy to assist you! 4 inch wide MARCH TO 1000 EXPERT INFANTRY stickers $4.00 each. Price includes shipping worldwide. found here 3.5 inch tall 1000 TARGET FISD EXPERT INFANTRY stickers $4.00 each. Price includes shipping worldwide. found here Racing Shirts Preston TK91488 has posted an interest thread for FISD racing shirts, it can be found here Expert Infantry Gold Challenge Coin Limited (100 coins) Running out fast thread here Interest Thread for Silver Bullion Challenge Coin Interest thread here New Troopers Helping Troopers 3 inch decal, artwork by gmrhodes13 Decals are $4.00 each, shipped anywhere worldwide Sale thread here FISD Blue EIB or Centurion Red 4 inch sticker with rocker and badge. Pricing $5.00 each, shipped anywhere worldwide Sales thread here http://powaysigncompany.com/wp-content/uploads/2017/10/Cent_EIB_Stickers.jpg More FISD approved merchandise can be found here http://strmstr.com/images/coming-soon.png March to 1000 Patches FISD Silver Bullion Coin FISD Flags Newsletter I hope everyone had a great holiday season, now it's time to get back to work. Big thank you to those of you who posted your The Last Jedi premier trooping photos, they all looked great. This month is quite a jam packed edition, I would personally like to thank all those who contributed to this edition. We are always on the look out for content, ideas, funny photos or even your TK adventure story so feel free to contact either Danny or myself. With Unquestioned Loyalty Glen "Q" Rhodes TK85421 "gmrhodes13" PRO - Communication & With Unquestioned Loyalty Daniel Lauber TK55550 - "Ripper_L" PRO - Content Editor At Large Don't Forget We're on Facebook and Twitter! Facebook: www.facebook.com/whitearmor If you're on FB, stop by and say hi, ask questions, and share stories! Twitter: www.twitter.com/FISD501st or @FISD501st follow FISD on Twitter! Instagram: www.instagram.com/501stfisd On behalf of the 1st Imperial Stormtrooper Detachment Command Staff and the Imperial Propaganda Department1 point
-
Great write up Jesse, many thanks. If anyone wants to know more, please message from my page facebook.com/trooperamp Best, Paul1 point
-
Thanks Mike! Happy you're finally on the paint / assembly stage; must be so exciting Hey there Dan, thanks so much I will see to enable the trigger next, we'll see.1 point
-
There’s a separate build community for those that have purchased BlastFX on Facebook with a total of 200 members to date. Here is a link to the Facebook group; I believe it is set to public for everyone to browse : https://m.facebook.com/groups/1246759182092517 Hope the link works - perhaps an answer can be found there. I noticed also, as of Nov. 28, an ‘ancillary kit’ is available for purchase on shapeways, with trigger switch housing, and of great interest, a hollow hengstler counter - only thing is, no eagle logo but instead ‘blastfx’ on the side of it. Sent from my iPhone using Tapatalk1 point
-
The TRamp BlastFX seems like a good choice for your blaster. Thank you for sharing this product with us in such a detailed way. Any chance to possibly (some day) get a little video clip of steps 2 to 6 from the instructions below? Really curious to see those changes in the display.1 point
-
What a monster update, Jesse! I am totally blown away. Simply clicking that "like" button, just isn't enough for THIS effort you went through. Man, I am out of words. Your work raises the bar for this particular resin piece one more time - and we all know, this got difficult during the last years. Never say never, it has been done again. And I think you want to keep me busy with updating the FISD E-11 Blaster Reference, heh? To me it looks like you just posted another addition for it. You truely deserve that contributor ribbon in your signature.1 point