
Leaderboard


Popular Content
Showing content with the highest reputation on 01/31/2018 in Posts
-
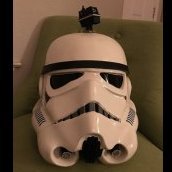
new kit3 points
-
The build isn't as hard as it looks once you get going. Even if you do make a mistake most of it can be fixed with an epoxy putty like green stuff. Good luck trooper.2 points
-
I have only this to say to you: wow.2 points
-
Drum room sacrificed for somewhere to build my E11 and eventually my armour. Did manage to trim and sand a few bits down last night, looking forward to getting stuck in again tonight. Sent from my iPhone using Tapatalk2 points
-
Thanks guys, the kind words mean a lot. There really are a great bunch of people here. Next up....the Power Cylinders...that's what I'm calling them...I don't think I did anything special here. Pretty much the usual "Power Cylinder Procedure" that I've seen in other builds. Here's how they started from Doopydoo's kit: Many people don't like the way the 3 central fuses are mounted and overlap each other. So there is a lot of very careful dremeling and a lot of very careful filing and somewhat careful sanding to get rid of them. I used a dremel to get the large chunks away and switched to box shaped needle files to clear out the rest of the resin. It was a lot of work... All gone...just like they were never there. Selfie.... These head mounted magnifiers are like a gift from heaven. There's no way I could do all this detailed work without them. Note the layers of clothing. It's "January-in-Canada" cold in my garage. Ok, back to work. I used a flat needle file to file off the resin bolt heads from the ends of the power cylinders, then cut the tiny, tiny, tiny bolts from T-Jay's kit in half and mounted them (with the nuts) on the fronts and backs of each cylinder. Now it was time to make some more use of my Dad's old jewelry tools. He had some drill bits that are super small. I believe I used a 0.55mm bit to drill holes for the fuse leads in the bottom of the power cylinder block. Next I used the aluminum rods supplied by T-Jay and cut out three replacement fuse pieces. The using the same tiny bit, drilled holes in the ends of the fuse pieces. I can't recall which build thread I saw this in, but someone put each fuse piece into an electric drill (instead of a drill bit) and drove along a metal file to taper the ends of the aluminum rods. This was a great idea but it did leave a few scratches in the aluminum from the teeth of the drill chuck. Then I used a mini-drop of CA glue to hold the little pieces of wire in the ends of the fuses. Not sure if CA glue will actually do much since it's aluminum, but it seemed to work ok to hold them in place for the next step. I used a bit of "green stuff" to create the end caps for the fuse thingy's. I know the end caps aren't shaped correctly, but the end caps are so small, I doubt anyone but WhiteArmor readers would notice. I cut a hole in the rear of the fuse block so that the fuses could fit in through. Then I painted the inside of the fuse block black and painted the aluminum fuses with primer and then black as well. I figured it would be hard to get spray paint in there later so I would get better coverage now. After they dried I glued them in place with E6000 and started to work on the wires. I carefully bend right angles on the front leads and fed them into the little holes I drilled in the front. For the rear, it looks like the original cylinders use 1960's resistors. I couldn't find any in my parts box but I found some 1980's resistors. Close enough for me. I glued 2 together for each side and used T-Jay's red insulated wire to wire them to the aluminum fuse wires. Yes, I actually soldered them as if they were real electronics. Here's an "in-progress" shot....and you can also see the "tiny drill bit" case in the background. Finally, the whole thing got a coat of matte black. Again....weathering to come at the end. That's it for the power cylinders. I'll probably do some catch up work next on the easier stuff. Mark2 points
-
The longer piece should be against the outside of the ankle.2 points
-
WHAT THIS PROGRAM IS: A dedicated forum where members can submit their completed stormtrooper costume for peer review prior to formal submission to their GML. Your armor will be reviewed and suggestions made by the FISD Staff and Imperial Attaché team, but detachment members can also provide peer review on any submission. All feedback provided will be specific, constructive, respectful, and helpful. Any feedback that is deemed negative, derogatory, inflammatory, or otherwise offensive will be deleted, and the poster can be subject to account suspension for repeated offenses. You may also be provided suggestions for attaining the rank of EI (Expert Infantry) and Centurion levels should you wish to pursue higher levels of screen accuracy. WHAT THIS PROGRAM IS NOT: This program is not a replacement for the GML approval process, as Detachments are not charted to approve costumes for membership. While a costume that passes Detachment peer review should be in a state to be accepted by a GML, Detachments cannot override a GMLs decision, nor are GMLs bound to accept the ruling of a detachment costume approval. That said, as a general rule the goal is that any costume that passes peer-review approval should be accepted by a 501st GML. WHAT YOU WILL NEED TO SUBMIT: You will need to post up various high quality photos of your armor/accessories on the list below, as well as the basic information listed next to it. We realize that this is more information than normally required for basic approval, but we want you to look your best! Also, please include the name(s) of any approved Trooper(s) who have significantly helped you with your build. Yes, we are asking for more photos and information than are normally needed for basic approval. The reason being is that we feel it gives us a better overall view, and we can catch things that may be missed should the recruit want to move to level 2. PHOTOS: INFORMATION: 1. Front view (arms down) 1. First/last name 2. Back view (arms down) 2. Future Garrison/Squad/Outpost or local area 3. Left side (arms raised) 3. Armor maker 4. Right side (arms raised) 4. Helmet maker 5. Ab plate close-up 5. Cloth belt maker 6. Helmet close-up (front, left and right sides) 6. Neck seal maker 7. Detail photos of any parts you have questions on 7. Boot maker 8. Interior strapping (optional) 9. Blaster maker (if applicable 10. Gasket maker (if applicable) 11. Height (optional) 12. weight (optional) 13. TK type (ANH Stunt/Hero. ESB, ROTJ. TFA etc.) 14. Name(s) of any Trooper(s) who significantly helped with your build. INSTRUCTIONS FOR POSTING YOUR REVIEW REQUEST: 1. Go to the Request Pre Approval thread: https://www.whitearmor.net/forum/forum/193-request-tk-pre-approval/ 2. Click on Start New Topic. This is located on the left of the blue "Reply to this Topic" option near the top of the page. 3. In the Title area, post the following information: (Fisd screen name) Requesting Pre Approval Review, followed by the armorer who made your kit in parentheses. Example: MegaTrooper123 Requesting Pre Approval Review (Anovos) 4. Post all required photos/information (as listed above). HELPFUL LINKS: 1. Where can I get in touch with my GML/Garrison? http://www.501st.com/members/displayUnits.php 2. Where can I choose my official TK number? http://www.501st.com/members/search_avail_ids.php 3. How do I join the 501st Legion? http://www.501st.com/members/join_form.php 4. What do I do once I am approved? https://www.whitearmor.net/forum/topic/16-501st-trooper-status-requests-include-link-to-your-501st-profile-in-your-request/ ____________________________________________________________________________________________________________________ WHY WE ARE DOING THIS: Not every garrison has responsive GMLs, and even those that do are not always experts in the stormtrooper costumes. Costume peer review provides members with a supplemental feedback on items that need to be fixed prior to approval, as well as other feedback that will help the overall fit and finish. Catching errors earlier will result in increased confidence a build will pass GML review and thus save GMLs time. It will also provide GMLs insight in to a sounding board beyond the GML peer review area on the 501st boards. Additionally it provides non-GML forum members the opportunity to learn about and gain experience in the costume judging process. This is valuable because it can provide people considering being a GML real-world experience before accepting the role, and provides GCOs a potential pool of people experienced in costume judging who may not have yet served as a GML. ADDITIONAL INFO: 1. Any feedback that is negative, derogatory, inflammatory, or otherwise offensive should be reported immediately, will be deleted, and the poster may be subject to account suspension for repeated offenses. 2. Feedback should follow the same format that Deployment Officers use, e.g. for each item to fix they will be marked as “must fix”, “should fix”, “could fix”. 3. “Approval” only covers base 501st acceptance (aka L1). Expert Infantryman (L2) and Centurion (L3) standards can be cited only for “could fix” items and are never “must fix”. 4. For GMLs, this is intended to catch errors early to make your lives easier. This is not a replacement for what you do. Additionally, since detachments can't approve costumes, there is no concern that a Detachment will override a GML decision. 5. For GCOs, an advantage is that a 501st member in their garrison can gain experience in the costume review part of being a GML before they take on the role officially, and this may also for their Garrison provide an outlet for people considering being a GML, and a pool of experienced members should they need to fill that role. 6. For FB users, other TK Facebook pages can offer advice on their site that may or may not be correct. FISD is the official Detachment run by experienced 501st costume approvers the world over, and this is a service we can provide prospective and current 501st members that a FB group cannot.1 point
-
Hey guys, until I`m waiting for BBB day I`m starting with building the rest of the accessories and want to share some pictures with you. If you have any ideas to improve something, please let me know, because this is my first Trooper and I never did anything similar before Today I painted my shoes: I was not so happy with the surface after painting it but with the help of nail polish remover I could get a really nice finish with no damages! Now I just need to clean them a little bit and paint the rubber parts1 point
-
Information Name: Shay Lattimer Garrison: Knightfall Garrison (VIC, Australia) Armor maker: RS Prop Makers Helmet maker: RS Prop Makers Cloth belt maker: RS Prop Makers Neck seal maker: RS Prop Makers Boot maker: Imperial Boots Blaster maker: RS Prop Masters Height: 5' 8" Weight: 78kg TK type: ANH stunt Realise belt is a bit loose in the photos and doesn't line up in the back with the velcro. ill retake those photos shortly, basically just want to get a general idea of what i need to change/update. Photos Front Arms Down: Back Arms Down: Left Arms Raised: Right Arms Raised: Ab Plate Up Close: Helmet Front: Helmet Left: Helmet Right: Helmet Rear: Blaster: Interior Lining:1 point
-
AUGH! D'OH! I was reading someone's Anovos build thread and saw an entry about the weird numbering of the shin pieces, and that they had put them together the way recommended here. I couldn't tell what the descriptions of the curves of the parts meant, but reading about the ankle protection on the outside made me suspicious. I checked my shin pieces and found to my dismay that one side had wimpy ankle protection and the other side had … better ankle protection. AUGH! D'OH! D'OH! D'OH! D'OH! D'OH! D'OH! D'OH! So I carefully peeled the shins apart. E-6000 is good that way: it will, with some persuasion, let you do that. I'm probably not going to reuse the velcro; that started unsticking anyway. I peeled off the glue on al the parts, filed down some unevenness in the mating edges, and started off gluing the front cover strips to the outside halves. The second tube of E-6000 is different from the first one I got. This stuff claims to be flexible and transparent like the first, but it's also self-leveling. I think I'll figure out soon enough what that means. Other progress is mostly in cutting down return edges: front end of wrists, tops of bicepses, and shoulder connecty parts. I also plan to replace all that velcro with snaps. I scavenged the cut-off ABS for suitable flat sections from which I plan to cut 1" x 2" rectangles. These will get drilled to receive two snap halves, then glued in place. The existing elastic I will re-use to join the armor pieces. I think elastic will work better (as in more comfortably) than non-elastic nylon strapping. And I might as well use white elastic for the shoulders while I'm at it. The back-kidney-butt and right kidney-codpiece connections are probably straightforward: Make the parts have tight connections. (I'm 5'10" tall, perhaps a bit short in the thorax and longer in the legs. Stand up straight, Timber!) The chest-codpiece and back-chest connections are a little trickier. I think I will set up the shoulder joints to butt tightly together as I am an elf right on the border of S and M. (That's in t-shirt sizes!) Then I'll try on the armor and mark how the chest overlaps the codpiece. That will guide how those straps should go. I may build in a little tension there. Nobody likes a saggy codpiece. Going will be a little slower form here on out as next week I start my new job.1 point
-
Thank you, chaps. Really looking forward to it! :-) Although, I think I might take the rubber blaster for this one - just until I find my feet. :-)1 point
-
Oh it`s so easy, I guess everybody can do it But I`m going to think about that when my Trooper is ready1 point
-
Centurion nr 6 - amazing (I know not yet approved but it will be)1 point
-
That looks great1 point
-
Today I had time to create my neckseal! After trying some techniques I`ve found the best way to get a really nice shape. I`ve put a fabric lining of cotton fleece in it, which gives softness and volume . To get a good looking shape I used a 4mm rope. Here you can see my result:1 point
-
I will always be an ANH guy because that was the film that started it all for me. However, I get very nostalgic seeing ROTJ armor. Very nice job. Good luck!1 point
-
Good luck, not often we see a ROTJ in the Centurion area!1 point
-
Hahahaha! Yeah so far I've mostly been in the comfiest stuff I have. Sent from my VK815 using Tapatalk1 point
-
I bet. If you take a close look at some of my build photos you'll see SW pajamas and slippers. Good times1 point
-
LOL from what I can tell Shingate will never ever settle down1 point
-
Return edge Bad! Get rid of it. Won't do anything for you! With WTF the long sides are the outer halves. Shingate 2018!1 point
-
Gotta day though came out nice. Sent from my iPhone using Tapatalk1 point
-
Hey Danny Andrew or myself will be with you shortly.1 point
-
Nice armor building slippers lol1 point
-
Bring it all home brother Joe!1 point
-
I attended an armor party last weekend and a few TK's commented to remove all or risk tearing up your boots. Consensus with that group (none had built a WTF) was to have the longer part on the outside1 point
-
I don’t believe u [emoji23] I’m sure you’ll keep ‘sticking’ them in [emoji23]. Sent from my iPhone using Tapatalk1 point
-
Ah, I love the look of AP armor. Looking great thus far.1 point
-
Welcome to the Legion!1 point
-
Congratulations TK-27072!1 point
-
The Print settings are as follows: Materials: Prusa PETG Quality: Detail - 0.1mm Infill: Standard -20% Support: Part dependant Brim:0ff1 point
-
Ok, got confirmation that I don't need to worry about the ridges, so my cover strips will be ok. Thanks for the responses, they do help! Here are the side profile shots, waiting to hear back from Rocky on larger pieces.1 point
-
1 point
-
If you went with a wider "22/24mm" strip in front it really does make a difference in the back. Saying this as it looks a bit more even so to speak viewed from a side angle. We're bigger Troopers so a little bit wider coverstrip isn't as noticeable in front. With it being cut already a gap would be left but still covered by strips. I say plural as I recommend internal ones. When you measure ridge in back you can take a couple mm off and cheat in a "little" and be ok. Say you measure 28mm a 26 would work. About bigger size ab question. Post a picture of ab from the side and I could tell you. Keep up the good work. We're watching!1 point
-
Really nice clean build! Good Luck!1 point
-
Nice work, good luck1 point
-
Pro -tip of the day! Give yourself one extra adult beverage on me!1 point
-
That's great news! Because if I had to ask my wife to sew one more thing for this endeavour, I'm pretty sure she would pack up the kids (and my RRSPs) and leave.1 point
-
Many congrats. Welcome to the club, Mr 373. :-) Sent from my iPhone using Tapatalk1 point
-
Congrats and welcome to Centurion!1 point
-
Congratulations Sean!! Fantastic work. You set the bar nice and high - gives me something to aim for. Oh yeah, and... I told you so.1 point
-
Woop woop! Congratulations Sean1 point
-
Great news congratulations and welcome to the ranks trooper1 point
-
Congratulations Trooper1 point
-
I'm pretty sure Kylo was slashing away with his light-saber in the control room again.1 point
-
Well this experience has made me realize what Hell is going to be like for me. It will be a nice beautiful home office with a massively powerful computer sitting in front of me. The computer won't freakin work on the internet and instead I'll have to spend eternity typing on a tiny smartphone screen to people.1 point
-
Congratulations! Sent from my XT1254 using Tapatalk1 point
-
The Oracle is mysterious, and while I can perform the ritual and attend the sacrifices, it's beyond the ken of men to know when they will choose to intercede.1 point
-
Looks awesome. Very happy with the result! Sent from my XT1254 using Tapatalk1 point
-
Ok awesome. My photos unfortunately disappeared, however this is probably a good thing. I have an idea. What if we used darthcue's baton that he attached a few pages ago as the CRL model, and I can include my holster for you, and we can combine the 2? Just a thought, but I honestly believe that darthcue's baton (and the pic he attached showing the measurement of it extended) is the closest we can get to it, not to mention most accurate. Also are you sure those guards aren't considered deployed? They are standard troops that have been sent to that planet to act as prison guards (at least that's how I interpret it).1 point


.thumb.webp.27f7939d37871f319ff836257d4a3668.webp)
