Leaderboard


Popular Content
Showing content with the highest reputation on 01/13/2018 in all areas
-
In June I decided to pull the trigger on my first set of TK armor. I knew that the 501st existed, but that was about the extent of my knowledge. I knew if I was going to build stormtrooper armor, that I wanted to do it right. So I thought I would do some research and see what I was getting into. I found the FISD site and started to read - nausea and fear were my initial responses to seeing the amount of info and detail that goes into building a TK to 501 standards. But then I remembered that nothing worth doing is going to be easy. And more importantly, once the kids are in bed and I have a hour or two to myself, I need something to do other than sit in front of the TV and drink Guinness. That, and the amazing resources and on this site along with the enthusiastic members of the FISD convinced me that this is totally doable. So here is my first build - and following the advice of many, I'm going to aim for Centurion. I've done some home renovations and know that doing it right the first time is easier than going in later and upgrading. Anyway, BBB day finally came. I ended up getting a set from Authentic Props. I originally ordered a set from Anovos and eventually cancelled (I won't go into that rant - but I will say if you are new and looking to buy your first set of armor - my advice is to avoid ANOVOS). Well, on a happier note... Yes!!! Everything was well packed and in good shape. Thanks, Mark! I ordered the trimmed kit with accessory package (belt, holster, gloves, latex hand guards, and TD clips). His kit includes all the parts needed for the helmet (green lens, screws, brow, trim (regular, not S-trim), decals, frown mesh). He also includes all the split rivets and a few snaps as required for approval. Everything is here! Parts for the TD and other bits. TD screws (painted black already), hovi mics, and assorted rivets, screws, and snaps. Anyway, gotta go Christmas shopping for the kids. Black Friday - yuck.1 point
-
Here are some pictures of my Shoretrooper costume build so far. It is an ongoing project so I will not call it finished yet.1 point
-
I know right, I do like to be unique but then sometimes you get "why does that one look different" or "weren't you a good guy"1 point
-
Easy enough. Thanks Sent from my iPhone using Tapatalk1 point
-
Start sizing with your biceps. They’re the easiest.1 point
-
Hahahaha! It's alright I got what you were getting at. I know a lot more of the elbow needs to come off and the wrist needs to be evened out as it has a slight curve to it. The outer elbow is way to much for me as it is now. Sent from my VK815 using Tapatalk1 point
-
Scared to answer now, mate. ;-) I’ll let the boys confirm. Keep up the good work mate. Sent from my iPhone using Tapatalk1 point
-
Good shout Dan...been looking for Tino’s build thread! Just spent the last hour or so reading through it...I have no words! I’m totally dumbfounded at the level of detail and quality of work throughout...totally inspirational and educational...[emoji41] Sent from my iPhone using Tapatalk1 point
-
Good call in waiting for the right boots and the helmet is looking good Dave1 point
-
Ok so not much progress at the moment . . Just waiting to order my boots then i can size the rear of shins and add sniper knee olate etc . Do have some chelsea typr boots and the are narrow ankle just not high enough so thinking instead of using those to size i may be better to wait till u have my boots from ts . Money been a little tight after christmas and all . Will also be requesting help see if any one local can help with final touches to strapping . My stupid frame aint helping things [emoji52] Then such as back piece If i make it almost touch the kidney it feels too low on shoulder blade area and a promenant gap between shoulder blade etc . Move up a touch and it fits over my shoulder area fine but leaves a small gap between back and kidney . Prob around 20mm so may have to get a pic or two up to show what i mean So if any one local to me reading this can help fine tuning to make the armor sit better ... although i dont mind travelling a short distance then message and will get back to you The only thing i have done realy is the inside of my lid Using eva foam adhesive sheets and a foam helmet line from clive . I have more or less lined the inside of the helmet . Along with toyying with a chin strap What you think ? Sent from my GT-I9505 using Tapatalk1 point
-
If I don’t have time to build, then I’ll make up for it elsewhere. Pancakes for the kids... Ok, this one was for me. Sent from my iPhone using Tapatalk1 point
-
Good shout Dan...been trying to find this thread (still haven’t worked this forum out yet [emoji85][emoji23]) that’s my next hr or so checking Tino’s construction. Absolutely loving some of these builds...can’t wait to get started now! [emoji1591] Sent from my iPhone using Tapatalk1 point
-
Or use a canon photo/s, a picture is worth a thousand words.1 point
-
The thing is that people tend to look more at photos than read the text, so they see your photo and think that's how it should be done as you are trying the help the guy out. It would have been better (IMO) to show a finished wrist end so there is no confusion So, to be clear on the return edges of your forearms, there should be none on the wrist or inner elbow scoop. Just leave a small amount on the outer elbow.1 point
-
So, I tested some of my tweaking. This is the new left ab to kidney connection - no overlap at all. All is good. The connection on the right side rotates when I lift my arm a bit - so I get this. I haven't added my tab and slot solution, so that should fix this up. I adjusted the shoulder straps and this looks a lot better. the back is much more snug to my body and raised a bit. I am just snapping in test pieces of strapping to fit - I am doing this alone so it is kind of hard to size. The wife as had it with the whole process so I guess I need to call a friend. Excuse the seemingly vulgar pose. I was just checking to make sure the thighs would fit and how much black is showing at the top. they need some trimming for size (from the back - I've cut away some already but I could stand to remove some more) but otherwise look alright. I was worried that I glued the inner part too low compared to the outer part, but I think it looks ok. The thighs - just need to do some more trimming at the back for size, and then clean up the upper edges (after final fitting of all armor). Button plates. Something that I seem to keep forgetting to do. So I did it tonight. random shot from the closet in my office. Using my toys from the 70's as reference just isn't cutting it. Sent from my iPhone using Tapatalk1 point
-
Additional screws added Gun selector screw added Bottom grip screw1 point
-
Drilled out the fake screws and created pilot holes Added the screws from Tino's kit, ripped out the front part of the monical Installed1 point
-
Not too much to report, got all the back pieces rough trimmed, as well as the thigh ammo pack. Will get started on the chest and abdomen tomorrow, and then from there I'll start fitting. My goal is to have this completed by spring, so far I think I'm on track for that.1 point
-
Thank you, slowly but surely. I've watched his videos as well, I also like Panda Props videos, he explains the process more in depth.1 point
-
Again not what I want to hear tonight, but I can’t expect magic. Sent from my iPhone using Tapatalk1 point
-
I’m starting to see that, when I took a screen shot of the CRL which is a terrible pic but they are at the bottom. I already wrote back asking for some clarifications on other issues and I don’t want to send a ton of emails so I’ll verify that on my next email. My only concern is now I’ve got holes in the wrong spots. Not sure how to fix that without buying a whole new belt. Sent from my iPhone using Tapatalk1 point
-
Congratulations!1 point
-
You will find most makes of helmets are not symmetrical and oddly shaped, even full of bumps and lumps I would also advise touching up the paint on the teeth. Good luck with the build.1 point
-
Thanks for the fast reply! I was just stunned to see it so look...oblong and obviously deformed. Maybe I just never noticed it because, well, the movies move quickly, and I don't exactly go up to folks in stormtrooper and detail eyeball their costumes.1 point
-
Thanks the feedback is great, but I'm also happy for the critical too because it only helps, it's nice to see that so far so good. So far I like the interior I'm using the large and two small pads and it fits pretty good almost a little to snug. However I'm glad I trimmed off my mop of hair I can't imagine how it would be with that still.1 point
-
Congratulations and welcome to the Centurion ranks trooper1 point
-
Congratulations Tom1 point
-
While baby was catching some Zzz's last night, I trimmed my forearms' return edge. [emoji16] Getting to Centurion will take a bit longer, but my wife is encouraging me to achieve that level of detail. Motivation comes from anywhere, you know. Lol Sent from my XT1254 using Tapatalk1 point
-
I'm glad you like it. It's going up for sale soon to make way for my new ANH armour I am building for myself.1 point
-
Yes !!! Yessssss!!!! And yesssssssssss man !!!!!!!! Sent from my SM-G930V using Tapatalk1 point
-
Yes !!! Yessssss!!!! And yesssssssssss man !!!!!!!! Sent from my SM-G930V using Tapatalk1 point
-
Anyone tell me if I’m on the right direction with my trim lines Cheers Also this is how it came cut from RS, other people’s threads I’ve check theirs seem to have more meat on...maybe I’m just worrying? Sent from my iPhone using Tapatalk1 point
-
I found these washers for the buttons. I wish the inside was a little wider but they will do. So this is a lot of work you are looking to here. I hope it all turns out looking like I would like in the end.1 point
-
For anyone wondering what the various logos, bars, and titles to the left of posts is all about, this is the thread for you! User Ranks Found above the avatar, rank is determined either by post count or other criteria: Private: 0-24 posts Corporal: 25-49 posts Sergeant: 50-99 posts Lieutenant: 100-149 posts Captain: 150-199 posts Major: 250-499 posts Colonel: 500-999 posts Commander: 1000-1499 posts General: 1500-1999 posts Field Marshall: 2000-2999 posts Grand Moff: 3000+ posts Expert Infantry: Users who have received an EIB Award Centurion: Users who have been granted Centurion Status There are also special ranks given to Command Staff and Extended Staff, such as Detachment Leader, Deployment Officer, Combat Photographer, Hall of Fame Curator, etc. Achievement and Service Awards The FISD Achievement Award is granted for exemplary service to, or outstanding achievement for, FISD. Tradition holds that persons currently serving on staff cannot be granted Achievement Medals (or else it can become too self-serving). Thus, if you see a staff member with an Achievement Medal, they've all earned them prior to joining staff. To date only two people have ever earned a second medal, and no one has ever earned a third. Award Levels FISD Achievement Award (1st Award) FISD Achievement Award (2nd Award) ... FISD Achievement Award (6th Award) (and so on) The FISD Service Award is granted to recognize the contributions of Command Staff for their commitment to keeping the detachment running. Each award represents a full year of service. Additional awards are denoted by a star (1 Gold Star = 5 Silver Stars, 1 Silver Star = 5 Bronze Stars, etc.). A frame denotes fifteen years of service, with additional stars for further years. Award Levels FISD Service Award (1st Award) FISD Service Award (2nd Award) FISD Service Award (9th Award) FISD Service Award (10th Award) ... FISD Service Award (16th Award) (and so on) 3D Contributor Award This program, as with others, is an optional Detachment-only award incentive. It recognizes members who have gone above and beyond in contributing to our 3D forum section. The Silver award can be earned numerous times over the years. The Gold award is given to those that have contributed at such an astounding level that it is deemed appropriate. All awards are given at the discretion of Command Staff. Award Levels Silver 3D Contributor Award Gold 3D Contributor Award For more information please refer to this thread. Attaché Outstanding Achievement Award This award is bestowed to those who consistently exemplify the meaning of an Imperial Attaché and have gone above-and-beyond in helping their fellow troopers for at least one full year: For more information and a list of recipients please refer to this thread. FISD Master Armorer The FISD Master Armorer program is an optional, detachment only incentive award to recognize individuals who have directly helped another 501st stormtrooper to achieve Expert Infantry status. Some people spend countless hours helping others, and want to reward their results as well as incentivizing new people to help as well. Award Levels FISD Armorer (5+ "wins") FISD Senior Armorer (15+ "wins") FISD Master Armorer (25+ "wins") Centurion Badge These are awarded to those who have reached the highest levels of costume approval for FISD. These are awarded only once, to the person, regardless of costumes: Expert Infantry Badge (EIB) These are awarded per costume, thus a person can have more than one EIB award. Stars (like the awards above) indicate multiple awards, and appear above the EI badge (1 Blue Star = 5 Gold Stars, 1 Gold Star = 5 Silver Stars). Award Levels Expert Infantry Badge (1st Award) Expert Infantry Badge (2nd Award) Expert Infantry Badge (3rd Award) Expert Infantry Badge (4th Award) Expert Infantry Badge (5th Award) Expert Infantry Badge (6th Award) Expert Infantry Badge (7th Award) Expert Infantry Badge (8th Award) Expert Infantry Badge (9th Award) Expert Infantry Badge (10th Award) Expert Infantry Badge (11th Award) Expert Infantry Badge (12th Award) Expert Infantry Badge (13th Award) Expert Infantry Badge (14th Award) NOTE If you are approved with a "2nd Version" of a particular costume that you are already approved with you do not receive an additional award, there is only 1 award issued for each costume version ie: only 1 x Hero, 1 x Stunt, 1 x HWT, 1 x ESB, 1 x TFA and so on. If you have a second/additional version costume approved you will see "2nd Version" and [APPROVED] added to the thread title, no additional profile stars For more information on the Expert Infantry and Centurion programs, please refer to this thread. EIB and Centurion requirements can be found in the corresponding costume CRLs (as Level 2 and 3), additional information on how to apply is available here for EIB and here for Centurion.1 point
-
Hey guys! Just wanted to let you know that I was approved. I am officially TK55933!!! I am very grateful for this!!!! So excited to troop1 point
-
Incredible! The day has finally arrived - E-11 enthusiasts worldwide applaud!1 point
-
I got an email from Vincent saying the boots will be available soon and too watch their Facebook page for updates Sent from my iPhone using Tapatalk1 point
-
I learned so so much from today's test fit. For one, that top area of the ab has to go. Another thing is the upper part of my under suit needs to be tailored to fit better. I was bulging out of the elbows and armpits.1 point
-
I used poppers on the thighs as well Dave, i taped the male poppers in place on the thigh first so I could move them up /down to get the right fit before gluing them It’s coming together really nicely Sent from my iPhone using Tapatalk1 point
-
Pauldron is black on the Yavin, Cloud City, the Death Star, Endor. Pauldron is orange on the Tatooine map. ----------1 point
-
"Armorbuilding with TK1336" on YouTube is also a great source, one of the builds are anovos for centurion...in case you haven't seen it1 point
-
Some pictures showing my updated and finished skirt armour. Lightweight, very flexible and functional. I am very happy with the shape of it. It does all the right things as it curves around the waist. Because it flairs off the hip it allows the breeches to puff out at the thigh. The hinge down the front of each side allows for the legs to be lifted to full height and working in unison with my articulated long box there is no restriction to movement. Some comparison pictures of my armour skirt against the some screen shots.1 point
-
Quick 360 of the shurtzen before I kick the crap out of it.1 point
-
I think the hip armour is now where it needs to be. Its rigid but soft enough to move in. It has the downward slant to the front. It holds the right shape as it curves around the waist and the greeblies and the oiler pouch have there place on the back albeit the cylinders are a little too high up at the moment (an easy fix of just mounting them a little lower) The rear is held in place by a single popper on the back of the belts slider buckle. I decided against using 2 poppers on the front and opted to use velcro as this holds it closer to the armour on this particular kit. Pleased with it so far. The next step is to add the texture, paint then weather it up to match the rest of it.1 point
-
Got a better inner arm shape to my biceps today. The BSP was more like a crescent so its been squared off. I suspect this may give me greater articulation. Bonus.1 point
-
Thanks very much, Dan.1 point
-
A better photo of the finished blaster i did some time back :-)1 point
-
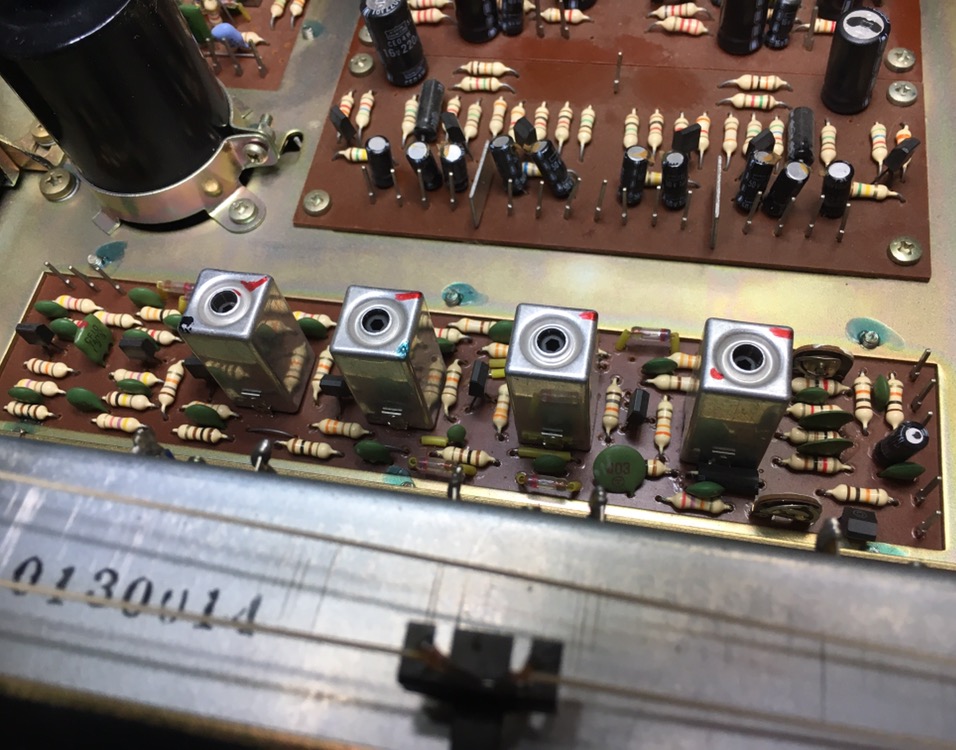
This isn't a lead or anything, but I was upgrading/doing maintenance on this early 70s receiver and it reminded me of this. Just thought it would be fun to share since I don't see things in a line like that very often. Not the same obv, but I was excited when I saw in nonetheless.
 1 point
 -
Hi Chris, in terms of volume there is very little in it, but there is a big size difference. My personal choice is the smaller version as it sits nicely behind the chest plate. Hope that helps. I use a similar version to the larger one for my product TRamp (www.facebook.com/trooperamp) but that's simply because I need more space inside the amp for the added circuitry.1 point
-
That might be helpful to you when you will be working on the hands and blasters. Lots of details!1 point


.thumb.webp.27f7939d37871f319ff836257d4a3668.webp)


.thumb.jpg.fe734c2874fe147a5789e833ad00772e.jpg)