Leaderboard


Popular Content
Showing content with the highest reputation on 12/13/2017 in Posts
-
I'm all for blaster accuracy, but I'm opposed to a new set of CRL's and awards. Blaster accuracy is inherent in EIB and Centurion. And for those that value accuracy and have the means to go above and beyond, they will do so regardless of any awards. Let those who know appreciate it for themselves. My personal trooping E-11 is all metal, a mix of aluminium and steel with a (un-)folding stock, moving trigger, safety selector, charging handle, etc, and disassembles like the real deal. I don't need an award for that. I know it's a good blaster, and so does everyone who sees it.3 points
-
I have seen blasters that look so real it's almost unbelievable, as well as real decommissioned Sterlings made into E-11s, both used at events where literally dozens of police and law enforcement were present. All we got from them were smiles and requests for photos. When you are dressed head to toe in shiny white armor along with others from the SW universe, the chances of someone thinking it is actually real weapon are miniscule. They realize that we are characters, much as the TKs that work at Disney who brandish replica weapons and therefore pose no danger. Something to think about is how you actually hold and pose with your weapon. I always HIGHLY discourage anyone from ever pointing their weapon at anyone for any reason, especially children. This is just in really bad taste. I also never let anyone hold any of my weapons. When you hand it over to someone not in a costume you never know what they may do with it, i. e. pointing it at someone not aware of what is happening who could very well "freak out", especially in this day and age. Then you have a bigger problem on your hands, not only with your "host" but with your Garrison and the 501st. To say this would be "bad press" for us is an understatement. Some troops (like children's hospitals) understandably forbid weapons of any sort, as some kids may not be familiar with us or our mission. A Stormtrooper without a weapon, you say? That's crazy! But, the first time you get an ear to ear smile and a high five from one of those kids will make you forget you ever carried one.3 points
-
UUUUUUUaaaaauuuuu, Thank you!!!!! I'm very happy to be able to reach this level and belong to 501st Legion THANKS TO THE SDS group of the Spanish Garrison I got this title.2 points
-
Following this thread with great interest. Haven't yet made up my mind, but it sounds like a nice idea with good arguments on both sides. Some people want this, while others do not. To me, it would make sense to get an overview first. Why not let the community decide on this? Maybe raise awareness in a future newsletter with a link to a voting-thread and then wait what the people on this board prefer. When there is a result, the next steps can be taken - and there are a lot: different E-11 versions, different detachments using E-11, different types of materials like steel, aluminum, resin, plastic, rubber and each has it's own characteristics. Not an easy task - but a nice idea.2 points
-
Thanks Dan, I’m amazed and really chuffed Sent from my iPhone using Tapatalk2 points
-
Hi Tony and Andrew, TD screws done. :-) Please let me know if I’ve missed something from my application as I’d be happy to provide further details if needed. Best wishes, Dan. :-) Sent from my iPhone using Tapatalk2 points
-
TLJ troop (just got home) had an awesome time and it was great to get the opportunity to see the sneak prewiev https://www.tv4play.se/program/nyheterna?video_id=3948224&utm_medium=sharing&utm_source=permalink&utm_campaign=tv4play.se Not that I do much in this video but still2 points
-
Alum front sights2 points
-
I decided to work out a complete, comprehensive list for those about to start an OT TK armor build (ANH Stunt, Hero, etc,) to help get everything in place for when "Big Brown Box" day arrives! This list does not include soft parts, (neck seal, boots, etc.) but focuses on the hardware and supplies for building the armor itself. However, a list of soft parts can be found HERE I believe I have covered most items, but would appreciate additional suggestions/corrections to add, and will keep it updated as such. Yes, it looks a bit daunting, but some of the items you will already have, and the rest can be purchased at major home improvement stores, online, or borrowed from a TK friend! Plus, it gives you something to do while you "hurry up and wait" for your kit! This list is includes items used for the EIB and Centurion programs, (marked with double red asterisks)**. These items are not required for initial TK approval, but I encourage everyone to consider them as an option. Hope this helps, and best of luck on your build! PLEASE NOTE: Some kits come with all the hardware you will need to build to Centurion level, i.e. split rivets, ear screws, TD screws, etc., however, not all armorers supply the correct ones. If you are (hopefully) planning on aiming for level 3, please check with your armorer to see if they provide these. You can also reference the photos below to see if they are accurate. These supplies are based on using the snap method for connecting the armor. Example photos are shown at the bottom for many of the items, but not all. (Everyone knows what a hammer looks like). Items with photos have a notation. 1. E-6000 glue- Great for almost everything, and removable if necessary. Highly recommended. (Pick up some wooden tongue depressors as well, makes spreading it easier)! (Photo 1) (Please see updated information on E-6000 below, after #50 before purchasing). 2. Binder or notebook- To keep notes on your research. 3. Dremel or rotary tool- A "must have". (Photo 2). Be sure to get the sanding drum attachment and extra sanding drums (Photo 3). I suggest the 180 grit type. 4. Small plastic containers- Keeps everything organized. 5. Lexan scissors- Curved and straight, for cutting ABS. (Photo 4) 6. Small spring clamps- For holding things in place while gluing. You can't have too many! (Photo 5) 7. Line 24 snaps- For strapping. You will need at least 30, and do NOT "cheap-out" on these, but purchase quality ones. (Steer clear of Wal-Mart snaps). Tandy is recommended. Tutorial located here: https://www.whitearmor.net/forum/topic/44617-snap-setting-101/ (Photo 6) 8. Snap setting tools- There are 2 types to choose from- One is a two piece set (requires a hammer) (Photo 7) and the other is the pliers style (Photo 8) 9. Hammer- For setting snaps if you use the 2 piece style of snap setter. 10. Pliers/vise grips- 11. Screwdriver- Slotted head. 12. Rivets-** 5/16 (8mm). (Photo 9) Round head bifurcated/split rivets with washers. You will need 9. (3 for the kidney, 3 for the ab, one for the cod piece, 2 for the thigh ammo pack). You will also need 3 speed (Chicago") rivets to attach your ABS belt to your canvas one. These are attached by hand and not to be confused with the aluminum ones listed below (#19). Some like to use the screen accurate single cap rivets (Photo 10) to attach the ammo thigh pack but these are not a requirement. 13. Elastic- 1 inch wide black for shoulder bells, etc. (4 ft.) 2 inch wide white for ab/back plate shoulder connection (1 ft.), 1 inch wide white for drop boxes, (1 ft.) 1/4 inch wide white** (1 ft.) for shoulder straps. 14. Nylon strapping- 1 inch wide black, at least 6 to 8 ft. long. 2 inch wide black (48 inches) for high tension areas if you are using the double snap method. (NP) 15. Exacto knife/extra blades- For cutting, trimming, cutting nylon strapping. (Photo 11) 16. Heavy duty razor knife/extra blades- For cutting cover strips and scoring around pieces that will be removed. (Photo 12) 17. Heavy duty scissors/tin snips- For (carefully) cutting large sections of ABS. (Photo 13) 18. Metal ruler or straight edge- (At least 18 inches long). For use as a cutting guide, especially cover strips. 19. Hand Rivet gun/aluminum open end blind rivets- For putting your helmet together. Available for about $10-$12.00, EASY to use! (Photo 14) 20. Metric Ruler- 21. 2 x 2 or larger piece of carpet- Protects work surface, keeps dust down, and stops small parts from rolling away. 22. Rags/paper towels- And plenty of them. 23. Blue painter's tape- 1 inch and 2 inch widths. For keeping glued parts in place and dry-fitting your armor. 24. China marker/pencil- For marking cut lines. 25. Sandpaper- I highly recommend Sandblaster Pro Flexible silicone sanding sheets from 3M, 220 grit. You will never use anything else, I promise. They last forever! 26. Sanding block- The sponge type, 120 grit. 27. Band Aids- You will need these. Might as well keep them handy. 28. Rare earth magnets- (10 minimum) SUPER strong! I use the 20 mm x 3 mm round ones. Cover them in blue tape to prevent scratching your armor. You cannot have too many!!! Tutorial located here: https://www.whitearmor.net/forum/topic/44619-magnets-101/ (Photo 15) 29. Butane Lighter- For sealing the ends of nylon strapping. (see # 44 below for a better option) 30. Large "half-round" file- For smoothing out edges before sanding. I used this a LOT, especially in the curved areas. (Photo 16) 31. Small "Needle file" set- Very inexpensive, comes in 6 different shapes, and is perfect for the teeth and eye openings on your helmet. (Photo 17) 32. Foam padding- 1 inch thick. Great for helmet and armor padding. Available at craft or fabric stores. 33. Velcro- 2 inch wide black (various uses) and 1 inch wide white, for calf closures (about 36 inches). Go for the "Industrial Strength" kind. 34. PAINT: Satin Black: Humbrol # 85 or Testors # 1747 for vocoder, trap/ tear drop/ear bar outlines/stripe(s), ROTJ and ESB frown, TD screw heads. Gray: Humbrol # 5 or Testors # 1138 for trap/tear drop/ear bar background, ANH frown and ab-buttons. French Blue: Humbrol # 14 or Testors # 2715 ForTube stripes/ab buttons. Mediterranean Blue Humbrol (Tube stripes alternative color) Testors: No exact match Gloss white for all rivet heads (excluding cod rivet). Mineral spirits for brush cleaning 35. Goo Gone- Citrus based solvent that will remove latex and enamel paint and NOT harm your armor. (Photo 18). 36. Small paint brushes- Assorted sizes. Try to buy quality ones.. Cheap brushes =cheap looking results. I suggest picking up a "filbert" (Photo 19) style brush (photo 5) as well, as it's rounded tip works great for painting the ab plate buttons and vocoder. Another GREAT way to get clean, crisp lines on the ab buttons is to use Testors Micro-Sponge brushes (Photo 20). 37. Wire or fiberglass mesh- (Window screen). For inside the "frown" of your helmet. A piece 3 x 8 inches will work fine, and you can trim it as needed. 38. Safety Glasses- It never hurts to be too careful, especially when using a Dremel type tool. For your Thermal Detonator, (TD) clips: (Note: There are some GREAT pre-made TD clips you can buy on this site, and some kits include them, but you can use the following 5 items to make your own. 39. Aluminum strip- 1 inch wide 40. Screws- Size #6 pan-head slotted screws **, 1/2 inch long, You will need 4. (Photo 21). NOTE: The CRLs have been updated and round head screws are permitted, but they must be the slotted (not philips) style. 41. Hacksaw- For cutting the aluminum strip. 42. Drill- Electric or battery operated, with various size bits. 43. Vise grip OPTIONAL ITEMS: 44. Heat sealing iron- For making return edges. Not normally needed, but there are some great tutorials on this here on FISD. Try it on a scrap first, though! 45. Soldering Iron- For making holes in nylon strapping and sealing the ends. Pretty inexpensive, and worth the cost! (Photo 22) 46. Plasti-Dip- A black rubberized coating you can spray inside your helmet, (also available in a brush-on). Or, you can use spray paint. Just remember to sand and prime first! 47. Heat gun- Not normally needed. For shaping ABS. Use this CAREFULLY, and practice on scraps first until you get the hang of it. These things can reach 1500 degrees and melt your armor. 48. CA (super) glue- Not recommended for first time builders, as it is PERMANENT, and you can't fix mistakes. Also, if it drips on your armor it is nearly impossible to remove. It can also become brittle over time, causing connections to fail. 49. Acetone- For use ONLY in making ABS paste for filling small gaps, (see tutorials). Do NOT put this directly on your armor, as it will melt it. 50. SUGRU- This is an easy way to attach the lenses in your helmet. Tutorial located here: https://www.whitearmor.net/forum/topic/44593-how-to-attach-lenses-using-sugru/ 51. Respirator- An informative post was made by Clint, (cm325i) concerning the effects of E-6000 glue on some individuals. Definitely worth a read: http://www.whitearmor.net/forum/topic/33347-e6000-warnings-read-them-and-wear-a-respirator/ 52. Cut resistant gloves- Especially helpful if you are prone to cutting yourself. Available online for about $12.00 (Photo 23) E-6000 update: Please note that there are certain online retailers (including those in Europe) that are selling FAKE E-6000 or "knock-offs" like these: The genuine product is clearly marked Made in the USA, and has a batch number on each tube. They do not sell to distributors in Asia, so if you try to save a few bucks by ordering from a seller there it is not the real stuff. If you have any doubts, you can contact the manufacturer at www.eclecticproducts.com, and they will let you know where to get it. The fake stuff is garbage and will not hold up. 1. 2. 3. 4. 5. 6. 7. 8. 9. 10. 11. 12. 13. 14. 15. 16. 17. 18. 19. 20. 21. 22. 23. IMPORTANT UPDATE! To make life easier, Ray (Dieltski) made this into an awesome Google spreadsheet, which you can download to keep track and add notes! Just click here. Thanks, Ray! .1 point
-
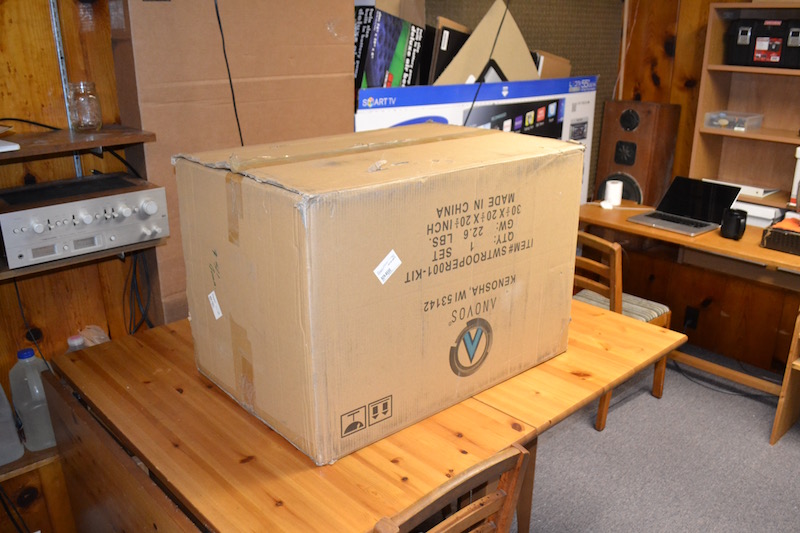
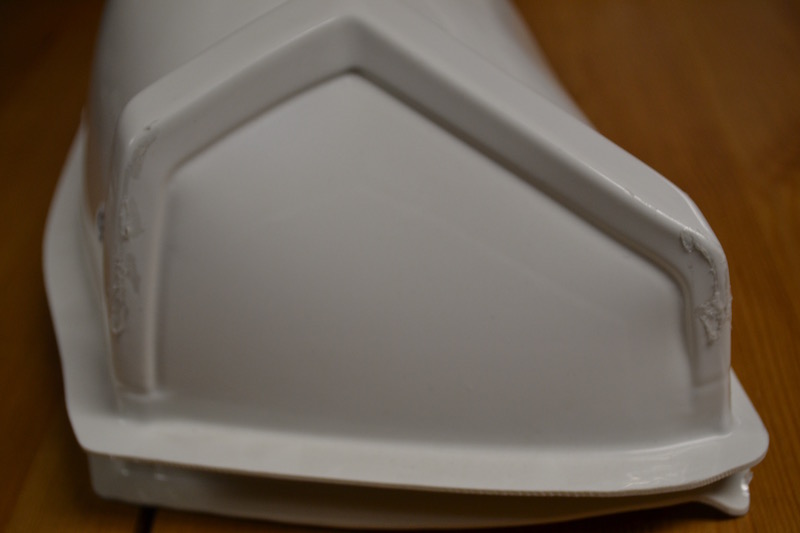
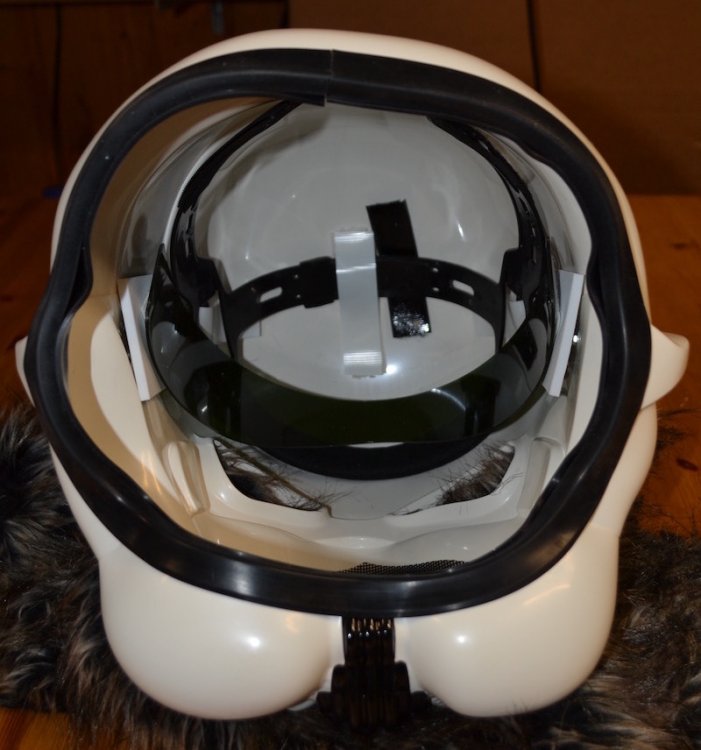
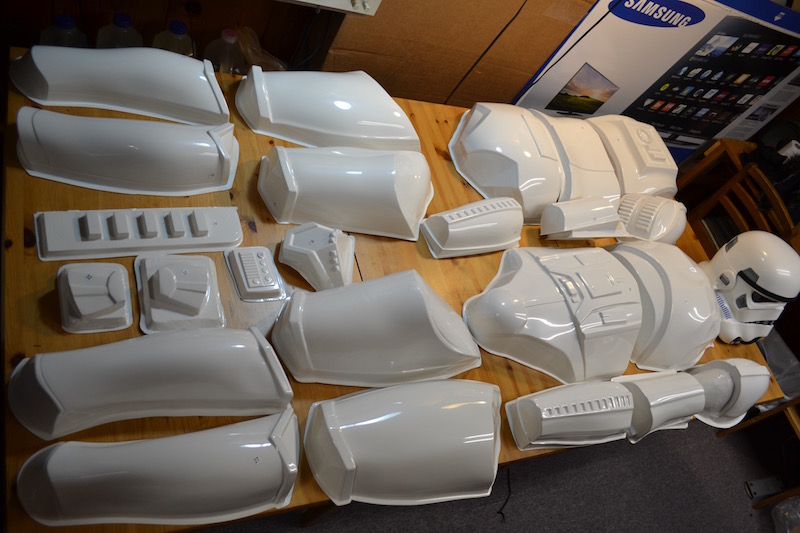
I've liked full-body armor such as Stormtrooper and Halo for a long time. (As a hockey goalie I was the best-armored player on the team!) My persona Timberwoof is a swashbuckling anthropomorphic wolf space cadet in space, and he needs appropriate boarding armor … but I don't know anything about building, let alone designing, amor of this type. So this build is a step to that project, and a worthy project in its own right. I was goofing around on that place you're not supposed to buy Stormtrooper armor kits on when I found this set. I researched it here and found that yes, Anovos can be approved. I like the ANH Troopers the best even with their weird asymmetrical knees. From what I read on the Anovos web site, this particular kit is no longer available, and was at a decent price, so I sniped the auction and won. Then I received an email from the sales site saying that the seller's account had been compromised! *Facepaw!* All I could do was wait: they had already shipped the kit and FedEx confirmed the tracking number. Today it arrived. I was prepared to find a BBB containing a brick. But it was a real Anovos box, somewhat worn but had not seen the inside of a trash compactor. I opened it up, took inventory (Thanks to ukswrath, I have the Anoos book, which did not come with the kit), and inspected the parts. None of them had their protective plastic film, and some have suffered over the year. The photo shows the worst of the damage. Most of the parts look good aside from some scuffs here and there, probably about the same as a suit might get in action. I believe that the kit had been opened and repacked at least once, for it was upside down in the box. All the pieces were in baby-suffocators. At the "bottom" of the box I found an envelope containing a packing slip for 2 Shadow Trooper Decals dated April 2016. I suspect that it was a project someone never got to. I felt like a physical anthropologist digging up a grave at Sutton Hoo. I laid out all the parts on a table barely big enough. This will be a project to take in small, managed steps. The helmet is astonishingly asymmetrical: Are they supposed to be like that? The mic tips are not very symmetrical in their niches; that looks wrong to me. The lens setup seems dodgy to me. I tried with glasses but not green lens. Okay. I can see better than out of my fursuit without glasses. I'm not going to try glasses and green plastic; I don't want to scratch the plastic. I rejiggered it to be what I think is right and tried it on. The world is blurry and green' my eyes don't lie! There was an odd piece of black velcro with sticky back on the inside of the helmet; it's not clear where that's supposed to go. The suspension system for the helmet is cheesy; I may redo that with foam rubber. The strapping kit has a bunch of stuff; the Thermal Detonator is complete; the belt is all there. I'm missing screws and split rivets and washers, but these are easily replaced at a hardware store. "You came in that? You're braver than I thought!"
 1 point
 -
Hi blaster fans, Much like armour has basic, EIB and Centurion, I was just wondering if the idea of a tiered clearance for blasters had been floated before? Seeing the amazing lengths that some members are taking their blasters too, a recognition system could be quite rewarding, and possibly encourage new builders to reach that bit further. I've not gone into too much thought but wondered if something along these lines might be handy: Basic/Expert - off-the-shelf, meets basic criteria Sharpshooter - kit or scratch build, medium upgrades and good screen accuracy Marksman - heavily upgraded, realistic appearance, working parts, custom paint job Just throwing ideas around, mainly after following some of the threads on here with ridiculous attention to detail. Best wishes, Dan1 point
-
Likewise, Well said Sir1 point
-
Congratulations to you too!! It's an honour to be part of the 501stLegion1 point
-
Congratulations Toni , we both made Centurion on the same day Sent from my iPhone using Tapatalk1 point
-
Hey Alright Toni welcome back. Thank you for your Centurion application and thank you for making the last minute adjustments. CRL and Centurion Application Requirements: All required submission photos are present. Thank you for making repairs mentioned during your EIB application. Excellent job on your build trooper . Now that everything is in order Andrew and I are pleased to announce your armor displays all the elements as set out in the Centurion CRL. Congratulations and welcome to Centurion Other-Armor Fit/Assembly: We have nothing to add here. Vader has requested your presents on the Death Star as his newest Centurion.1 point
-
Lol thanks Tino! I'm glad it worked too! Was a bit risky but I didn't have any better ideas. And actually, your work on scopes (where you cut the end off to install the lens) was what encouraged me to go for it! In the process of 'bandaging the wound' at the moment lol Sent from my SM-G925F using Tapatalk1 point
-
I've seen people reinforce the flimsy areas with fiberglass or Plastidip-soaked cheesecloth but those a bit involved. As long as the areas where any strapping/snaps/rivets are going to go is thicker than that you should be okay for now, but something to keep an eye on for sure.1 point
-
Glad to be of assistance Taylor, thank you for the kind words.1 point
-
Centurion approved - goal met! Thanks to everyone who helped me get there. Now on to help others get there... I'm only the second Centurion in CCG, we have one other who is an ESB trooper so between us lots of knowledge for new recruits, hopefully.1 point
-
Nice work Taylor1 point
-
Congrats, Brien. Top job. :-) Sent from my iPhone using Tapatalk1 point
-
It’s well deserved mate. :-) Sent from my iPhone using Tapatalk1 point
-
That was fast! Happy trooping.1 point
-
Congrats, Stephen. Possibly the quickest approval ever. ;-) Super job. :-) Sent from my iPhone using Tapatalk1 point
-
Well done Stephen. [emoji1303] Sent from my iPhone using Tapatalk1 point
-
TK85421 Requesting TFA Centurion Status (Anovos) Name: Glen Rhodes Height: 180 cm Weight: 74 kg FISD Name: gmrhodes13 Legion ID#: 85421 Profile Page: 501st Profile EIB Thread: TK85421 Requesting TFA EIB Status (Anovos) [APPROVED] Garrison: Desert Scorpion Build Information Armor Maker: Anovos Helmet Maker: Anovos Boots: Imperial Boots Gloves Imperial Boots Electronics: Aker Neck Seal: Anovos Blaster: JJ's resin1 point
-
Congrats, Stephen!1 point
-
Hi Tony.... I’ve just had to look at this three times to make sure I’ve not miss read it.... Wow.... again, many thanks to you and Andrew for considering and approving my application. I realise you are all very busy this time of year and I truly appreciate you taking time out to do this. As I have previously said I could not have got this far without FISD and the UKG. You are all amazing people. Thank you A very happy Stephen Sent from my iPhone using Tapatalk1 point
-
Wow. Just wow.1 point
-
1 point
-
Submission Photos With all the building and strapping now complete, it's time to kit up for some photos! Big thanks to my garrison mate Sean for helping out with the iPhone photography! Untitled by Taylor Goodson, on Flickr Untitled by Taylor Goodson, on Flickr Untitled by Taylor Goodson, on Flickr Untitled by Taylor Goodson, on Flickr Untitled by Taylor Goodson, on Flickr Untitled by Taylor Goodson, on Flickr Untitled by Taylor Goodson, on Flickr Untitled by Taylor Goodson, on Flickr Untitled by Taylor Goodson, on Flickr Untitled by Taylor Goodson, on Flickr Untitled by Taylor Goodson, on Flickr Untitled by Taylor Goodson, on Flickr Untitled by Taylor Goodson, on Flickr Untitled by Taylor Goodson, on Flickr Untitled by Taylor Goodson, on Flickr Untitled by Taylor Goodson, on Flickr Untitled by Taylor Goodson, on Flickr Untitled by Taylor Goodson, on Flickr Untitled by Taylor Goodson, on Flickr Untitled by Taylor Goodson, on Flickr Untitled by Taylor Goodson, on Flickr Untitled by Taylor Goodson, on Flickr1 point
-
Come on! It’s been 24 hours???1 point
-
Thank you Joseph for sharing from your experience. I can see now with the scope of a costume event clearly made known to the public and wisely handling oneself in public, carrying highly detailed blasters pose little threat to public safety. For the most part, the public would be oblivious to the detail of the blasters, unless they are allowed to examine them. As you shared, even after police inspection, within the context of a supported event, it's all smiles. Then the blaster ranking can be a point of pride between blaster enthusiast who know the difference.1 point
-
Hey Daniel, You held that belt super well! Looking good there, trooper. I am incredibly jealous!1 point
-
Have you signed up at the Great Lakes Garrison site? http://www.greatlakesgarrison.com/ I would definitely try there first and see if anyone lives in the Royal Oak/Warren (maybe even Sterling hts.) area that can help. You should also get in touch with Kyle, (Zarlon) https://www.whitearmor.net/forum/profile/20903-zarlon/ who is the Imperial Attache for the GLG. He lives in SE MI. and may be able to steer you in the right direction. (Tell him Joseph sent you). Hang in there, and don't give up!1 point
-
Nice! A few of my garrison mates got to see it Saturday. Super jealous. Can't wait 'til Thursday.1 point
-
No apologies necessary, Dan.. I'm glad this came up again! Paul has given it the official "thumbs up", so we can move forward. I will post this subject in the Staff section and see how he wants to proceed and keep this thread updated with the results.1 point
-
Hi Joseph, Thank you for sharing that, and apologies for unintentionally bringing up an old topic. Very interesting points from yourself and Tim. I see the point about possibly alienating those that can’t participate, however I guess that’s where basic clearance plays it’s roll. Those that want to go above and beyond can do so to a level they are comfortable with. And yes, it would be wonderful to reward those talented blaster builders with an extra thumbs up. :-) I’m pleased to hear that the topic is not off the table. Perhaps this latest round of discussions will raise new interest from members. :-) Sent from my iPhone using Tapatalk1 point
-
Here goes... I already know a few changes I need to make, just for wearability. I need straps to keep the biceps in the shoulders and tighter elastic between the chest and abdomen. This will help keep the chest plate a little lower. Also, one side of the butt sits wide from my hip. Either a strap or tighter elastic will fix that. I think I might need to bring the shoulders forward but not sure how. They are a little tight on me as well as a little short IMHO. I do think it is an outstanding set of armour. Kudos to Mark at AP. p.s. This is the first time I've put the shins on with the Velcro and I didn't line them up properly. You can see it in the back pic. I will make sure all is good and proper for my submission pics.1 point
-
I'm not looking forward to (probably) having to paint my FOTK kit, but you make it look easy Taylor.1 point
-
For me roughly its this: Kids get high fives and fist bumps, adults get the full Imperial treatment. There's exceptions but that's the gist of it. I've also acted as an interface to Lord Vader a few times with shy kids. They won't go near him, but a TK can bridge that gap and help reduce the fear of standing next to him for a photo, just make sure you know when to stop pushing, upsetting children is not what this is about.1 point
-
Hi JC, I’ve not officially trooped yet, so I’m sure more experienced troopers will give more info than I can. So far, I’ve learned some of the lines from the films, such as “how long have you had those droids” etc. I’ve read that that’s a good one to use when parents approach with children. I’ve tried to keep my vocal pattern and phrasing close to those that we hear in ANH. To me, they always sound quite laid back. In my mind, the back story is based on what we know from the films. And I’ve a read a few tips from my Garrison; such as, if someone asks where your armour is from, “it’s Imperial issue” etc., etc. The main thing I’ve noticed that is out of character, and I’ll be more than happy to do this in the right circumstances, is hi-fives for children. That’s not a bad thing. My kids LOVE to high five daddy trooper!! :-) I hoping to pick up a lot more tips and tricks when I start trooping. Cheers, Dan1 point
-
Great to see it worked out! Good luck with your build1 point
-
HA! I Bet i know who you are referring too!! is his Initials K.S. ??? LOL1 point
-
Awesome to see another build thread in the works. Good news the photo you posted is not damaged goods but indeed peeling the protective layer off. I'm suspecting if you peel it back a bit you'll find the armor in good condition. Looking forward to your build.1 point
-
Tim, As a total newb. Not knowing squat... this single post was the "How to actually do it - for dummies" guide I needed. It is really appreciated. Josh1 point
-
I have to ad... Love my garrison, and the peeps in my squad. But not a lot of info is exchanged or posted on their forums. Belong to a couple other detachments too while I was exploring costume options. The FISD is the best forum in the 501 in my humble opinion. Unbelievable amount of shared information and helpful people. The only problem is that there might be too much information, makes it a tad bit difficult to search with the glitch we have. Aside from that, this forum rules. The people are awesome. I like the idea of an essay! It could be "why I want to wear plastic in public"....1 point
-
I can say, by my own experience, that FISD was of great help to my TK and E-11 blaster building process. I did engage my garrison whenever I didn't understand a process or how l do proper procedures since all armors are not the same. So I would say that half the battle is won reading FISD threads and researching through the vast photo documentation that can be found here! Sent from my iPhone using Tapatalk1 point
-
Sounds like the Rebels are running some interference out there. Lesson 1. Don't trust the rebels, their information is dirty and underhanded at best. They will stop at nothing to prevent/deter you from joining the Imperial forces. Legion for life.1 point
-
The red based one is called the FISD Service Medal. I created it as a thank-you to everyone who served on staff a full year (or close to it). The reason is that staff work so hard throughout the year and get very little recognition for it. I wanted a way to say thanks and commemorate their work, as otherwise once they roll off of staff people tend to forget what they contributed. Each star is a subsequent award, e.g. one star is a second award, two starts 3rd award, etc. That worked great, but we also had people outside of staff who contribute quite a bit as well. They create best of the best tutorials, or else spend the hours taking screen caps of some EU character, or else just really contribute over time by consistently helping out new members. I wanted a way of saying "thanks" for that as well, as post counts really don't tell the full story (see * below). So I created the FISD Merit Award for oustanding contributions to FISD and the FISD community. In order to keep things fair I also made a rule that current staff can't get this award, as they are already getting "rewarded" with a Service Medal and also that the real reward is the good karma feeling of giving back and helping others. Service is a privelege in it's own right. The reason you see a lot of staff (or former staff) with both ribbons is that I usually recruited new staff from Merit Award winners as they had already demonstrated their spirit of troopers helping troopers, though as you can also see this is not a hard and fast rule, as talent is where you find it, and there are many ways of contributing to the community. Does this help? * aside: on MEPD one person - I think it was Brak's Buddy - used to have a signature that read something (this is from memory) like: - You are not your post count - You are not your TE armor - You are not your hyperfirm blaster What he was trying to say was that we really are equals in the hobby and status is gained by helping others, not by having the most accurate kit or posting a lot. A great way for helping keep egos in check1 point