Leaderboard


Popular Content
Showing content with the highest reputation on 09/18/2017 in all areas
-
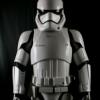
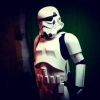
My son tried on all the pieces this afternoon and the costume came out better than I thought it would. He looks awesome and was really excited. He insisted we take a picture together and I wasn't going to pass up that idea. Eventually I have to fix the back of the shins, they didn't come together the way I wanted and I really don't feel like fixing them so they'll have to be good enough for this year. Also, need to figure out what I'm gonna do for shoes. Future 501st member??? And here we are, ready to defend our street from Rebel attacks.5 points
-
Update: 10-26-17 I have one in my local garrision but wanted to jump on the main boards as well. Right now I'm just getting pieces in slowly but surely. Bucket: Anovos Standard- Will update to a TLJ in future once MIMIC ships Bucket Mods: Just painted the inside black, not gonna do much to Anovos bucket Armor: MIMIC- Status: Moulds done, waiting on casting and shipping. Est: End of September?- Update plans to ship upper body items (yoke chest bells etc soon, rest 2nd shipment) Gloves: IB- received Boots: IB- received Gaskets: Geeky Pink- Received Belt- Kit Ordered- Received! Thanks JAFO! Soft pouches- Received- from Jim Lau Blaster- Not ordered, may just Rubie it up or get a nerf one for fun (Not screen accurate but hard to justify money on blaster when I can't even troop with it) Voice Box- Received- TRamp Fans- Not ordered- May go with a supplier I used in past for Shore Undersuit- Received- Went with same one everyone else seems to be using was fair deal once I started looking at underarmor. What I have now works for my shore but after looking at everything seemed best to get what works. Ordered XL after hearing they run small on most and to order a few sizes up. Other: Ordered 1 inch clip in buckles and some strapping Bunch of misc supplies: got buckles 1 in straps/ elastic etc Bunch of magnets in, and after I just did a project I have a ton of scrap ABS that will help later Probably not going heavy anymore, stick to the ole basic white. Got a sewing machine in to make some straps and other random sewing on this kit Starting to get a general idea of my rigging system, going to draw it up and try to post it for review Wanted to get this up on here to not spam MIMIC's post over on RPF You can find me on YouTube as well under Trooper 857514 points
-
STERLING MAGAZINE FOLLOWER The follower spring is being fabricated, so I should be able to install the mechanism within the week and complete the magazine.4 points
-
Speaking only to complete builds the RS knocks the Anovos into a cocked hat. Price is probably great for non UK people too *grumbles about exchange rates* Worth remembering too that the Anovos kit appears to share the same heritage as the RS kit.1 point
-
Thanks, was really discouraging at the time but when life gives you thin fibreglass rip that #%&* out and fill it back up! I am noticing a spot in the same area with the same problem, i'm just not going to touch it1 point
-
Yeah I have this set as fine as I can currently with the nozzle I have installed. If I changed my nozzle I could get an even finer thickness setting but double the print time ha. Just the "main" sections took 51 hours to print. Agree completely! As these are I think all I would have to do is fill with a little bit of spot putty and then filler primer!! Should finish printing in the next couple of days. I was going to be competing in a cosplay contest at the local con but I just got my refusal letter. So more fun time with 3d prints for me! Maybe more goodies will show up and I can mess around with things till my armor shows up eventually1 point
-
0.15mm layering I'm pretty sure. I would have to grab the nozzle but it's my medium nozzle (.2mm I think?). I have a finer nozzle that will enable me to go even smaller both diameter and layering.1 point
-
I just left the Launch Bay at Disneyland... they sell TK Helmets for $280 (I didn't check shipping on this item) and the TK Armor Ensemble for $1800 (plus $150 shipping). No kits. The woman working there was nice enough to pull out their Store catalog that they use for ordering. I flipped through the whole thing and found no kits. As an Anual Pass holder you can get 20% off (at least at my pass tier). So the Armor Ensemble would end up costing about $1700 after discount (including shipping and CA tax). She also said they think you receive the items within 6-12 weeks. But they ship direct from Anovos and the employee said It's out of Disneyland's hands at that point. Hope some of that information helps. I went there today hoping to order a TK Armor Kit since I was notified my order from December of last year has been delayed (sadly as I expected). Was slated for Summer 2017 shipping. Oh Anovos! Oh, and they replaced their TK Helmet in the display case with a v2.0 -Dana1 point
-
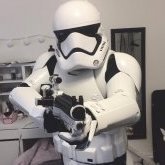
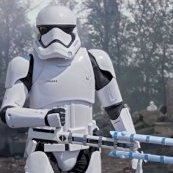
Hi all, I've made significant progress on the folding stock over the weekend. Happy to say I am well on my way to making the latch for the folding stock fully operational. I've borrowed much of the know-how from T-jay's 2nd E-11 Build on FISD. Having already hollowed out the folding stock; I proceeded to hollow out, let's call it the front end retainer, which is that part that holds the inner rod at the front end. Discovered 6" is sufficient and purchased the correct bit extender size. Used a 3/8" spade bit to make the hole. The hollow aluminum rod was drilled at the end, width wise to make way for support pins. The other end was trimmed to length to match support pins through the stock cube. Pins were cut to recommended lengths (30mm for the front and 20mm for the back) from the solid 5mm diameter aluminum rod. Front end of folding stock drilled through with 3mm drill bit then a 5mm drill bit to prepare for pin installation. There are quite a few components sourced and revised to make the latch mechanism work. A hollow styrene plastic tube at 5mm diameter was used to link the pencil to the spring coil. 30mm piece of styrene used to support spring against plastic tube. Length of components revised according to the recommended lengths and further confirmed by test fitting. Here's is a close-up of how the individual components worked together to form a functional latch. Here's the fully installed folding stock rod with functional latch components installed and pins in place. Here are some more details to come. The latch opening needs to be created and the latch itself needs to be created and installed. The 'washers' at the front end also need to be revised and installed along with the support piece that runs down the front. I had quite the ride putting this part together! Felt like I was doing open heart surgery for a bit lol I have to give a shout out to Tino for his detailed build; thank you thank you for your contributions to the forum; I would not even have dreamed of such a mod let alone do it, with out your enthusiasm and technical documentation. Three cheers for Tino! Jesse1 point
-
I have a WTF and it's abs with resin side panel inserts.1 point
-
You sir are a master! And you're wanted back on set! The whole set up came out awesome Glen. Wish I could see you in action!1 point
-
There is one thing for sure Q, you never disappoint... Awesome work as always my friend. Sent from my iPad using Tapatalk1 point
-
Thanks Rudi! My way of giving back to the community as I have learned from many awesome build threads here too.1 point
-
Aaron's resin bullets will go great with this mod... cost of each is $11 point
-
Yes, the chest goes over it, as does the back1 point
-
Yay BBB (big brown box) oh wait, IBB (itsy bitsy box). Well every piece adds up in the end I also use imgur and have had no troubles so far, it's really hit and miss with free hosts, any of them can start charging at any stage, I'm just cheap and don't want to pay for it1 point
-
I know of 2 other makers in the process of making abs plastic packs too, will be a lot lighter1 point
-
Oh, so so insightful fellas, intrigued and following closely [emoji6]1 point
-
I'm back!! I survived another great troop with the GLG at Star Wars night in Detroit. Super fun, I think I was in 200 photos tonight and got to march around the infield which was super cool. On his 6th birthday, my son got his TK helmet. He was pretty happy. Then we tried on the pieces I made while he was off on vacation. I trimmed a bit off the sides of the ab & kidney to make a nicer fit. Next up was the butt and cod pieces. Here's the rough pattern I made for the butt based on measurements. The part that runs underneath and straps to the cod was made a bit long when I cut out the 6mm foam. I figured I better make it longer and cut it back as needed. Here's the piece after I heat bent the sides and bottom. Then I added the raised detail on the back. You'll see pencil lines on the bottom, I trimmed more material off once we test fit the pieces. The cod was similar. Made a paper pattern, cut it out and did test fits to refine the size, trimming away material to get a good fit. Some heat bending. More heat bending, Here's the strapping of the cod to the ab. Strapping of the butt to the kidney. I added side strap to cinch up the side gaps to the cod. Last main pieces were the thighs. This took some trial and error..a couple errors actually. I took measurements of his thigh height and circumference at the knee and up high. These dimensions were used to make this pattern. Here are the pattern lines. I cut out the origin shape in foam then sketched out a rough line where I thought the piece should be trimmed to create the notch at the top and the taper along the top sides. Then I tried it on him about 3 times, refining it each time. Once I had the shape correct I traced that foam shape onto the original paper pattern as a record of the final shape. That's what you see in the image below. This was used to make both left and right, just flip it over to make the other one. Here the piece is cut out and I'm adding the trim around the bottom. This trim was cut from a single strip of 4mm foam and I pencil drew the shape I wanted, test fitting it over the thigh. This got contact cement glue. Here they both are before I added the cover strips to the front and back. Those were 4mm sheets. Last thing to make was the knee ammo pack. I used 4mm foam for the back piece and 10mm foam for the ammo blocks. Very similar to the belt. Here's the whole piece glued. I had painted the thigh before attaching the ammo pack so instead of contact cement, I used the hot-glue gun. Wasn't sure if contact cement would stick to the paint. Here's a random shot of me painting. Wear a glove, makes it easier to paint and not worry about your hand getting covered. For all these pieces I used 2-3 coats of white Plastidip to seal the foam then used 3-4 coats of Krylon Fusion gloss white spray-paint for the finish coat. It dries in 15 minutes and is perfect for plastic. Here's the pile of parts. Tomorrow we try this all on. Take care!1 point
-
Have: ANH TK (on 3rd set, formerly FX and TE2) Staff Officer (ANH Black) Intelligence Officer (ANH White) Had: Sandtrooper (FX and TE2) ANH Hero TK (TE2) ESB TK (TE2) Heavy Weapons Trooper (TE2) Imperial Crewman (black) / Bridge Crew Imperial Crewman (gray) / Scanning Crew Imperial Navy Trooper (enlisted) Emperor Palpatine Red Robes Clone Commander Bly ARC Trooper Captain Animated Clone Denal Cad Bane in Denal Armor Had a WIP Airborne Mandalorian Grunt, but never finished it before I sold it.1 point
-
I have my ANH TK IN THE 501st I also have TFA Luke Skywalker in the Rebel Legion. Sent from my SM-G930P using Tapatalk1 point
-
sterling Stock spring guild1 point
-
Thanks! I'll keep it going [emoji106] removal was a must or they would've driven me crazy lol1 point
-
Many heartfelt congratulations, Tino! It has indeed been an adventure for you - as it really is for most of us, but many here are more intimately familiar with your journey due to the route that it took. I could not be happier to welcome anyone to the Legion, and specifically to the FISD's TK ranks. As non-members go, you have already made an amazing impact here, and I am sure that that will only continue now that you are officially a Stormtrooper. Your attention to detail leads me to believe that both Tony and Andrew will be very happy to see your EIB and Centurion Applications come through, with the expectation that it will not require much hard work for either of them. Again, congratulations, and know that all of us here are happy that you took this step, and cannot wait for you to make the next steps. We all know that the results will be phenomenal. Welcome aboard, my friend!1 point
-
I designed this TK Armour Transport case to use while I troop. Hope you like it! It's a 50 gallon rolling case with pull out arm. I painted it and had custom decals made and have area in Carbon Fiber. It's large enough to fit everything and then some. Also fits nicely in my Imperial Hybrid [prius]1 point
-
I used E6000 to glue my latex plates from JustJoseph and it has worked great.1 point
-
Congrats! And this... Ok, that's it. I'm building a Greedo starting as soon as I finish this post. See you at the Cantina!1 point
-
Fandom is a journey not a destination. Through your whole build you feel anxious to finish it but then, once you finish, you quickly begin to miss the adventure of the build... and so it goes.1 point
-
You just never know what you're going to get as each pull is different. A little frustrating but if there's one thing I've learnt on this journey, repairs and maintenance feel as ongoing as the build! Sent from my iPhone using Tapatalk Pro0 points