Leaderboard


Popular Content
Showing content with the highest reputation on 11/03/2021 in all areas
-
Thank you for all of the advice. I think I am leaning more to the AP armour. I have gone through many of the build forums and will for sure start my own when the time comes. This bunch of people is amazing3 points
-
A solid day of drying ahead of me now. Gives me time to get more snaps and some washers tomorrow. I somehow way underestimated the number of snaps I'd need.3 points
-
I am 5'9" and around 210 , I sent a few pieces back to Dave to have them resized which he did free of charge ( AWESOME customer service). The butt plate is pretty much as low as I can go , so I think leaving it for now is my only option, I don't want to start cutting on things unless I have to :-) , I will play around with the strapping a bit more and see what I can come up with but if I need to shorten some lengths I will do that. . Right now things are fitting just OK , helmet is OK but the hovi tip area does rest on the chest piece, I cant look down at all but left to right is better. NOT sure if the current set up I have will get me approval or not? I will check out those builds you suggested , and see what info I can gleam from these , they should provide useful. There might be a local armor party with my garrison this month as well, praying that goes through and get some some help there as well. I'll try a few more fittings and send some pics on how well it is going , might be that I have to shorten some pieces and not look back :-). THANK YOU ALL for your help so far , I really appreciate the support.2 points
-
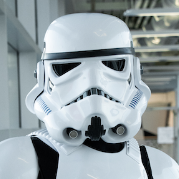
I haven't made any of these improvements yet, but I do have an update. Because of the ear screw and paint issues, RS Propmasters is sending an entire new helmet. Gotta love that kind of customer service, well above and beyond what I had asked for.2 points
-
I will do that as soon as I can for you guys. But I can already tell you I do not have the border around the panel which I know will be required for Centurion2 points
-
Welcome, Gerald! If it were me, I would go with AP. They make a great kit, and since the abdomen and kidney plates have built in extensions you shouldn't need to worry about adding shims to the sides of those pieces. Once you order your kit, I would suggest getting all your build supplies ready for Big Brown Box day. Having everything you will need on-hand will save you lots of time.. trust me. I have some tutorial links under my avatar below that will help. When you are ready to start, I highly suggest starting your own build thread here. That way, you can ask all the questions you want as well as post up lots of photos. Posting photos is especially important when/if you have an issue. Know that we are here to help every step of the way, and never be shy about hitting us up if you need assistance. It's what we do best!2 points
-
You can use a little heat to help them lower Some references of length1 point
-
That's What I have come to realize , so no worries there at all , that's why we have spotters :-) .1 point
-
Awesome !1 point
-
Wanted to post a follow up on this here. I asked RS Propmaster for either a new ear or some scrap PVC so I could get a proper repair making a paste the correct color. I also asked what brand and number of paint they use so I could do the touchup work. They have opted not to go that route and have chosen to send me an entire new helmet. Can't complain about that customer service!1 point
-
Thank you Jeremy and Glen!1 point
-
Yeah also was looking into the backplate as well. I've got velcro going around the sides and around the back that will keep it in place. But I'm not sure how the backplate will play into all of this. For some reason the belt seems to be much more tedious than I imagined.1 point
-
Awesome, and the only legitimate use for a rebel helmet!!! [emoji38] Hope you both had a great night1 point
-
Good job little brotha. Hope you got tons of goodies.1 point
-
Bit of progress on this: I started to paint the grip section. First was 2-3 coats of satin black to act as the base coat. I then carefully masked this up to spray the white grips. I used a mix of Tamiya and Frog Tape for this. I like these as they stick well, don't really bleed but also come off easy when done. I then covered the bulk with some decorators masking film. I did a bit of a bad job on the butt and got some over spray I also had a few small corners that were tricky to mask and so were not as clean as I wanted in the tight corners. To fix the butt I carefully masked along the edges and then sanded with some 2000 grit to remove the worst and re-key the surface. I then just lightly dusted with more satin black until I got a nice finish. This has left a more of less seamless paint repair. To fix the smaller corners I sprayed some of the spray paint into a cup, you don't need to spray much as you get a surprising amount quickly. Then I used a small brush to touch up the bits I needed. The paint is pretty thin so you make need to do a second coat on a few bits if needed. If you want to re-use the brush then you'll need to use something like IPA to clean it before it dries and ruins the brush. I also painted the "Visor" (Sight?) assembly with satin black. I then added the wheel and pinned it in place with some brass wire. To cover the hole I used a drop of 3d printing UV resin and cured it with a small UV torch. This was then sanded flush, a small bubble filled and sanded again. A quick pass with the spray can and this part will be done. Finally after doing a new trigger for my F-11D I decided to do a new one for this too. It's based on a real Glock trigger, though a little simplified. I just wanted something a little more realistic looking as the supplied ones are a little chunky and this seems to be a nice medium. I've done a resin version, which needs to be cleaned, which will hopefully look a bit nicer. I've not decided if I will clear coat the white yet. The First order stuff is all gloss, but not a ultra high gloss. Basically "from the mould", not polished. The gloss paint seems to match this far better than a clear coated white but I'll be losing some durability this way. That said the un-clearcoated gloss black on my E-11 is still going strong after a few years so maybe it will be fine?1 point
-
Sorry to hear this, you could post in the For Sale area but you need at least 5 forum posts to do so1 point
-
I am having thoughts about the back also. I think Velcro is the way, yes it overlaps the front on the sides. I also noticed the notch for the back plate! After I get the front attached I am onto the back belt….we will see. Have fun!1 point
-
Hi Gerald, Welcome to the 501st and FISD. It's really good to have you here. Finding the right armour to fit you is important, and it's great that you're asking about this before buying anything. I'm over in the UK, and have no direct experience with the armour makers you're looking at, so I hope someone else can chime in. Whichever armour make you go with (even if you commission fully assembled armour) you can expect to do some degree of tweaking; I don't think I know anyone that's passed through this forum that hasn't had to do that. Don't worry about that though. There's a lot of help and advice to be had here and with your local garrison, and the sense of achievement when you're armour is cleared is amazing. Good luck with it all, and please post questions and pictures anytime you need help. Rich1 point
-
I've definitely been considering going for centurion from the get go. Seems that would be easier than trying to do it later on haha.1 point
-
I recently modeled, printed, built, and finished my Rogue One E-11. Some time ago, I created a Rogue One accessory kit for my Sterling SMG model. I knew at the time that a true Rogue One E-11 was not built on a real Sterling , but an S&T Sterling L2A1 AEG (airsoft replica). I didn't have one at the time, so I created the kit to work with the model I had. It was good enough for basic approval, but not for higher levels. Not being one to leave well enough alone and move on with my life, I ordered the airsoft gun, an Evike Sterling 55 round (short) magazine, an actual Element Airsoft M300A Mini Scout Light, and an accurate replica of the required SDS power cylinders. I constructed my model using direct measurements from these items and built realistic functionality into the assembly. After much discussion with the experts here and fine tuning of the model, I give you a proper Rogue One E-11! Functional features include: Moving and resetting trigger Functional selector switch Functional folding stock Reciprocating false bolt Functional end cap latch Removable end cap Removable magazine Functional magazine catch/release Functional reset button on the Hengstler Hollow scope with clear lenses Removable barrel Provisions for mounting some electronic switches Accurate S&T Sterling L2A1 AEG replica Accurate 1943 M38 scope replica Accurate small eagle Hengstler replica Accurate SDS power cylinders replica Accurate Element Airsoft M300A Mini Scout Light replica Here are some pictures of the airsoft and flashlight I purchased. Here is the research and modeling thread. Here are some print/assembly progress photos. Here is the finished blaster. If you have a 3D printer or access to one and want this blaster, the files may be downloaded for free here. https://www.thingiverse.com/thing:4941514 The assembly and instruction manual can be found at the link above under the "Thing Files" tab, but you can view it directly here. https://cdn.thingiverse.com/assets/36/7d/42/3c/c5/STAS.PDF If you want this blaster but have no way to print it, I have a few available.1 point
-
You certainly have a great start with what you have acquired so far. In my experience, fans would be the first priority for basic airflow, some visor fog and just to make it that touch more comfortable.icomms are a fun gadget to have, but even just an Aker amp will make a difference to being heard in a noisy environment. hearing assist, well I never really though it was worth it until I decided to put one in. Suddenly I could tell who was talking to me from where they were standing, left or right, and I stopped asking people to repeat or just nod like I heard what they said. I could hear people talking clearly from quite a distance away, so it does take a little volume adjusting to get it just right, but man the first time I wore my bucket with it installed, it was a game changer. The beauty is you can have all these things and change your load out based on different trooping environments. Sometimes I just go fans, other times the whole shebang it's always a bunch of fun what ever you do as long as you can troop and enjoy it.1 point
-
Welcome Bobby! You'll be well served with RS! As far as helmet stuff, honestly after however many years... I ended up taking most of the stuff I put in my bucket, out. Except the extra padding to fit my head snug. The only one that's sometimes worth it is the fans, but even then only on the hottest days. I'd say build it, see how you like it, and go from there. You can always add extras!1 point
-
It’s honestly awesome seeing what you’ve done with eva foam! One of the things that really stuck out to me was the fact that all the skills you learned from foamsmithing really does apply to working with hard kits as well! I’m still terrible at using bondo and sanding lol. Not only that, but you strive for accuracy as well! This is what the 501st is all about and I hope to see you get a plastic kit some day, but no rush! I am super glad that you are sharing your journey with us here! I look forward to your future posts!1 point