Leaderboard


Popular Content
Showing content with the highest reputation on 09/24/2021 in all areas
-
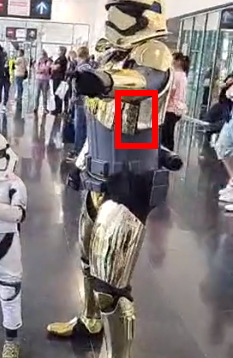
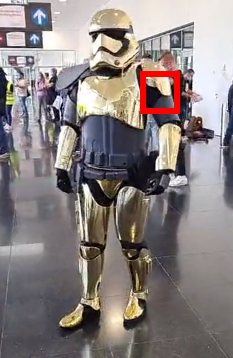
Thank you all for your kind words! @LEGOeatPokemon yes! I am currently working on the F11-D Heavy Rifle ( Phasma Style ) as I like that blaster style most. It will have the TRamp blaster board as well as a fancy function noone else has. But that will be shown in a video @Ripper_L definetly planned is Comic Con Dortmund in December. Since Liam is now announced for Magic Con next month.. maybe there as well. Depends on if I get the blaster finished until then @gmrhodes13 thank you for analysing my dressing video. Keep in mind that that was the very first gearing up. The gaskets were borrowed and didnt fit me around the chest. My own set is on order at Teresa Also, I need to loose more weight to really fit in the costume. The ab piece doesnt close fully in the back, hence the chest and back dont align at the sides well and I guess thats also why the chest is a little up. Or because I am always standing very straight. The belt definetly can be a little tighter. The bicep / forearm issue might just be the strapping. Not sure what I can do about the Chest yoke corner tbh. Thats how the Anovos piece was. I probably just cut it. But adjustments can always be made As I said in the beginning, Im not looking to rush this project. I see it still as a longterm project and also of some sort of WIP on my person with weight loss etc.5 points
-
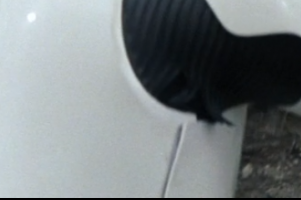
Could we be a step closer to knowing what these parts actually were used for? Thanks to Daniel O'Keeffe this looks to be the closest we have come in over 40 years. Here is the full story from the man himself Daniel O'Keeffe but first I'd like to take this opportunity to welcome Daniel to the FISD forums and thank him for allowing me to share the below information, taking us another step closer to solving the mysteries of this found part mystery. Following information and images property of Daniel O'Keeffe I have recently come into possession of a pair of genuine 1970's aerators. I'm posting this up here as I think it could be of interest to a lot of people and wish to gauge that interest for reasons I'll explain a little further down. Just to give a little background on this, back in 1977 as a young boy a friend of mine saw an afternoon matinee screening of ANH at the cinema and at the time recognised what the parts were on the helmet. After watching said matinee he then got his father to take him to a plumber's merchant where he was bought a set of these aerators and they just sat there in a tub for years. Sadly he passed away and whilst helping to clear out some rubbish from his house I clocked these parts in a pile earmarked for the bin. Now what is interesting is that it opened up a couple of previously unknown things about the tips, namely that there was a serated push fit tube on the back of these which fitted into a hose. What is now obvious is that these were cut off from the original backs for the threads to fit through and attach to the helmets. Another thing that stands out is the internal fitting, in the past I have seen the pictures Gino Sabatino shared of the hero helmet aerator and the insert appears to be a one piece. It isn't, the middle piece is actually a two piece moulding that fits together. Something else that doesn't seem present on the screen used tips is a black O ring seal. As you can see from the pictures the colour itself is actually off white, with a definite yellow tinge to the plastic as opposed to an all white moulding. When I first saw this part I actually thought it was a resin cast as the colour was very reminiscent of a polyurethane casting resin I use and to be honest I almost dismissed it! I think it's fairly obvious that these were moulded in different shades of plastic, and that the internal components were also moulded in different colours as Gino himself in the past has stated he had seen a mix of aqua and white. Another difference to the screen used tips and these is the filtration mesh, this is a different pattern. From what I can ascertain there is a moulded groove on the inside lip and you can see how the mesh was inserted from the inside before being fixed in with an adhesive. Another interesting thing about these was that he actually had what appears to be the connecting hose that they fit into. When I found the first one it was sitting in the wider end of the tube but I actually think it's supposed to fit in the narrower end and the wider end fitted onto a tap or a tap adapter. This would make sense of what my friend had told me a while back, that these aerators were tap mixers for hot and cold taps back in the 70's. The tube itself bears a very consistent appearance to how they appear today, they are called rubber swirl mixers and are still in manufacture although not to this exact design. Also the rubber on this is obviously aged and shows signs of perishing particularly at the base where the aerators would most likely connect. I think for this reason the aerator was stuck in the larger end to prevent the narrower part from further deterioration. So onto the great unanswered question... what I HOVI MIX pa2? Well, on that one I really have no answer I'm afraid. Like most people curious about these I've spent far more time than is healthy trying to track this info down. I've even tried thinking outside the box I case VI is actually roman numerals rather than text! I have asked around several old time plumbers and will continue to do so but for the time being all professional opinion seems to agree that this is actually the part code or name as opposed to a manufacturers name. One thing that does seem a lot simpler to clear up however is what pa2 means, this is simply the formulation of the aerators' operation. P= pressure, A = area and the 2 is the equal mix of water and air into the nozzle. So far all attempts to identify a manufacturer have proven fruitless. One thing that does seem conclusive is that this was a UK manufacturer rather than an imported product. My initial hope was that if somebody I talked to could have identified the part there may have been an outside chance of then finding the company that sold these and then the manufacturer and pursuing the chance the dies could have still been in existence with a view to recommencing manufacture. Sadly this seems to be impossible to bring to fruition. So, what I have done is what I hope will be the next best thing. I am currently part way through the process of having these parts reverse engineered. At the moment I'm still in the early stages but my plan is to have these parts remanufactured exactly as they would have been back in the 70's. This means having them produced as injection moulded pieces and making them available to the community. As of yet I'm afraid I can give no further details for the simple reason I don't have any myself at present, but as soon as I know I will be making it known! Below is the YouTube video that RS Propmaster posted on Daniels beautiful pieces.2 points
-
scrape... scrape... scrape...2 points
-
Once cured the front assembly could then be installed using C/A glue. Simples! You could also tint the lenses by using Uhu glue to stick a small piece of acetate to thew inside. Sent from my SM-G950F using Tapatalk2 points
-
Hello everyone, Kris Typolt here chiming in from Garrison Titan. I got approved last week but the start of the school (teacher) and having a newborn around means my free time has been a little short. I was the perfect age for the 1997 release of the OT and growing up my favorite figure was Han Solo in stormtrooper gear. Now I'm 32 and have finally become that stormtrooper myself, well stunt not hero. I ended up getting an RS commission but the minor tweaks I've done have gotten me excited for EIB and centurion levels and have got me wanting to build something myself. Thanks to everyone for being very welcoming and helping in the pre-approval thread. I can't wait to get trooping. Cheers, Kris Sent from my SM-G781V using Tapatalk2 points
-
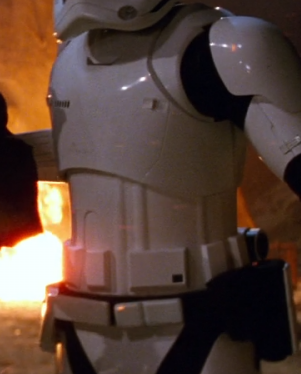
Most impressive, I know it's your first outing and no doubt you will want to make a few adjustments, here are a couple you may want to make before you kit up again for CRL photos. Your chest at times is popping over the ab and looks very high, try to bring this down. Also the top of the cod can be seen between the belt and ab. Chest height comparison Comparison top of cod Chest yoke corner is quite visible on the sides Yoke comparison Chest / backplate sides are not quite aligned. Comparison Biceps could come upwards, appear to be hitting your forearms at the back. Comparison Once again great work, looking forward to seeing the CRL pics.
 2 points
 -
Hello! Being inspired by Brian's amazing thread I thought I would begin a thread on building my relatively new ANH JMC-E11 Let's begin erm.....At the beginning! I fell into creating my own blaster by accident TBH. At the time, I was trooping with my trusty Doopy blaster. But, with age getting the better of me I found that towards the end of a long day's troop I was getting more and more pain in my elbow from carrying the resin E-11. It was then I decided I needed a lighter option. I bought my first (and only) 3D printed E-11 kit. Soon enough I realised why I had avoided working with 3D prints. The sanding ( along with the detail affected by the print layers ) were just so much work. Comparing the print to my Doopy blaster made me realise just how "off" some of the printed parts were. I decided I could do a better job building one from scratch using the excellent templates available out there. A friend of mine makes the receiver tubes from aluminium so I could reduce most of the weight with just this single part. I also decided that I would like my blaster to be able to comfortably accommodate electronics without the need to grind out solid resin parts. This meant that I would need to make hollow resin casts which in turn would reduce weight and leave as much space internally as possible. As time went by, I sourced a few original parts which I could not scratch build. Things such as the Sterling Grip, the counter, and scope. I also wanted to add a more detailed stock, so I got purchased one of those too and took it apart to cast. It then got to the point where I wanted 100% accuracy. I was lucky enough to come across an original sterling which was to form the backbone of my new blaster. Which meant I could ditch my scratch-built parts such as mag, mag housing, trigger housing etc, etc, etc. Making casts from an original is not for the faint hearted let me tell you! Saying that, I was soon to get my hands on a second L2A3 which is solely for display purposes! Well, there is a little history to the ANH JMC E-11. Now, let's move on to the kit itself. The entire blaster is made up of 75 individual parts which consist of aluminium and resin hollow casts. It has replacement screws, nuts, bolts and springs which will replace the resin ones. Wires, cord and Spring have also been sourced, along with the scope lenses and material to make the counter lens. You can see in the pics below a full listing of the parts which go into making the JMC E-11. Sent from my SM-G950F using Tapatalk1 point
-
Thanks again Glen. I do want it as screen-accurate as possible. At least from the outside. But, at the same time, I’d like to be able to separate the chest and kidney plates completely for easier storage. Did I see a build somewhere where the rivets go through the bottom part of three snaps? Or did I imagine that? Sounds ideal if it could work.1 point
-
I was thinking of phase 2 clone trooper helmet and later armor but a DLT-19 does sound interesting. Uh oh, I feel my wallet crying1 point
-
Congratulations! Looking forward to your EIB and Centurion applications. Do you have a preference what to build next? Maybe a DLT-19 blaster? Maybe a FOTK executioner?1 point
-
Heftige Glühstrümpfe Luca! That's a great report on your journey! I hope your first troop will be a blast! The event looks like a perfect start with younger and older members attending. Have fun and let us know how your first experience went!1 point
-
Welcome aboard trooper! Looking forward to you tackling those higher levels.1 point
-
Congratulations and welcome, Trooper.1 point
-
Yeah, people think the resin stock would be super fragile. But, they are stronger than you think. I always say whith my kits that they are cast so as they are functional but they're cast in this way for a more accurate detail rather than to be used all of the time. They are a nice part of the replica to be able to play with though. Sent from my SM-G950F using Tapatalk1 point
-
Thank you Tino! To be honest I cannot say if the receivers can be bend free with each casting. I did 2 more castings and those had a slight bend because I did not have the mold perfectly straight before the resin cured. It will take some time and practice to make good copies. The folding stock is fragile if you compare it to a real sterling or a metal replica but it’s not as weak as it may seem. The resin I use has a bit of flex to it so its not the type that shatters easily. It will probably crack if flexed too much but so far I have had no issues. Opens and latches closed like it should.1 point
-
Wow, Brian! Looking at the first three photos, it is hard to believe this is a resin receiver. No bend, no warp. Looks great. Didn't expected a functional folding stock from resin. Isn't that a fragile part? Good job done on that - and the whole blaster, erm Sterling.1 point
-
Thanks Glen, I remember seeing this mentioned elsewhere [emoji106]1 point
-
Looking good, nice work. Just in case you aren't aware, one thing if (when) you will be applying for EI and Centurion you will also need to remove the UKG branding from your shoulder bell, unfortunately it is required for higher level approval and many have had to do this in the past, some even purchased another shoulder bell as they didn't want to replace their original branding, could be an option1 point
-
And because I had some time, I modeled the level 3 forearm shape as well... Feedback welcome! Left is the normal shape and right is the updated one.1 point
-
Finally finished the DVH blaster and also the Phoenix Props/Doopy blaster. Here is the DVH blaster finished: Here are the parts leftover. I decided to use a few newer parts I casted from my own sterling parts. Here is the Phoenix Props/Doopy mixed parts blaster build. I did not use the Phoenix Props original aluminum tube and went with a PVC pipe. I still need to glue on the power cylinders and then is 100%done. Some pics of the grip and trigger assembly parts from my sterling parts . These were B grade castings with some cracks and air bubbled needing to be filled. Power Cylinders for blaster #2: Not 100% accurate or cleanly made but look decent enough. Slowly making improvements on these. Overall a good learning experience with crinkle paint, recycling older kit parts and testing new resin parts. The second blaster crinkle paint went on way too thick and not that happy with it. Hoping to figure out the best way to use that paint and get the results to be consistent and applied in a thinned coat. Last thing I noticed was that the folding stock position on both blasters was off and this was due to the template I used.If you notice the entire stock is positioned a little bit too far back. The front of the stock should protrude past the front muzzle. I believe that is more accurate. I will be using a different template now for future builds and also getting measurements from other sources to confirm the positioning. Thank you for stopping by.1 point
-
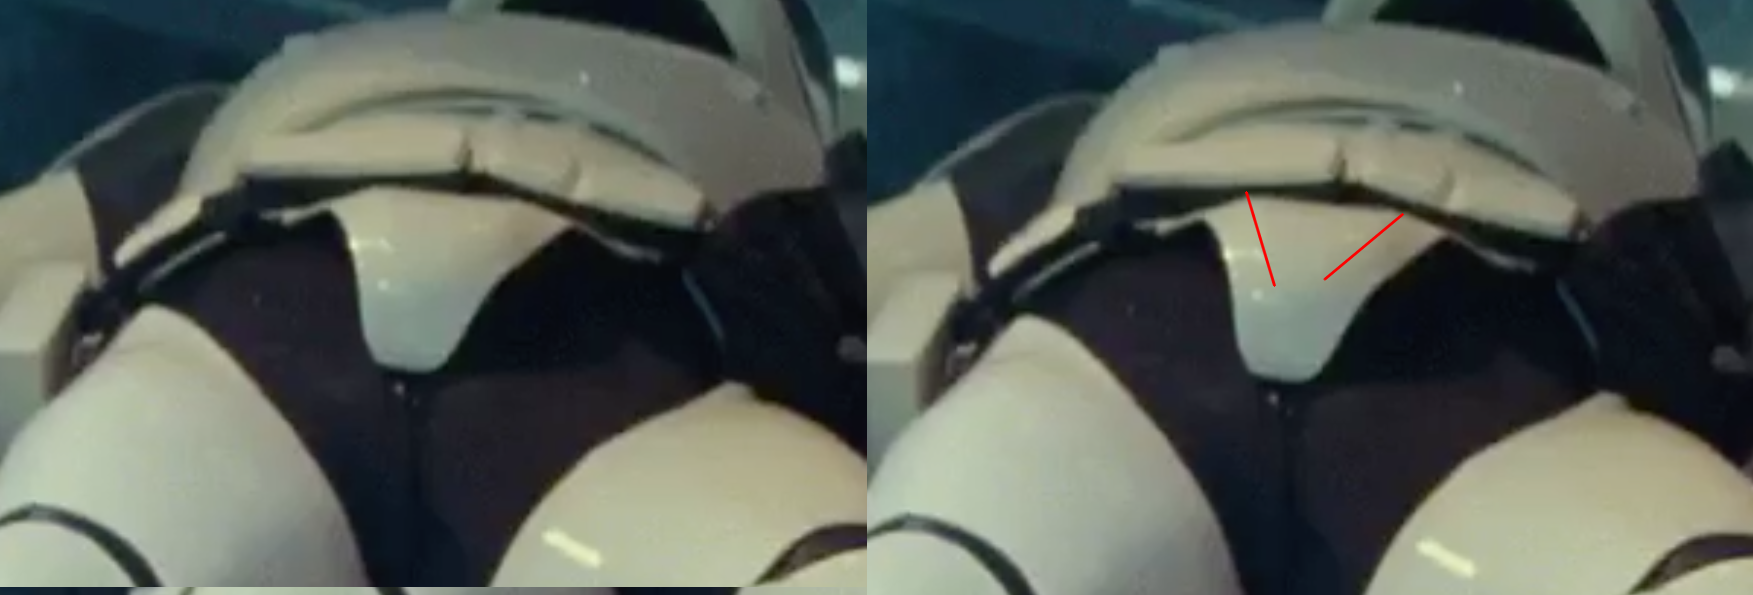
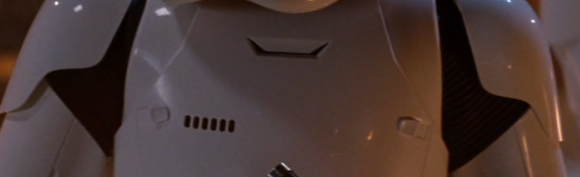
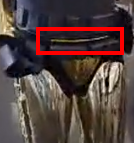
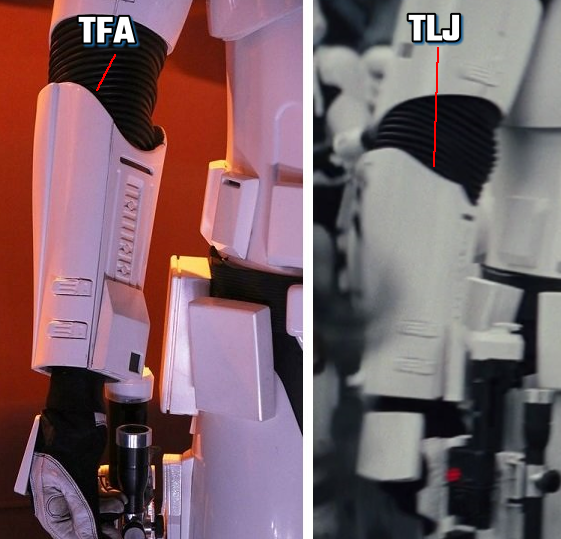
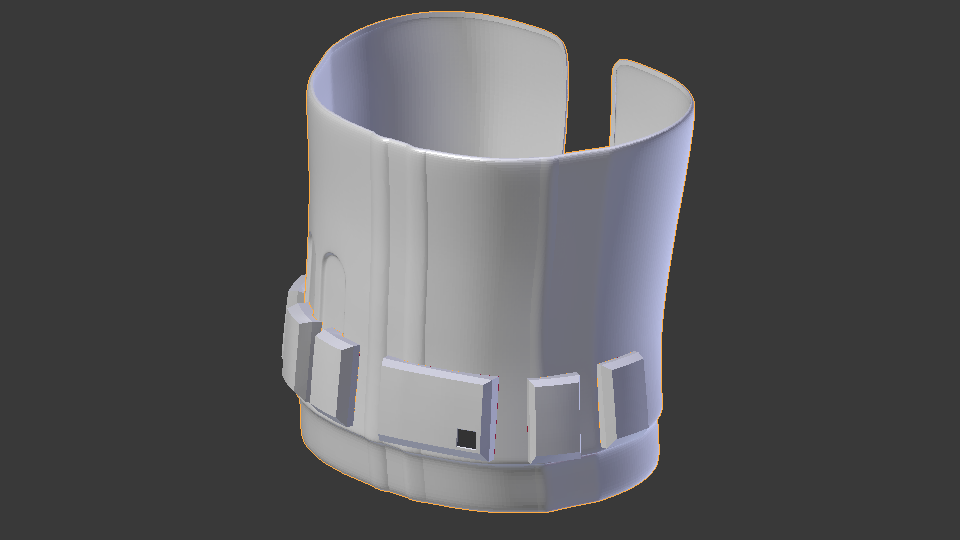
Yes, it is hard to make out. In some of the frames in the movie it looks like the ridges are more pronounced and in some they look very smooth. I added a side by side comparison of the two Codpieces I made. Left is TFA, right is TLJ...1 point
-
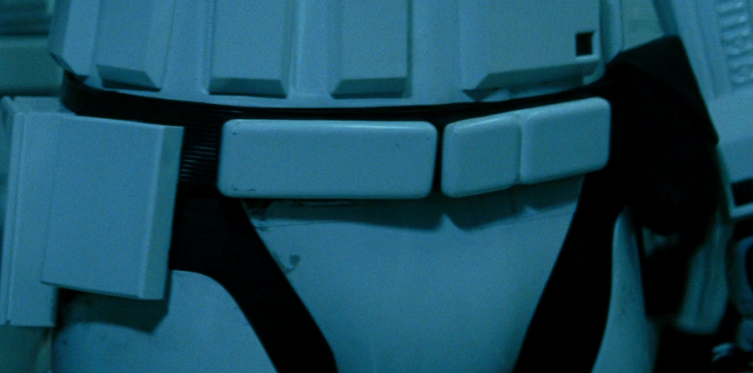
Bit hard to make out the cod, some references here Anovos TLJ Anovos TFA Notice the two raised lines/angles

 1 point
 -
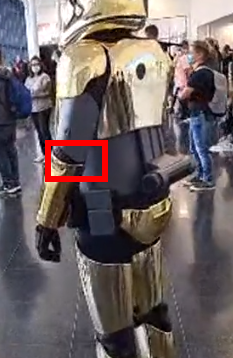
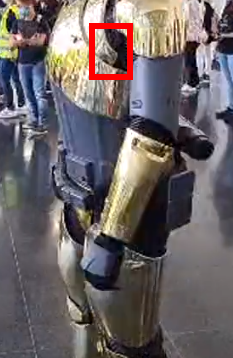
Nice work, also the rear of the forearms are different Differences are being discussed in the TLJ CRL update thread
 1 point
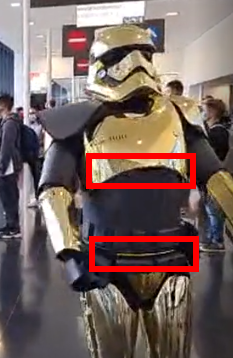
 -
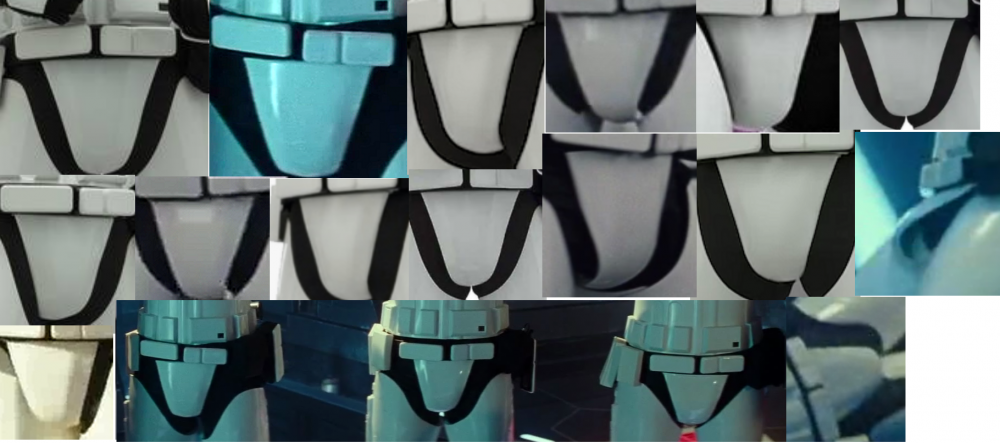
Okay, I promised some pictures so here goes: I made some screen captures of the whole TLJ suit version assembled. The changes to the TFA suit seem minimalistic, but they are present: The most obvious would be the helmet of course. The more subtle changes were made to the Bicep (overlapping, rounded edge), the forearm Picatiny-style rail (Torx-screw), the Codpiece (more narrow and slight ridges visible), the Thighs (overlapping, rounded edge), the Thermal Pack (cylinder length and color scheme). Just have a look at it and let me know what you think.1 point
-
I might try to find an armor building party near me1 point
-
It takes time and patience to build a set of armor, but there are literally hundreds of tutorials here (and us of course) that will make it easier. ATA makes an AWESOME kit, so you are on the right track. Some areas have "armor parties" to assist folks with their builds, but Covid has unfortunately put a hold on those in many places. Once you choose your armorer and order your kit, I would suggest looking at some of the build threads (link here) to give you an idea of what to prepare for. You should also start collecting the supplies you will need. I have a thread on that here, and I have some tutorials that will help under my avatar below. Once BBB day arrives, I HIGHLY recommend starting your own build thread. That way, you can ask all the questions you have as well as post up lots of photos (we LOVE photos) of your progress and any issues you may come across. To paraphrase a line from Home Depot- "You can do it, we can will help"1 point
-
Cool:) I've met a few 501st in GA when I attended dragoncon. I'm thinking about going Ata works but I've never built a kit before so wondering if there's anyone near me that could assist me when my BBB day comes1 point
-
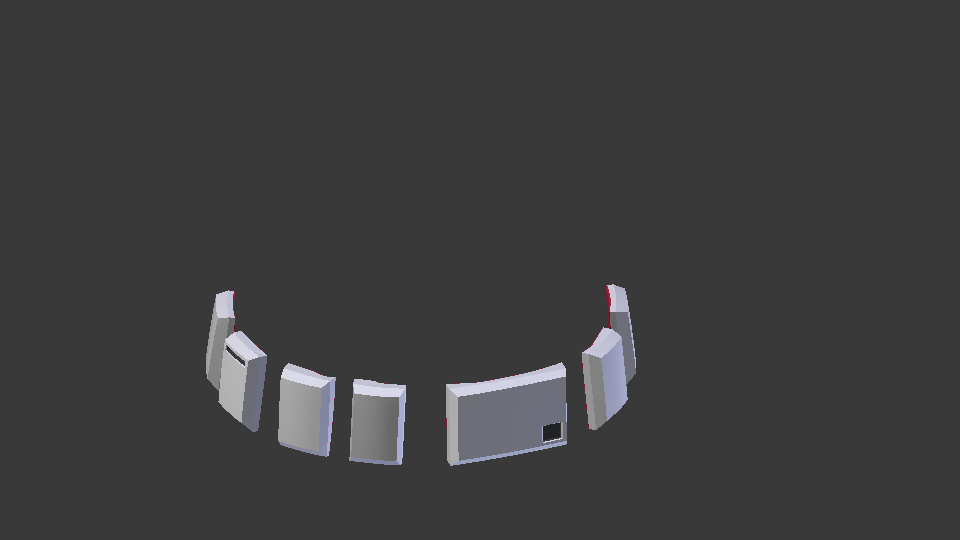
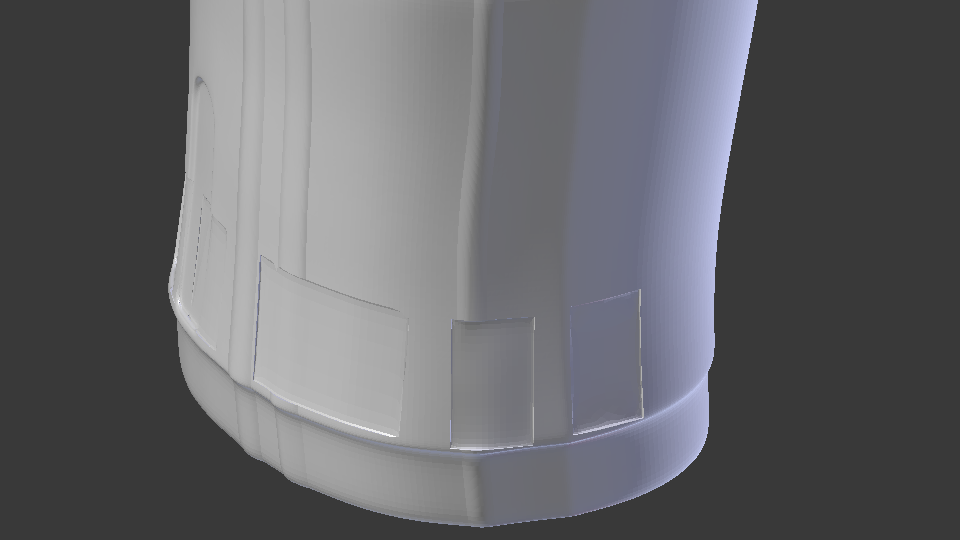
And while the kids are sleeping... I'm actually getting some work done! - I fixed the meshes - seperated the individual boxes - made matching indentations for the boxes to be glued onto the abdominal section after post processing Not long now until this is downloadable!
 1 point
 -
Okay, just to let you guys know: I am reviewing the individual files for maximum printability and I ran into an issue on the Abdominal Section. Some meshes were colliding, causing gaps and holes in some slicing programs. I use Cura, Ideamaker and Simplify3D. While Cura usually handles those issues really well and forgives some mesh defects (like overlapping volumes), Ideamaker and S3D are not as forgiving. While I'm on it, I will make the abdominal boxes separate. That way it is easier to print and post process. I saw that the updated CRL features those as well (finally)... Hang on, I will give an update with pictures soon.1 point
-
NEW In Memoriam Detachment Leader Deployment Office Merchandise Hall of Fame Just For Laughs Around the Detachment INFORMATION & AWARD PROGRAMS Common FISD Acronyms and TK Glossary Pre Approval Forum 3D Section Field Exercise Award Imperial Attaché Program Fire Teams EIB & Centurion: What do these terms mean? Advanced Tactics Awards Public Relations Staff List 2020 Follow FISD André Düvel TX-7683 passed away earlier this year, after a long battle with illness. André participated enthusiastically in German Garrison events for many years in his Shadow Trooper, Royal Guard, and Staff Officer. He was a helpful, open person, who welcomed everyone and reached out unreservedly to all. He was always available with advice and support. His Garrison members have many fond memories of troops and social gatherings with him. He will be remembered as a passionate Trooper, an avid Star Wars collector, and cosplayer. The loss of André has left a deep void in the ranks of the German Garrison, and he will be greatly missed. Our condolences go out to his family, friends. "Buckets Off" On the morning of 21st August, Chris "Hot Rod" Scott ST-10772 joined the big Death Star in the sky surrounded by family and friends, with the Star Wars movies playing so he could hear them. Hot Rod was a valued member of Korriban Squad in Iowa. He was part of many visits to the University of Iowa Children's Hospital, appeared on stage with Weird Al in 2019, and many more. Our condolences go out to his family, friends. "Buckets Off" On the morning of August 23, 2021, we lost Marea Anselmo Gardella (ID-9541). Her passing was unexpected, and she is dearly mourned by the Everglades Squad and the Florida Garrison. Marea joined the 501st Legion in May 2008, shortly after her husband, Ryan Gardella. Her nephew, Matthew Anselmo, is also a member who joined in 2010. While she didn’t troop as much as her husband and nephew, when she did, you knew she was there by her infectious smile and welcoming personality. Marea was constantly thinking about others before herself and it showed at every event she attended. There is so much more that could be said about what a kind, compassionate, and caring person Marea was. Alongside the rest of her family, she exemplified the core communitarian and familial values that characterize Everglades Squad; her memory will live on through her family-- both genetic and of the Legion. Our condolences go out to her family, friends. "Buckets Off" Suddenly, it's September, and although many around the galaxy are in various stages of lock down and pandemic related restrictions, it is good to hear stories emerging of more and more troops occurring. Slowly but surely we are getting back to something that resembles a little bit of normal. I hope this trend continues to improve and allow us once again to be the bad guys doing good out there in our communities. This month I would simply like to discuss a few updates vs our detachment plan to keep everyone in the loop. Firstly, the 15th anniversary coins have finally shipped from the supplier and are on their way to the US. Hopefully they arrive soon after this news letter goes live and James can start the huge task or sorting and shipping out to everyone. The newest version of EI coins has also shipped out, so all those who have been patiently waiting to get their one-off, numbered and exclusive Expert infantry coin will not have much longer to wait. Announcements for both these coins will be made in their relevant areas on the forums once they are received and the shipping commences. A big shout out to all the troopers that have sent in photos for the anniversary special project. Wow, wow, wow, there are some truly beautiful images from around the world, and with over 300 submitted, it's going to be a challenge for the staff to sort through and categorize these snap shots in time. We can't wait to give you the bigger picture on the project, and when that time comes we also hope everyone will be as excited as we are. Many of our set plans for this term have been completed. The clean up still continues and will do for a while yet, but once it is complete you can expect to see a few more minor changes happening in a section or two of the forums. Updates on that will come closer to the launch time. Merch remains a topic of discussion, in our planning, but recently I have received a few messages from members asking when the next Detachment shirt run will be. The easiest way to give you an answer on this is to look at the bigger picture when it comes to shirt runs. As a rule, we do this type of merch about every 2 years. The last run was still ongoing into April 2020 with a few members waiting on reprint shirts due to errors etc. That would put the next run in the vicinity of April next year, but fear not, you won't have to wait until then. FISD shirt runs are HUGE!!, up to and over 800 pieces, so finding a member that is willing to put the time and effort into helming a run of this nature is not an easy task. Ultimately a shirt run will pivot on someone stepping up to the plate to facilitate one. Another major point to consider is the fact Celebration is an apparent go again for 2022. It was scheduled for August but has since been brought forward to May 26th-29th 2022. We would like to align the next shirt run with the advent of Celebration Anaheim, as we have for Celebration events in the past, therefore the best timing would be early in 2022, and most possibly kicking that off in January. There are decisions to be made when it comes to the design as well. Do we keep the current version, do we add something for the 15th anniversary year, or do we have a totally new design. This will come under staff discussion in the near future and once we are finished discussing the next merch item we are bringing you, and the current coins have been distributed. More updates to come on that, but if you are interested in helming a merch run for the detachment it comes with a couple of perks in itself. 1. You find out before the rest of membership, what that item is. 2. You get yours first. 3. You get the merch item for free as we always gift one to the person who makes the run a reality for everyone. So you see there are many considerations that go into planning such a task as a shirt run because detail is more important on these runs than most others. If any of our members are interested in stepping up earning some Kudos and detachment praise, please know my door is always open to discuss the in's and out of what needs to be done in helming a merch run for FISD. More merch to come before then so watch this space. With Unquestioned Loyalty Andrew Franke TK11469 "Sly11" Detachment Lead On behalf of Mario, myself and the entire Command Staff, I would like to congratulate Chemi (TK 30173) for being promoted from Deputy Deployment Officer to full fledged D.O. Since his arrival on Staff, he has done an outstanding job in his role and dedicated countless hours to both research as well as ensuring that the applications he has completed have been precise. He is a great team player... always willing to learn something new and an absolute pleasure to work with! Buckets off to you, brother, and keep up the great work! With Unquestioned Loyalty Joseph Pedigo TK-10963 "justjoseph63" Chief Deployment Officer With Unquestioned Loyalty Mario E RT TK-48117 "TKSpartan" Deployment Officer With Unquestioned Loyalty Jose Maria Sanchez TK-30173 "Chemi" Deployment Officer FISD 15th Anniversary Coin CLOSED Run is now CLOSED, coins are in hand and will be shipping soon. For more updates head to the sales thread here Please welcome TK-11672 Carsten to the Stormtrooper Hall of Fame with this epic photo - well done Trooper!https://www.whitearmor.net/forum/topic/49798-3-tk-11672-troop-log/?do=findComment&comment=724486 With Unquestioned Loyalty Aaron Gibson TK-99725 "Pyrates" Curator Hall of Fame Hovi Tip Found Could we be a step closer to knowing what these parts actually were used for? Thanks to Daniel O'Keeffe this looks to be the closest we have come in over 40 years. Here is the full story from the man himself Daniel O'Keeffe but first I'd like to take this opportunity to welcome Daniel to the FISD forums and thank him for allowing me to share the information, taking us another step closer to solving the mysteries of this found part mystery. Full story here Action Photo Backgrounds It makes our job a lot easier editing your images into the Expert Infantry Honor frames if you use a contrasting blank background when taking your action photos for your EI applications. Contrasting is not using a white/light or black/dark background while wearing black and white, it just doesn't work. Also taking photos outdoors, in sunlight, in the garden or in front of brick walls really makes our job harder. A simple solution is using a colored sheet or a tarpaulin. Here are a few examples of backgrounds which make our job difficult Here are a few examples of backgrounds which make our job much easier If possible please try to use a contrasting background when taking your photos, your GML's and GWL's with also thank you for it INFORMATION & AWARD PROGRAMS For a full list of FISD awards head here Are you new to the FISD and wondering what the heck all those abbreviations and strange sounding terms mean? To help you @justjoseph63 has started a list of the most commonly used ones that will give you some insight. If you have ANY questions about a particular term that is not listed or suggestions for new ones please contact Joseph. You can find the list here Pre Approval Forum allows future Troopers the opportunity to submit photos of their completed build to be reviewed by the Staff, Imperial Attaches and others in preparation for forwarding it to their GML for approval. Any and all advice/suggestions given will be specific, constructive, helpful and respectful. Please note that this program will NOT take the place of your local GML, as Detachments are not chartered for costume approval and can not override a GMLs decision, but is instead a peer review program designed to help you look your best and offer guidance and positive feedback. For more information on this program, please visit the link here Don't forget to visit our 3D section when next surfing the FISD forums, there is plenty of useful information to potentially help you on your next TK adventure. You might be feeling may generous and share with our community a new TK related 3D file and maybe win yourself a 3D contributors award so check out the details below and be part of the in house 3D community. Here is a link to the FISD 3D Contributor program. Don't forget to create a troop log here on FISD and get awarded for your adventures The list of accomplished troopers keeps growing, so get on board and register your troops today Simply start (or update!) your troop log, keep the running total in the title, and post (at least!) a date and name for the official 501st event where you wore your TK! Once you've hit a milestone count, go over to the "Field Exercise Awards -- Post your milestones here" thread to request your profile be updated! Simple, right? Award Recipients August - September TK91973 "ocmano" Aaron - TK46116 "CallMeMrTibbles" Richard - TK24233 "BDWC" Jim - Are you an approved TK that spends more time on the boards than the average Trooper? Do you enjoy using your knowledge to help out future and existing Troopers? If so, we would like to invite you to join the Imperial Attaché program! Members of the I.A. team are chosen to help out not only those here on the boards, but on a local level as well. Our aim is to have at least one in each and every Garrison, Squad and Outpost in the entire legion to be the eyes and ears of the FISD on a local level. For a complete list of Imperial Attaches, go here Some of the benefits: Access to exclusive Attaché merch., including patches, IA patch , IA Rocker For a complete list of Imperial Attaches, go here You may also be in the running for an Imperial Attaché Award Imperial Attaché Award for those attaché's who have gone above and beyond [minimum 1 year of service]. You can find a list of prior recipients here Want to setup a "Fire Team? the Fire Team program is completely optional, and is intended to help form a common identity and spirit of camaraderie among 501st Legion Stormtroopers in the same geographic area/garrison that troop together. Fire Teams are not officially recognized by the 501st Legion nor the FISD, although they will be able to access a Fire Team sub-forum on the detachment website. You can find more information here Lets welcome our 63rd Fire Team Team: Fire Team Rio Bravo!! Region: New Mexico, US. Dewback Ridge Garrison. Name: Fire Team Rio Bravo So what exactly are and levels? These programs were designed for those who choose to take their armor above and beyond the minimum requirements for basic 501st Legion approval. It gives you the chance to show a level of dedication and pride that takes your armor closer to being as "screen accurate" as possible, without as much extra work as you may realize! You can find more information on the programs here This area lists all those who have gone above and beyond basic approval toward screen accuracy and obtained EIB or Centurion or both. FOR August - September the 1st Imperial Stormtrooper Detachment would like to congratulate: Expert Infantry Badge Award: Colin "Csefton" TK19632 EIB 1031 Ardeshir "equuspolo" TK42128 EIB TLJ - 6th Award Glen "gmrhodes13" TK85421 EIB TKC - 8th Award Brett "Cleantrooper" TK9593 EIB ESB - 3rd Award GREAT job on your approval, now on to Level 3! Request your free EIB certificate here You can find a list of multiple award recipients here --------------------------------------------------------------- Centurion Badge Award: Ardeshir "equuspolo" TK42128 EIB TFA - 5th Award Colin "Csefton" TK19632 Centurion 504 Jacob "Pistolsheets" TK86267 Centurion 505 Glen "gmrhodes13" TK85421 Centurion TKC - 8th Award Justin "fishgoh0nk" TK83751 Centurion 506 Outstanding job on reaching Centurion, Troopers! Request your free Centurion certificate here You can find a list of multiple award recipients here If you see any of these Troopers around your Garrison or Squad, be sure to congratulate them! Newsletter If you have any interesting stories or photos or something you think newsworthy please send them to me via pm. For anyone interested in having a look through any of the older newsletter they have now been moved to a new archive sub forum which you can find Here With Unquestioned Loyalty Glen "Q" Rhodes TK-85421 "gmrhodes13" PRO Newsletter Staff List 2021 Detachment Leader (DL): Andrew Franke (Sly11) TK11469 Executive Officer (DXO): Tim Waychoff (Dark CMF) Chief Deployment Officer (DCA): Joseph Pedigo (justjoseph63) TK-10963 Deployment Officer: (DCA): Mario E RT (TKSpartan) TK-48117 Deployment Officer: (DCA): Jose Maria Sanchez (Chemi) TK-30173 Lead Provost Marshal (DCOG): Steven Sheades (starsaber25) TK-10466 Provost Marshal (DCOG): Chris Pearson (themaninthesuitcase) TK-10911 Provost Marshal (DCOG): Dan Branton (CableGuy) TK-42911 Personnel Officer (PER): AC (Novatie) TK-5597 Fire Team Relations (PRO): Mark Ryner (Captsafe66) TK-4584 Content Editor At Large (PRO): Christoph (Danny) Lauber (Ripper_L) TK-55550 Content Editor Support (PRO): Tony Jobe (ukswrath) TK-10116 Content Editor Awards (PRO): This will be handled by the XO Newsletter Publisher (PRO): Glen Rhodes (gmrhodes13) TK-85421 HOF Director (PRO): Aaron (Bronx) Gibson (Pyrates) TK-99725 Attaché Ambassador (PRO) Frank Peranteau (Frank75139) TK-75139 Social Media Relations (PRO): Teresa Nuthall (Soulart) TK-41307 Social Media Relations (PRO): Jim Ferrell (Rat) TK-95970 Systems Administrator (DWM): Eric Brager (Darth Aloha) TK-9674 Systems Administrator (DWM): Mathias (Locitus) TK-2959 Detachment Founder (DF): Paul (Daetrin) TK-8020 Trading Cards Content Support (IPM): Eric Ho (Hoda) TK 77520 Imperial Propaganda Machine (IPM): Brien Edick (Harbinger) TK 92802 Imperial Propaganda Machine (IPM): Jeff Salt (wingnut) TK 50297 Facebook: www.facebook.com/whitearmor Facebook Group: 1st Imperial Stormtrooper Detachment (FISD) Official Twitter: www.twitter.com/FISD501st or @FISD501st Instagram: www.instagram.com/fisd501st On behalf of the 1st Imperial Stormtrooper Detachment Command Staff and the Imperial Propaganda Department


 1 point
 -
1 point
-
Progress pics: Base sterling finished with some minor weathering, bolt painted & installed. Inner barrel is just black PVC pipe. The grip and the bolt charging handle are the original raw cast color. Bolt is painted with Mr. Hobby dark iron and chrome silver metallic paints. Hand brushed and then rubbed to a dull shine. Also added a light layer of black wash paint from Tamiya. The end cap photo shows the wrinkle paint pattern well. I could not get the same wrinkle pattern across the entire receiver but it added some character to the blaster and made it easier to attempt some worn weathering effect. The bolt completed. Some subtle metallic weathering on the mag release button and the mag clip edges. T tracks installed and a temporary hand wound spring. Next up is the scope rail, scope and counter and then I need to finish a set of power cylinders. Almost there.1 point