Leaderboard


Popular Content
Showing content with the highest reputation on 08/01/2021 in all areas
-
Some pictures of the progress made, gun is still in two parts though, I am not sure how to proceed because the contact surface is limited and the gun is very front heavy. https://imgur.com/a/xwJDDGn Credits to @stevechewbacca for helping and providing emotional support3 points
-
Hi Romain! TBH, the silver and satin black are only for those pieces, as I painted the silver, put the on, and painted the black. The rest will most likely be satin black, with brown woode handle gripa (like the T21 for example). The idea of this coloring comes from Marko's concept art for the 3D rendition, which looks great, and mixes some dark gray with black and some silver parts. As mentioned, I only painted these 2 pieces, awaiting CRL clearance first before I paint anything at all. The black is a simple Montana Hardcore satin black.2 points
-
Ok, Will do if I haven’t heard anything after clearance Thanks. Colin Sent from my iPhone using Tapatalk1 point
-
Thighs after doing the corrections: Thanks, justjoseph63 for pointing them out, they're much better now! I'll probably mix myself some ABS paste now for those gaps. Would probably be good to get the acetone work done before moving into a small room where I can't work outside anymore1 point
-
Looks good, I just used superglue and unless I drop it, it holds on fine mate. I will also add an aluminum rod1 point
-
I have asked steve to model an extra supporting piece to connect the two halves of the gun. I have included an aluminium rod that goes from the stock to the "flash suppressor". The extra piece features the same hole as the rest of the pieces, so it will sit nicely at the front. https://imgur.com/a/f1Vnh5V1 point
-
All of these are ready for primer then 1000 grit sanding!1 point
-
Looking GREAT!1 point
-
Yeah, that's the part I was concerned with - the base looks a little off. But, it might be something I can modify, since it still needs sanding and paint, anyway. Thanks!1 point
-
Always better if you use the direct link copy function so the images appear in your thread. I have added the main image to your post1 point
-
My pleasure :p1 point
-
@Yiyo I noticed you painted your gun with different colors for the nozzles, it looks all black to me in the reference pictures though. Where did you find about that silver part and satin black ? Also : what black did you use for the gun itself ?1 point
-
Awesome thanks, found similar in a QLD suppliers online store. Will order and see how it goes. :)1 point
-
Thanks a lot glen. Although I already see some minor tweaks I need to do.1 point
-
Good luck with approval, although I doubt you'll need it1 point
-
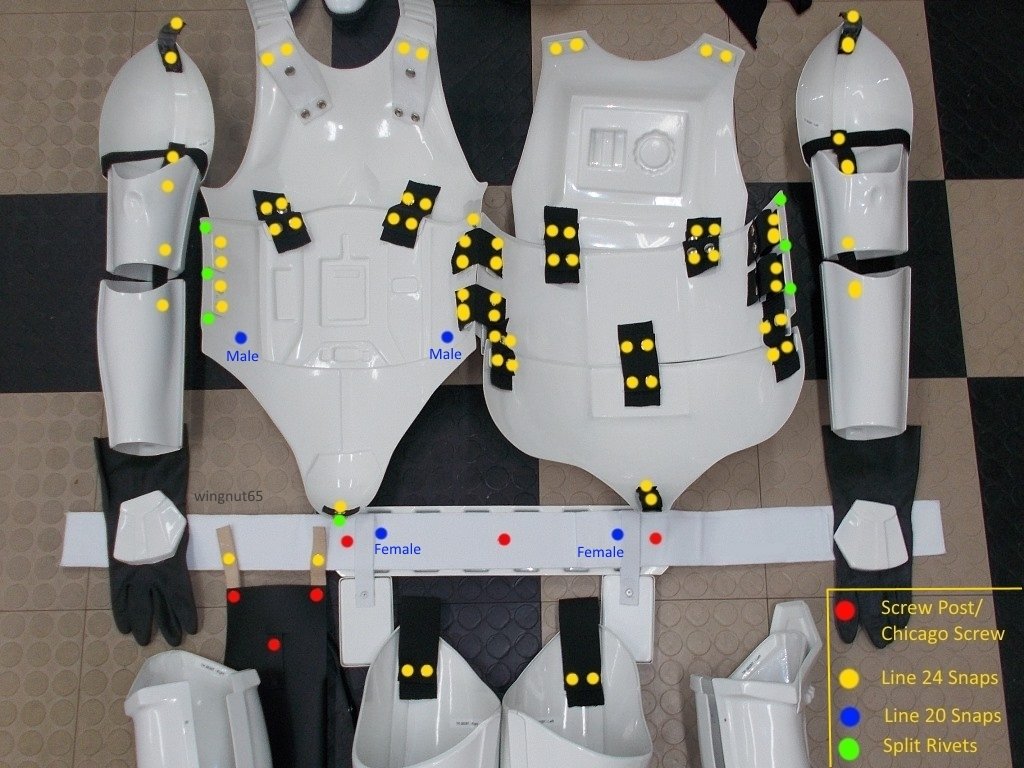
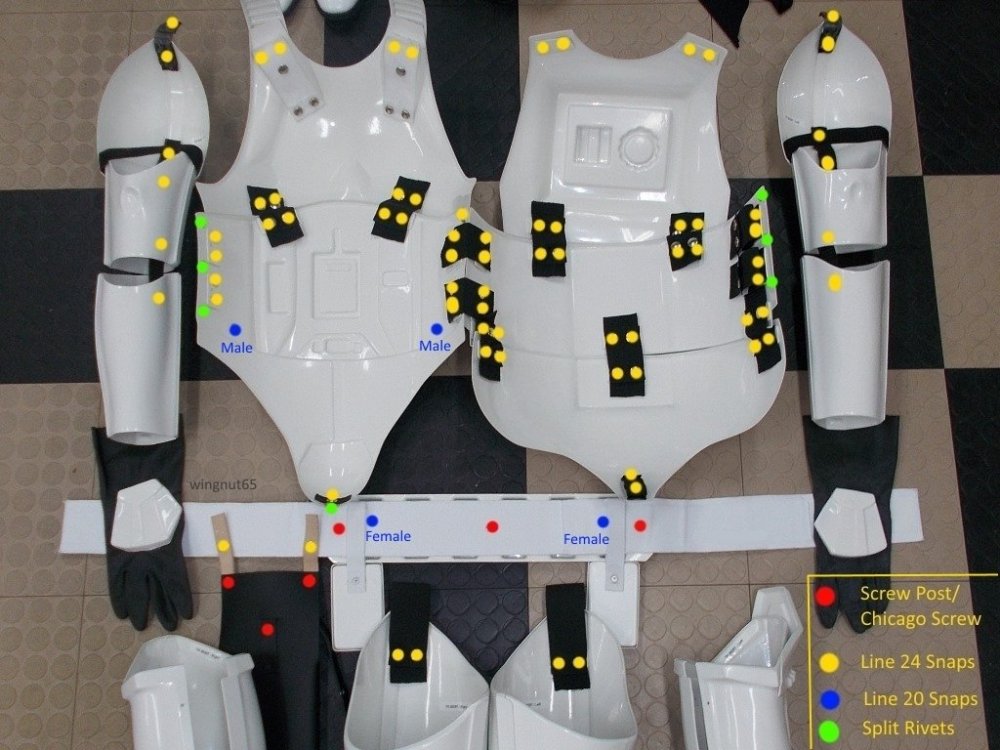
This is pretty much the standard setup a lot use, you may be able to work out from this:
 1 point
 -
Well, this has to be the fastest update so far The thighs are glued and currently drying and I just finished painting. Doesn't seem like a huge difference, but there's definitely some more black paint on there: I also got rid of some of the grey in the frown: Thanks for all the feedback so far!1 point
-
It's the same model that I have used.. mine has a few mods tho.. I have some pictures of the build on my Instagram https://www.instagram.com/tk_75128/ Sendt fra min VOG-L29 med Tapatalk1 point
-
Here is a recent thread1 point
-
Some gallery references for you to compare with Looks like a nice kit, the stock looks a little square on the base, could add some curve to it Also the transition from stock to housing is a little off but doubt anyone will really notice that1 point
-
As long as it meets the basic guidelines in the CRL for anything above basic level as no blaster required, and it is sanded and finished correctly to remove any print lines, then it should be fine1 point
-
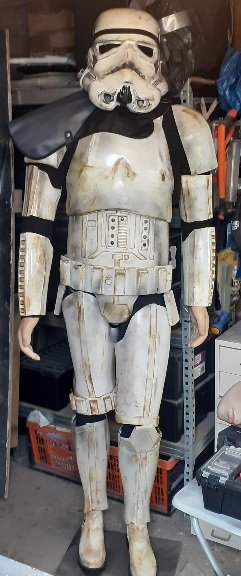
So I found a set of Trooper armor that I had forgotten about after moving house 3 years ago. It's a mix up of ABS, Fiberglass and god know what else but it was not in a good state and cracked discoloured etc. I was going to buy new ABS leg armor as FG is a pain in the an impolite person to work with, but I decided to use it and just heat and shape it to the mannequin. Found a pair of white chelsea boots on eBay, brand new for £11 posted and bought new but unused pauldron for £25. Just hands and gloves left now. Got another helmet and decided to do a sandy. I know the ab plate, and knee piece are not accurate but I can't moan. It's nice when something is saved from being thrown away sometimes. Paintjob isn't the best but for a budget build I'm happy.
 1 point
 -
Looks and feels better, thanks for the picture! Thanks Although (sadly) the butt plate/kidney plate gap does get a tad more visible once I close the crotch snap. Not the shoulder straps, instead the tube stripes template finally arrived! Visibly hand painted, so maybe I'll do a bit of clean-up in the future. For now I'll just let it dry. Happy to finally have completed this iconic helmet for now! I also opened my thighs in the back by removing the cover strips. I'll do some cutting and fitting this evening or this morning and will hopefully be able to present you with a smaller thigh tomorrow to get some more feedback. The shoulder strap may have to wait until I get the thighs done, but I hope to get that one done during the next week as well. If there's anything else that I should fix before I submit the armor for basic approval, this weekend would be the ideal time to mention it, so that I can get most things done until Wednesday. Afterwards I'll probably be too busy packing everything up1 point
-
Congratulations and welcome!1 point
-
Welcome Trooper!1 point
-
Congratulations Trooper !! Welcome to the ranks1 point
-
Congratulations Geoff!!! Welcome to the ranks!!!1 point
-
Good to hear you found a solution that works. Looking great1 point
-
Nice and shiny! Congrats!1 point
-
Congratulations trooper and welcome to the ranks1 point
-
Yes. It sets like a very flexible clear rubber, and you only need to apply a very thin coating. I've been playing with the parts of the belt I've already treated, and definitely isn't going to crack as it is. I guess it could go hard as it ages, but only time will tell. Also, it hasn't currently discoloured the white canvas. Again, this could change as it get older. I'll try and remember to post updates to show how it's holding up in the coming months.1 point
-
Serious question Obviously they put something in the ink that makes tattoos addictive ( you and I both know this!) Do they also put something in the abs that makes armour building addictive? Thoughts?1 point
-
Coming along nicely mate !1 point
-
Hot water is GTG, heat gun + novice = bad idea. I warped my ANOVOS bicep and had to purchase an ATA for replacement. Expensive lesson.1 point