Startide
-
Posts
65 -
Joined
-
Last visited
Content Type
Profiles
Forums
Gallery
Articles
Everything posted by Startide
-
 I also have triple AA batteries holders if needed.
 -
I was using 2 AA batteries, I assume that's indeed not quite enough
-
https://www.aliexpress.com/item/1917223733.html?spm=a2g0o.order_list.order_list_main.4.420d1802wsVDab Got them in red, orange, yellow... got the whole set basically
-
I sure could use guidance, just got my leds and resistors, but they don't seem that bright to me. Have to take some pictures or make a drawing of the thrower, that will make more sense of what I am trying to achieve
-
Well I am trying to give a "flame" look to that smoke, so kinda bright I reckon. But then it's not an industrial smoke machine either. I have picked up the ones recommended by gmrhodes, we shall see how that turns out Thanks again for the support guys !
-
Thanks a bunch, what else do I need to power those babies ?
-
Hello there, Still working on the remnants incinerator, just go my microfogger machine, which I plan to hide in my backpack. To complete the "flame" effect I would like to add orange leds to the flamethrower muzzle. I don't know the first thing about electronics though so I am not sure what exactly I should be looking for. See microfogger in action : I have a 3D printed flamethrower (see included file) and I assume I could hide some leds in the muzzle fairly easily. What should I get ?
-
Another question : how do you paint / prep a fiberglass kit ? I am especially curious at what to do with the interiors of the kit since they still feel "itchy" somewhat. Anything in particular is expected to be done to those parts ?
-
That's what I thought, what liquid do you use for your microfogger ? The one they sell seem crazy expensive, but it's not always obvious what those products contain while browsing amazon or alie
-
Geeting back into that project after a couple hectic years, I was looking into how to make smoke from that flamethrower... I found the microfogger machine, but it's super expensive. Are there alternatives to make decent amounts of smoke ?
-
Hi there, I have been looking at my options to store and transport (safely) my remnants TK flamethrower : It's about a meter long, and a good 15 cm wide basically. I have search for various type of boxes, but no luck so far. I would like something rather "hardshelled" than a softbag, plus I can mod a case with star wars things to make it look cool Outside going pelicase and sacrificing my first born to the gods, I had no luck so far. Most hunting / shooting cases are rather thin because real weapons are not bulky like the flamethrower from mando show. My best find so far is photographer bags for tripods / lights... but as I said above : I would rather have something with a hardshell... If you guys have ideas, I even tried military surplus, without breaking the bank of course !
-
That's a good one ! I was told about wolfcub but couldn't pinpoint where his work was. Thanks for the help !
-
Found those : Chrome strongly disagrees with downloading that file, but you can force it.
-
I have downloaded that zip last week, so clearly I found it somewhere on the forums Not sure how to figure out where I found them though. For the "best template" I found those : But a lot of measurements are not available in that one. I would like to be able to input the correct distances in fusion 360, and not just eyeball it with the templates used as canvas...
-
Well they are available here : https://www.whitearmor.net/forum/applications/core/interface/file/attachment.php?id=4702 But I have not idea where from on the forum I found them, and I don't know who made them either... It's my understanding that the initial work started years ago for the "best template" has never been completed ?
-
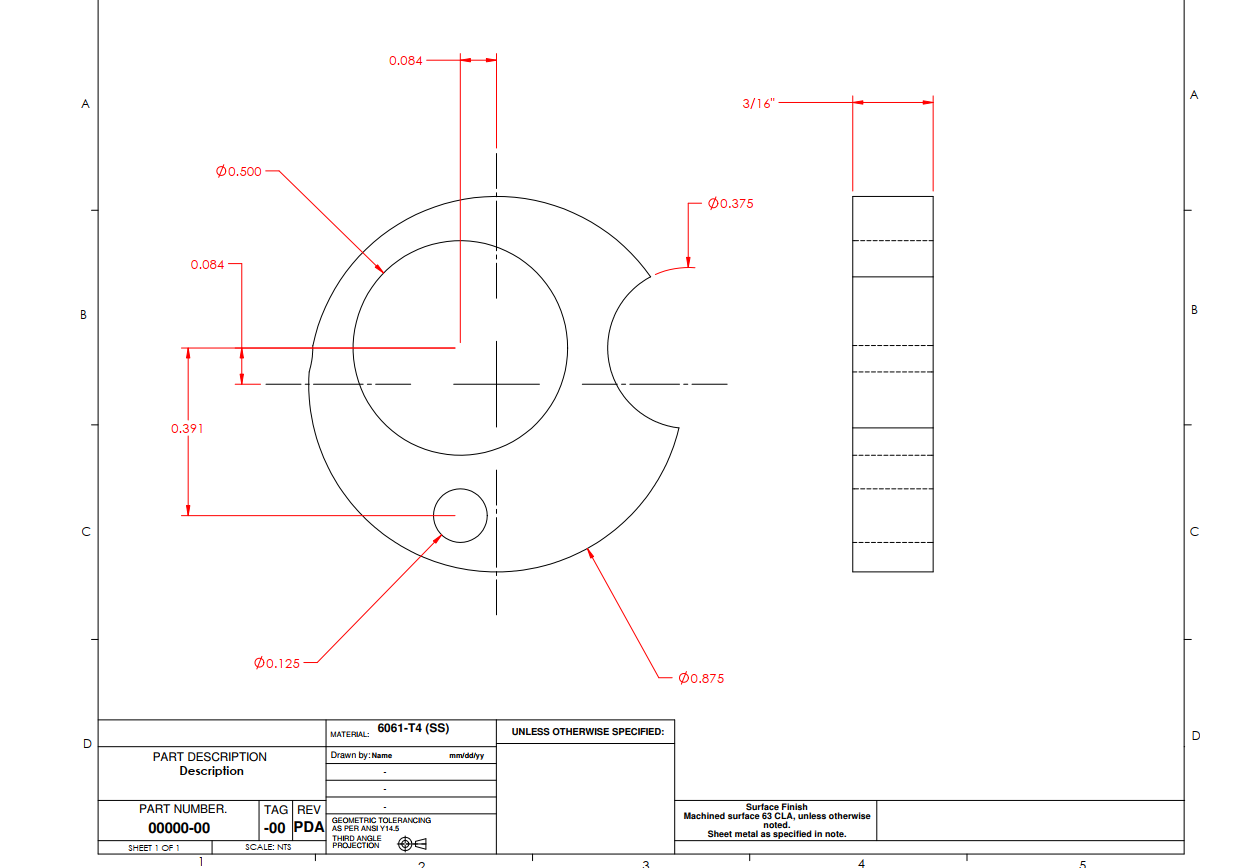
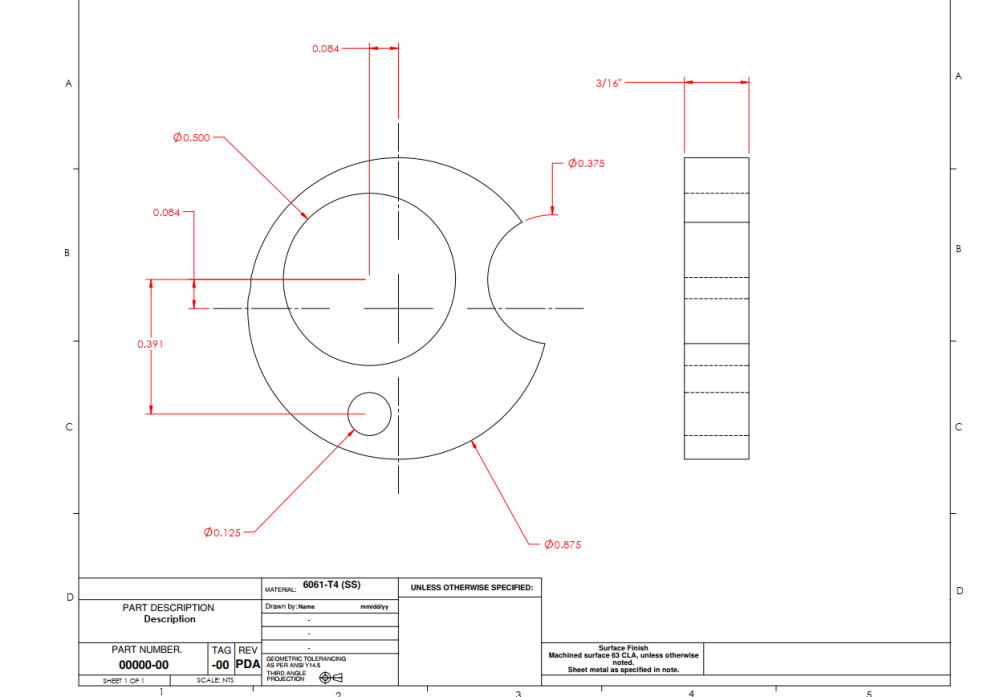
That's a somewhat silly question, but I spent quite a bit of time on google and FISD downloading reference pictures for the sterling L2A3, and eventually found in my download folder a zip file with very good templates / blueprints, that look like that : It's the best I found so far, but I can't for the life of me remember where on the FISD I found that zip package. Also : it's in imperial sizes, maybe there is a metric version somewhere ? I would like to make a spreadsheet that allows you to set your tube diameter and then determine all the sizes to be at the right scale.
-
I was thinking about using mustard, but toothpaste probably has better adhesive power
-
So a bit of progress was made, although at this point I am mostly waiting for the CRL and nicker updates because I have no idea how to put together the armor strapping Anyway primed the helmet, it needs more sanding though. Also I bought some small drills for my dremel to cut through the nose, I am quite proud of myself because it's quite good looking https://imgur.com/a/4HSaYnI I also painted the flamethrower, only to see the printing lines show up quite badly, so I sanded again and put some modelling putty to fix this. It's pretty smooth now. Needs to be painted again. Last but not least : bought some montana cans in black shock, white shock and Shock Kent Blood Red, with some dark undercoat it looks pretty good IMO. Quick questions : I will have to paint the helmet white (obviously), then mask off the areas for the red painting. I plan on painting white first when I mask so that the paint fills the small gaps under the masking tape. Then I need to paint black, then red. How should I go about the weathering ? Paintjob is missing some red, which visible white here and there. How can I achieve that considering I need a black layer betwee, my white and my red ? Also : what should I use to topcoat all that paint ?
-
Quick pictures of today's work, my friends steve & steve showed up for emotional support and guidance in triming those vents in the helmet https://imgur.com/a/kcgPQvQ
-
Good to know, take your time we are in no rush
-
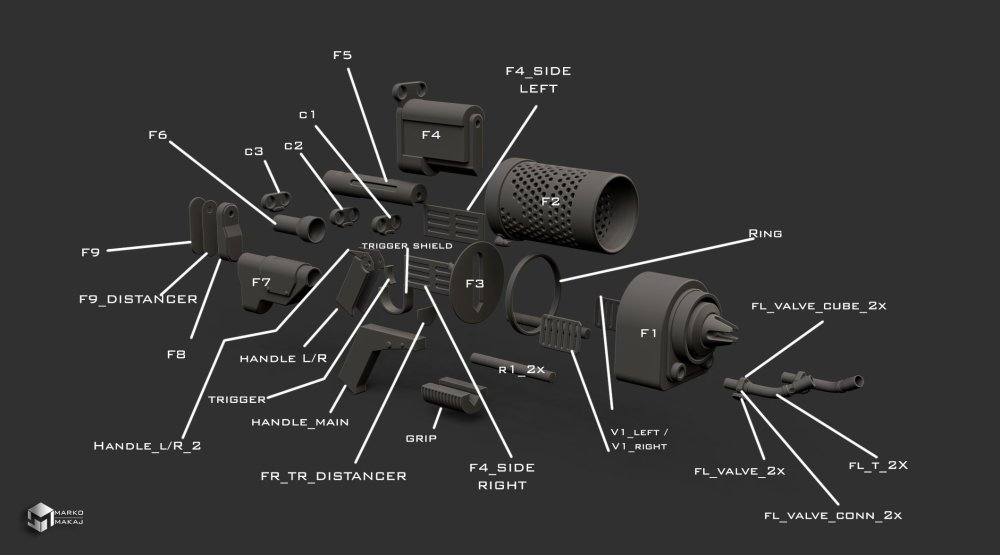
So as I said I was working on a connecting piece to make the bond between both ends of the gun stronger. Steve was nice enough to model what I had in mind and here goes the result of his work : Some more pictures here : https://imgur.com/a/HrwKyX4 I used a long aluminium rod (well a tube + a rod, because there was no rod big enough to fit). And now I have primed the whole thing, it looks pretty crisp. It's not perfect I know, but it's a first for me so I am quite happy
-
The holes aren't aligned for me. The yellow mark is where I cut my aluminium rod off (I don't want to see it inside the flash suppressor) :
-
I am intriged : how can you add one now that everything is stuck together ?
-
I have asked steve to model an extra supporting piece to connect the two halves of the gun. I have included an aluminium rod that goes from the stock to the "flash suppressor". The extra piece features the same hole as the rest of the pieces, so it will sit nicely at the front. https://imgur.com/a/f1Vnh5V
-
Some pictures of the progress made, gun is still in two parts though, I am not sure how to proceed because the contact surface is limited and the gun is very front heavy. https://imgur.com/a/xwJDDGn Credits to @stevechewbacca for helping and providing emotional support