Leaderboard


Popular Content
Showing content with the highest reputation on 08/30/2020 in all areas
-
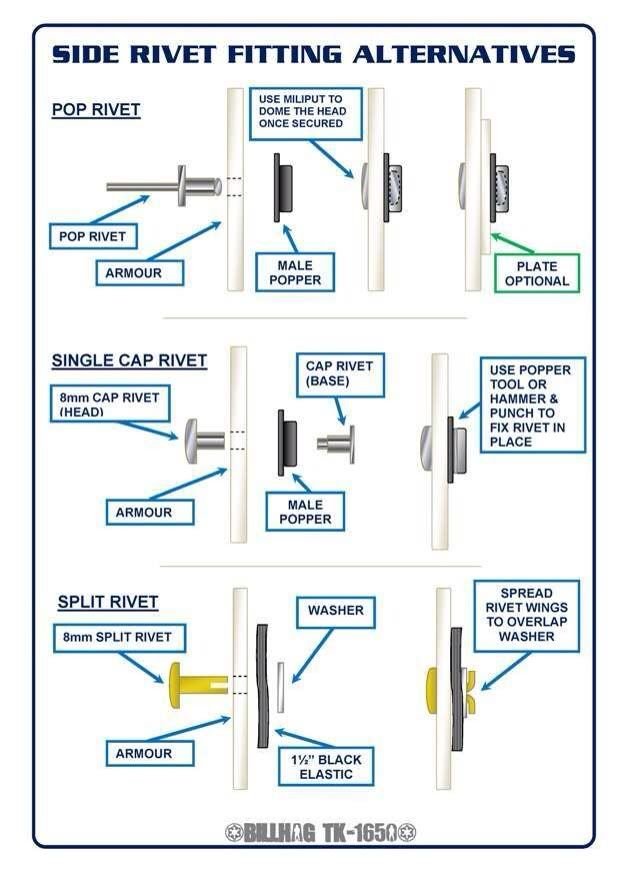
ANH Holster, although we see Stunt holsters on most Stormtroopers, strap size and color varies from trooper to trooper as well as position on belt. Majority having long straps Approximate guide Hero Holsters, the following are what are seen on Han and Luke, E-11 style with the 4 rivet attachment, although slightly different Approximate guide A nice shot of Han and Luke both with E-11's holstered and Han carrying the DLT19. Note the droop on Han's belt from the weight Incidentally how many of you noticed when TK421 (Luke) comes out of the falcon wearing the comlink and grappling box he is also sporting a detonator? RS Holster worn by Hero helmet trooper below, mid attachment, believed to be a rebel DH-17 holster put on a TK belt (incorrectly). Also note the stitching is on the left (front) of the holster and the standard E-11 is on the right (back), it is shorter than the E-11 and also angled on the bottom. At first only believed to be worn by 1 trooper we have the image below showing 2 troopers sporting this style of holster Very easy to spot as the holster is a lot shorter than an E-11 holster and slightly angled on the bottom Hero Promo, short like the RS holster also stitching on the left (front) BUT with a cut-out section and SE-14R in the holster, once again you can see it is a lot shorter than an E-11 holster as it is high on the thigh. This could very well be one of the RS style holsters modified with the cut out seen below. 4 rivet attachment as you can see the two rivets on the one strap below No Holster and of course there has to be someone who's been in a rush to dress and forgotten his holster (note not approvable) For anyone wishing to make their holster removeable IMAGES RS Props belt comparison Luke belt references
 5 points
 -
10 spots!? Alright, that's it, no more procrastinating. I have my work cut out for me, but I'm gonna be one of those final 10!3 points
-
ONLY 10 spots remaining . Last approved EIB #990 Ueli "carcharoth" TK198443 points
-
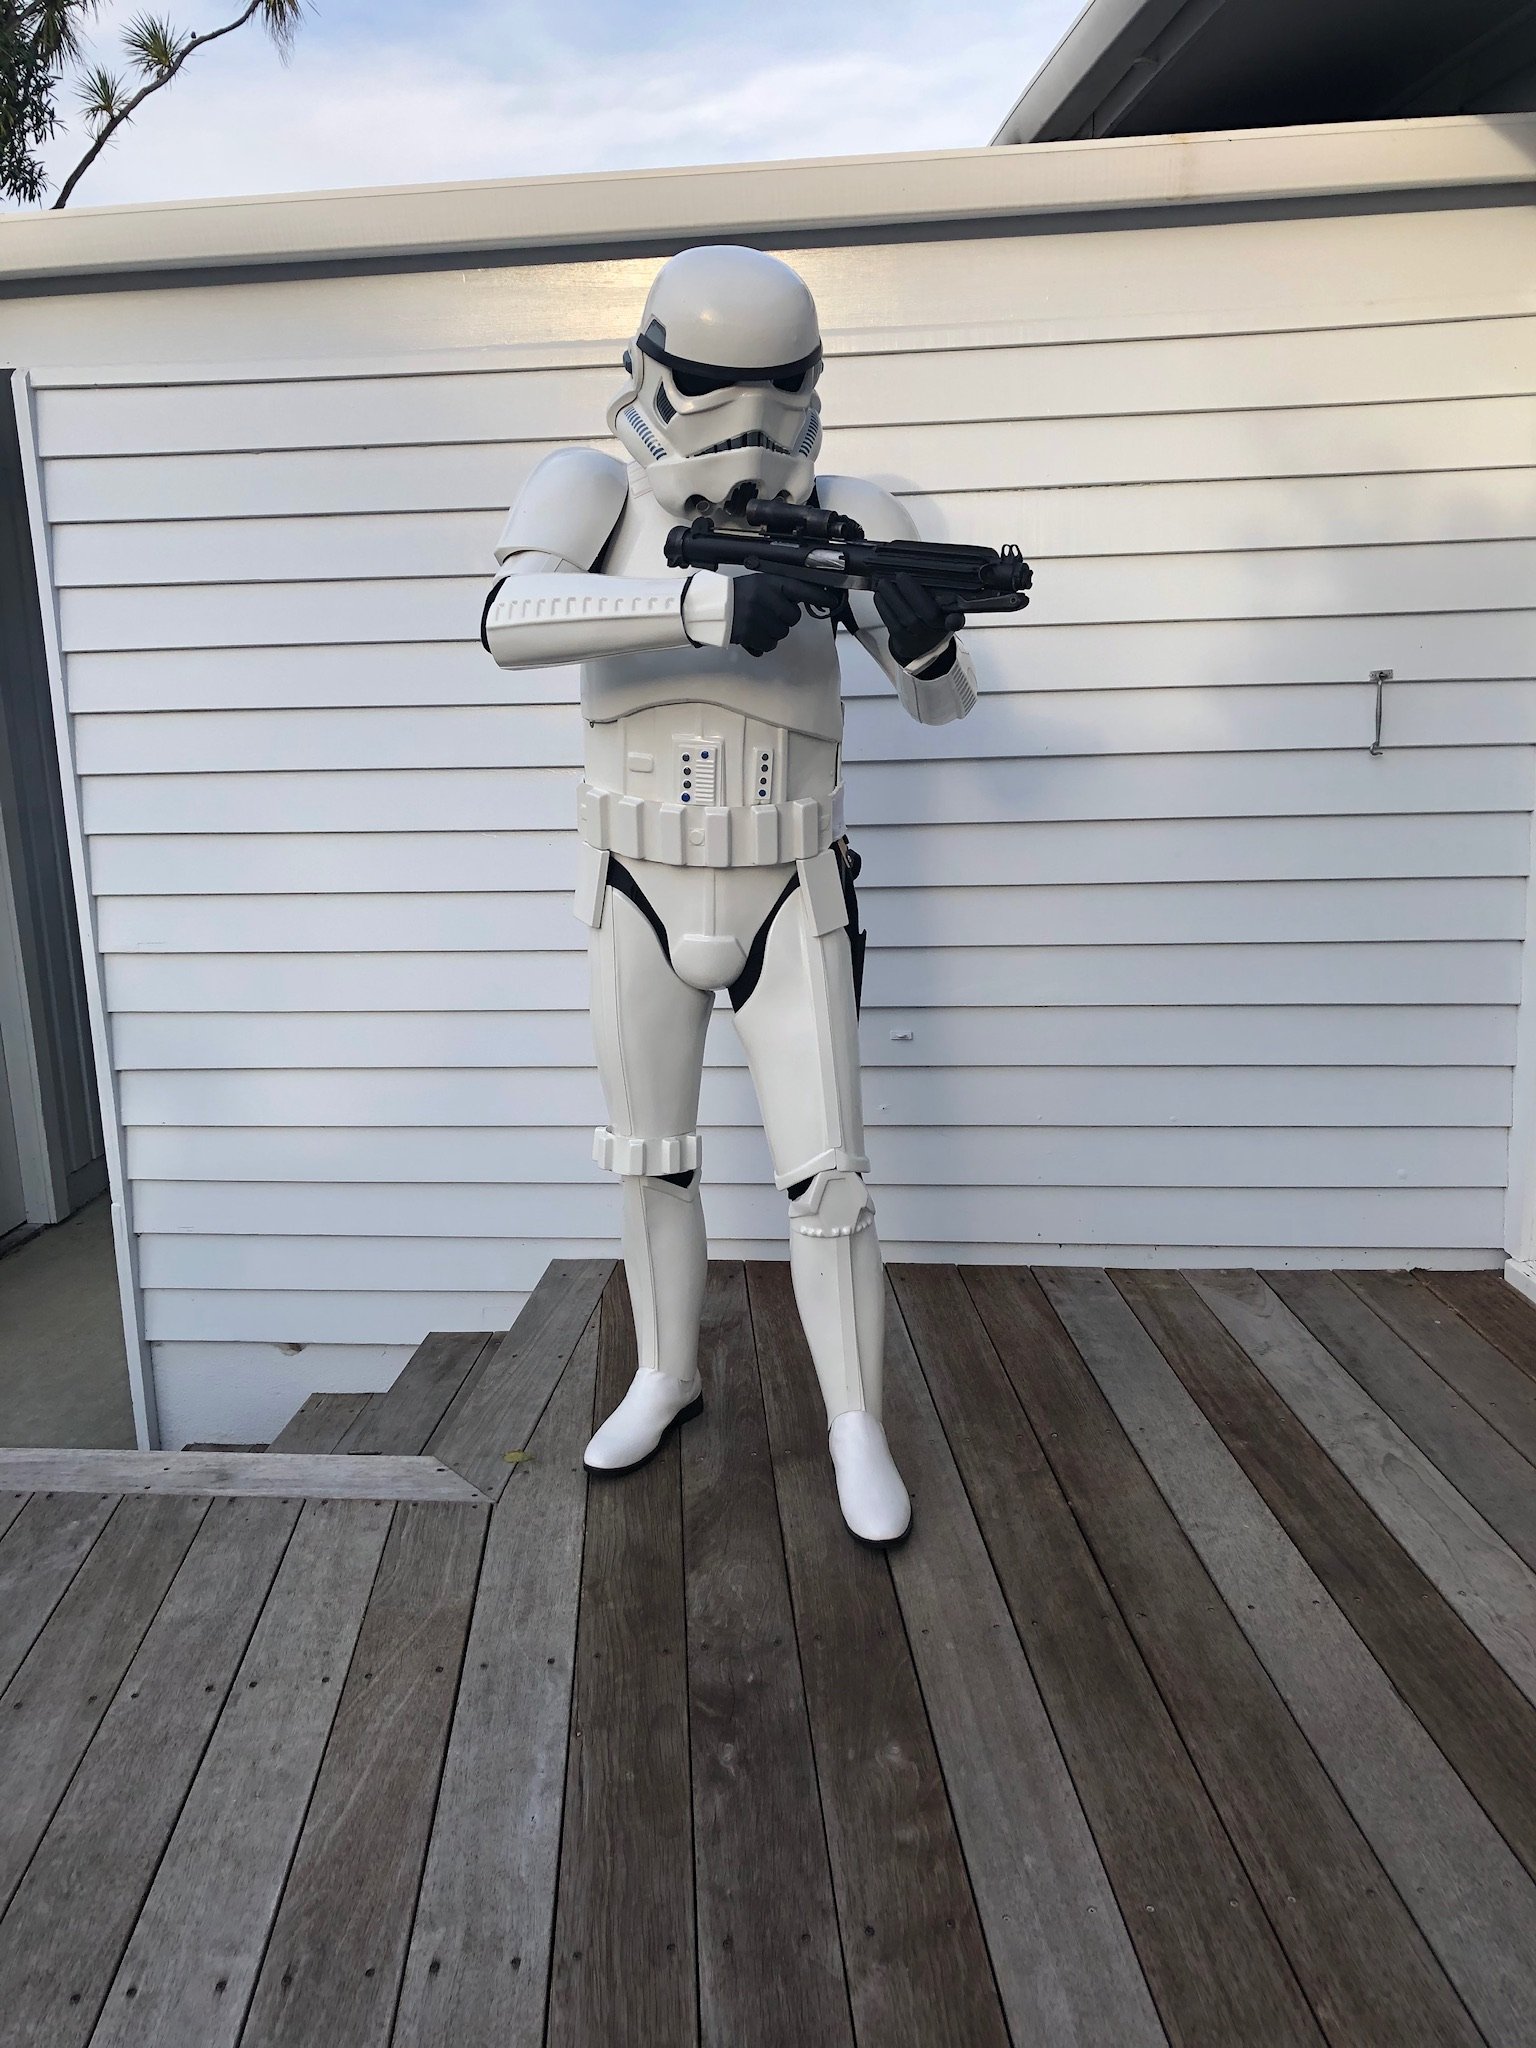
Name: Dave Fredericks 501st ID #: 18034 FISD Username: Freddybear Garrison: United Kingdom Legion profile: https://www.501st.com/members/displaymemberdetails.php?userID=24942 Armor: RWA Creations Helmet: RWA Creations Blaster: Doopy Doos with heavy modifications Boots: Imperial Warfighters Canvas Belt: RWA Creations Hand Plates: Silicone Neck seal: RWA Creations Holster: RWA Creations Electronics: Troopacoola dual fan system with Anker battery. Recently cleared basic with the following submission pics: Gloves: Rubber with silicone hand guards Neck Seal: Two piece Under Armor body suit with balaclava: Boots: Helmet: Thermal Detonator with flathead screws painted black: Belt: Wrists no return edge: Ammo thigh capped rivets painted white: Sniper knee: Han snap: Left side split rivets painted white: Cod brass rivet and butt snaps: Ab buttons: Shoulder bridges front and back: E11 Blaster with M38 scope, metal screws, original counter inners, aluminum trigger guard, movable ARS switch, magnetised ammo clip, working locking pin and removable end cap:2 points
-
I cannot believe we are down to the final 10 of the 1000. This is so cool and I am honored to be a part of this.2 points
-
The drilling template is also in that link I shared. :-)2 points
-
Thank you! Yeah it has been tough on us all. Good to know I can do my blaster in this thread too, as it is kind of another little side thing ontop of the armour. I'll submit some photos of the kit soon to give you guys a better look at what needs to be done. Hey Rudi, good to see ya! Very close to finishing, I'll try to get submitted soon, but I might work on the blaster a bit since it is something new! Thanks for the welcome back! Hopefully in the future we can all troop again soon2 points
-
Hmmm, 10 more EI's and we are at 1000! that is awesome in itself. So as promised, here is your next sneak peek, and to celebrate 10 to go, here is an extra piece

 2 points
 -
There still hope amigo! Now that you've started your build it will roll like a snowball gaining traction downhill. Maybe you can be the squeaker and get in just under the line.2 points
-
Greetings Troopers, I decided to go ahead and document my process closing the gap between my ab and kidney armor. For my project, my right side had a gap that was about 3” wide at the top and 1.5” wide at the bottom. This was acceptable to be approved as a 501st TK, but in order to achieve level 2 (Expert Infantry), the gap needs to be closed. (Disclaimer: This project is currently a work in progress, I’ll continue to update this thread as I progress through the process. Be sure to read through the tutorial, start to finish, before beginning work on your own armor.) The supplies I used were as follows: 1. ABS plastic 2. Exacto knife 3. 6” ruler/ Measuring tape 4. Small clamps 5. Small super strength magnets 6. E600 glue This project is a work in progress, so if I end up using any other supplies I’ll be sure to annotate them below. With my supplies gathered, I began working. First measure the working edge( the edge you’ll be attaching the shim to) of the kidney armor to prepare to make the first cut. And always remember, measure twice, cut once. Using the Exacto knife, cut a piece of ABS to fit the length of the working edge of the kidney armor. I left a little length on the bottom to be trimmed later. Better too much than not enough. Next, prepare your kidney armor for the shim. You may not need to, but I trimmed away the return edge and removed the nylon strap and snap used to attach the kidney to the ab. I then went over the edge a few times with the exacto knife to ensure the edge was as straight as possible. Prepare your shim and a connecting strip of ABS that will be used to attach the two pieces together. My shim is 7” by 4”, and my strip is 1” by 5”. Yours will be different depending on your kidney armor working edge length and the width of the gap you’re closing. Before gluing, using the clamps, position the shim and the connecting strip on your armor to ensure that: 1. Edges are straight 2. Lengths are correct 3: shim will hold position on its own E6000 glue needs to be left for 24 hours to dry, so you’ll want to ensure your shim will not move during that period. This step is important, ensure the shim will fit exactly how you want it before applying any glue. Apply glue to one side of the the connecting strip. Holding your shim butted against your kidney armor, apply the connecting strip to the inside of your armor. Ensure the connecting strip is evenly placed half on the working edge of your kidney armor and half on the edge of the shim. once I had the shim held in place by the clamps, I used the super strength magnets to keep the shim held tightly during the drying period. And now we play the waiting game. It’s recommended that E6000 be given 24 hours to dry, so make sure your armor is positioned somewhere it will not be disturbed. (As stated above, this is a work in progress, so I’ll provide updates to this project as I continue working. In the mean time, any and all input is very much welcome, I’m by no means an expert and any tips or advice will benefit not only me, but anyone else this tutorial may help in the future. Thanks in advance!) to be continued...1 point
-
TK-19024 reporting in from Outpost 42 Garrison in New Zealand. I have always been a big Stars Fan anyways born in the auspicious year of 1977 when ANH come to our screens. I have always been drawn to the Stormtroopers and have recently realised this passion when two BBB‘s arrived from RS Props. A big thank you to my GML, Andrew, who has helped me through the approval process.
 1 point
 -
It's really starting to come together now Dan. Looking good.1 point
-
Looking good, shame about those pinholes but at least you are tackling it head on and know what's involved to move on1 point
-
I made sure to give some extra room. I test fit it with cargo shorts on. Keys, phone, and wallet in 3 pockets.1 point
-
Ueli Isch TK 19844 EIB A4 TKSpartan Thank you My pleasure, and CONGRATS! http://www.whitearmor.net/eib/certificates/19844-eib.png1 point
-
Thank you very much =) It's astonishing how helpful the FISD is. It's a real joy to see But I can't promise if I do Level 3. First I have to finish some other projects (A Mousedroid, a Sandtrooper and a Zombietrooper). But I'm trying to convince a fellow trooper and our CO (both with IronMotion Armor) to go for EIB to help the FISD to reach that magic 1000. I assume they have the same things to fix as I had, so that should be easy for them. Cheers!1 point
-
Congratulations on your EIB approval!1 point
-
Next is the TD . I've taken it to pieces and painted the screw heads satin black enamel . Tomorrow I'll attack the alloy brackets . Sent from my iPad using Tapatalk1 point
-
Below is another note from my EIB application on a Centurion requirement I will need to address. It appears that I made a mistake on where I placed the three rivets on the side of the abdomen. CRL: Three rivets, approximately 5/16"(8mm) diameter, are present on the left side of the abdomen armor... equally spaced along the depth of the armor and about 10mm from the edge. We have a challenging issue here but we have confidence that you can do it! Unfortunately, the rivets on the ab plate sit too far back from the edge and, for level 3, will need to be moved closer as seen below. The ones on the kidney appear to be farther, but we are taking into account that there is a return edge (as seen by the dotted line) right next to them. They also need to be horizontally aligned. After moving them, the holes can be filled with ABS paste and then sanded/polished. A bit of a task, of course, but we have faith in you! Reference Images In order to fix this I am going to need to remove those rivets ans move them over to the appropriate location nearly 10 mm from where they are. I have two options to accomplish this feat. The first is to remove and replace the rivets and fill the holes using ABS paste. The other requires trimming off equal amounts of the ab plate from both sides to maintain uniformity. Now I haven't decided which route to take but wanted to try a couple things first before coming to a decision. I decided it was probably best to do a trial run on the ABS Paste repair that would be needed to fill in the holes that will be left behind. I took out a leftover piece of ABS and drilled three like size holes. In case you are unfamiliar with the ABS paste process Here is Kman's most excellent tutorial. Next, I proceeded to fill the holes and waited for it to dry. After it was dry I moved on to sanding. Looking at these results I am not happy with the process yet. You can see the holes are quite noticeable. I think my ABS paste was not smooth enough and air pockets allowed bits of debris to get caught in the gaps and voids making it look awful. Another thing to note is that the ABS paste fuses to all it touches so if you are not careful it gets everywhere and increases the surface area you need to sand and repair afterwards. I may be taping off the work area to help keep it clean. Alas I have more supplies and since this was only a test I will try again to hone my ABS paste skills!1 point
-
Ok, on to the upgrade list . First those darn teeth .... A craft nice slice and a screwdriver tip brought the edge paint off better than I could wish for . A little touch up and hopefully it's ok . I'll post a final pic when the paint is dry . Sent from my iPad using Tapatalk1 point
-
Cheers Scott. You'll discover a new found freedom trooping as a TIE. It is so much easier to move around. I did not realise just how restrictive a TK was until now. Respect to y'all!1 point
-
Like many others, I didn't get a chance to pre-order the figure. I even tried waking up in the middle of the night just before the "release" time with the tiny glimmer of hope that I could snag one and not have to run out, still to no avail. I got up and went to Target before it opened and found there were two people there in front of me. I made nice small talk with both of them just in hopes they wouldn't just horde whatever figures were available. The first guy bolted when the doors opened and managed to scour every toy isle before I got there. He was angry because he said he saw them on Friday, but the register wouldn't allow them to be rung up. What really got him going was there was not a single Target exclusive out on the shelves. He ran off to find a manager who went to the back and after about 10 min she returned with a small cart of all the Target exclusives they had. She asked what you guys are looking for and the first guy pointed at the black series figures and she said grab whatever you want. I looked and saw there were only three Capt. Cardinals. The first guy grabbed all three and my heart just sunk. He immediately turned around and handed one to the second guy and then to me. Faith in humanity restored. What a roller coaster of a morning. Link to photos in Shawn's Build thread...1 point
-
Wow! This is like the Bible of Blaster reference! thank you! I found the template in it, which might be the first thing i'll do after cleanup1 point
-
Thanks, only a small problem in the scheme of things. Had a gap on the lower edge for air flow. Will try the silicon on next attempt. Sent from my SM-A520F using Tapatalk1 point
-
As Glen mentioned, we will need a few more photos (no need to get suited up). He also pointed out the paint on the teeth. As this is actually a requirement for Basic, we are asking that you spend a few minutes with a cotton swab/toothpick and some (non acetone) paint remover to take a little off the tops, as seen below. Looking forward to seeing the results and new photos so that we can get that EI badge under your name!1 point
-
Internal pics of Thigh ammo pack single capped rivets as requested:1 point
-
Here are some references, you will notice that the sides do have a slight curve from about 1/2 way upwards curving out. Also the sides meet with the cod bulge sides Your butt plate is very rounded, again compare with some references and you will notice they are quite angular and straight lined You can find more images in the gallery sections for reference https://www.whitearmor.net/forum/gallery/category/28-r1-tk-reference/1 point
-
Thanks for the feedback. I have included some additional images of the snap (hope it the one you were referring to, still a bit new at all this:) ) I actually got a second pair of gloves and moved the handguards up because I was worried the gaps were too large. I have included pictures with the original gloves and handguard placement and it does look a lot better but would welcome any comments on the gap. That is a good idea regarding foam to push the sniper plate out and reducing the curve is something I could have a look at. I am not sure what I could do about the ammo strip rivets. This was a commision build by RS Props and that is where they put them. I have looked at your image and can see what you mean. I had a bit of look in the galleries in the 501st at the ANH images and it does not look like there are some with the rivet closer to the corner. Would there have been variation from armour to armour?1 point
-
Used some blobs of Apoxie to strengthen around the ear screw holes, which gave me a bit more confidence when counter sinking the screws. Least something turned out ok today Sent from my SM-A520F using Tapatalk1 point
-
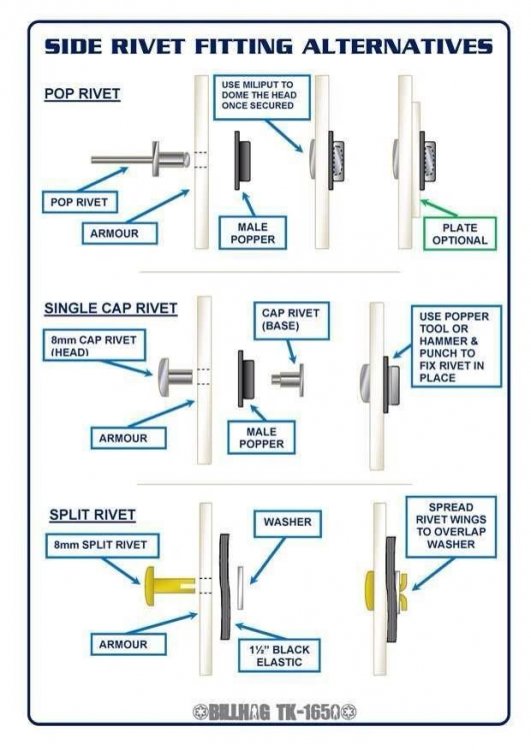
Great post, Glen. And thanks for making this updated graphic a reality. Let’s hope it starts to catch on. Additional images; https://www.whitearmor.net/forum/topic/48867-anh-stunt-belt-attachment-suggestion/1 point
-
Only way to get the scratches out is to buff them out. You can get a buffing bit for a Dremell that usually comes with buffing compound. I have used this to make clear lenses for hengsler counters on the resin Doopy's kits and it works perfectly.1 point
-
Had a solid session today and made some great progress on a few things: My wife carried on with cape progress and I sanded until I developed a blister and filed my nails to the skin lol I removed the tape from the fiberglass resizing job and was pleasantly surprised. Not bad! I just took a dremel with cutting blade and sheered off the excess and sanded it down with some 80 grit. I couldn't tell if I was dressed for the grocery store of for working fiberglass... small victory following a three day fiberglass job. This was a learning experience for sure. Confidence boost x100 This is officially the largest bondo job I've done. I've only ever spot filled in the past, but this was a good learning experience as well. Bondo's got like... 5 minutes of work time once you add hardener? You can see the left thigh is super goopy where the right side is considerably better. I found that smaller batches of bondo application is preferable. I ended up wasting materials because it would harden on my plate. Pro tip for other first timers out there. Following the literal slap-dash application of bondo, I sprayed plasti-dip over the interior work and its as if the fix never happened. I made sure to layer the fiberglass to be close to the original thickness. Pleasantly surprised. You can kind of see where the checkered cut is. Not too shabby. The whole time I was just hoping this thing would work out. No going back. Some 80 grit sand paper took the excess bondo off and a 220 grit smoothed out the rest of the thighs. In the end I sanded both thighs down to 220 because I had the clear coat already on these (before I decided to resize, which I'm SO glad I did despite dreading the work). Then a fresh coat of filler primer went down and is drying over night. 1k and 2k wet sand tomorrow. (disregard the splotchy paint job. it's getting cleaned up in the next step) I superglued the abdomen boxes down a while back, but I found that stretching the corset around my body requires some flexing of the parts, so I worried the boxes would just pop off (because super glue is brittle) so I drilled screws into them and called it good. Unfortunately, I bought those screws for my belt boxes, so I'll have to get another set. Might plasti-dip the interior again to cover up the screws. Yay, and now, cape progress! Pockets and straps cut to size. My Mrs has made some notes on her cape build (her first one) and I will add those notes to this WIP once she's done. We're using the TLJ measurements (since TFA does not mention sizes, only location) and you can see those noted on the corresponding item. And then my Mrs. mentions she can't make any additional changes to the cape until she can see me in it, with armor and boots on. So... I did my first partial suit up! This is the most I've been in costume since I've started this build. The chest was scheduled to be re-sanded, and it was done following this image. There was some misting going on from the clear coat, so it doesn't look as nice in this image. (but them shoulders! mmm hmm) Also a back image of Phasma from Disneyland for reference. Also realized the abdomen area needed to shift over a bit, so it's unaligned. Ah well. There's some work to be done on the cape. The middle panel is going to be reduced by a few inches on each side to bring the seams closer to my back. To note: The CRL (level 2) states "the cape is three panels with seams on either side of the back plate." Well... there's seams on either side of the back plate... but every reference photo I've seen is closer to the backplate than mine is, so we're going to bring it in a bit more so the pockets line up. There's also some length issues going on but we didn't hem anything until this test fit. We've found that the Geeky Pink measurements weren't quite what I needed, but it was a great help and landed us in the ball park. The cape was remeasured and will be tailored to hit the marks in another session. (More seamstress notes to come!) Lastly, the red textile paint showed up. Huzzah. That's going to be a fun session when the time comes. I think tomorrow is just surface prep on helmet, chest, and thighs. Then Unicoat can go down. Again. If the gloss coat isn't beautiful, it'll be magnified by the chrome. Like many before me, I'm stumbling through this step and any failures results in a clean sanding to try again. Cheers to a new day.1 point
-
Problem is on the outside, the glue ran and dissolved some of the lenses color into the excess glue which made contact with the white now it looks crap! Had a test piece that it happened too which cleaned up easily with some sandpaper. Should I use 1200 grit or go for something finer as need to get the green stain out and clean up the lense scratches Sent from my SM-A520F using Tapatalk1 point
-
The Final stretch !!1 point
-
Congratulations Basti and thank you for sharing1 point
-
1 point
-
Congratulations!!!!1 point
-
Congratulations Ueli1 point
-
Congratulations trooper and welcome to the EI ranks1 point
-
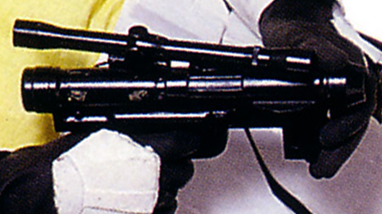
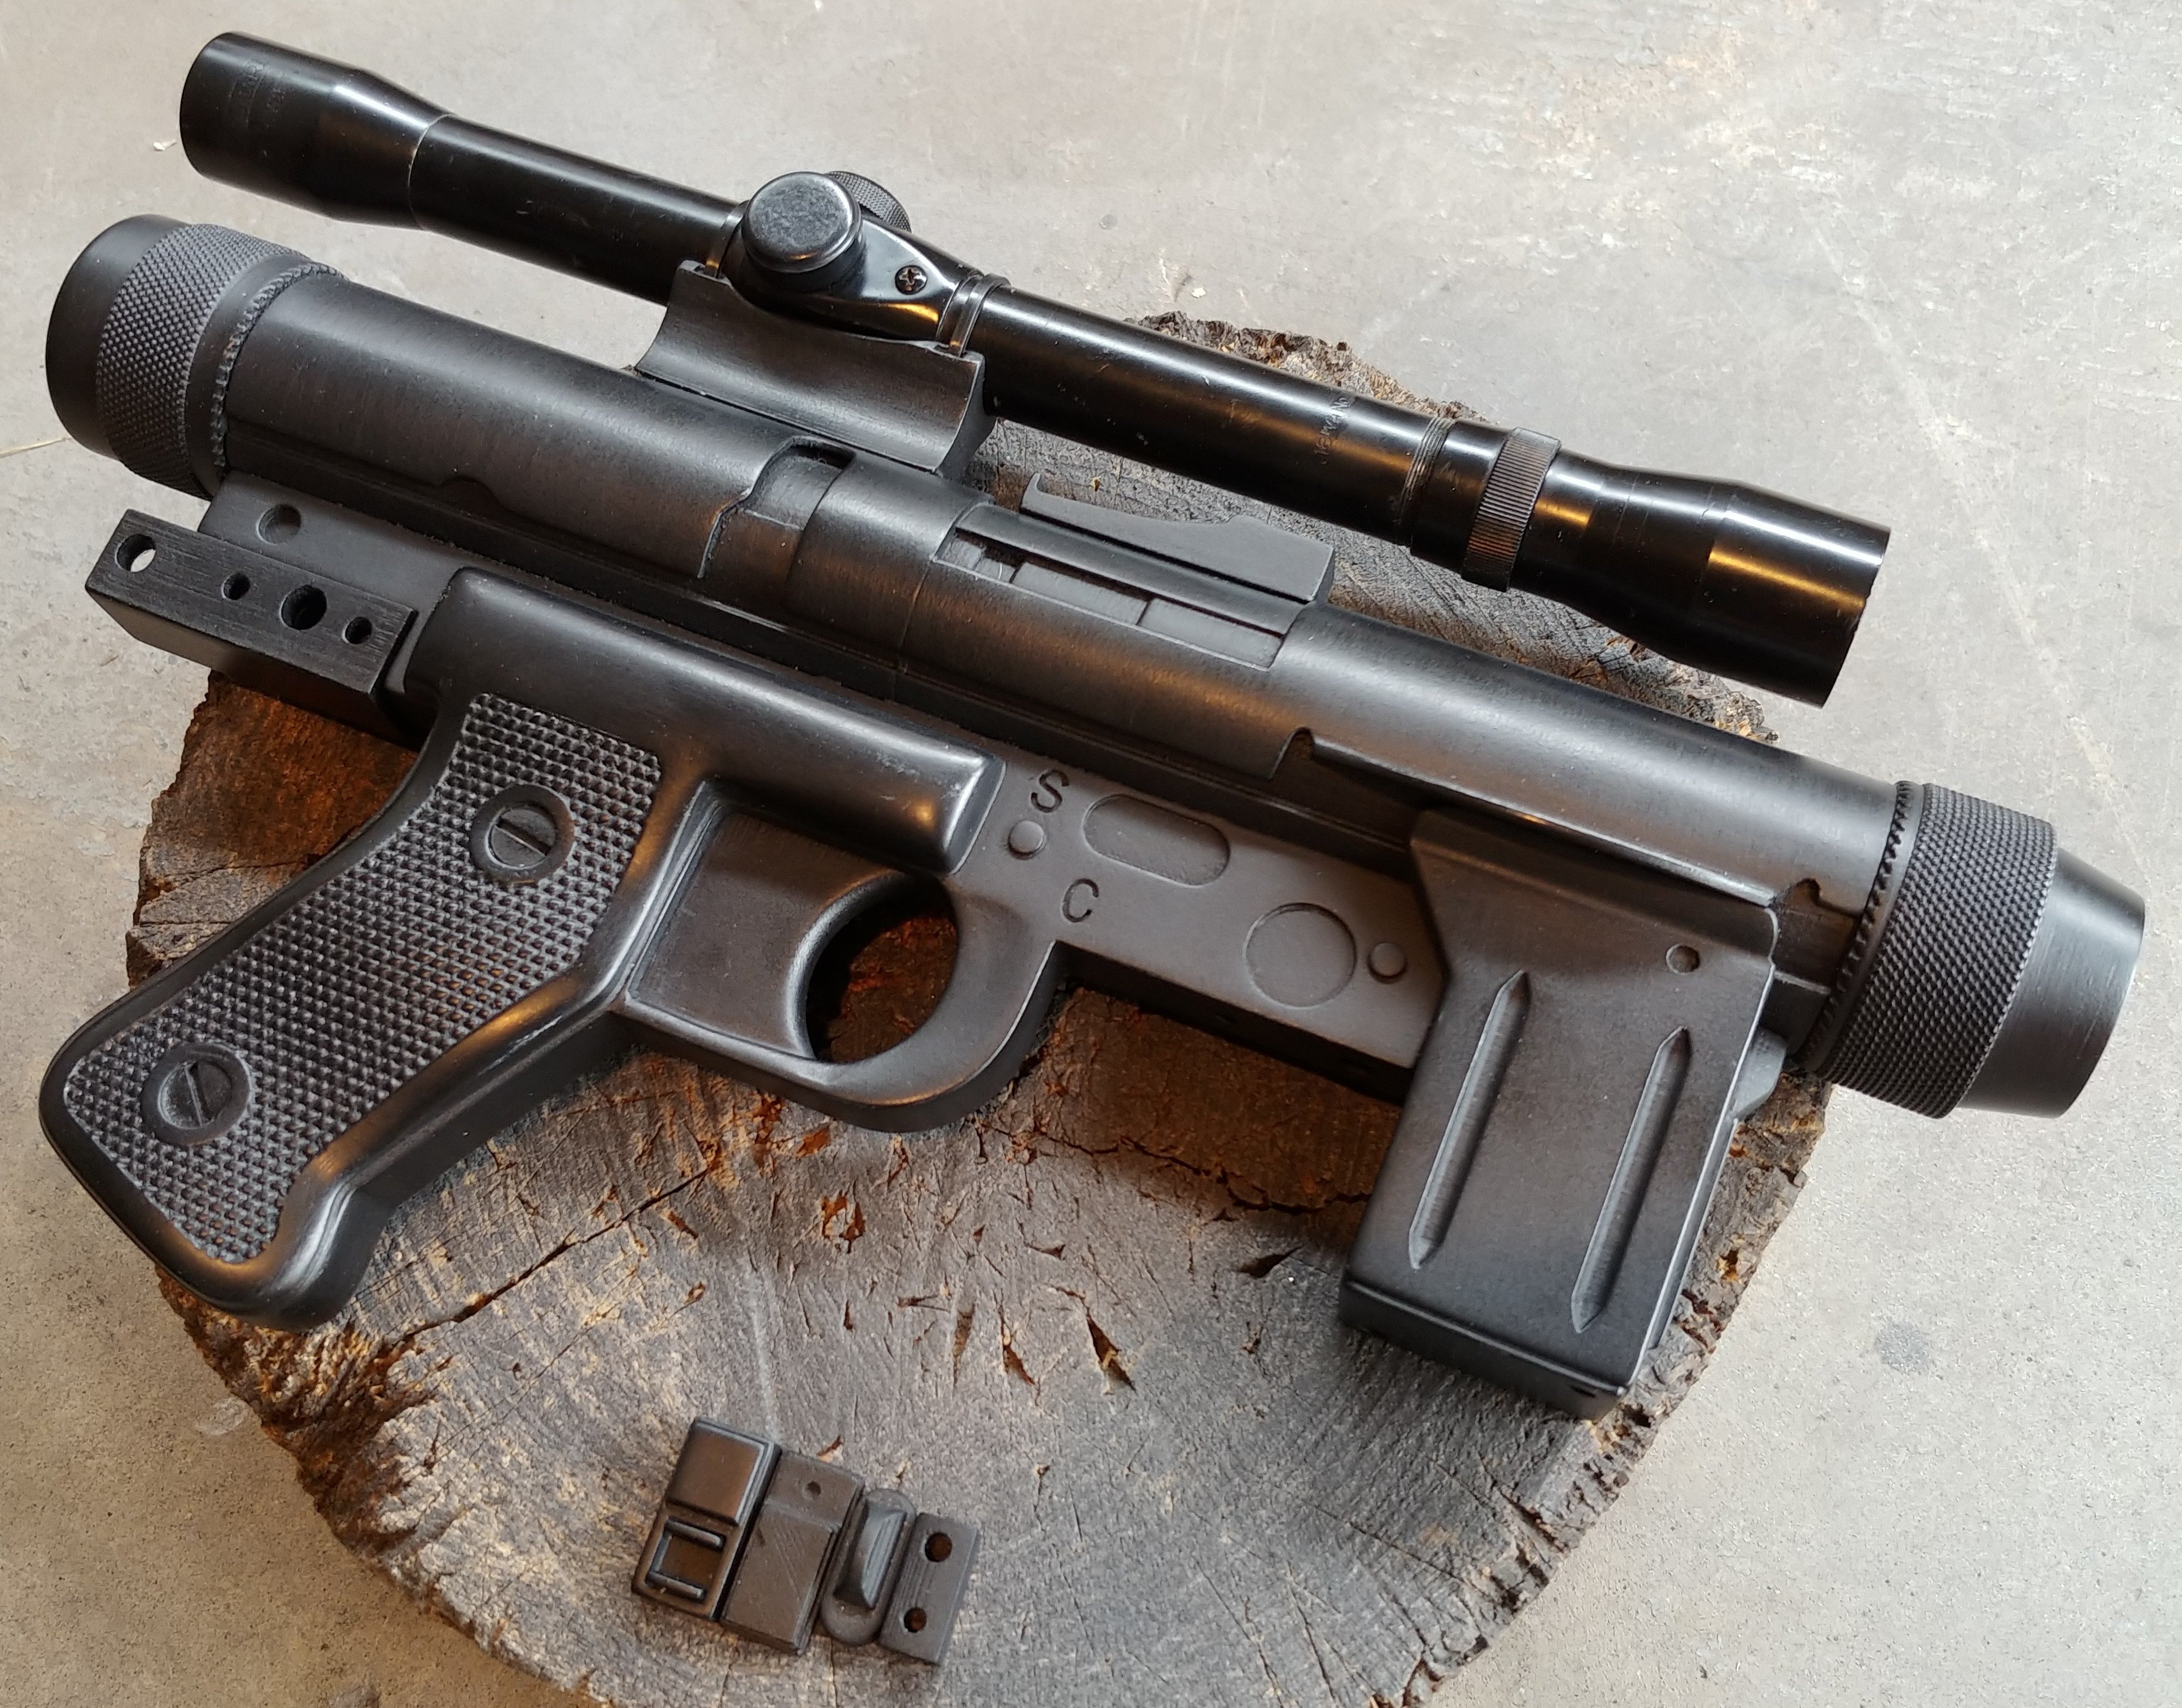
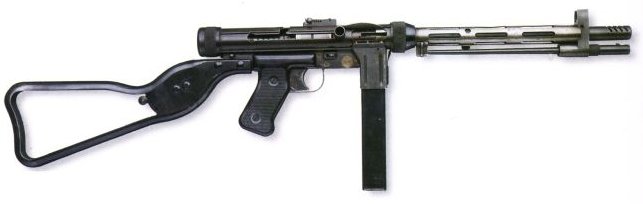
SE14R reference pix, restored by gmrhodes13 SE14R build, restored by gmrhodes13 SE14R greeblies, restored by gmrhodes13 SE14R holster, restored by gmrhodes13 Need help about SE14R, restored by gmrhodes13 https://www.whitearmor.net/forum/topic/9925-se-14r-eu-reference-pix/ https://www.whitearmor.net/forum/topic/25093-se-14r-build/ https://www.whitearmor.net/forum/topic/28078-se-14r-greeblies/ https://www.whitearmor.net/forum/topic/35912-need-help-about-se-14r/ https://www.whitearmor.net/forum/topic/28745-se-r14-holster/1 point
-
Hi Ueli, and thank you for your EIB application! CRL and EIB Application Requirements: All required photos have been submitted, and on behalf of the entire D.O. staff we are pleased to welcome you to the rank of Expert Infantry. Congratulations! Other-Armor Fit/Assembly; In this area we review observations made by your fellow troopers and the DO team. Some observations may lead to suggestions to improve the overall look of your armour. *************************************************** Let's atrt from top: Your left eye looks great but we suggest you trim out some more the right one a point for that more menacing apperance when staring down a crowd Reference Images When in our Stormtrooper armor, we are anonymous. Children and their parents in Trooping see their characters with emotion and do not imagine or think that within that armor there is a fanatic like them. For this reason, we try, by adding a mesh behind the "teeth" of the helmet, to prevent our face from being seen through the holes in them. We are suggesting to add the mesh to your helmet. Reference Images The brow trim of your helmet, as you can see in the reference photos, should be a bit shorter, this is a very easy and fast adjustment, just be careful to do it little by little so as not to cut too much. Reference Images Your traps and tears outlines are a bit too thick if compared with the screen used references. Reference Images This looks like a just a strapping adjustment is needed to close that small gap. You could extend the White elastic Back/ shoulder connection a bit to allow this to get low a bit. Reference Images We suggest to shorten the biceps to forearms elastic to allow them to close the black showing and give a better look from wrist to biceps.. Reference Images We are suggesting that you reduce the size of your small ab-button plate a tab, Also, the edges should be square and not rounded off. Reference Images Finally on this section, we are suggesting to trim the sniper knee a bit for more accuracy. Reference images *************************************************** Centurion Requirements; In this section we prepare you for Centurion. Because Centurion photos show more detail than EIB, items pertaining to Centurion might be seen there and not here and additional photos may be required. We try to point out all that we can from what we see, but the final accuracy is the responsibility of the trooper. CRL: There should be a minimal gap between the shoulder armor and the chest/back plates. As the CRL states for level 3 , there should be minimal space between the shoulder bells and the chest armor. (Although not specifically mentioned), the tops of the shoulder bells should touch (or be very close to) the shoulder bridges. In your case it seems that it is a matter of shortening the elastics of the connection between these. Also, you can trim all the return edges from the bottoms of the Shoulder Bells to have more room. Reference Images CRL: No return edge on the inside of the front of the forearm is allowed. This is an easy fix that will take only a few minutes of sanding . Reference Images CRL: Ab button paint shall not extend beyond the bottom of the actual raised button. The paint on your ab buttons is a bit too big. If you take a look at reference photos, they should be a bit smaller. As you did with the teeth, this should be pretty easily fixable with a bit of paint remover, (non acetone). CRL: The top of the ABS ammo belt should sit at or just above the bottom of the central and vertical abdomen button panels. Your ABS Ab belt needs to go up a little to be perfectly, a widely used trick is to place a couple of small strips of Velcro behind belt to ensure it doesn't sag in the front Reference Images Even though it's not detailed in the CRL for level 3, looking at the reference images , your TD caps are a bit too narrow and will need to be replaced for screen accuracy. Reference Images CRL: Hand guards shall be latex or latex-like, solid white or painted white, and affixed to rubber gloves with no visible strapping or stitching. For Centurion level, you will need to replace your handguards for latex or latex-like ones with no visible strapping. Reference Images CRL: A single male snap on the top right corner of the ab plate is present. Moving on we have the Han-snap. It should be ideally in the top corner, and it doesn't need to be functional. Reference Images CRL: Three rivets, approximately 5/16"(8mm) diameter, are present on the left side of the abdomen armor. Note: The original rivets used for the TK armor were bifurcated rivets or split rivets. Rivets are equally spaced along the depth of the armor and about 10mm from the edge. The same case as the "Han Snap" pointed before, you can just install them and they don't need to be funcional. be sure to place the ones on the ab section first a then proceed with the kidney ones. Reference Images CRL: Ideally there no gap between the abdomen and kidney armor. Abdominal and Kidney Plate align horizontally at top. The sides should be together nice and thight , aligned on top . Some tighter strapping using Nylon instead of elastic should have this sorted. Reference Images CRL: Drop boxes are vertically aligned with the end of the ammo belt with minimal gap between belt and box. This is one of the most common issues we see, but is quite simple to address. Some E-6000 on the inside strap will take care of this. Reference Images CRL: The corners of the plastic ammo belt shall be trimmed at a 45 degree angle that that meets the outer edge of the cloth belt. There shall be three square buttons, one centered in the middle and one on each end of the plastic ammo belt.. As required in the CRL the 45 degree corners on the ends of the ABS ammo belt must meet up with the edges of the cloth belt. Additional to this, the square buttons on each end should be centered . Reference Images Finally , Your left thigh shows a gap in the lower ridge as seen below will need to be filled. A small ABS shims behind them and fill with ABS paste would do the trick, Reference Images *************************************************** Congratulations again and if you decide to take the next step to Centurion, (as we certainly hope), I'm sure you have the ability to deal with the requested changes and don't hesitate in let us know for further assistance . We'll be here when you are ready.1 point
-
1 point
-
Here are the requested photos: Updated E-11: Left and Right Thigh Rivets: Left Side Thigh Rivet: Sniper Knee: Thanks for all the feedback so far, everyone!1 point
-
Just jumping in to say that your posts have been super inspirational! I have a big box of Phasma from KB sitting in my living room, no idea where to start! I'm enjoying seeing all the trial/error so I don't have the same issues1 point
-
Anthony Shultz TK 16603 EIB Letter Size Sha Sha http://www.whitearmor.net/eib/certificates/16603-eib.png1 point
-
Anthony Shultz TK 16603 Centurion Letter Size Sha Sha http://www.whitearmor.net/eib/certificates/16603-centurion.png1 point
-
@gmrhodes13 and @Firedog cool I'll go ahead and get rid of it. Cheers!1 point
-
Started the thread on at the following location:1 point
-
You need to post a link to your 501st profile, enter your TKID in the legion member search https://www.501st.com/holocron/member/search You need to post a link to your 501st profile, enter your TKID in the legion member search https://www.501st.com/holocron/member/search1 point
-
Hi guys! Applying for approval!, TK-26590 https://www.501st.com/members/displaymemberdetails.php?userID=32795 Thanks in advance1 point