Leaderboard


Popular Content
Showing content with the highest reputation on 08/20/2020 in Posts
-
Leaving in just over an hour to go meet up with @justjoseph63 to work on my kit. I am gonna try and push through to get in under the wire.4 points
-
I am waiting for my RS Propmasters ANH armor and bucket. This site has been a treasure trove of guidelines and teachings. I have started collecting the tools and additional supplies for when the armor arrives. I aspire to reach the TK Centurion level one day. I still remember seeing ANH in the movie theater and being blown away. Future TK Trooper, Michael from GA2 points
-
"I still don't know what "V Style" is and google image search isn't helpful. Can you provide an example please"? This refers to the shape of the screw head, Ueli. What you have now are "V-head" (image 1) which are not permitted. Ideally, they should be "Pan-head" (image 2) but round head screws (image 3) are acceptable. The top must be slotted (top, image 4) and not Philips (bottom). Hope this helps! 1 2 3 42 points
-
Did some more trimming and finally decided after cutting the yoke down like what I've seen on some others to glue the thing together. After sanding the 2 parts that would be mated I applied some Zap-a-gap Stuff is no joke, it bonds quick. This was like 10 minutes later. Trimmed around where my arms come out so I have more freedom of movement and bring down the ride height of the chest piece cause right now my helmet likes to sit on it which is no bueno for trying to move my head around and bad for line of sight. This is about as far as I wanna cut down on the yoke. I think I'm pretty happy with how it is now. Dont wanna trim into the shoulder too far cause I plan on getting those metal support tabs to go in between for the shoulders. Hopefully once the helmet gets padding and a hard hat liner it will all sit better and not clash so much. Need to start putting some other pieces together like the forearms, but I still need to trim those...man trimming takes forever and hurts ya hands!2 points
-
Nice work trooper, a couple of things you may want to address before the DO's go over your application, these are suggestions. TD caps are too narrow, also clips and screws/bolts are not accurate. Control panel corners should not be rounded. You have different gaps between your shoulder bells, try bringing your right inwards at the top. You could also reduce the gap between your biceps and forearms. Belt could come upwards Any gap between the abdomen and kidney armor is no more than 1/2" (12.5mm) wide Also the height of the Ab and kidney should match Some of your black lines are a little wide You have a little excess paint on your gums: Frown is painted gray and does not leave the teeth area. There is still some return edge on the forearms Looks like you are missing a cod rivet Ab button paint is a little large, the plates could be trimmed a little more, also the plates are not rounded on the corners Ideal placement for thigh ammo strip rivets Could you also post up an image of your ab/kidney side rivets and also the single top ab rivet.2 points
-
I am sooooooooo close. I’m submitting for basic this weekend hopefully and then EIB first part of next week. I’ve got a few minor things to finish and my E-11 should arrive Monday if it doesn’t get delayed by US Customs.2 points
-
I hope I'm doing this right. There may be some errors because english isn't my first language. I know the lighting isn't the best as is has a light yellow tint, but I tried to fix it a bit Due to Covid19 it's a bit hard to find someone who is able to take pictures and check the fitting of the armor. Garrison: Swiss Garrison TKID: 19844 Name: Ueli Isch Profile: https://www.501st.com/members/displaymember.php?userID=27757&costumeID=76 Armour maker: IronMotion Helmet maker: Ironmotion Blaster maker: Doopydoos E-11 kit. Full body pictures. One picture is from the approval so you see it's the correct color. The rivets may be wrong? When I imagesearch for "rivets" and "pop rivets" it shows the same pictures. So I'm not sure if those are correct or if they need to be filled. (Original Humbrol Colors. Might look a bit off due to lighting, can retake new pictures if you want.) I'm not sure if the screws are right? The description on the CRL isn't very clear. But I believe I have to change them. (With the V-Screws, does this mean Sink-Screws?) The writing is not visible when I'm wearing those. It's hidden under the armor.1 point
-
Yeah progress! I like the binder idea. When I was building mine I had like 20 tabs constantly open in my browser and would bounce back and forth between them. I think your binder idea is great. Sent from my sorrosuub C1 comm link device using Tapatalk1 point
-
Can I ask who you ordered this kit from?1 point
-
Thank you so much. Looking forward to the experience.1 point
-
Surprisingly, I've already read two of those links, I'll also be sure to have a look at ATA, I probably won't be making my armour from scratch, heh. I've also already found all the other soft and other components, minus a Blaster and a Thermal Detonator, I'm also not really on a tight budget either, because I do have a bit of time before I pass the age restriction, perhaps I'll even get my armour to Centurion if I try enough. Anyways, thanks. (Edit) I wonder if there are any age exceptions, or you need to be above 18 yrs..1 point
-
When adding snaps inside just make sure you remove any paint and rough the area with some coarse sandpaper, will help adhere more. Looking good1 point
-
I decided not to let a 34,000-acre fire 9 miles away stop me...I sprayed gloss white on the barrel today. I kept my garage door mostly closed and didn't end up with too much ash inside. Application went well, just trying to get all the angles. Some spots underneath where it's resting on the box won't be sprayed, but maybe I can touch them up another time. I haven't decided how I'll get the buttons or side stripe... I think I'll order some detailing masking tape for the stripes and spray gloss black. I don't have gloss gray, but might try satin gray and a gloss clear. I don't have any spray blue, but I do have a blue paint marker that I'll try... I probably won't worry about those details for a while. I also sprayed satin black inside the side plates. In a few days I can E6000 snaps inside the barrel, and then figure out the suspenders! Tomorrow (fire permitting), I'll spray satin white inside the belt halves and prime the bells and biceps!1 point
-
Requesting access, TK-15028. Garrison Carida. https://www.501st.com/members/displaymemberdetails.php?userID=328591 point
-
Welcome Michael! I hope you were prepared for all us Georgians to descend upon you here on FISD! I can't really provide any better advice than what you've already received from the Troopers above, but what I can share is a link to a resource compilation thread I made for ANH builds. https://www.whitearmor.net/forum/topic/49412-all-in-one-tk-anh-stunt-index-of-resources-by-maskedvengeance/ I look forward to possibly trooping with you someday, whenever I can get back to my own build. Now go out there and make Vader proud!1 point
-
Hello fellow Georgian! Great to see another shiny white trooper, and going for Centurion out of the gate is great! Start a build thread and we can help you get to trooping soon. @Scimitar @Cricket. Both Christine and Eric are in the garrison and active on the FISD.1 point
-
Hi Tyler and welcome to the FISD! AP is an excellent set of armor. Please just peruse that getting started thread that Mario provided. It can come down to your height and weight to make sure a specific set of armor is right for you. Also, have you located your nearest garrison? You may have a member or two close nearby and you can pick their brain about building your set of armor. Check out the build threads around here. It can feel like a daunting task at first but once you start building you will find that it is not too difficult.1 point
-
Hi Michael and welcome to the FISD! RS Props is one of the nicest armors out there. You will be very happy with it. Good luck on your build!1 point
-
Welcome to the true home of shiny white armor, Michael! Great to hear that you pulled the trigger, ordered your RS kit and are aiming for Centurion, and we look forward to helping you in any way we can. While waiting, I suggest getting all of your supplies in order ahead of time, as well as researching some of the build threads already here. When Big Brown Box day finally arrives, I also highly recommend starting your own build thread where you can post photos of your progress and ask all the questions you may will have. I have some tutorials below that will help, and I look forward to seeing your progress!1 point
-
Looking forward to seeing those BBB photos soon1 point
-
woo. not much to look at here, but the 2k wet sand is done for most of the kit. Gauntlets, hands, and blaster will get the 800 and 2k treatment tomorrow. I'm glad I managed to get this done in small sessions instead of entire days, as originally planned. Each session has been 4-8 hours, so that's basically a full day... it really is a marathon. On another related item, the black canvas for the Captain's cape has arrived. Same stuff as Kylo's tunic and sleeves! I'm going with this Colonial Red for the stripe, painted on and decorative stitching to be added. My wife is a seamstress wizard so I'll be following her work on the cape and will do my best to document the process here as well. I found the patterns on the Phasma builders group on Facebook via Geeky Pink. Weehoo. Getting to the fun stuff.1 point
-
1) Good thing I did those additional photos. It's already 1/2 inches 2) I'll try to fix that. 3) I still don't know what "V Style" is and google image search isn't helpful. Can you provide an example please? Does this describe the type of screwdriver-design? I.e. - vs +? 4) Will do as soon as I'm home1 point
-
Welcome! Good to see another local TK here! I joined not too long ago. Maybe I'll see you in the Georgia Garrison soon1 point
-
Hi Joseph, All right, I already fixed the strapping on the biceps as you suggested, it's also a good way to get it a bit smaller for packing. I also repainted the helmet stripes, paying more attention to get all of the stripes as similar as possible, badly I ain't got a template by hand and shipping from the US takes about a month, so Itried again with tamiya masking tape, please let me know if it's good enough, the differences are within 0,5mm and I carefully shaped all of the curves the same. Thanks a lot to everyone for overseeing all of my project, it means a lot to me. Imperial greedings, Alex1 point
-
Hi Michael, glad to read you're near to make a dream come true !!! Congratulations and hope to see your first photos soon !1 point
-
Thanks for the helpful info, I'll be sure to check that out right away!1 point
-
Hi Tyler welcome to FISD . Glad to read you're on the way of making a dream come true, (as most of us were in some time ago). If you haven't done yet. I would like to recommend you to take a look to the Getting Started Section Assembling your own armor is a Challenging but full of learning and rewarding process . Most recruits use to open a building thread to post photos of their advances, receive tips and feedback from our very experienced Troopers. Also you can take a look to some build threads like this for an Ep 4 stormtrooper. You can also search some youtube videos about building a stormtrooper armor. Browse the forum, ask questions. we are here to help. Good luck mate1 point
-
Hey i have a current friend who is a part of the 501st legion his Legion ID is TK 91091 he sent me here to get advice and tips. I am currently looking to making a Stromtrooper, ANH Hero costume. I am looking to save up some funds and spend when i can. Thanks hopefully future 501st member1 point
-
Hi Ueli, Thank you for your EIB submission , one of us will be with you shortly. Meanwhile there are a few fixes that will be needed in order to proceed: 1- AB / Kidney Gap , CRL for L2 : " Any gap between the abdomen and kidney armor is no more than 1/2" (12.5mm) wide" It looks like this could be just an Ab/kidney strapping adjustment , Could you please check this out so the gap can be reduced up to 12.5 mm? 2- Thigh ammo belt CRL for L2:"The rivets used shall be single cap, double cap or split rivets. No pop rivets allowed." Could you add a couple of photos inside the thigh ammo belt to see the rivets please? They seems to be pop rivets but it's not clear. If they are pop rivets, they should need to be changed for the correct style. 3- TD Screws CRL for L2: "Clips shall be attached with slotted type, flat or dome top style screws, and be black (two per clip). V head screws are not permitted." Yours looks to be slotted that is correct but "V" head style and will need to be replaced for thr correct style and to be painted in white color. 4- Could you add a close photo of your right thigh front cover strip please? what we need to check is as per the crl states for basic level: "Cover strip must end at the top of lower ridge in front and back." and we can't see this detail clearly. Additional info and photos will be requested by the assigned officer. Cheers1 point
-
Man, hard to believe we just need a dozen more. How hard can it be to convince a dozen folk to just to a few small tweaks and go EI? :-)1 point
-
Okay so now that I’m clear that we are all AM, I would recommend joining the AM Armor’s Costuming Group on Facebook if you aren’t already a member. I got awesome advice on our specific kit because that’s all that group is about. Hope to see you there! Sent from my iPhone using Tapatalk1 point
-
Welcome to the FISD, good luck in your build, feel free to ask when you want.1 point
-
Welcome to FISD Jake! Good luck with your research and saving up!1 point
-
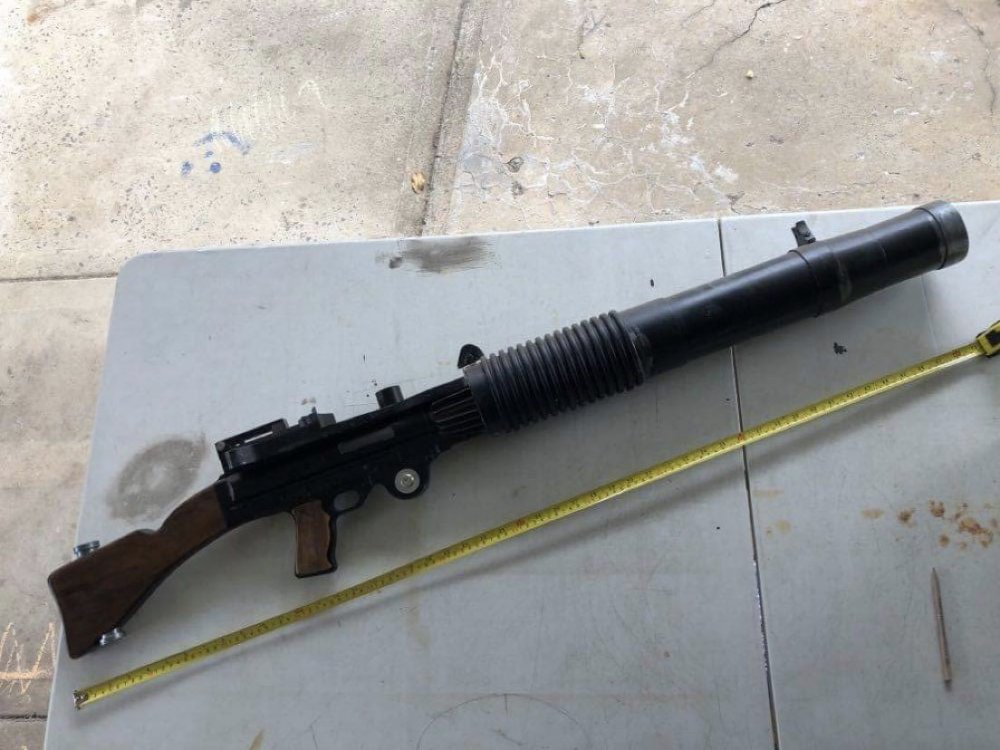
Currently saving up to buy this amazing T-21 was wondering what is the best sling to use for the blaster?
.jpg.feb5425e420fc287c7b059b94fb30c94.jpg)
 1 point
 -
Hi David, welcome to FISD. looking forward for your photos. We are here to help1 point
-
Welcome to FISD Jake, good luck with your project1 point
-
Glad to have you here, Jake! Andrew gave you the best link to get started, and there is a ton of information here, but don't let it intimidate you. If there is anything you can't find or you have any questions at all (no matter how small), please don't hesitate to ask... it's what we are here for!1 point
-
Hi David! As mentioned, we are more than happy to help get you to EI (and above)! You can post the photos in your thread here and we can offer any suggestions (if needed) that you may need. I would suggest looking over the links below that will help. You are also welcome to PM any of us on the D.O. staff with any specific questions/concerns. 1. Visual checklist- https://www.whitearmor.net/forum/topic/49232-anh-stunt-expert-infantry-visual-checklist-2020/ 2. Photo checklist- https://www.whitearmor.net/forum/topic/49703-ei-photo-checklist-updated-version-2020/ 3. Quick CRL reference- https://www.whitearmor.net/forum/topic/48335-quick-crl-reference-guide-for-your-ot-build-pics-notes-tips/1 point
-
Hello Jake...Welcome to FISD...Soon(I hope you save what you need fast ), you will have your armor ready. Meanwhile, enjoy the forum and read all the threads you can. Regards...1 point
-
Welcome. Look around, see what’s going on while your saving them you’ll be good to go with all the knowledge. Sent from my iPhone using Tapatalk1 point
-
We’d be happy to help. Sent from my iPhone using Tapatalk1 point
-
Hi Jake and welcome to FISD. You are certainly in the right place. Here is the link to the getting started section. https://www.whitearmor.net/forum/forum/38-getting-started-read-this-first/1 point
-
Hello and welcome aboard, lots of research ahead of you, head to the Getting Started Section, will get you well on your way1 point
-
All previous updated A few more Butt joining am armor, restored by gmrhodes13 Thermal detonator assembly, restored by gmrhodes13 T-21 Build I'm bored , restored by gmrhodes13 Zeroroom the best sterling templates ever , restored by gmrhodes13 https://www.whitearmor.net/forum/topic/16417-butt-joining-am-armor/ https://www.whitearmor.net/forum/topic/32042-thermal-detonator-assembly-apte-how-to-assemble/ https://www.whitearmor.net/forum/topic/21392-t-21-build-im-bored/ https://www.whitearmor.net/forum/topic/16705-the-best-sterling-templates-ever/1 point
-
Let this build thread rain with photo drops! Hope you see what I did there. How's the build goin?1 point
-
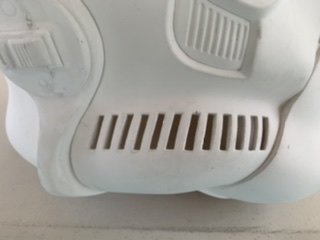
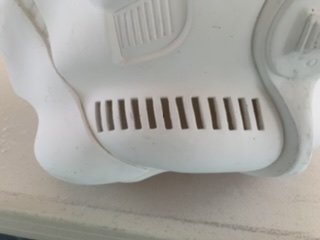
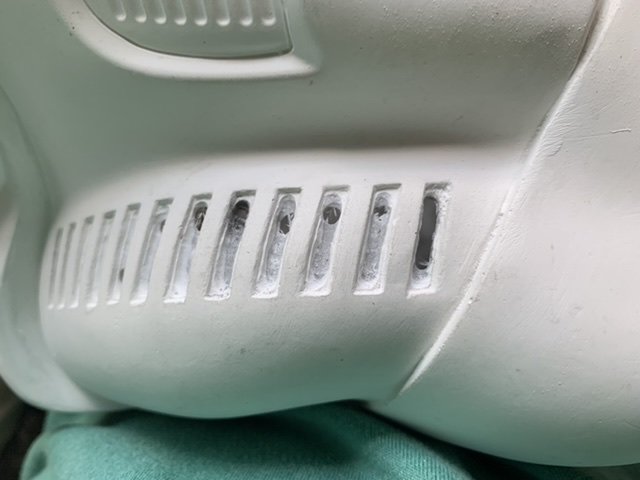
Hey guys, update for today. I was able to cut out the tears and teeth, and file the teeth. I think they turned out pretty good! The far right one might be a hair larger than the left, but I’ll look at it again later. I started sanding the grooves in the back left trap and man is it a tight fit! Slow progress is still progress though. I wish that I could finish the left one today, but I’ve got to be somewhere in an hour, so it looks like that’s it for now. Thanks1 point
-
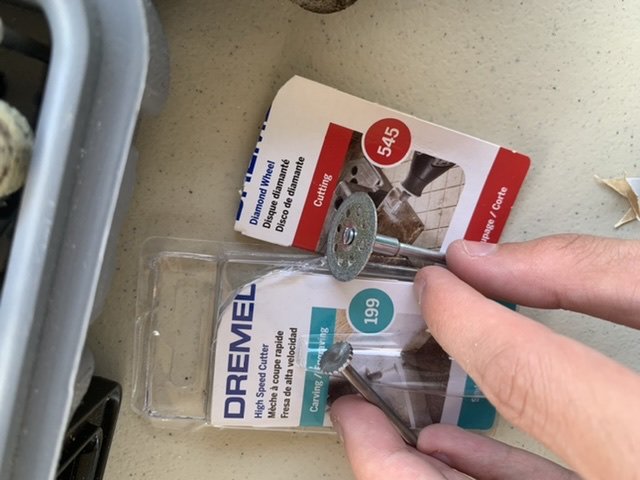
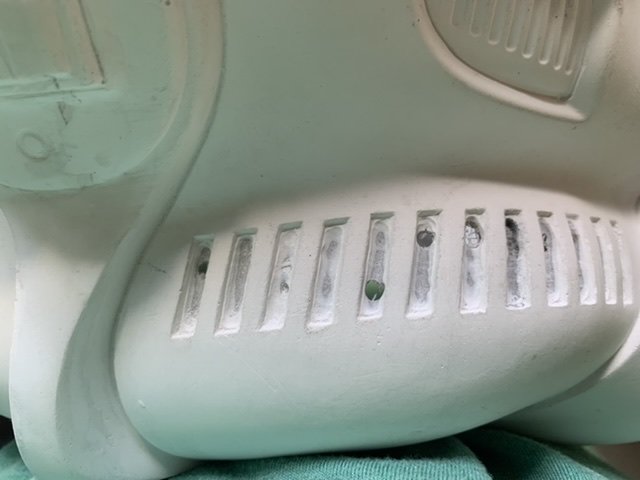
Today I’ve cut out the other side and then filed each to be about as rectangley as I can get them. The traps are long enough to where I should be able to use that diamond wheel cutter pictured above, but it’s just barely too long to use on the tears. I might try the other cutter, I’m just afraid I’ll nick the sides way too much. That first bit I used is too large to fit in the trap/tears unfortunately. Depending on how easy the traps are or not, I might go by Home Depot tonight and see if they have any other small bits. Thanks
 1 point
 -
Alright so this is the bit I used first. They didn’t have a lot of options at the Lowes near me, but I did manage to pick up a cutting bit and also the same wheel you used DarthBiscuit. After some filing, it turned out pretty good for the time I had left today. I did however nick the top of the 7th one (forgot what they’re called), so that’s not good. Not entirely sure how I’m gonna fix that, but I’ll cross that bridge, along with any other mistakes I make in this stage, when I get there. Any advice would be nice. Thanks
 1 point
 -
I used this cutting wheel. I was a pain! Either its diameter was too big to fit, or too small and the Dremel couldn't get close enough. Small files helped tidy it all up though!1 point
-
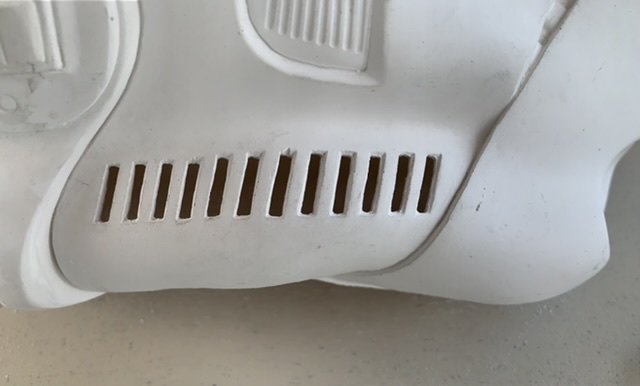
Alright, using the Dremel tool at my dad’s today. I was gonna start on the helmet yesterday, but it was waaay too hot. Not much better today, but it’s only gonna get hotter the rest of the week, or rain. Here’s my progress so far. I’ve only done the right side. The dremel bit I’m using might be just barely too big to go through all the way on this bottom section, and definitely will be too large for the top, so off to Lowe’s to get a smaller bit and some hand files. Thanks for watching.
 1 point