Leaderboard


Popular Content
Showing content with the highest reputation on 07/12/2020 in all areas
-
Hello There. The name's Kody ( or Kodii, a spelling that was a pseudo spelling from high school that stuck), and some people call me Ash. I don't really know what to include or exclude in introductions! I'm from and living in Southwest Colorado, I'm a college student and our mascot is a "Skyhawk." Due to COVID ending my studies back in March, I've been living on the Navajo reservation in AZ a few hours from my actual house in Colorado. I'm a film maker, digital illustrator, and an actor/dancer from time to time on film and on a stage. Back in January I ordered an Armor kit from Walt's Trooper Factor and it arrived back on July 9th. I'm really new to the whole armor side in the realm of costuming, so I'm really nervous about tackling it due to a really nit picky perfectionist nature I pickup when I start working on a project that I'm passionate about. I'm here because I do in fact want to be a Stormtrooper, get the help and guidance to make my kit look as awesome as it can get (and folks from Mountain Garrison said to sign up on here and get a build thread going here.) I've got the armor pieces only (for now at least) My experience in costuming and prop making is probably primitive to all of the pros on here. When it comes to working with anything like a dremel, lexan scissors, sizing, sewing- pretty much all of the skills and knowledge necessary to complete a TK- I've got none of that. I started out tinkering with nerf blasters and eventually found my way to a Doopydoos E-11 conversion kit, and finally a bunch of 3D printed blaster kits (quarantine gave me a lot of time to do a lot of things). I collected a lot of military gear over the years put together a handful of budget Rebel Troopers for short films until I started working on my Rebel Fleet Trooper. This was probably on the long side, but I like to get it all out there and add on/answer on later on.4 points
-
For those who don't believe that the 2K Gloss is serious stuff, I present the can's label. Ye be seekin' adventure, eh?3 points
-
Just put in my order with RS Propmasters for my ESB TK! I can’t tell you the last time I was this excited! Sent from my iPhone using Tapatalk3 points
-
Hi Caleb, and thank you for your EIB application! CRL and EIB Application Requirements: All required photos have been submitted, and on behalf of the entire D.O. staff we are pleased to welcome you to the rank of Expert Infantry. Congratulations! Other-Armor Fit/Assembly; In this area we review observations made by your fellow troopers and the DO team. Some observations may lead to suggestions to improve the overall look of your armour. Let's start from top. The brow trim of your helmet, as you can see in the reference photos, should be a little shorter. This is a very easy and fast adjustment, just be careful to do it little by little so as not to cut too much. Reference Images As you can see, the gap between your bicep and forearm is quite a bit smaller than the gap between the forearm and wrist. If you're able to drop the forearms a bit, it will help you look your best. Reference Images Moving on we have the Han-snap. It should be ideally in the top corner, currently yours is to far in and it's suggested to be moved. Reference Images Ideally, the screws of the Thermal detonator sit closer to the end of the clips. This is not a big deal and would involve replacing the clips. We consider it's worth mentioning. Reference Images As you can see, this is just a dressing issue to take care of , the left thigh is a little up and looks misaligned, Easy fix. Reference Images *************************************************** Centurion Requirements; In this section we prepare you for Centurion. Because Centurion photos show more detail than EIB, items pertaining to Centurion might be seen there and not here and additional photos may be required. We try to point out all that we can from what we see, but the final accuracy is the responsibility of the trooper. I have followed your armor build thread and I know the great work and dedication you had invested, amazing mate! In my own experience, although one tries to make everything perfect there's always a detail here and there. Looking at your front view submitted photo , we noticed that the the brow trim is riding entirely too high over the trap on the left side. We think you may be able to lower it to align and glue it in place. Reference Images Your Shoulder-Chest connection look quite good, but there is still some gap, especially at the top of the bells. You can tighten the strapping holding the bells on to bring them as close to the chest and back as possible and this will allow then to align better. Reference Images In most of the photos the drop boxes line up perfectly with the ends of the ABS belt, but you may want to add some E-6000 to the straps in the back to prevent them from shifting. Reference Images Finally brother, we noticed a small gap in the rear of your thighs. The left one is close enough, but for the right one , you could add an ABS shim behind the lower ridge to cover that gap (or fill it with ABS paste). Reference Image And here we finish Caleb, again congratulations for being part of the EIB 1000 and for such great set of armor you have built. Don't stop here Trooper, I have full confidence that you can do the fixes and go to Centurion Level!!! Pura Vida! ***************************************************2 points
-
Hello to everyone! I am Liam from Italy and I am one of the LMOs for this term by the way! I have just bought form a friend my FIRST whole armour kit (whole 'cause I already have a pilot and a SnowCommander) and I am totally excited! Shoild arrive in august and it's a TK armour kit. Can't wait to get my hands on it and start a build. First things I need (as I noticed for now) is a neck seal and a canvas belt. Any advice? Thankyou to all of you and have a great day!!!!!!!!!!!1 point
-
Most don't seem to have issues with E6000 and water baths, at the end of the day it is easy to remove and reapply if you have any issues. Great thread on return edges You can use elastic between a lot of areas, glued directly or snaps and plates, even velcro works for some1 point
-
I don't think it's TOO noticeable from the front. I'll get a pic tmrw when I take the magnets off.1 point
-
Well that's a little annoying, can you drop it down a little, I know with a lot of resin's they can have heat applied and they will bend, it could be an option, I do this with resin T track and it works well. There is a pretty big gap there so if you leave it as is it really depends on if your GML will notice it.1 point
-
Congratulations Caleb!!!! 3 or 4 easy fixes!!! Now, centurión level !!!!1 point
-
1 point
-
Keep up the good work Troopers, I'm looking forward to the day we hit the magic 1000!1 point
-
Great work with the thighs and shins fitting !!1 point
-
Hi Kody, Welcome to FISD. Looking forward for you building thread , post photos, ask all questions you have,recently someone said to me ""The only dumb questions are the ones you DON'T ask". We are here to help and most of us were one exactly in the same stage you are now. Browsing the forum is overwhelming at the beginning but remember you're not alone here. Welcome again future Imperial Stormtrooper1 point
-
Welcome, Kodii! You’re definitely in the right place for building your first Stormtrooper kit, and we’ll all be here to help you on your journey. I’m sure you’ve already seen the excellent posts in the “Getting Started” and “Tutorials” forums, but if you haven’t find those areas yet, definitely check them out. I’m looking forward to following along with you in your progress! By the way, Southwest CO and Utah are some of my favorite places. Growing up we used to camp or backpack in CO every summer, and the national parks there are awesome! Sent from my iPhone using Tapatalk1 point
-
Thanks guys for all of your help!!! Sent from my iPhone using Tapatalk1 point
-
This would be on the back. I guess my thighs taper a lot so I have enough at the bottom and not at the top. I will be trimming all of the return edge on the top to get a better fit.1 point
-
Aww, thanks, troopers! You all know how to make a FOTK Mom feel amazing! Finished painting the remaining odds and ends that needed some cleanup today. The big thing was getting the ab piece all done. It had some drip marks last week, so I sanded them down and repainted it entirely. Very happy with how it turned out. And it feels good to get everything white and glossy! I also tackled refurbishing Cameron's helmet. It's an adult size Rubies Deluxe helmet that I had converted for his old FOTK kit. He doesn't know about the surprise upgraded lid, so in order to keep up appearances, I needed to repaint the old helmet to match the new armor. I wet sanded the helmet with 400 grit to remove some of the old paint and give it bite for the new white gloss. I bought a small paint shelter and a cheap turntable so I could paint the lid without worrying too much about extra particles landing on it while it dried. A turntable is a really nice convenience for painting something like a helmet; it allows for slow and consistent rotation while the paint is being applied. I also rigged the spray shelter with a small swivel hook in the inside top so I can hang and rotate small objects in the shelter while painting. I didn't need it for today, though. I had enough extra 2k Gloss to cover the helmet twice. And whoa. Again, I am in love with the ease of how it applies. It self levels beautifully, and I didn't see any drips at all on any of the parts I've painted. It's pricey stuff, but seriously worth every penny. Before repainting this helmet, it was shiny, but nothing like how it is now. The finish is like glass. You can see the blue sky and trees in the reflection on the dome. It is so difficult to get accurate pics of how shiny this stuff is because the white color blows out the reflections. I'll be letting everything cure for a week before painting the black details on. I still have a lot of strapping things to assemble and sew, but it feels like the finish line is in sight!1 point
-
Finally, something came! The parts for the custom thermal detonator plate I'll have to make!
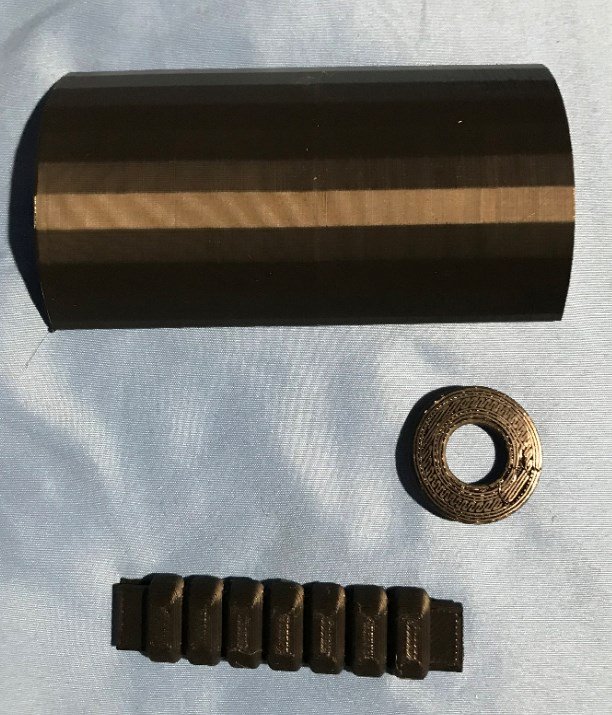 1 point
 -
Well...not a whole lot going on until the full kit arrives. I still have the left over parts from when I built my Sandtrooper, so I decided to get the Thermal Detonator out of the way. Gave the grey tube a quick measure to make sure it's not 2 feet long. Also, drilled a hole to relieve the air pressure when the end caps are put on (the hole will be hidden by the "control panel" plate). Then, I measure the end caps to 20mm. This photo is post "scribe" of the line...and the ruler isn't exactly in proper position. To give a consistent line around both end caps, I "scribed" the pencil line using a compass. I double checked the measurements at a couple of points to ensure nothing got too wonky. A quick cut with the lexan scissors. Scrap/waste goes right into a shoe box to save for ABS paste down the line. Then, a quick sand on a flat surface to even them out. That's the backside of the sandpaper...I did turn it over. Quick test fit. I'm using the belt clips from @ukswrath, and numbered them so I knew which one went where after marking the holes for the screws. Instead of the screws that come with the belt clips from Tony, I'm using the screws from @justjoseph63...and securing them with some self-locking nuts. Belt clips secured, it's now time to glue on the "control panel" and then the end caps. And finally, what do you do when you don't have your paints yet? Improvise! And hopefully I can cross this off the list as well.1 point
-
Hi Steve, and thanks for the pics! Unfortunately, as per the CRL for Level 2 any shims must sit flush, (completely level, not overlapped). If you don't feel comfortable doing this, I would strongly suggest getting in touch with my buddy Gary jr. (whistle nut) in the Makaze Squad. The guy is a genius when it comes to all things white armor and I'm sure he will be happy to help you out. I can contact him if you like, just let me know! The green rectangle shows what the seam should look like Side view1 point
-
Ready for white touch ups! And it worked! There are some seams along the tape, but I think I can buff them out with some rubbing compound, after sufficient drying time. Next on the helmet: redraw the black outlines (hella carefully). Then pull out the interior tape and touch up the interior black. After that, I can start attaching ukswrath's Hovi speakers, the vocoder (with E6000?), vent/frown backing (with hot glue?), lens (with velcro along the top), and velcro padding. In between coats of white, I prepped some snaps! gmrhodes13's soldering iron tip worked great to cut squares and poke holes! I prepped 28 snap backs on squares that I'll E6000 to armor. I'm waiting for my paintbrushes to arrive tomorrow, so then I can apply fiberglass resin on pieces that flex a lot and that will rub on my undersuit. I also put a few pieces on and see that I'll need to trim quite a bit, but I'll get into that on another post...1 point
-
I worked on the spring last night. I ended up using some markers to get the right diameter and got 11 curls in the visible area. The cocking handle is getting another coat of paint then it will be attached. Things on my list I have left to do are dwindling. I need to paint the silver accents on my handle and shorten 1 more wire in the BlastFX kit to save some space. Re-wrap the circuit board back up in shrink tubing, and also cut a notch in my clear light tube. After that I think I will be able to get wires run and into final assembly. Then most importantly apply for EIB before the 1000 mark!1 point
-
July 10, 2020 Part 3 of 3 I dreamed a dream. It is with great sadness that I must announce an indefinite hold on my dream to become a Stormtrooper. For financial reasons related to COVID-19 it appears I must sell my ATA armor (ABS only) in its current state. I'm hoping to get what I paid for it (around $540 plus shipping), but I'm wondering if the value of the kit would actually depreciate, or appreciate, due to the work I've already done on it? I'd like to assume it would become more valuable, in the same fashion that fully-trimmed kits are more expensive than untrimmed. For a detailed look at what state the ABS is in, see all my previous posts in this tread, as all my trimming has been photo-documented, and everything is in the exact state as shown in my images. To-date no pieces have been cut for sizing purposes, so the armor will still fit any trooper who would otherwise fit in a new just out-of-the-box ATA kit. Special thanks to @zv288bot, @Cricket, @TheRascalKing, @TKSpartan, and @justjoseph63, who have been with me on this journey since day one. These past eight months have been an amazing adventure, and I would never have made it this far without you. Thanks as well to Terrell (@SuperTrooper) for graciously dealing with my 39-message email string during the ordering process, as well as additional help and encouragement from @wook1138, @T-Jay, @ukswrath, @gmrhodes13, @Frank75139, @husky68, @Daetrin, @Sly11, @CableGuy, @Blast 'Em!, and also @magni and @CrookKnight from my HWT build. Hopefully all these tags aren't inappropriate—I simply want to express my gratitude and apologize for what feels like failing you all and not being able to finish what I started. This not goodbye. (I'm sticking around to put my gained TK knowledge to use helping other new builders pursue their dreams) I'll be back. (Someday. I'm keeping my soft parts for the long haul) Save the Dream. MV | Art by one of my students|1 point
-
Just to get it right. The basic approval is given by my Garrison? In my case the German Garrison. I´m actually in the process being approved. EIB or even Centurion will be done by FISD? I´ve built my armor following Level3, just Boots and undersuit are for basic.1 point
-
These should help give you a good idea...1 point
-
Well Steve, you will be instrumental in developing this CRL so I took the liberty to reach out to the LMO's, who have given their blessing. Full speed ahead sir. Also love the Z-6, who did the commission build, or created the 3D files for it?1 point
-
Yep 1 CRL with accessory options. it going to be a full gamut that's for sure.1 point
-
I would think it would be one CRL with options vs. multiple CRLs.1 point
-
Wow, awesome job! I'm hoping to join you soon in Centurion-ness!1 point