Leaderboard


Popular Content
Showing content with the highest reputation on 06/08/2020 in Posts
-
Hello everyone So I had quite a few requests for photos of my binoculars, so I thought I would post them here. They are customized to my own liking. Of course you can do yours as you see fit with the stickers or lack of stickers. So let me just say this. I wanted binoculars that looked real as opposed to just brand new or worn out prop. I thought about putting in electronics and real lenses, and then I stopped myself before I got to carried away. So here are the details: The binoculars are 3-D printed by 3dprintmerchant. Awesome awesome awesome. I chose white to match my TK and TB kits. The sticker on the in black says, Special Operations Command, the sticker on the opposite side is my TK ID. On the front is the Neurosav model, the bottom has the maker and model number and finally the on off labels by the on off switch. The green is the range and the imperial cog placed on face plate and top. I had the option of green and red lenses. I loved both but I chose red for more elite operations infrared look. I painted inside of the lenses on both sides black so that the red lenses, which are flashlight red lenses, look deeper. The front lense has the red dot up top as you see on other Neursav binoculars, and same with the tip of the on off switch. The turn nob by the on off has a red line across the top, I chose to run it down to the center for a bit more visibility of turn nob. Non functional of course. There are 11 screws, 7 larger and 4 small screws all installed to the faceplate. The whole thing was sanded and painted white and then distressing done with a fine brush. The distressing I wanted wasn't the chip paint look. but more the dirt that has been cleaned off but during time just naturally wedged in to recessed areas. Military would keep their equipment as clean as possible. Not the banged around damaged look. Which is what I wanted. Anyway, I hope you enjoy this and it is of some use and help. ------------3 points
-
"I will very likely be making a dirtyboi at some point as well, so we'll just say I'm prepping for that". Do I see a HWT pack build being added to your "to-do" list in the future? I certainly hope so!3 points
-
If you wanna wear a pauldron without building a Sandie, you can convert your TK to a Heavy Weapons Trooper (HWT), and actually switch back and forth. Basically you just need to make a backpack, get some ammo pouches, and slightly adjust the belt. I’m actually doing that myself right now, in case you wanna check out my HWT thread. Great job on your build so far! Sent from my iPhone using Tapatalk3 points
-
Hello, fellow troopers! I’m thrilled to be here. My hands still hurt from holding the Lexan scissors too tight and cutting through 2mm acrylic-capped ABS. Do you feel my pain? Ha ha! Anyway, I can’t wait to get out there and troop! If Only You Knew: Well, I thought I needed to buy everything under the sun to make this kit, and after buying way too much stuff, I realized, man, I only need glue, my dremel, some sandpaper, blue tape, and some magnets. A few clamps, too. But I just had way too much stuff lying around that I never, ever used. In that case, I made the job seem harder than it was because I thought I needed all this “stuff.” Top 5 things I learned: 1) Take your time. Accomplish only one “big” thing each day. Today I’m working on the right shin. That’s it. If you go too fast, you will screw up! 2) Don’t start without mentors. Make sure you have some guidance from experienced troopers and send them pictures as you build. 3) Listen to your mentors. If you ignore them, you will make mistakes! Stubbornness does not equal screen-accuracy! 4) Your family may not be as excited about you getting your thigh piece to fit as you are. Don’t be disappointed. Once they see you fully suited up, your appearance will blow them away. 5) When using the dremel and sanding roller, hold the piece tightly against your chest and use smooth, light strokes. Ignore the dog licking your leg no matter what. Oops!: My kit was a little big on me, and after fitting it, the entire torso was sitting too low and the thighs had no room to move. I had to redo my shoulder straps (tighten them up), and cut the neckline on the chest plate to give myself more room, and then take a full inch off the backs of my thighs to get them to fit properly. It was a pretty big challenge, especially when I thought I was nearing completion. Time to "embrace the suck" and take a risk! And so I did... Warnings I received were mostly about being too OCD versus screen-accuracy. Sometimes the screen-accurate way looked ugly to me, but in most cases I got over that and learned to love the asymmetric and wonky nature of these kits. A funny thing happened on my way to the Death Star: I decided to become a stormtrooper after teaching a Star Wars class at the University of Central Florida: https://news.cah.ucf.edu/news/star-wars-telep/ https://www.fox35orlando.com/video/637681 I invited the Makaze Squad to visit my classroom and talk about the 501 and about trooping in Central Florida. After hearing the fun and inspirational stories, I couldn’t help but want to be a part of this great community. That was last October, so it’s been an eventful eight months to say the least. My armor did take a long time to reach me (ABS plastic shortage when I ordered) so I was taking pictures of myself looking like a James Bond henchman from a 60s movie, LOL. I kept telling my friends, my armor will come soon! This is the best I can do for now: Shout Outs: I received great tips and advice from my armor builder, Troopermaster, who treated me like a good friend and answered all my questions as though he was standing by his phone, waiting for me to ask. This was a GREAT first experience with an armor builder, and that made it even more memorable. I also received incredible help from Gary Collins, Sr, his son Gary, Derek Zink, and Daniel Branton. All of these generous troops spent a lot of time answering my questions, sending me pictures and videos, and trying to put me at ease as things didn’t come together as I’d planned. Of course my family put up with me and with stormtrooper parts lying all over my kitchen and formal living room. The place looked like a plastic warehouse and smelled like E6000, ha ha. Finally, I’m really excited to be here, to start trooping, and to put some smiles back on people’s faces during a very challenging time in this world. In that way, I guess we are entertainers and should help make people forget about the cares of the world, at least for a little while. TK-33348, ready for duty!2 points
-
Mandatory Information Name = Justin R. TK ID = 61490 Legion Profile = https://www.501st.com/members/displaymemberdetails.php?userID=26076 HWT EIB Thread Link = Base ANH-S Suit Centurion Thread Link = Garrison/Squad = Southern California Garrison, Orange County Squad Forum Name = TheRascalKing Armor = Anovos Helmet = Anovos V1 Blaster= Hyperfirm DLT-19 Optional Height = 6ft 0in, or 183cm Weight = 170lbs, or 77kg Neck Seal = Darman's Props Under Suit = Nike Pro 2-piece compression suit Pauldron = katarra8 on eBay Hand Plates = latex, justjoseph63 on FISD Gloves = latex, Double One chemical gloves Ammo Pouches = leather, 牛翠芬 on eBay Backpack = self built, some parts from CrookKnight on FISD Ammo Belt = Anovos Canvas Belt = Imperial Issue Boots = Imperial Boots Electronics = XIAOKOA 2.4G wireless microphone into TK Talkie V3 into Aker MR1506 amp (not shown), 5V helmet fan system, UKswrath on FISD Armor Photos Full Body Front Front (Helmet Off) Full Body Back Full Right Full Left Helmet Detail Photos Front Side Back Interior S-trim Detail Hovi Tip detail Lens color (Backlit if necessary) Accessory Photos Neckseal Pauldron Ammo Belt Backpack Boots Blaster Action Shot Optional Interior Strapping Abdomen Detail Cod Details Handguard Flex Sniper Knee Attachment (glue) Thigh Ammo Pack Attachment (rivets) Wrist Return Edge Detail (none present) Left Side (rivets) and Kidney Notch Detail Requested Changes from EIB Vocoder Paint Cleanup Ab Button Paint Cleanup Black Wire Added to Blaster Fill Left Thigh Armor Gap I'm trash at hand painting, but did my best! My scrap plastic trimmings are long gone so I couldn't make ABS slurry that would match, soooo... Just backed it. Shout outs to Tony/@ukswrath for his excellent backpack guide and to my wonderful girlfriend Lauren for having the patience and attention to detail to adjust me and take my photos! Thanks for looking @shashachu and @justjoseph63! I definitely appreciate you guys!2 points
-
Name: Peter Telep TK-33348 Forum Name: 4Runner Florida Garrison, Makaze Squad Armor Maker: TMprops Helmet Maker: TMprops Cloth Belt Maker: Rob Kittel (Imperial Issue) Neck Seal Maker: Darman’s Props Boot Maker: Imperial Boots Blaster Maker: Pretorian Blasters Holster Maker: Darman’s Props Height: 5’ 10” Weight: 165lbs TK Type: ANH Hero Mentors: Gary Collins Sr. Derek Zink Gary Collins Daniel Branton (UK Garrison) Added weathering to tips on helmet: Thanks so much of your time, help, and consideration! Respectfully, TK-333482 points
-
This is a fantastic thread2 points
-
Hi Peter! Fantastic to see a Makaze squad member stepping up for EI, sir. Knowing Gary And Gary jr.'s work, I can see why it looks incredible! Although the current CRL for the Hero Hovi-tips is under debate right now (needs to be changed)... the interiors (except for the rear parts) and the screen should be black (just as you have them), but in looking at the Hero reference images below you can clearly see the presence of some white(ish) color around the tips. Although there are a small number of references showing the rims as black, the majority had the discoloration.2 points
-
Alright, round 2 of hot water bathing went much better. I started with my one shin. After realizing that this piece could fit diagonally in my sink, I quickly did the dishes then got to work. I filled one side with glasses so my minimal volume of boiling water would cover more of the shin. To try and control the shape of the shin, I used the best I had- zip ties and a clamp. I poured all my boiling water into this sink, waited 75s, then did a plunge in the cold sink. Success! Next up was the biceps. I couldn't fit them in the sink, so it was back to the Home Depot buckets. I took Caleb's advice and as a precaution insulated my boiling bucket with two other buckets. I was able to reshape both into more of a circle for now. I ended up shaping my back shoulder straps a little more too. I removed a little more of the return edge to allow the shoulder to flex more easily. Last up was gluing the rear covers strips on the shins. Like Kman, I glued the cover strips with only 10mm overlap so that the velcro can cover the remaining 15mm. Lessons learned from my hot water adventures: don't fear boiling water. The water needs to be as hot as possible to soften the plastic in a repeatable manner.2 points
-
I actually hadn't seen that thread, or at least not recently enough to remember it! He is seeing a lot of the same things that I am. I'm trying to match the game parts but still be sympathetic to the CRL in the hopes that I can still get it approved. If not, I still have the files from most of my gen 1 parts that are very close to the CRL parts so I shoudln't have any trouble. When I release the files I'm going to release it with both variations of CRL and Game versions.2 points
-
Grips. The grips gave me a fair bit of trouble. Firstly the Elegoo Mars is not the most dimensionally accurate of printers. I originally printed the grips in resin but there were always scaling issues which caused issues with how the grip fit into place. After a ton of sanding and filing I did manage to come up with a set that fit, but I decided to also try going back to my FDM 3D Printer, a CR-10. I still had some wood filament which is a sort of plastic mixed with wood dust. I had heard the wood filament will accept wood stain so I was eager to give it a try. The print came out very well with no fitment issues. I sure like FDM printers for their accuracy. After sanding down the print layer lines, this is what I had: My first attempt was to try staining the print just as you would wood. I purchased some Dark Walnut wood stain, (Varathane Ultimate Wood Stain) brushed on the stain, let it sit for 15 minutes (instructions say 1 to 3 minutes), then wiped off the stain. I'm not familiar with staining wood but I'm assuming the stain should have soaked into the wood leaving a nice finish. This is not what happened. When I wiped off the stain it basically just came off leaving the print just slightly darker than it started as. So my second attempt was to brush on the stain with a brush and to leave it "streaky" so that some of the lighter print showed thru the stain. This one I didn't wipe off. I just left it for a couple of days to completely dry. This looked pretty good to me. Not perfect, but certainly passable. Then I tried painting on a clear coat sealer for the wood and things turned bad again. The clear coat didn't seem to apply well and had very tiny little bumps everywhere. I thought maybe they were just little bubbles that might pop as the clear coat dries. They didn't, and when it hardened I had a pretty bumpy surface. I wasn't happy. I tried acetone to remove the clear coat but in the end just sanded down the grips again and started over. The third attempt worked OK. I used the same streaky paint brush technique to stain the print. Let it dry for 2 days and this time used a spray lacquer that a friend suggested. It was by a company called Mohawk, and it was Tone Finish Clear, Satin. It took quite a number of coats to hide my aggressive sanding that I had done to get rid of the previous clear coat. I think I should have followed up my sanding by going down to 600 grit, but live and learn. After building up enough clear coat it hid most of my sanding lines. Here's the result. First just the streaky brushed on stain.... And then with the clear coat... The clear coat dried fairly glossy. I imagine if I hadn't given it so many coats it would have been more of a satin finish. But I'm OK with this. Some weathering and finger prints will tone down the shine. :-) Mark2 points
-
Hi everyone So I used my Dremel for the first time ever - what a great invention! I should say in all the photos below I still need to do a final sand to smooth off the rougher edges. I decided to take some more return edge off the biceps - it's not pretty work, but at least the tops will be covered by the shoulder bells and hopefully I'll get better with practice! When I wear the biceps over the undersuit, they feel snug when I bend my arms, but nothing digs in as such, so I guess I will leave them for now until final fitting. Next I tackled the forearms, but I'm not sure if something's gone wrong! I tried to follow the RS Propmasters video tutorial for the right forearm as best I could. The following photos show the results: Hopefully not too dramatic so far... For the scoop on the inner I only took it to the natural line of the part, though I have seen threads where it is recommended to remove more material here? I then went to work on the return edges trying to leave some at the top outside edge, but trying to remove everything all around at the bottom. I didn't really notice it at the time, but look how "flat" the piece looks, rather than round - does this look right? I can get my arm in and bend it with no problem - again, it's snug, but feels okay. It's as though the shape is that of a flexed forearm? The view from the bottom is shown below - I tried to get as much of the return edge off as possible with the Dremel. Is this sufficient, or do I need to do a bit more? If so, is there a recommended method to get into the corners of the raised part (needle files)? I have seen a video by Dan (Cable Guy) where he sands the whole wrist profile simultaneously until the return edge disappears, so I may try this method if required. I then moved on to the left forearm - I followed the same approach as for the right, but noticed that the piece seems much rounder, rather than flatter: The "swoop" of the raised cover strip edge seemed wider on the left arm (though it could be the way I cut it) than the right? In the photo it's not quite lying flush, but you get the idea anyway. A comparison of the two forearms below (right on top, left on bottom): And another (left on left, right on the right): And with the undersuit (left forearm not taped very well at the top). I have measured the circumference of both forearms at both the tops and bottoms, and they are similar, I guess I am just worried that the shapes look different, so wondered if this was an issue? I certainly would like to avoid the dreaded hot water bath this early in my armour building career!! Looking forward to your comments. Thanks Adam2 points
-
The First Order Visual guides are all located in the First Order Battle Group Ssections of the forums. Here are the links directly to the section. Phasma CRL will be undergoing an update so guides will be completed to suit once they CRL's are complete.1 point
-
[DISCLAIMER: THIS THREAD WILL INCLUDE MANY LINKS, FOR BOTH MY FUTURE REFERENCE AND USE BY OTHER TROOPERS] I've always wanted to wear an orange pauldron. I've always wanted to be a stormtrooper. Yes, sandtroopers are cool, and I imagine someday I will make the conversion (ABS yellowing?), but right now I'm still drawn to shiny white armor. I recently began my journey to join the Legion with an ANH Stunt TK kit and in the past couple of weeks I caught the BFG bug. DLT-19 and T-21 build threads consumed my Tapatalk time, and then I discovered the HWT. Eureka! Yes, I'll have to shell out for some MP-40 pouches, and build a backpack, which sounds fun, but—ORANGE PAULDRON and BFG!!! So much like Kman's side track, here is my semi-tangent. For kicks I'm going to have to boot up my old Battlefront games to check out some of the heavies, but luckily there are already some great screen caps here on the forum, and of course there's the CRL (link). I'm aware that there has been discussion on building packs to match the games vs the CRL, and my plan is to stick to Joseph's CRL model image as close as possible to maintain continuity (guide link), but there are several areas in which I will differ / provide my own interpretation. My plans, including the small variances which I believe will be approvable, will be noted by category in the next section below, and in general to plan take inspiration for my build from the following trailblazers: Tony's (Ukswrath) three part series Charles' (Templar) two threads Shawn's (@CrookKnight) thread (he also sells them) Kalani's (Kman) thread Zac's (Devolver) thread Bradley's (@AngryEwok) thread. My goodness, I particularly love the analysis on this one. Rick's (Caligari) thread Sarah's (Alay) thread Eric's (@Eric Ostendorf) 3D printed pack and files. Amazing work and very generous to share. [NEW ADDITION] Pauldron I've seen troopers debate between Trooper1 and TB for the purchase of a pauldron, and I'm almost certain I'll be going with @trooper1 for my orange. Is there any reason for me to reconsider other options? I'm still waiting on an email response from Jay for pricing, and hopefully I won't have to change plans based on the cost. MP-40 Pouches I likely simply need to do more research, but these recommended ebay ones from this thread are sold out, so I'm seeking alternatives. I did reach out to the ebay seller, and he hopes to have them back in stock sometime in the new year. In general I'd prefer to go pre-pade for these pouches, but any suggestions would be welcome. Oil Pan Base The oil pan used as the base of the backpack is perhaps the area in which I'm most curious about, in relation to the CRL. In the CRL photo Joseph is donning a pan from Bavarian Autosport, but unfortunately they closed shop earlier this (2019) year. [Anybody have an extra Bavarian pan they'd like to sell?] This means that all Heavies from now on will no longer be able to perfectly match the CRL, and we are instead left with two primary options—the Wedco 12.5qt model 83150 or the GarageBOSS 12.5q model GB150 (also available here). However, I believe there is a third, and possibly a fourth option. Here are the specs of the aforementioned pans, and the two others I am considering. CRL Model: Bavarian 16qt, dimensions 22" x 16" x 6.5' (photos by Templar (2) and justjoseph63) Wedco and GarageBOSS 12.5qt identical options, both with dimensions of 21.5" x 15.75" x 3.5" There are the most commonly-used oil cans now, since Bavarian has closed shop. I'm not a huge fan of them due to their shallow depth and their angled handle, which isn't accurate to the game or the CRL (see section right above). GarageBOSS 16qt discovery, dimensions 22.75" x 16.75" x 5.5" This is the first alternative option which I am considering building with. I especially like that it is deeper than the Wedco's, but not quite the the larger depth of the Bavarian. I'm quite bummed that I didn't pull the trigger on one of these the other day when Walmart had them clearanced for $12.32 shipped, since they're also out of stock on Amazon, but they can be found on eBay. The other aspect I like about this pan is that is has the larger cutout which would lay very well onto the backplate [ O II ] of TK armor. You can see how tight Joseph was able to cinch this same cutout style in his Bavarian photo above, which I'm not sure would be possible with the Wedco. Midwest 9qt discovery, dimensions 20.5" x 13.25" x 5" Finally, here is the most bold of the two alternative options I'm looking at. Most obvious, from the photos, is that there is no built-in handle, so I'd have to afix my own. Two potential options are shown below, and considering the fact that two different types of handles are already approvable, it seems like these (especially the first one) should be too. Such and add-on would also be more game accurate, but of course, I need to stay within the confines of the CRL for continuity. The two features I particularly like is the large recession, similar to the Bavarian and GarageBoss are the large recess which would lay against my backplate, and the non-flat surfaces on the sides, also like the Bavarian. This pan would also be deeper than the Wedco, but not to the extent of the Bavarian. The height and width are a little more narrow, so I'll need to examine those aspects. Rick has some great diagrams of the existing options, and I'm very interested in hearing feedback on these two other oil pans I'm investigating. Purchase sources: Autoplicity, Farm&Fleet Top Left Button Box As much as I am tempted to build the button box to the game-used ratio relative to the middle tube, I will be sticking with the commonly-accepted Popit! storage boxes. I don't recall which thread I saw it in, but somebody had cut squares in the octagonal pace plate in which they set the buttons (Amazon) to add a little depth and the appearance of functional utility; I may consider this. Too bad I have to buy 35 buttons when I only need four, but then again it may be useful to have spares. I think I will screw them into the box top from underneath for added security. Middle Tube This one will be easy to source, since we already use these wipes here at home. I'll just need to sneak purchasing the smaller, 35-count and less cost-efficient, tubes next time. =) Vent Box No rocking the boat in this area either. Popit! box with hopefully very clean-cut vent covers. Uniformity will be mandatory. Radio Box I'm not yet sure how much time I want to spend on this section, but I really like what Devolver did with his, and I do plan on using the Michael's box as the base. I grabbed three of them in black clearanced for $1.99 USD (plus tax) each. I like the idea of depth, and the framing on the sides of the box, but I want to ensure I remain CRL approvable. I think I will also reinforce walls of the cardboard box by adding some extra framing on the inside. There is an off-chance I may look into using Radio Shack project boxes in the same fashion that Charles did. Bottom Right Box I'm going to look into two alternative methods to make this box, though I still plan on using the Popit! boxes. I really REALLY want to angle the front of this box down like Templar did, but I'm not sure if my GML would be ok with it. I wonder if it would help my cause that the CRL model himself wished he had done it? I'm also interested in Bradly's cutout method to pride more depth than a sheet cover would. I am considering making two versions of this box, in case I get denied during my first submission. Drop Siphon Funnel Since the siphon will be the lowest point of the pack, and perhaps also the least sturdy due to the rounded mounting surface, I've decided that I want to go with a rigid structure, rather than a handmade / rolled piece. I checked out both of Devolver's options at Walmart and went with the floral vase due to it's larger taper, and the shaker cup having flat edges on two sides. The vase is nearly nine inches tall, so I know I will need to shorten it to reach the required six inch height. I'm also considering Bradley's nalgene bottle top portion, since I have tons of those laying around, and I might even look into a screw-removable siphon, to protect it from damage when laying the pack down. Antenna Tube There's not much up to interpretation and deviance in this area, and my goal is to close the ends of the tubes with flat caps. I've seen some Troopers mention that the home improvement stores only had curved-top caps and that they found flat ones at Walmart, but thus far I've had no such luck. Do any of you have purchase links to such caps? I briefly considered investigating a latching attachment mechanism for the tube for removal in transit, but I don't think any space benefits will be worth the hassle. E-11 Mount This may, perhaps, be the most controversial aspect of this pack build. I LOVE the idea of mounting a Rubies blaster on the left side of the pack, but I definitely will not be doing so before submitting for approval. If I do eventually elect to implement such a mount, I will go with a very simple, removable design. Other notes: No, I will not be including the previously-accepted antenna on top. It looks cool, but I understand it is not game or CRL accurate. Yes, I will be utilizing a "less is more" approach to armor weathering, especially since I want it to be removable. Joseph will be proud to hear this, and that I purchased the makeup brush set in the photo above for $2.49 in Walmart's Christmas clearance section. Now I just need the dollar store eye shadow. I purchased a thin $0.88 cutting board at Walmart with the intention of reenforcing the bottom of the radio box, but I may end up getting more and use it to create the framing / paneling on the entire radio box. The cutting board also has a texture to it, which may look better on a weathered radio than smooth cardboard. I may also have a fellow SW enthusiast friend print me some of Kman's templates. Question for @justjoseph63 or @Templar726: Which specific sticky floor tiles from Lowes did you use for your box covers? Here is my ANH Stunt TK Build Thread which will document the armor to be used for my HWT. My plan is to build it to Level 3 specs, submit for 501st approval, attain Centurion status through FISD, then transition (at least temporarily through Joseph's temporary weathering technique and Charles' styling) to HWT and submit for approval. Wow. I think it took me sessions (squeezed between baby naps and diaper changes) over four days to hammer this out. Hopefully this compilation of links will be helpful to future builders! MV1 point
-
COSTUME INFORMATION Armour: Anovos TFA beta kit, with mods and accuracy upgrades, including: - new accurate chestplate - new accurate thermal detonator - upgraded clip greeblies - reworked biceps detail strip - new forearm detail boxes, forearms have the "Finn" mod for mobility - lightly weathered to match the screen used battle look Helmet: Anovos Premier line, repainted to match the armour Gaskets: private run, latex backed with t-shirt fabric Belt: supplies from amazon (mostly), fully working metal holster (R2Dan - d'oh), resin box pieces (R2Dan), pouches kindly made by TK72216 to specs I supplied Boots & gloves: Imperial Boots, topped with resin handguards (R2Dan) Undersuit: Extreme Racing F11D Blaster: Justinian kit SE-44C Blaster: 3D print (files by The5thHorseman) Name: Dan Sczudlik Height: 173cm (5‘8“) Weight: 72kg (159 lbs) TKID: 8527 Level 1 approval: https://www.501st.com/members/displaymember.php?userID=8369&costumeID=326 APPLICATION PHOTOS Parts: Action poses: Hope I didn't miss anything. If you have any questions, feel free to ask away Thanks!1 point
-
Thank you Mario1 point
-
Look great, nice work1 point
-
So I spent yesterday cleaning up. I sanded the runs to 1,000. It took a while, but smoothed it out without taking off a layer of white. I see why that's what everyone recommended! I also brushed some white in the tube vents again to cover some missed spots. Today I was patient. I set a stopwatch and waited 3-4 minutes before spraying anything. I got close enough to apply paint, but kept it moving. And I'd go to opposite sides to avoid spraying on a fresh coat. Thankfully, all of this together worked! I think I ended up with 2 tiny runs, but nothing too visible or worth redoing. Now, I'll wait 3 days. The can suggests 2, but I've seen forum recommendations for 3 to avoid oranging or peeling. Better safe than sorry! This is what I'll use: After 2ish cots of clear (hopefully without repeating) I'll peel off some tape, tape up the white, and get to work on other areas. I kind of think the flat gray primer I used could work for the ears, tears, traps, and teeth. What do you guys think? If so, all I have to paint is the black PlastiDip!1 point
-
Hi Emma, The Diagram is the same I have to be the right one. and for the questions about shims, take a look to each of the following threads, I think they could be useful. 1- Kidney-Shimming 2- Thighs Shimming 3- Calves Shimming Hope this can Help Cheers1 point
-
Yes, currently it's in the extended staff area1 point
-
I do believe that Centurion ab cutout diagram is accurate, but somebody correct me if I'm wrong. My understanding is that the notch is not on the shim, or you could interpret it as the entire length of the shim being "notched," or cut off at the bottom edge. As for your calves, my understanding has been that you'd leave the flat area (rather than cutting it off), but perhaps try to contour it to your leg with a hot water bath. Then add a shim, or shims which will be butt-joined with a normal cover strip. Alternately, if you don't need much extra room, you could try to use a slighter wider rear cover strip.1 point
-
Nice work Justin, I'd say good luck with your application but I don't think you'll need it1 point
-
Good luck with your application, Trooper! It's so cool to see First Order troops here! I think the Supreme Leader will be happy!1 point
-
nice job so far!!!1 point
-
Welcome back, and good luck with your build. I'll keep an eye on your thread.1 point
-
Congrats on your approval, and good job going for EIB! Centurion on the horizon, I'm sure, right?1 point
-
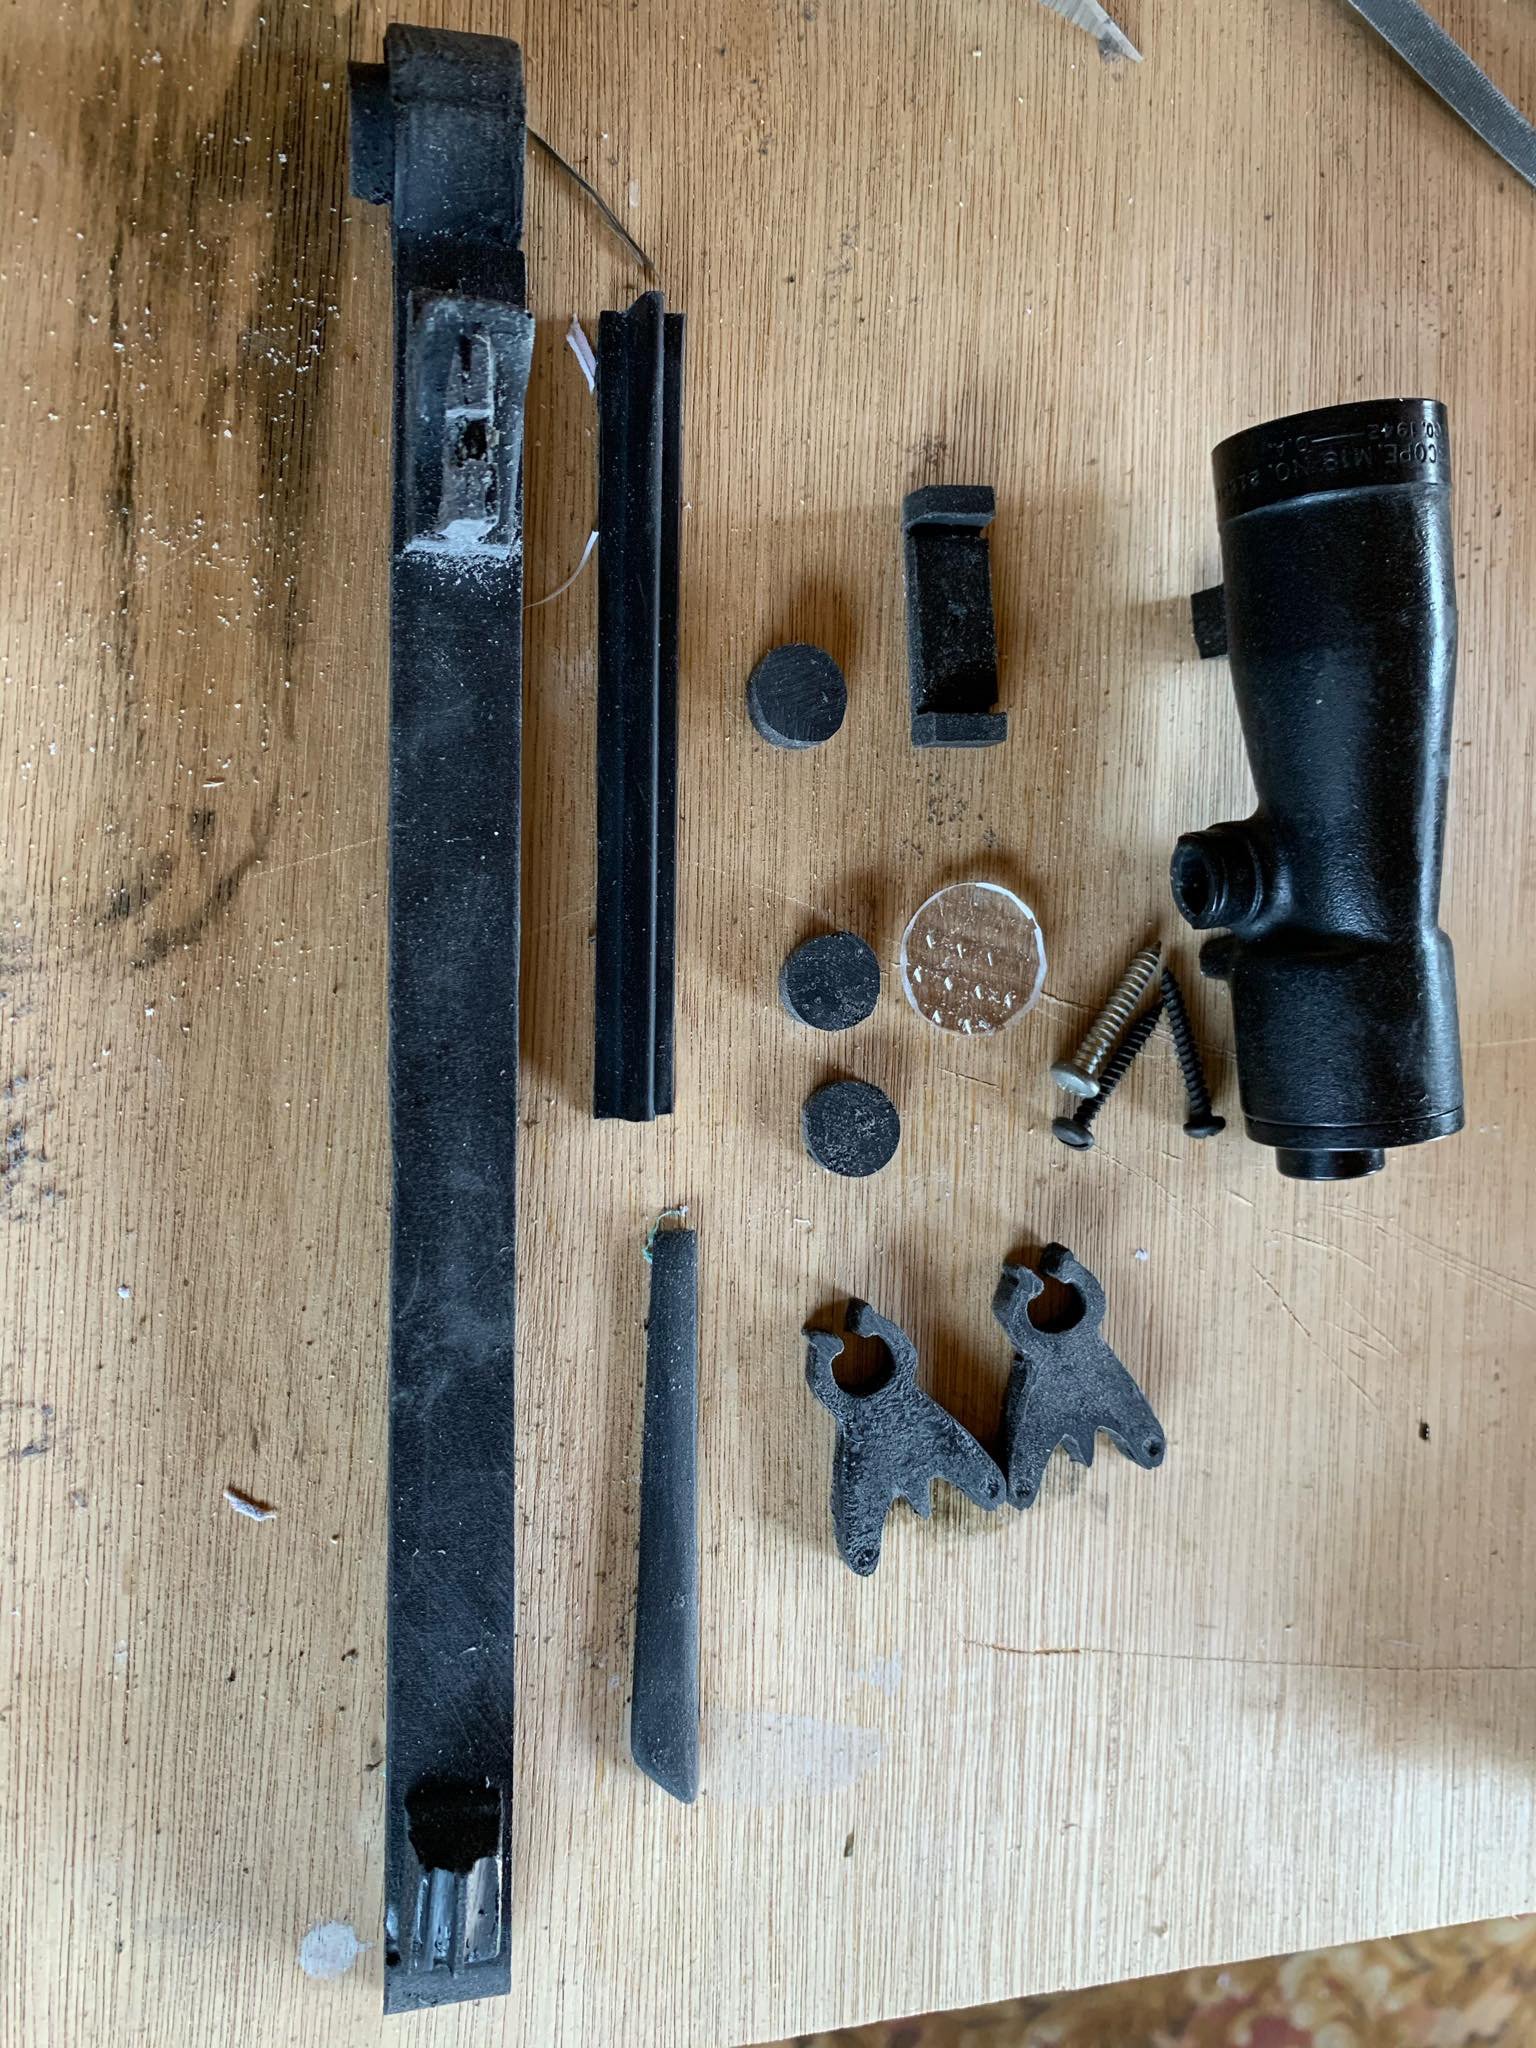
Hi guys I make ESB greebies kit with m19 scope in uk
 1 point
 -
Amazing !!1 point
-
Great work !! one valuable thing from building your armor is the learning process. This allow you to be a future help for others. keep it up!1 point
-
Awesome brother. You got this. Your kit looks amazing. Can’t wait to troop them together.1 point
-
Congratulations Trooper and welcome to the Legion Sent from my SM-G960F using Tapatalk1 point
-
Slow and steady. I know you’ve had long breaks before, and I myself just came back from two months away. You’re doing great; it’s not a race! The final product will be well worth all the blood (literally), sweat, and tears! Sent from my iPhone using Tapatalk1 point
-
Every bit adds up in the end1 point
-
Although the biceps fit better than before, they are still a little big on me, so I'll just do what other troopers have recommended and add some padding. I've cut a 15mm outer coverstip so I can see how the ridges look before continuing. Does it look like it would sit correctly on the bicep ridges evenly? I don't want to have the ridges showing underneath the coverstrip, nor do I want to accidently trim off too much. Please let me know what you guys think. Here is the right bicep Here is the left bicep Test fit1 point
-
Made a start on the biceps, I measured 15mm on both halfs and even added an extra 2mm so that I woudn't cut too close to the trim line and just in case I needed more fitting room. After looking at other build threads, I found in Mayo's build, he trimmed the highest side of the biceps off so both sides were level and even. By making a comparison between those that left the higher piece and Mayo's trimmed one, I decided to do the same and trim the top part off. I like how both side match, they give an even look to the biceps. Here is the result. Very pleased with my progress so far, it's great to see things start to come together. I did a test fit and found them quite big on me (I'm such a skinny fellow). Taking the advice from more experienced builders (measure twice and cut once), I measured so many time before cutting/sanding the armour to make sure everything would line up correctly. So I double checked the measurments, sanded down the ridges 1mm, checked again and sanded some more to 15mm (screen accurate measurments). That seems to be the size that best fits me best so I'm going to make my bicep and forearm coverstips 15mm. Made the inner cover strips from scrap bicep pieces and started on the gluing.1 point
-
Welcome to the ranks Trooper, congratulations!!!1 point
-
Well done, welcome to the ranks trooper1 point
-
Looking Great trooper, Good Luck !1 point
-
That's just how the RS forearms are. The originals were flatter, and their suit had two right arms, so they had to sculpt the left arm from scratch. That's why the left forearm is slightly different, and rounder. It's not a big deal, as long as it fits you and all looks good. On my armor, I did a hot water bath to get the edges to line up better on my forearms, and slightly flattened my left forearm, so that's always a way you could go. But, if you don't want to bathe them, that's fine too, and the arms will be good. Tldr: that's just how the forearms be1 point
-
Hey all, I'm ready to buy boots for my ANH TK Stunt. Is Imperial Boots still the recommended one? Thanks, Paul1 point
-
Hello Peter... Excellent work and great advice ...Now we have to wait...Hopefully everything returns to normal as soon as possible.Soon you'll be trooping1 point
-
You could also add a photo of the left side of the helmet Very good work Peter....You got it1 point
-
Looking Great Trooper !! if a can make a suggestion, as per the crl states for level 2 for ANH Hero : Correct Aerators/Hovi-MIX tips are present. Screens used shall be of a wide type mesh, with the rim of the mic and the inside white or painted white. You may want, in advance to the D.o. to review your application, to paint the rim of the hovi mic and the inside white. Good luck Trooper !!1 point
-
Any progress is good progress. Nice work on those initial trims.1 point
-
Here's my current workstation. I've been using a camera tripod to help with helmet stuff since it's conveniently sized and allows me to position & tilt the helmet as necessary. Dremel is hanging on the key holder. Easy access to an outlet and lights directly above. Overall a decent setup. This is not really applicable to a clean ANH trooper, but I love the look of those pauldrons, so I got myself one for funsies. I will very likely be making a dirtyboi at some point as well, so we'll just say I'm prepping for that. Purchased from TrooperBay. This arrived in a folded, but otherwise mostly flat state. When doing test fits, the sides kept popping up... ... so I used an old blown out hairtie to help shape it. I'm guessing the orange part is painted on due to the couple orange smudges on the black parts of this. I'll have to figure out a way to get that stuff off gently. Moving along to the Vocoder. Humbrol 85 Satin Coal Black. Using a rounded brush tip this time. And so we begin! Reference ever present in the background. Going about this again by hand, no masking off. I started off with the helmet on the tripod, but moved along quickly to holding it with one hand or resting in my lap at every varying angle (from the front, from the side & upside down to anywhere in between). Made the mistake of turning the helmet upside down when there was enough excess paint to run up past my paint lines on the left side. Used a cotton swab with a little paint thinner to clean up the area. I did this a number of times when the paint went past where I wanted it to go. Pausing to check reference, where do I put the paintbrush? Where else but in my mouth, geez. Oooor I could rest it on those pliers. More progress pics: Initial outline going to the mould edges, then expanding the middle three up. Extending the next ones out upward a bit more and painting the middle three through to the neck at the bottom. Expanding upwards a bit again. This is where I left it since parts were starting to dry and it was getting a little harder to work the edges. Overall shape is looking ok, but there are a couple edges that I will likely clean up, mostly the right side (left from the front) That corner looks too squarish. going to even that out next go-round. Looking at the helmet from a bit of a distance, it actually looks like the vocoder is at an angle to the vertical line of the helmet. Taking a close look at the original helmets, this indeed seems to be the case. I don't think I'd noticed this before!1 point
-
Doo doo dooo, ok. what's next? So while I was working on the other bits of the helmet, I have also been working on the Mix-Tips on the side. (CRL) Survey Says: ..."with the rim of the mic and the inside white or painted white." The RS Kit that I got came with the Mix tips painted black on the outside and with the mesh already installed with the inside of the tips being unpainted resin. Considering the comment above, we need to fix that. There's that HOVI-MIX Pa2. - But the paint job.... It was flaking off right out of the box. So these meshes were already glued in place. How to remove without deforming the mesh too much? The first one I ended up bending a bit getting out, the one on the left in this picture. I think I just tried using my fingernails to pull it up in places. I noticed the bending and switched to a utility knife. For the other side, I popped a little utility knife under one of the more open edges and kind of popped up the ends of the wires one by one until I could fit the blade underneath and then held the mesh on top with one finger while I pushed up with the flat of the knife on the other side. This way I was able to keep the mesh flat & reduce deformation significantly. The inside was a bit dirty, and I needed to remove that glue. I used a paper towel to wipe out the inside with my finger. Used the utility knife to scrape gently around the inside edges of the rim which did a good job of chipping away the glue, being careful not to dig into the resin. Resulting in nice clean surfaces to paint. For the meshes, a few times, the little wires would pop out of place or completely off. I was able to put them back into place with my fingers, matching the weave, then used some wide & flat pliers to squish and flatten everything together a little better - I also used this to flatten the mesh that I had bent trying to get out. Sometimes when handling the mesh, it was loose enough that the shape became more oval and the square gaps of the mesh became more like diamonds, but when putting them back into place, they went back to being square-shaped. This isn't the greatest picture for silhouette value, but if you look close, you can see one of the wires is out a bit. Side note: I have "rediscovered" the timer function on my camera, so maybe I can stop putting pencils in my mouth now. I figured for the painting, I could install the tips into the helmet as a place to hold them while I painted and stay there to dry. This is the first coat, wet. First coat dried. There's still not a very good consistency, so I'm going for another coat. I planned to work on the helmet while these dried, so I took the tips out to do the second coat. Once done, I rested them off to the side in the tape roll set at an angle so they wouldn't fall out. Later I upgrade to a piece of cardboard +++. I used a flat, angular tipped paintbrush and Humbrol Gloss White for this. Using the paint on the cap was enough to coat both the tips. I'll be painting the outside after this, so no precision is needed here. You can see there's paint over the edges. I expanded it to make sure I'm not leaving any more big paint lumps on the outside. Aiming to coat the entirety of the inside and along the rim edge. This is a half-and-half pic. Coat #3 applied on the left side of the picture, and the result of coat #2 on the right. Here's the result of coat #3. I used the bottlecap to keep my meshes safe while they were waiting. And hey look! I've got a little helper now! The paint is pretty decent, though it looks like it could use another coat. I decided to check out how things looked with the meshes in place before going for another coat. In place, even up close, unless you are trying to look inside, you're not going to notice the slight variation of the white, so I decided it was good enough to reinstall the meshes. This is a test fit. This is one of those original Lego stormtrooper guys that came with a head, but no face... Because, I mean... Stormtroopers are a faceless foes? But with helmet on, this guy reminds me of Gomez Addams. To get the meshes back in, I aimed to place one corner (one where there were lots of wires converging at the same point) onto the little ledge and held it in place with one finger while I poked in the other edges with my fingernail. This process took a while to narrow down because at times, the mesh would fall into the tip, or didn't want to push down past the rim, but I was eventually able to get things situated correctly. Some of this took a little bending and pushing one of the wires that was poking out too far on one side with the help of the pliers. This is one where the wire is out of place on the left one which prevented the mesh from sitting fully inside the tip. I took it out again and adjusted things. Now it's sitting correctly. Both meshes are below the rim & sitting nicely. I got smarter for the gluing and painting phase. I stuck one of the drill bits though a piece of cardboard (9/64") and screwed the mix tips in place. For the gluing here, I used some Gorilla Super Glue Gel. This has a thicker consistency than liquid super glue and allows for the use of a toothpick to apply the glue with precision. Going all the way around the edges and making sure that I don't create any little windows with the mesh (where the glue completely fills the gap). I dragged the toothpick across the top to pat down any excess glue that was poking up. Looking good. I just tested both of these after ~24 hours of cure time (inadvertently - it cures faster than that) - using a toothpick and gently trying to pull on the mesh to see if it would release, there was no movement. These guys aren't going anywhere. While the glue sets, I moved on to painting. I used the same flat, angle-tipped brush that I used for the inside. This gave me decent control and I was able to get good coverage. I rotated the tip around by spinning the screw from the bottom. This helped me hit the sides of the tip all the way around without running into the other tip. Using Humbrol 85 Satin Coal Black. Here's the right side started. And here's the end result. This was done by hand. No masking. Whenever I blipped the black paint too far up, I wiped it off with a cotton swab. If I feel like it, I can do a lil' touch up later on. From the top: Here's more of an edge-on view after they've had plenty of time to dry. Was surprised at how reflective this paint came out, but unless the lid was switched out before being shipped to me, this should be the semi-gloss.1 point
-
Surprise, delays. Decided to sand the inside of the shins where they overlap to try to get them to sit a bit more flush. Especially since I have that ultra thin Velcro, I'm hoping to minimize visible gaps. Some if the parts just didn't line up 100% right, but they were a little better after dremeling/sanding. I ended up exposing a bunch of low spots and pin holes, so I felt the need to fill those. I also noticed that the bottoms of the shins were a bit long as well, so I trimmed and sanded and bondoed those edges... then of course sprayed the whole thing white over again. Similar setback with the thighs - I had previously repaired a small crack at the top of the inner thigh with super glue and thought it was fixed, only to have it open back up again. I ground it out and filled it with two part epoxy and sanded again... and sprayed white... again... Same as the shins below. Bonded: Sanded: Almost disappears with paint: Fiddling with the last little imperfections on the helmet too, finally pretty happy with it. Found some pinholes I didn't notice before along the neck seal edge, so you guessed it, I filled and sanded those too. The interior unfortunately had some white overspray from some masking tape that failed, so I sprayed it with one more coat of bed liner. Masking makes it look like a luchador mask haha Also started prepping the vocoder, almost forgot about it! The ab section also developed a couple weird tiny cracks, probably from flexing it "open" too wide while sanding. My bad - it'll flex but don't go crazy. I just filled these with filler, I hope they'll be okay. Too hard to get shots of it. Sorry, didn't take too many photos. More little fixes this weekend then I swear I'll get to final paint soon... Rushing causes problems! Hopefully getting my HWT Centurion app in this weekend too. Did my first "virtual troop" this week and my first in a couple months! We got to crash an elementary school STEM class's Zoom call and in costume, then suit down and talk about the club's charity work, Galactic Academy, costume building techniques, and STEM skills. Was a blast!1 point
-
Thank you Tony and Staff I appreciate this.1 point
-
No worries Tuomas thanks for the update. If there's anything we can do to please let us know. FISD Staff1 point
-
How to attach flexible hand guards to rubber gloves For those aiming for Expert Infantry/Centurion level or just screen accuracy, the flexible hand guards will be need to be attached to your rubber (chemical style) gloves. Many folks have asked me the best way to do this, so here is my preferred method. Note that I am using the silicone guards that I make which have a heavy-duty cloth backing in order for glue to adhere to, but this should work for most other types including ones made from natural latex. ****Instructions for Nomex gloves at bottom Supplies needed: 1. E-6000 glue- I highly recommend using this product instead of CA (super) glue or epoxy, both of which can (and will) get brittle over time, causing the bond to fail. 2. Rough grit sandpaper (80 to 120 grit) 3. 2 or more heavy books. 4. Thin point Sharpie marker or soft lead pencil. 5. Blue painter's tape. Step one- Determine placement. The front end of the guard should sit right at the end of your knuckles, and in the center of the back of your hand. NOTE: Placing them too far forward will put undue stress on the glue in that area when you bend your fingers down and may cause separation. Step two- After measuring both sides and determining proper alignment, attach the blue tape to mark where the bottoms will be. Note distance between end of guard and bottom of glove fingers. Reference image Make sure that there are no wrinkles in the rubber glove. Step three- Using the Sharpie or pencil, mark a line around the guards. Step four- Sand down the area inside your lines. Doing this will rough-up the surface and allow for better adhesion. NOTE: Clean the area thoroughly afterward and allow it to dry. Step five- Place a generous amount of E-6000 around the perimeters and inside, then rub it around the entire center/edges to even it out (you can go a little heavier on the edges). Leave a small area around the edge to prevent seepage. Step six- Lay the gloves side by side and place the hand guards glue down in the outlined areas. Place at least TWO large books or other heavy, flat objects in top. This is necessary for proper adhesion. IMPORTANT: Leave them under the weight for at least 12-24 hours to allow the glue to completely cure/set. If you do have any seepage of the E-6000 it can be removed by rubbing it off with your thumb. DONE! NOMEX GLOVES- When attaching to Nomex gloves, use the same method as above But be SURE to put a piece of wax paper inside the gloves. Otherwise, the glue will seep through and bond them closed. NOTE: Please be aware that Nomex gloves are not permitted for Expert Infantry/Centurion approval.1 point