Leaderboard


Popular Content
Showing content with the highest reputation on 06/04/2020 in all areas
-
Look at the thickness of the walls, this blaster feels as if it was real. Will have to route wires through the mounting block2 points
-
I havent gotten membership yet, however I sent over some $$!2 points
-
We just released the teaser for the series. Check it out here: Always happy to hear feedback and opinions. If you'd like to support the creation of the series, you can help us out on patreon.com/TransmutePictures2 points
-
a. Eric F. b. 501st TK ID: 37423 c. GoofTrooper d. Dune Sea Garrison Costume Information: Armor = Anovos Helmet= Anovos Blaster= DoopyDoo’s E-11 Kit with T-Jay Completion Kit and 3D printed elements Height = 5’ 8” Weight = 160 lbs Boots = Imperial Boots Canvas belt = Rob Kittell Hand Plates = Joseph Pedigo Electronics= iPhone with TrooperTalk and 10W voice amplifier Neck Seal = Cloth Neck Seal by Darmans Props Holster = DarmansProps Expert Infantry Request Thread URL: In Armor: Note: I currently have a shoulder injury which is causing my right shoulder to be lower than my left shoulder, which kind of makes the armor look a little uneven. I didn’t realize it was this bad until I saw these photos! Centurion Compliance Photos: Helmet: Shoulder Straps: Biceps: Forearms: Hand Plates: Chest Armor: Abdomen and Kidney Armor: Belt: Thigh Armor: Lower Leg Armor: Blaster (DoopyDoo’s Kit):1 point
-
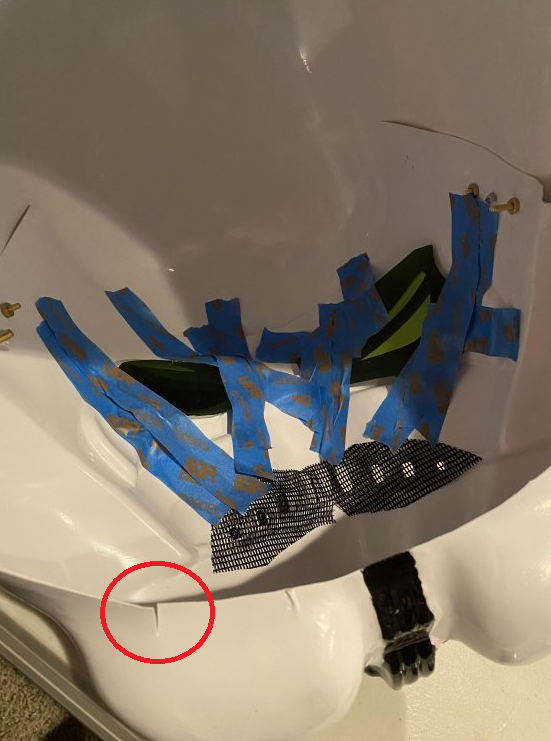
Looking at the photos of the helmet, I see a break that worries me ...Maybe you can stick a little abs on the inside, to stop the progress of that break. Maybe a piece of cloth soaked in cyanoacrylate or something similar can help too...
 1 point
 -
Yes, number 11 point
-
Happy to oblige EIB Compliance Photos:1 point
-
@GoofTrooper although it's redundant, we do like to paste all photos (including those that are EIB requirement) in Centurion applications just so each application stands on its own as a resources for other troopers, and for ease of review for the DO team. I can go ahead and start to take a look at your review, but it would be great if you could update your post with the full set. Thanks!1 point
-
oohh I wrote EIB , sorry. (I have corrected it) As I know, you should add the photos again because it's considered a new application for another level , but you can wait for the D.O. team . Your Centurion badge is around the corner Sir. Cheers1 point
-
Lookout great, Lou! Someday when I'm done with my TK, HWT, and T-21 builds I'd like to do one of these 5th Horsemen blasters. That and some Mando stuff. Goodness my to-do list is long. Looking forward to seeing your final product!1 point
-
Assembled the main components so I can figure out where to place everything. Only a few pieces glued, the rest are screwed together. I like how the barrel can be removed for easy access Need to make the trigger functional, will have to make my own spring Will place the screen and wiring in the scope, possibly will need to cut it at the bracket1 point
-
Great work Trooper !! another Centurion is near. I would like tu suggest in advance to add the following photos, i'm sure the D.O. is going to ask for, according to the CRL. for level 2 Thigh ammo belt is attached to thigh with a solid head rivet, painted white, in the upper corner and fastened to the lower thigh ridge. The rivets used shall be single cap, double cap or split rivets. No pop rivets allowed. Rivet should be approximately 5/16" (8mm) in diameter (exterior). 1-Detail of external and internal attachment of the thigh ammo belt. both sides. Two male snaps are present on the lower center tab of the Posterior Armor. Snaps do not need to be functional. Snaps are silver in color with the bottom of the snap facing outward and are not painted. 2-Close photo of the lower center tab snaps. There is no seam present on the front of the boot. Boots have a black sole 3- Close photo of your boots. Good luck with your approval.1 point
-
starting to work on the yoke and back area. completed pile of parts grows almost daily1 point
-
So one step forwards, two back. Basically, I dropped it. This was the 1st part I printed and the temperature wasn't hot enough, and I am pretty sure under extruded. So it broke. As infuriating as this was last night it was always going to break, just a case of when. At least I've not done much assembly and finishing on it. I double checked some things this morning, like extrusion width and also destructively tested some of the chest parts I won't be using. I am pretty happy that with current settings the replacement will be up to snuff. That said, that right angle is a bit of a stress raiser so will reinforce it either by welding it or fibreglass. Also I'll try not to drop it again, especially as the price of filament has gone way up due to demand. Butt plate is almost done. The main sections are pretty large and more or less maxed the Z axis. Size seems good just hope it all fits once assembled! I'll be doing some of this before I get too ahead with the chest plate incase I need to make any changes. I also managed to get hold of an older copy of the chest plate file, which has holes! They are still the wrong shape so I have knocked up a "fixer" in fusion 360 that I will use to correct them. Once the part is printed I can measure the holes and update the parameters in the fusion file and print that. Once that's done I can carefully file the chest plate until the fixer fits and then fill all the remaining gaps and smooth it all.1 point
-
Thank you all for you responses. Sorry for delays, alot happening all over the world right now. Haven't been able to work on armour at all. Will be getting into this weekend! Stay safe!1 point
-
Very good job buddy!!! Good luck with your application Eric!!!1 point
-
1 point
-
A tip to get your black lines nice and clean is to go over with a black permanent marker, a bit easier to control than a brush at times1 point
-
Sanded the runs to 220. Filled some pinholes with putty. After they dried, sanded to 220 again. Tomorrow I'll wipe it down and spray an INSANELY LIGHT COAT of white.1 point
-
Thanks going to go with ABS, appreciate the replies1 point
-
Tube stripe time! After my ear victory, I decided to work on painting. I have the tube stripes decals (from WTF) and the tube stripe painting template (from Trooperbay). I tried the decals, realized I put them on with the bends of the strips going forward instead of backward, sighed, removed them, and used the Trooperbay painting template instead. Cleaned up with a toothpick and mineral spirits. It's not perfect and I'm not sure /how/ perfect it needs to be. I also spilled mineral spirits all over myself. I am clumsy. I've also begun to outline the ears. I will paint the ear screws white and finish filling in the ears gray (with paint previously used on the helmet so I know the colors match). Then after I can confirm that it's okay for there to be a gap in the top of the eye lens or not (see above) I will move forward accordingly! Update: I painted the ears and ear screws but pictures to come tomorrow once I touch them up after drying. Very exciting- I’m in the helmet home stretch!!!1 point
-
I'm agreeing with CableGuy here on the ear. That right ear looks like it could stand to be trimmed down a bit more, especially on the round area (it looks a little on the thick side). It looks like the round parts of your ear are all trimmed flat. Remember that for the round parts (the tops of the ears with the rank bars), they typically aren't trimmed flat across the back of the piece. Often you'll see a 'step' carved out to make the ear fit flush on the face and cap/back. This is due to the gap between the front and back halves of the helmet. The front of the round part of the ear usually ends up thicker than the back of the round part of the ear. Jeez, I hope I'm making sense here. :p I also had an ear issue with my last build. Turns out that I attached the face plate lower than I needed to, which threw the side tubes out of alignment. It was making getting the ears lined up extremely difficult due to the gap. As a result, I had made my ears very thick in the front to cover the gap. Once I realigned the face and cap/back by moving the face plate up, everything fell into place (no pun intended), and I was able to trim the ear and fit it properly. Before and after pics:1 point
-
Thanks @MaskedVengeance and @Chemi for the information! I'll use this and draw up the cut lines. Finally attaching the V-tabs as well. One step closer! (With added mobility )1 point
-
Loving this build thread! I’ll be starting on my helmet soon so this is going to be great reference too1 point
-
Looking Great , keep it up !!!1 point
-
No need to say thank you...We are here to help. Thank you for opening a thread and sharing your build with us. Regards...1 point
-
Metric screws tend to be based on standards, at least here, so if you get an M3.5 slotted countersink with it will comply with DIN963 which sets the sizes for everything. But as said the only real crucial dimension is that head diameter, if its in the 6-7mm range, flat and has a slot I'd say it would be good enough unless you're going for a replica. As you're in the UK I used these: https://www.spaldingfasteners.co.uk/metric-brass-countersunk-slotted-head-machine-screws-m3-m4-m6/ They are a touch long so will need to be cut down. You will also want some washers and metric course nuts for them.1 point


.thumb.jpg.77bd551337f7adc46a4b151e703df6be.jpg)