Leaderboard


Popular Content
Showing content with the highest reputation on 06/03/2020 in Posts
-
We just released the teaser for the series. Check it out here: Always happy to hear feedback and opinions. If you'd like to support the creation of the series, you can help us out on patreon.com/TransmutePictures4 points
-
Next up, they eye lenses. The RS kit comes with a flimsy - film accurate - piece of green film for the eyes. I wanted to go with a sturdier option. I research a number of threads on what to use and a frequent suggestion was to use a welder's shield in "Shade 3.0" which is a dark green. I looked around at options on the interwebs (hadn't checked out TrooperBay yet) and I found a replacement shield on Amazon: https://www.amazon.com/gp/product/B00209I0UG/ref=ppx_yo_dt_b_asin_title_o00_s00?ie=UTF8&psc=1 The image shown on Amazon is a curved faceshield and I was expecting it to arrive as such, but it came in flat in a plastic bag and with protective film on both sides: Do _not_ remove that film. Keep it in place as long as you can to help keep the quality of the finish. I stuck a piece of paper behind the eyes and traced the lines. Just a quick go around, it's going to be expanded. I drew another line to expand the area by roughly 1/4" (a compass could be used - I made a compass out of my fingers for this). I made a copy of the templates and cut them out. I moved them around a bit on the faceshield to determine the layout to make the best use of the material and here's what I found. I put the templates in place, traced their outlines, and then moved them to the next position. The shield (I assume) is the same on both sides, so it shouldn't matter what orientation the eyes are placed in. I didn't draw in the lens in the middle, so that in the - hopefully very unlikely - event that I should need a single lens after using out all the others, I can draw it on at that time. Both eye shapes fit in the spot and I ended up trimming off a bit more material from the shapes that I drew, so there's lots of room. In this layout, I've got room for 5 sets of eyes and room enough in the middle for one more. If at any point I should need to replace the lenses, I've got plenty to spare. For now, I'm only going to cut out one set. This shield cut very easily with my lexan-style scissors. I found the straight scissors did a better job for these. Once I got the lenses cut, I took another look at the trimming of the eye holes while holding the lenses in place. Another pencil-in-the-mouth pic for effect. I marked out the places all around both eyes where the material seemed to bulge out too far so that I could even up the trim lines - aiming for as flat a fit as I could manage. Looking from the inside, the mould line looks like it's a little further back and there's easy room to safely trim out more. For these edges, I used the little conical Dremel bit and hit it from both the inside and the outside. Most of the trims were made from the inside, but more final touches were made from the outside. Until I had a better fit along the curves (for both eyes all around the edges - I seem to be favouring the top of the right eye in these pictures) A little gappy, but not bad and I don't want to trim off too much more. After getting everything trimmed off and sanded out, I gave the entire bucket a bath. Soap on the outside to clean up some smudgies and water everywhere to get rid of all the tiny bits of plastic dust clinging to everything. I didn't get pics, but you can do an image search for "stormtrooper in a bath" and you'll get the idea. Here's where the Sugru came into play. This method is detailed by @justjoseph63 and I actually purchased the packets via PM here (Thanks Joseph!) Tutorial: Purchase: The packets arrived quickly, signed, and with a collector's card! (Ok, it's more of a business card, but I'm going to start a collection now XD). I did some searches into other people's experience with Sugru and at least one post said that they had difficulty getting the (flat) lenses to stick to the Sugru, so I figured I was going to need a little pressure to keep them in place while it cured. My tools: A couple of C-Clamps with blocks of wood taped to one side. Testing out the fit before I get involved with the Sugru, I put the blocks on the outside to rest against the cheek ridge and the area just above the eye. This provides a solid position that has enough structural integrity to withstand the pressure exerted by the clamps without deforming the mask (too much). Putting too much pressure on the clamps does start to bend the faceplate, so don't go too ham on this. The feet on the inside go right in the middle of the lenses, at least for vertical positioning. This forces the lens to match the curve of the faceplate. Just enough pressure to curve the lens - not so much pressure that you're deforming the faceplate. This also reduces the gaps significantly compare to holding the lenses in position by hand. Hey a picture of the left side finally, hah. Once I was happy with the setup, time to prepare the inside of the eyes. I sprayed on the plasti-dip early and through my work with the helmet so far I have found that it comes off very easily. I want a solid base to glue against, so I removed the coating around the eyes. I used a utility knife to score the coating and then I was able to easily remove a clean section all the way around both eyes. Where it didn't peel off in strips, I was able to rub it off with my thumb. One side cleaned up. You can also see the inside view of the final trim lines I have here for the eyes themselves. From the top: From the bottom: Both cleaned up. I cut out a triangle where I'd scuffed off the coating below the right eye during sanding as well as cleaning up the edges where the drill bit ate up the coating behind the right ear to give a clean area for another coat at a later time. From the top again: And the bottom: Drill went om-nom-nom to my coating. Cleaned up the edges Now we're ready to open up the Sugru. I cut off around three of the edges with scissors since tearing things doesn't always work so well. And quickly realized that I would benefit from wearing gloves to do this. Not entirely necessary, but it kept my fingers clean and made the material easy to work with. Removed from the packet - dragging the glue along the inside of the packet worked well to pick up the bits that clung. Then rolling it into a snake. Ruler for reference as it was advised not to roll this any longer than 7 inches. If you roll it out too long, you can squish it back down a little length-wise to make it thicker and roll it back to even it out along the length. Then squished it into place, leaving a gap at the top for anti-fog purposes. One note: When I was working with it, I found the Sugru kept wanting to peel away from the eye-rim when trying to press it against the lens. For the other side, I pressed the material to the rim with a little more force and squishing it down a little more. That film protected the lens up until now, but it's going to get in my way, so time to go. Remove the film from the outer-facing side of the lens. Do _not_ remove from the inside yet! I then used the round end of the craft stick provided to press the material into place against the lens on the inside. This is where the material kept wanting to come away from the eye-rim, so I put the clamp on and used the craft stick to squish it back into place against both the lens and the rim. After this was done, checking the outside, there's some cleanup to do. I used the cut end of the craft stick to scrape it away - and it gave no resistance. I should have tried to move the stick along the rim of the plastic rather than along the lens, as dragging it along the lens cause a little scuffing (maybe it can be buffed out? Still, it's not bad as it is). Overall, not much squished out onto the lens. I also made the use of a good handful of cotton-swabs to remove excess material from the outer lens side. Rub a bit away, then rotate to a clean section of the swab so I wasn't rubbing the glue into the lens. Same deal for the right eye, though this one I squished the material into the rim a little more for starters There was still a fair gap on the inner corner of the eyes that I didn't like, so I improvised a couple more clamps into place to pin those into place as well. My bar clamps don't have much reach, so I had to find something sturdy, flat, and kinda thin. Turns out a couple of packs of gum fit the bill. I was able to get the right amount of pressure in the right way by placing the packs of gum on the inside to give a flat surface to extend the bar clamps' reach with the outside feet pressing against the brow line above the eyes which again had enough structural integrity to withstand the pressure without deforming the faceplate. This got the inner corners pressed flat into place. For both sides. If you look closely, you can see that minty-fresh clampy-helper goodness at work, haha. And the final resting position while I wait the 24 hours for this to cure. *does the Time Warp again* 24 hours later, the clamps come off. Overall, good results. The left eye is a little off center, but it's not visible, so it doesn't matter. If I were to do this again, I would remove more material from the lenses. It was a little difficult getting the craft stick in underneath certain angles, especially around the tears. I ended up releasing the clamps a bit while in the process so I could press it in place before clamping it back down. I'm keeping the protective film on the inside until I get closer to completion. Certainly leaving it on until after I re-coat the white bits. The curvature is holding very nicely and these lenses aren't going anywhere. If anything, the sections for the air gaps could be expanded, but I'll wait to do some test runs (or just leave it alone) until it seems like it would be beneficial. Here's some of the slight scuffing I caused by trying to remove the excess with the stick pointed against the lenses: We're getting close to riveting the faceplate in position. (Though it looks like I could technically get away with just having it screwed in place since all these bits will be hidden. I'm debating it.) And we're getting REAL close to starting the paint job on this bucket. I got some goodies from TrooperBay, right now, mainly the Satin Coal Black. Also got a set of snaps (I may revamp the internal strapping to either include these alongside, or replace the original strapping method - but that's for later), some zap-a-gap and zip kicker (though I don't have any direct intent to use these at this time), and a helmet liner. The foam padding star is lovely and all, but I figure a proper liner will allow for better control of helmet movements as well as allowing for a more precise fit. I still have yet to determine how I will be going about attaching that. I've already started with painting the Hovi tips, but that will be another post.3 points
-
Hi Emma You could consider trimming the ear some more, then sanding the inner curve for a smoother appearance. Approximation below; Regarding using ABS paste around the ears, personally, I’d highly recommend against this. As above, the ears were not glued or bonded to the helmet - many from the movie had slight gaps, and that’s perfectly fine. In fact, it’s a part of their charm. :-)3 points
-
Yes, yes. To Glen you listen [...] save you it can... Sent from my iPhone using Tapatalk3 points
-
It's been a while, but I thought I'd share this anyway: The short film was so much fun that we can't stop. Bucketheads is continuing as a mini-series with the help of my Garrison brothers and sisters. Shane Molina from Hawaiian Mako Design created another poster for us. I'll keep you updated as the project moves on. You can also follow us on the socials @Bucketheadsfilm3 points
-
You've probably already seen Dan's excellent post on brow height, linked below. There were lots of inconsistencies even within the Hero and Stunt styles, so I do not believe the DOs really mind what type of brow height you have. I plan on going relatively low with mine, in fact. I like the menacing look. =)2 points
-
Inside you, you know you're one of us...2 points
-
After building the fantastic SE44C from Imperial Factory with 5th Horseman files, had to get the F-11D version. As I want to use the BlastFx, I will deviate and include the screen on the counter. Figure I can overlay with a blank later, but it is too cool not to include it (I have one on my E-11). Here are the parts after cleaning (you dont need to sand anything!).1 point
-
Hello everyone The time has finally come for me. I have recieved my AP Stormtrooper kit and am all ready and excited (a little nervous too) to begin my build for what I am hoping to achieve is ANH Stunt TK Centurion. I chose to have my kit untrimmed because I can use the extra ABS plastic to make inner coverstrips, ABS paste and plenty of tests and experiments on scrap pieces before apply to the armour itself. I have done months of research, looked into tips and tricks and have carefully read other AP build threads. Since this is my first build (and I'm a perfectionist), I'm going to take things slow and start with some simple parts. I'll start with the Shoulder bells first, beacuse there's no gluing involved and not much to cut/sand either. As I am aiming for Centurion, I want to be as accurate from the start as possible. Any comments and feedback would be greatly appreciated. Thanks guys...lets get building.1 point
-
Tah dah! Unglued the ear, dremeled, re-screwed. Phew! No problem gap this time.1 point
-
I didn't know that before I bought it- it works to my advantage height wise but width.... lots of shimming it is! I keep saying "just wait until we get to the THIGHS!"1 point
-
The WTF kits are really, really small. I didn't have to trim anything but flashing on the ab/kidney on the WTF kit I owned, and it fit with little space. I'm just 5'4" and 110lbs, so not a big person at all. Contrast it with an RS kit- I can almost fit one of my kids inside while wearing it!1 point
-
Great progress Emma! I'm surprised the ab and kidney from WTF have that much of a gap between them. Shimming can be a real pain in the neck, just take it slow and make sure to sand with 1000 grit to finish!1 point
-
I'm agreeing with CableGuy here on the ear. That right ear looks like it could stand to be trimmed down a bit more, especially on the round area (it looks a little on the thick side). It looks like the round parts of your ear are all trimmed flat. Remember that for the round parts (the tops of the ears with the rank bars), they typically aren't trimmed flat across the back of the piece. Often you'll see a 'step' carved out to make the ear fit flush on the face and cap/back. This is due to the gap between the front and back halves of the helmet. The front of the round part of the ear usually ends up thicker than the back of the round part of the ear. Jeez, I hope I'm making sense here. :p I also had an ear issue with my last build. Turns out that I attached the face plate lower than I needed to, which threw the side tubes out of alignment. It was making getting the ears lined up extremely difficult due to the gap. As a result, I had made my ears very thick in the front to cover the gap. Once I realigned the face and cap/back by moving the face plate up, everything fell into place (no pun intended), and I was able to trim the ear and fit it properly. Before and after pics:1 point
-
Thanks @MaskedVengeance and @Chemi for the information! I'll use this and draw up the cut lines. Finally attaching the V-tabs as well. One step closer! (With added mobility )1 point
-
First coat of primer. Will have to assemble in order to fit the electronics, then disassemble for painting.1 point
-
My feet tend to be on the wider side...I should probably go the full size up then. Thank you all!1 point
-
Thank you everyone for the compliments so far! Drawing this in CAD with the aid of build threads and specs from here on FISD and 3D printing most of the parts has really helped me make this a sharp looking pack! I couldn't do it without all the resources available! My local garrison did a social distancing outdoor drive through con a few days ago so I got to try out my pack! Overall everyone liked it and it mostly worked well. I need to move the straps in and up just a hair and tighten them some so the pack rides higher on my back. The buckles are placed too high and they rubbed my rib cage/armpits so hopefully just moving them and tightening them will do, if not I'll make new straps with the buckles moved further down. I think all the pack needs otherwise is the addition of the third MP40 ammo pack and weathering. I'm super happy with it and will start printing parts for Pack #2. Once I'm happy with all the parts and its assembled, I'll release all the files1 point
-
This is very exciting, as the film was excellent! Will Samuel Kim be scoring the series as well? I’ve LOVED his recent Star Wars arrangements. Keep up the great work! Sent from my iPhone using Tapatalk1 point
-
Those eyes turned out great, Jeklyn! Really nice job!1 point
-
Fixed the helmet setup. I cut out the back section of the fan mounting bracket and used some 5/16” braided cord protector to gather the wires. Then I moved the batteries to the back so I had room on the sides to twist the helmet on. Still a squeeze but much more comfortable. A little back heavy but it works well. Now back to the armor!1 point
-
But we all know that Joseph and his OCD inclinations definitely colored in the threading on the back anyway. But I’m the same way myself, too. ;-) In fact, I checked my pouches this evening and was horrified to see that I didn’t do the backs of them. Maybe next time I’m watching a movie... Sent from my iPhone using Tapatalk1 point
-
Congrats on your BBB day! Great to hear you are going for Centurion! I found that I had enough extra ABS coverstrip material for inner strips with what Mark provided - so you should be good as long as you are conservative with the plastic. Good luck on your build!1 point
-
I will open a page for the question on my local garrison forum. We will have to wait and see.... Thank you for your help!1 point
-
Check with your GML (garrison membership liaison) some are sticklers for the brow height, some not so much, it is their decision at the end of the day1 point
-
It does look a little low, just slotting and slightly angling the two side screw holes behind the ears can allow you to tilt the faceplate a little which will move it down from the brow trim, that is an option, although it will change the gaps on the ears so could need some more tweaking.1 point
-
1 point
-
Very good work and very well explained!!!!1 point
-
Thanks man. Glad to hear the pros are going thru the same thing! And I'm a half mile from Monterey Bay, so the humidity isn't going anywhere...1 point
-
Congratulations Eric.1 point
-
I'm not a Legion member yet, but I intend to be this year, so I donated! I'm glad to be a supporter of this fine group! When we pool together we can do great things!1 point
-
Honestly I may be going down to 2 fans which removes a battery. It is very hard to get on and off...1 point
-
Step by Step. Enjoy!!!1 point
-
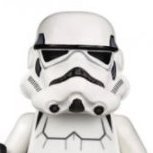
Part 3: End results I sanded off all the rough edges with some drywall sandpaper. I was able to use the edge of the counter to assist in getting those curves. Ear caps final trimmed and sanded I thinned out the ends slightly by sanding the inside to aim for a tighter fit at the bottoms. And the end product:1 point
-
https://www.501st.com/members/displaymember.php?userID=25439&costumeID=61 point
-
Absolutely correct, every little step forward counts.1 point
-
Have fun in the build!1 point
-
I'm still working on my own build, but from all I've seen there can definitely be mobility issues when suited up. You're on the right track with cutting into the raised section behind the knees. I plan on utilizing angled mobility cuts (if necessary), to maintain a clean, uniform look. Check out this post:1 point
-
Great work, every little bit adds up in the end1 point
-
I have the pack pretty much assembled! I have a troop here in a few hours so I'm going to wear it to try it out. If the pack isn't comfy due to strap placement or whatever, I'll be able to ditch it nearby without any issues. First I bought some nylon straps: https://www.amazon.com/gp/product/B07H1D15LZ/ref=ppx_yo_dt_b_asin_title_o01_s00?ie=UTF8&psc=1 I then used a regular backpack strap to get a rough idea of how long I needed it and where to put the buckle. After cutting and melting/sealing the ends, I put super glue on about 1" of the strap and folded it over and clamped it. I then used an old soldering iron to burn a hole in the strap for a 1/4"-20 bolt. The straps were then attached to the tank with washers and nylock nuts. I used the mounting position of the straps from a couple other builds but I think the top strap needs to go up and inwards a hair but we will see after I do some trooping. Easy enough to change in any case. I then tried it on. Granted its without armor so I'm not sure how its going to actually sit. After deeming it "good enough" I took a black paint pen and covered up some of the exposed unpainted screws. It needs more touchup and weathering, but for the purpose of having a complete pack to take on a test troop I'm super happy with how its looking. ...keep in mind that this is my "rough draft" pack that I'm planning on giving to a friend. My revised parts, strap locations, improved assembly methods, etc. will all go into a second, more refined pack that I plan on keeping. I'll do a build on it as well and use those photos on my Thingiverse after I release the files. I have other projects and work and real life to take care of, but I suspect files will be available very soon for anyone else wanting to use my parts!1 point
-
Hi Robert, and thank you for your EI submission! In the following review I will be going over a few items pertaining to your current submission, as well as those that will be required for Centurion level should you choose to apply. (And I hope you do)!! That being said, let's get started! CRL and EIB Application Requirements: All required submission photos have been posted and I am very pleased to announce your armor displays all the necessary elements to qualify for ANH Stunt Expert Infantry. On behalf of the D.O. Staff, Congratulations! Other-Armor Fit/Assembly: In this section we review observations made by your fellow troopers and ourselves. Some observations may lead to suggestions to improve the overall look of your armor. Note that we consider both text (CRL) and pictures (screen caps/reference images) when reviewing submissions. Starting at the top, your ears are a little off-kilter. Ideally, the top screw should sit just below the the bottom corner of the trap and the bottoms should follow in the same line. Not a deal breaker for L3, but something to consider. Reference images OUTSTANDING paint job on those ear bars, brother... among the best I've seen, but while the decals on your traps/tears is nice and shiny, it appears as if you used a flat/matte finish paint on them which kind of throws off the overall look. If you look at the reference images you can clearly see a sheen where the light reflects off of them. We are suggesting that you use a semi-gloss (or at least a satin finish) to make them look their best! Reference images The same with the frown paint. Reference images For a better look, the bottoms of the calves could definitely be tapered in a bit more. Reference image Centurion Requirements In this section we prepare you for Centurion. More photos may be requested in the future that allow us to make better decisions on possible adjustments. If there are any areas of concern they will be discussed here. Because Centurion photos show much more detail than EIB, items to pertaining to Centurion might be seen there and not here. We try to point out all that we can from what is seen, but the final accuracy is the responsibility of the trooper. Before you read this section, remember that it's the small details that really count when it comes to Level 3. Using your obviously awesome build skills, you should be able to knock out the following issues in an afternoon! The TD may take a bit longer, but I have faith in you! Let's get to it, brother: While the right one is close, the bottom left ear screw could use a little work. As per the CRL for Level 3, "Ear screws shall be .... countersunk..." Left Right Reference images Although they may actually be present, I can't see the thin white elastic bands that hold down the shoulder straps. Be sure to add a close-up of these if when you submit for Centurion. Easiest fix ever! Reference images The gaps on the sides of your shoulder bells are SUPER close, which is what we like to see, but since you have the room we would like the tops of the bells as close to the bridges as possible to eliminate the gaps at the tops. Some quick strapping adjustments would do the trick! If you need a quick way to do this, just PM me. Reference images Your TD plate is sitting REALLY far back, and will need to be re-positioned. Your O ring is actually facing the rear and is barely visible but it should be facing upward, and the button panel should face outward. Unfortunately, in order to do this, the length of the clips will need to be reduced at the bottom. Note in the first reference/comparison image that the end of the clip at the bottom can barely be seen. NOTE: If you don't want to cut the clip down, I have another idea that may work and save you some time/effort. Just let me know. Reference/comparison image Reference images This issue could very well be a lack of a clear/close-up photo Robert. AMAZING paint job on those ab-buttons (WOW), but as per the CRL the paint cannot extend beyond the bottom of the raised button. A side view may help. As per the CRL, for Level 3 the ABS belt should "....sit at or just above the bottom of the central and vertical ab button panels". Raising this half or even a quarter of an inch (6-12mm) would make a huge difference. Reference image Reference image While the tops of your drop boxes are positioned perfectly against the bottom of the ABS belt, they need to be scootched out to where the sides are parallel with the outer edge of it. This is a super easy item to remedy... just slide the connecting loop out toward the end some, add a few dabs of E-6000 and you are golden! Reference images Although it's a tiny one, there should not be a clearly visible gap on the rear ridge at the bottom of your left thigh. (The right one looks GREAT)! Another crazy-easy fix! You can just glue a piece of ABS behind it, or if you want to go all-out you can fill it with ABS paste (or even white E-6000). The choice is yours, and either would work, Reference images The same with the front of the left thigh. Since the front has a higher visibility, I would suggest filling it or actually raising the ammo pack to cover it. Again, it's the small things like these that are important for the top tier. Reference images Up last are the tops of the calves in the rear. Since you can't really close up those gaps, the next best (and easy) thing is to turn them into "mobility cuts" as seen on many of the troopers in the films. This should take all of 10 minutes and would give you a much better look. You will not need to do the same thing with the bottoms of the thighs in the rear (unless you want to). And that's it, Robert. Like I mentioned, a few hours (or less) of work and this set of armor will look spectacular! I honestly hope you will take these items to heart so that we will see a Centurion submission from you soon, brother. If we can be of any help, just ask. Now, get out and make Lord Vader and the Japanese Garrison proud as their newest EI trooper!!1 point
-
Congratulazioni Andrea! Forza Italica1 point
-
Got some Riot gear and some spare parts (spats) The webbing, elastic and grips are for the shield. I broke a clip greeblie on this Troop and had to go spat-less I did manage to get the rest of the clip off (not one for using E600) and replaced it but never felt content with closing the spat by that small clip and velcro, didnt feel like doing the snap variant. Then Anovos came out with their instructions I jumped on the idea and ordered new spats from KB and a spur of the moment skull trooper helmet and the sheild and consequently had to get the baton Much more secure and less likely to brake. As a bonus the spats came from a new mold and had a much better fit then the previous ones, JSIN also confirmed they had new shins so I guess the KB kit is getting more and more accurate.1 point
-
And here it is fellas: Snuck a little 501 reference in there1 point
-
During fitting I noticed that I could sew the shoulder and elbow gasket together so removed the velcro as I also found out that i don`t need it and it`s crowed enough in the suit Then is was the matter of attatching it to the undersuit, used glue to facilitate placement and it worked out Finished pruduct - did someone say Lord Vader1 point
-
Got a little side-tracked...was about to glue the sides but made the conclusion that it would be easier to sand the parts separately so I started with that. But they are now glued. Also decided to close the back using snaps so drilled some holes, made som strapping, set some snaps and I think it will work. And made the strapping for the cod1 point
-
So...time to get back on this, decided I wanted to use snaps to connect the chest to the yoke Figured this was a good spot... ….so transferd that to the other side and driiled the holes Held the chest in place and marked were to put the snaps using a pen and the previously drilled holes Yep this should work So the next thing was to glue snaps to the chest and hammer the other to the yoke Testing….and decided I was happywith it Did some sanding to clean of the pencil marks and prepping for paint, happy how it looks but….. ….all of a sudden life as I knew it was over!! CRACK.... Rescue mission was sucessful so the happy life was back on1 point


.thumb.jpg.77bd551337f7adc46a4b151e703df6be.jpg)