Leaderboard


Popular Content
Showing content with the highest reputation on 04/12/2020 in all areas
-
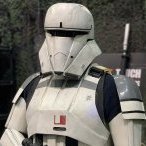
Hey everyone, name's Dave and just dropping in to say hi and introduce myself! Been a lifelong Star Wars fan, and growing up, the characters from the movies were my idols and heroes. Cons and cosplay weren't happening, and the big screen was where all my fantasies played out. Then a few years back I heard about a group called the 501st and what they did, and I wanted to do nothing more than to join. Sadly, being in the military in a time of war kept me from doing that. Well, just this past February I was lucky enough to be able to join the Parjai Squad of the 501st at Pensacon and trooped for 2 out of the 3 days as a Tank Trooper. I was hooked! Unfortunately for me, this all happened right before COVID-19 began sweeping the nation, and my build plans got put on hold. But I'm still researching and gathering the pieces slowly, and hope to be approved by this fall. First build is going to be a clean R1TK, then a Tank Trooper once the TK is approved. Got my Black Series helmet in Thursday, and can't wait to start the process! I've attached a pic from Pensacon this year, with me in Tank Trooper armor. Seriously the best time of my life. FOR THE EMPIRE!
 2 points
 -
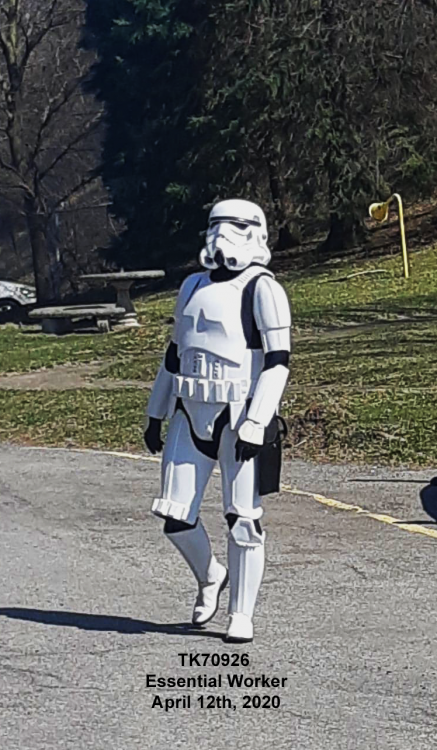
During this scary time.. I had to get the ol' gear out and test it after some major repairs due to cracks and such... Was out entertaining the building while many are in lock down due to COVID-19. Stay safe all!!
 2 points
 -
Alright, time for another update. It's been pretty rainy here in Southern California for the last couple weeks, and being immuno-compromised with all this COVID stuff, I've been stuck at home almost 100% of the time. So wanting to work on armor, but weather not permitting and not having some supplies has made for a frustrating few weeks! Nonetheless, I have made a bit of progress. The barrel has finally been sanded and moved to its second coat of primer (it has more ridged details than any other panel so I've admittedly been avoiding it...) Got the helmet on its second coat as well - it wasn't rough enough to need filler primer, so I did a coat of 2x flat white primer first, then gray Sandable, then it'll get flat white again. With Covid lockdown, I can't have my paint guy do it after all, so it's on me. It'll be a challenge! More on this in my next post. The helmet is really a beautiful casting and didn't need tootoo much cleanup. I'm glad I added resin to it tho - it is light, but I worried about its strength. I also lowered the brow trim with a file a bit, if you notice. Debating doing more... Speaking of which... if you haven't caught on to my perfectionist yet rattle-can paint technique yet, I'll explain it a bit more below. Work left-to-right, as needed, for each panel: Step 1: Every panel gets a rub down on both sides with some wet/dry 100grit just to literally clean them up and remove any mold release/wax/residue/loose glass strands whatever. Step 2: Rough panels get a coat of light grey filler primer - this stuff sprays pretty chunky but does a great job of filling any pinholes and is pretty high-build to give an idea of any larger low/high areas on the panels (ie, the inside of the thighs were real bad, same as Jeff's), but sucks to sand. Step 3: Sand with like a 200grit block. Step 4: Mark with a pencil any pinholes/chips/whatever and fill with body filler, then sand with a 400block. Step 5: Spray with dark grey Filler primer - it also will fill any leftover pinholes. The alternating light/dark primer colors reallyreally helps you see when you've sanded through one layer and into the next, as well as makes any small imperfections "pop" and be much more visible, and easier to fix. Step 6: Sand with like 4-600grit. Step 7: Spray with medium grey primer - most panels only needed two colored primer coats before white, but I used a 3rd on any rough ones. More body filler as needed after it dries. Step 8: Sand with 4-600grit. Step 9: Spray entire panel, front and back, with flat white primer - by now, any pinholes or imperfections should be filled - if not, you'll really see them with the contrast of the white and can fix them. Step 10: Wet sand Step 11: Mask flat backsides of panels and spray with Gloss White. Step 12: Wet sand to level any orange peel. Be careful not to actually remove any of the white, exposing darker bottom layers, just level it. Step 13: Spray with 2K Gloss Clear (as many coats as you can afford haha) Step 14: Wet sand/polish as needed. Yea it's not fun. My arm hurts from sanding, but damn is it gonna look good (I hope!) haha As for the helmet, I always like spraying my interiors black, so I did - using Rust-oleum truck bedliner. It has a nice texture and I'd like to think it gives the helmet like 0.01% extra impact strength. The helmet also received two additional layers of resin, so it's MUCH stronger than previously, especially in the dome, and I feel a thousand times better about it. It was pretty thin in a few spots before... I masked the eyes with tape and neck trim area with a garbage bag and sprayed a coat of sandable primer just for good measure after scuffing the interior resin with 100grit. I then put a bit of Bondo on a few low spots and sanded the filler once with 200 to even it out a bit and help the bed liner stick. The interior doesn't need to be anywhere near smooth, but I figured it couldn't hurt and would level some of the glaring imperfections. The photo doesn't do it justice, but it looks great with the black interior. I'll paint in around the eyes after I cut the tube stripe vents out, which I also started. Holy heck is this gonna be a pain with just a drill and jeweler's files, unless I find a better bit that fits for my Dremel... Not doing the cheek or rear traps forsure. As for the rest of the armor, it all finally got a coat of resin on the backside, so it's ready for more painting and sanding. I made decent progress on the thighs, biceps, and accessories (which are now in flat white primer), but the forearms and shins are still on their first coat of filler and are the furthest behind. I'll be working on them this week, weather permitting. The remainder of the armor is near the end though - I began masking the backsides of any of the panels that were ready for final gloss and clear. I'd like to keep the backside of the panels flat white. My goal is to get EVERYTHING done in white gloss, wet sanded, and masked before I spray the clear all at once. 2K is excellent and will hopefully give me a strong, durable, automotive-quality finish, but being 2-part in nature, I will have 48 hours MAX to use an entire activated can. And at about $20USD a can, I don't want to waste any. I've been working in stages on most of this stuff, but it will all get clear at once! I'll probably try to do all the armor with my first can, then the helmet and an additional coat on everything else with the second can. From there, strapping and fitting should come together pretty quick, I hope - I have most of it together already. I'll be using Velcro on most of the suit to allow it to be easily adjustable, then I'll likely switch to snaps down the line (it's a specialty of mine haha), once I know I have the suit fitting well. On the health front, I had great PET scan results come back and my cancer is no longer showing as "active" on the scans. I got cleared to do 4 weeks of radiation treatment starting next week, and then should be done with this cancer nonsense by summer if all goes well. Fatigue is the major side-effect of radiation, as opposed to the nausea of chemo, so we'll see how it plays out and affects my progress on the armor. Priorities tho. That's it for now! Thanks for reading.2 points
-
Mandatory Information Armor = AP Helmet= AP Blaster= 3D Printed Optional Height = 5' 11" Weight = 210 lbs Boots = Imperial Boots Canvas belt = AP Hand Plates = Silicone AP Neck Seal = Geeky Pink Holster = AP Armour Photos Full Body Front Full Body Back Full Right Full Left Right Side Detail Left SIde Detail Action Shot Abdomen Detail Cod and Butt Plate Attachment (edited, removed white paint on crotch rivet exterior) Interior Strapping Helmet Detail Photos Front (edited, removed paint overlapping upper gums on several teeth) Sides Back Hovi tip detail (edited, added white paint to rim of Hovi tips) Lens Colour (edited, took different photos with different lighting) Though it's not as vibrant as the ones from Trooperbay, I used this one from amazon. It's darker, but green. Ammo belt Holster Attachment (front and back) Neckseal Blaster left side Blaster right side Blaster back (ring) Thermal detonator (all sides) Boots Ammo Rivet Sniper Knee (all sides) Gloves Shoulder Straps Chest Attachment Shoulder Straps Floating in Back and Elastic Attachment (edited, added different angle to see white strapping under shoulder) Forearms (edited, added a few shots of the wrists. Wasn't sure exactly what was needed here so I took a few shots from different angles)1 point
-
Thanks for the feedback! I made the changes and replaced some of the images where needed. Please have another look and let me know if it's missing anything else. You can CTRL+F "edited" and it should take you to where I've made some updates. Thanks again!1 point
-
Thermal Detonator....Done End caps fit together easy enough, and got the faceplate/control panel centered and glued....Final length right at 7.25 inches. Used some metal snips to square off the corner as @ukswrath mentioned. Next I needed to find the correct screws as the ones Anovos sends aren't accurate. I had ready however that the ones Anovos uses to attach the ears on their helmet while wrong for the helmet are the right type for the thermal detonator! Right: Anovos Incorrect "V" shape philliips screws Center: Anovos screws from TK Helmet - TD accurate pan head slotted screws Left: Replacement TK helmet accurate angled screws Painted the heads black: Screwed the TD together. Done!1 point
-
Just finished all the cutting and filing. Again going for level 3 cert.1 point
-
Sometimes coincidences just happen. Probably the Force being at work... (had one of those funny coincidences, too last year when i met exactly that one TK that gave me a Pointer to a event where the 501st was. (there were enough TKs and visitors to lower the chances).1 point
-
Sure was Yeah and I was just randomly looking through some Trooping pics and was like ”now what a minute....this guy look familiar...?”1 point
-
That is one HECK of a coincidence! Sorry they cancelled that event for this year, but at least next year you will BOTH be in armor!1 point
-
Gotcha. and thanks for the pics! It was that shadow that was throwing me... Looks GREAT, and glad to see you sanded down the rivet heads (smart move) to help the paint adhere better.1 point
-
These would be my suggestions, Chris: It's best to leave a little more than you think you will need, as you can always remove more if required. I would suggest just blue taping the cap and face-plate for now until you get a rough trim on the ears, this way you can better adjust things forward or back as needed. Remember that the ears should line up as seen below, with the center of the top directly below the rear line of the trap and the 2 screws in line with it as well.1 point
-
Well then, seems we already met - I’m the Sandtrooper1 point
-
Hi dave, welcome to FISD and great to know you're in the way on becoming a R1 stormtrooper. Congratulations for your first step with the helmet. Since research is the clue to have a successful building process, You may want to check out the following forums sections if you still haven't done yet and could see if there are some other topics that would interest you. https://www.whitearmor.net/forum/forum/162-rogue-one/ Looking forward for your project photos. We are here to help. Troopers helping Troopers1 point
-
Welcome to the FISD Dave. Sent from my SM-G960F using Tapatalk1 point
-
Very cool looking kit, welcome and serve the empire with pride!1 point
-
Fair enough, I appreciate the attention to detail since I’d like to go for centurion straight away! The rivets are ~10mm from their respective edges as shown below (if you can’t read the display on the calipers they’re set to 10.01mm). Ab plate: Kidney plate: W/O calipers:1 point
-
Amen, brother.1 point
-
My concern was that it looks like the rivet holes are on the bend and may not be far away enough from the edge of the ab plate. It may just be the angle of the photo, though.1 point
-
Looking good Diana, in addition to what's been mentioned above, the vertical Ab button plate shouldn't have any return edge on it and should be smaller than the raised surface on the Ab plate itself. Here's a reference photo1 point
-
Looking good trooper.1 point
-
Hello and welcome aboard1 point
-
Fantastic work Garrett1 point
-
Don't cut from the sides or the top of the faceplate, aim for level 3, watch reference pictures from the movie and level 3 threads Sent from my GM1900 using Tapatalk1 point
-
Hello world. Just logging some armour build progress on here. Aiming for original suit sizes (based on RS suit). Sized-up and glued the biceps. Still a little large so trimmed down another 5mm Aiming for high levels of accuracy.1 point
-
I realized this too late and didn't fix it.. I meant to say Sven, please tell me there's more but got mixed up.1 point
-
First off, is the call for reading a children's book: In the end, I don't think that this one will be used for the Legion's promotion because I screwed up and didn't use a Disney book - but this shoot included many book changes, a costume change, and close to a meltdown from myself so I want to show it off. Plus I do like how it turned out. The next is a PSA I created for my students: This was fun project for the whole family during lockdown. And finally, I took the dog for a walk This last one was by far the best thing I've done since the quarantine started - a lot of smiles and waves. Stay healthy and safe!1 point
-
Got myself an armor bin today!1 point
-
Welcome to the FISD! For info on the Rogue One Tk, check out this area of posts: https://www.whitearmor.net/forum/forum/162-rogue-one/ For general tips go through the Getting Started section. There are vendor lists and supply lists, etc. Also, for general tips and info check out this: https://www.whitearmor.net/forum/forum/79-tutorials-tips-and-howtos/ I'm a OT TK and can't help too much with the Rogue One version, but there are some troopers here that can certainly help. Good luck with the build!1 point