
Leaderboard


Popular Content
Showing content with the highest reputation on 03/07/2020 in Posts
-
When the wife is working the husband tries on different outfits4 points
-
Hello Everyone. Just beginning my journey with the 501st and am a total "new guy". I now have my "ready to wear" armor from Mark at AP. (Fully recommend AP as well, pleasure to deal with and great armor) I am waiting on delivery of a few other items to be able to be able to submit photos and hopefully get the ball rolling with a basic approval and who knows, maybe even higher! This website is a wealth of knowledge for me and has been very helpful. More posts to come! K3 points
-
Former LMO, SpecOps DL, Garrison Titan member, holder of the most FISD EIB Awards and all-around nice guy Todd Maxfield-Matsumoto & other R2 builders in my garrison & the Pacific Northwest made it to the cover of the SeattleTimes today. https://www.seattletimes.com/entertainment/movies/how-building-r2-d2-and-star-wars-droids-creates-joy-and-wonder/ Talk about dreaming a dream and a lesson that persistence pays off - way to go!3 points
-
Fixed the corners today, had to use a little more paint so no grey today. Grey will likely be tomorrow2 points
-
My dude, it's not just a neck seal like ANH... It's a whole undersuit if you do it right. Here's a photo of mine on a mannequin from Jimmiroquai. Lotta late 90's industrial goth club vibes happening: Mesh makes it cooler and I wear a moisture wicking t-shirt underneath, but you get the idea. Jim's undersuit was excellent and only needed to be taken in a bit for me. The only people I know making them are Jimmiroquai, maybe Darkside Closet, and maybe Geeky Pinks. Ask around and let us all know!2 points
-
Hi guys. It's been a while since my last thread here. Been busy by others projects, personnal life, etc... you know what I mean. Props missed me so I decided to get back to an old project. By the past, I made some screen printed decals for some stormtroopers and TIE pilot helmets in the accurate way. But it was a very very long process and a little bit painfull. I improved the way to create those decals. Still not perfect (but the screen used decals weren't ^^) but I guess better. As you can see on the pics below, ESB style (which appears on ESB stunt, MKII and ROTJ V1) is different from ROTJ style (which appears on ROTJ V2, stunt and "Hero"). Shape and color. For the ESB style, I used reference pictures and close up of screen used helmet and corrected the shape since it's curved on the helmet and that I needed the shape flat. For ROTJ style, I used a resin cast of a screen used ROTJ helmet (those call Hero ROTJ) which was casted with its original decals. The blue stripes are the same for both (I used the ROTJ shape).1 point
-
That’s the aftermath of a good party right there Sent from my iPhone using Tapatalk1 point
-
Sounds about right to me. The guest bedroom and living room get overrun with WIP props... Sent from my iPhone using Tapatalk1 point
-
It’s like a behind the scenes shot from ‘76. ;-)1 point
-
Updated with latest approval in the center1 point
-
I know. Boy do I know! Sent from my LGMS631 using Tapatalk1 point
-
good job so far!1 point
-
WOW, William... looking GREAT! I don't see anything holding you back from Basic approval, but as you mentioned you might think about raising the biceps a bit more to stop them flaring out. Let us know when you get your official TK ID!!1 point
-
The gloves are not the right ones, they look like velvet, while the storm gloves are simple black chemistry gloves1 point
-
As Cody mentioned, the cover strips on the thigh and calf should line up. Ideally, they should face forward (first photo) but some leeway is given in many circumstances as there were slight variations (second photo).1 point
-
Hello all, thank you for your suggestions with the helmet! We picked up a hard hat for around $10 at our local hardware store. We were originally going to remove the white portion of the helmet seen above, which you can see it can be removed from the little white tabs locked into the yellow locks. We were going to stick these 8 tabs onto the helmet, but realised it would be nightmare to test, measure and line up properly. So instead we removed the entire top half of the hard hat to make a sort of 'crown' seen below. Then we cut out a section at the back so it could bend and mold a bit more to the shape of the overall helmet. It fits really well into the helmet and sits perfectly, but we are going to wait until our visors arrive so we can fit those in first! @Shinyarmour1 Thank you for your detailed write up, it really helped! we were going to go with the foam/strap option, but from my years of cosplaying as daft punk, which gave me less breathing room it gave me PTSD, I had a heap of padding in it. @CableGuy Hello sir! Neat idea with the adhesive EVA foam, we will look into that as an option, looks very proffesional!1 point
-
Great work on the changes William, you look much better now.1 point
-
Amazing Trooper, you did an extraordinary change!! Congratulations, go ahead.1 point
-
Ok everyone! So I removed the top foam in my helmet to lower it down, rasied my abs, lowered my chest, rasied my biceps (looks like I could raise a little more later), added velcro to keep my shins in place, shifted my shoulder bells forward, bent the shoulder straps back, and added white elastic strapping to them. It maybe not be 100% perfect, but is it ready for approval?? haha Thank you all for all of your tips and tricks so far!1 point
-
Is it a good idea to paint the inside of the helmet black?1 point
-
It's scary just thinking about the money spent sitting there across those six Droids!1 point
-
The little swoop on the Left side facing forward
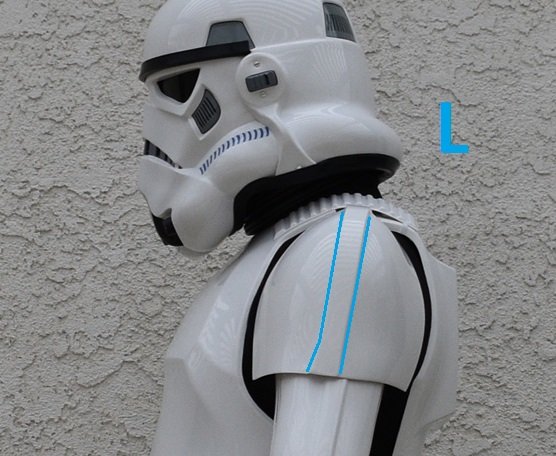
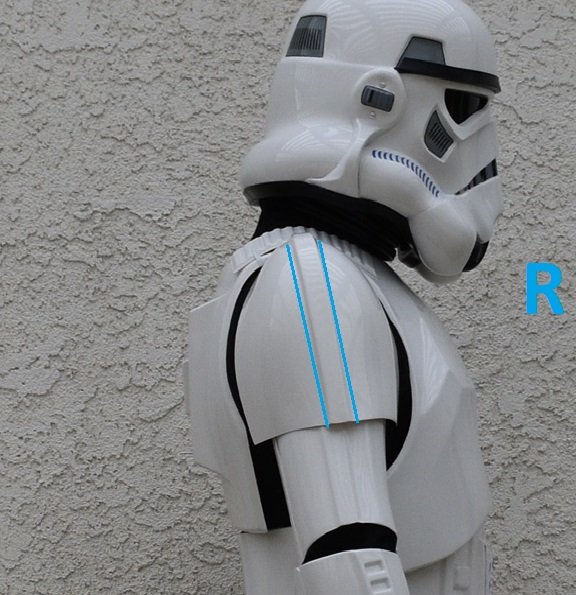 1 point
 -
See how there is a little swoop of the center ridge at the bottom of the bells, that needs to face forward.1 point
-
Dan, you should have unlimited storage space for attachments as you are on staff now. I've checked your settings and it does say "Unlimited". As to your old attachments, I can see the dates for them and can delete from the back end. There are 8 total, all from 2017. I cant see what they are from there but they do say they were removed by the poster. They will be gone momentarily.1 point
-
Great work Dan, love that little grey beauty spot1 point
-
I'd suggest posting in the Tech section, that's a little over my pay grade1 point
-
I've heated the straps while attached, it's easy enough to do. In this case, yes, remove from the heat... just in case. Just be careful to apply a nice curve and not a fold. Take it slow and you'll be fine.1 point
-
Hi, The following photo shows an Anovos Armor (centurion approved) so you can take a look to the back of thighs Cheers
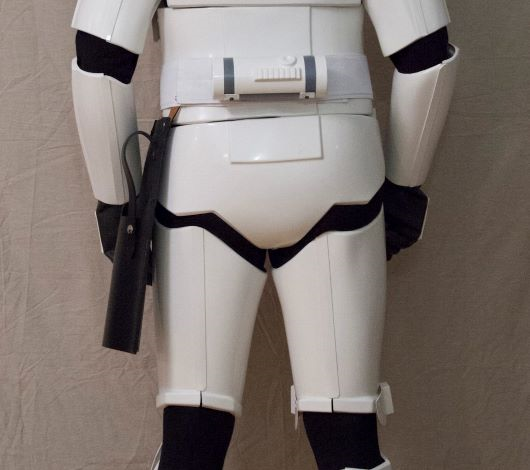 1 point
 -
As mentioned, a hot water bath works well. Boil a large pot of water, place plastic in water for about one minute, take out and bend to shape, while holding the desired shape run cold water over the plastic. Done. Don't burn yourself.1 point
-
You can also give the shoulder bridges a boiling water bath. Just be careful not to burn yourself. Sent from my iPhone using Tapatalk1 point
-
way overpriced, gloves innaccurate so is the neck piece, you can get a black undersuit for $25 at most sport stores1 point
-
It means the lawsuit isn't cancelled ==> More stuff will follow in the future1 point


-Copy.thumb.jpeg.8715a83cb32a3e6745f879885b26e712.jpeg)


