Leaderboard


Popular Content
Showing content with the highest reputation on 03/05/2020 in Posts
-
Are you new to the FISD and wondering what the heck all those abbreviations and strange sounding terms mean? To help you along, I have compliled a list of the most commonly used ones that will give you some insight. If you have ANY questions about a particular term that is not listed or suggestions for new ones please ask! TK Glossary located at bottom of post Entries marked with blue asterisks ** are our "vetted" (tried and true) armorers. More information on them can be found here Acronyms A ABS- Acrylo Butadiene Styrene is a highly durable lightweight thermoplastic used by most makers of Stormtrooper armor. More info. here AM- Armor Master- U.S. based maker of ANH Stunt/Hero style armor ** (See DDD below) ANH- A New Hope (Star Wars episode IV) 1977 AOC- Attack of the Clones (Star Wars Episode II) 2002 AP- Authenticprops Canadian based maker of ANH Stunt style armor ** ATA- Affordable Trooper Armor U.S. based maker of ANH Stunt style armor ** (Sadly, no longer available) B BFG- Big Freakin' Gun Larger style weapons (T-21, DLT-19 etc.) used by HWTs, Sandtroopers and certain other TKs. C CFO- Cast From Original- UK based maker of ROTJ armor** CO- Commanding Officer CRL- Costume Reference Library List of all 501st costumes with a detailed description of each. Link here. CS- Command Staff D DO- Deployment Officer Responsible for approving troopers at higher levels (EI and Centurion) DD- Doopydoos UK manufacturer of various SW props, including resin weapon kits. UPDATE- No longer selling resin E-11 kits DDD- Dave's Darkside Depot Maker of AM armor (see AM above) DCA- Detachment Costume Advisor Offers advice to GMLs for approving various 501st costumes DCOG- Detachment Captain of the Guard Responsible for interpreting/enforcing rules, mediation and disputes. Also oversees disciplinary hearings and moderates FISD elections DF- Detachment Founder Paul (Daetrin) DL- Detachment Leader Elected head of a Detachment DMBO- Detachment Merchandise Branding Officer Responsible for all items pertaining to FISD logos and branding DPRO- Detachment Public Relations Officer Social Media, Newsletter, Publications, Photo Editing, Diplomat, Trading Cards, Content Editor etc. DWM- Detachment Web Master Systems Administrator/website gurus DXO- Detachment Executive Officer (XO is commonly used) Second in Command of the Detachment E EI- Expert Infantry Optional second level awarded for a more advanced screen accurate TK build. More info. here EIB - Expert Infantry Badge Official FISD logo used for the above rank. ESB - The Empire Strikes Back (Star Wars Episode V) 1980 EU- Expanded Universe Older term use for non-canon items/characters not seen in the existing SW films (books/novels/comics etc.) Currently referred to as Legends F FISD- 1st Imperial Stormtrooper Detachment FO- First Order FOBG- First Order Battle Group. Area of the FISD dedicated to all things FO related. Link here. FOTK - First Order Stormtrooper FX- Older brand of TK armor. Armor is acceptable for approval up to EI with modifications. Helmet is not accepted for approval at any level. G GML- Garrison Membership Liaison Responsible for approving costumes at Basic level GCO- Garrison Commanding Officer Elected head of a Garrison GXO- Garrison Executive Officer Second in command of a Garrison H HDPE- High Density Poly Ethylene A petroleum based thermoplastic polymer used to make the 50 original Stunt helmets for A New Hope. HIPS- High Impact Polystyrene Used by some makers of Stormtrooper armor. More info. here HWT- Heavy Weapons Trooper As seen in the Battlefront video game series. More info here I IA- Imperial Attache FISD Extended Staff Officer. More info here IAA- Imperial Attache Ambassador- Staff Officer in charge of the IA program ILM- Industrial Lights and Magic Special effects company founded by George Lucas in 1975 for SW IPM- Imperial Propaganda Machine Pertaining to the monthly FISD newsletter/Facebook/Twitter/Discord accounts L L1- Level one Basic 501st costume approval L2- Level two Refers to Expert Infantry status. Please see EI L3- Level three Refers to Centurion status. Award for the highest level of screen accuracy for a TK build. LCO- Legion Commanding Officer Description here LCOG- Legion Captain of the Guard Description here LFL- Lucasfilm Limited Film/television production company started in 1971 by George Lucas. Now owned by Disney. LMBO- Legion Merchandise Branding Officer Description here LMO- Legion Membership Officer Description here LPRO- Legion Public Relations Officer Description here LXO- Legion Executive Officer Second in command of the 501st Legion M MEPD- Mos Eisley Police Department Detachment for Sandtroopers. Link here N NL- News Letter Refers to the monthly FISD online publication O OT- Original Trilogy (A New Hope / The Empire Strikes Back / Return of the Jedi) P PER- Personnel Officer In charge of various FISD administrative duties PM- Private Message PRO- Public Relations Officer Serves as the FISD's main voice on Social Media R R1- Rogue one: A Star Wars Story 2016 RL - Rebel Legion Info here ROTJ - Return of the Jedi (Star Wars Episode VI) 1983 RPF - Replica Props Forum is a non-501st forum for prop replication information sharing. RS- RS Propmasters UK based maker of ANH Stunt style armor** RT-MOD - Canadian based maker of ANH style armor ** RWA- UK based maker of ANH style armor** S SDS- Shepperton Design Studios UK based maker of ANH style armor T TB- Trooperbay Seller of various TK accessories. Link here TBA- To Be Announced TBD- To Be Determined TD- Thermal Detonator TD - 501st Costume designation for Sandtroopers TFA- The Force Awakens (Star Wars Episode VII) 2015 TPM- The Phantom Menace (Star Wars Episode I) 1999 TK - 501st Costume designation for Stormtrooper style armor TLJ- The Last Jedi (Star Wars Episode VIII) 2017 TM - Troopermaster UK based maker of ANH Stunt, ESB and ROTJ style armor ** T/MC- U.S. based maker of ANH Stunt style armor ** TROS- The Rise of Skywalker (Star Wars Episode IX) 2019 W WIP- Work in Progress WTF- Walt's Trooper Factory- U.S. based maker of ANH style armor ** Glossary of common TK terms A ABS Paste- Slurry made from ABS scraps and acetone used to fill gaps/seams. More info here Armor bite- Points where the armor (usually return edges) are too tight and rub against your skin or cut into you causing chafing/bruising Aurebesh- Writing system/alphabet used to represent spoken Galactic Basic (the most commonly seen form of written language in the SW franchise). B Brow Trim- Black rubber gasket with a U shaped profile located above the eyes that extends back to the center of the ears on a TK helmet Bucket- Alternate name for a TK helmet Butt join- As used in ANH and ESB armor where the seams on the biceps, forearms, thighs and calves are hidden with a cover strip C Cap- Rear section of a TK helmet Canon- For our purposes, as seen on screen or deemed a standard part of the accepted/sanctioned Star Wars universe Centurion- Highest level of FISD approval for screen accurate TK style armor Info. here Cheeks- Elongated semi-tubular areas located below the tears on a TK helmet Chicago screw- Fastener that has a barrel-shaped flange and is internally threaded. Commonly used for attaching the holster to the canvas belt. Classic (strapping system)- As used in OT armor, the torso parts are held together with metal brackets/straps in lieu of snaps/straps Cod- Lower tab of the abdomen plate that covers the crotch area Cover strip- Plastic strip used to cover the bicep, forearm, thigh and calf seams on ANH and ESB armor D Detachment- One of 16 specific factions within the 501st dedicated to researching, constructing and promoting a distinct group of costumes Double Cap rivet- Hollow bodied 2 part fastener with a dome on both ends used for attaching ammo thigh pack. Not screen accurate. (See Single Cap Rivet below). Double snap- The use of two snaps instead of one on the ends of a connecting strap, providing a more reliable/stronger connection Drop Boxes- Rectangular boxes located below the ends/tabs of the ABS belt on most TKs E Ear bar- The raised area in the center of the top (round) part of the ear on a TK helmet Ear bump(s)- The 4 raised ridges on top of the ear bar. Hero ear bars have 3 bumps Expert Infantry- Optional second level of FISD approval for screen accurate armor, given only after Basic 501st approval Info. here F Face plate- Front section of a TK helmet Fire Team- Although not officially recognized by the Legion or FISD, these groups form a common identity and spirit of camaraderie among approved stormtroopers in the same geographic area/Garrison that troop together. More info here. Frown- The upside down V shaped opening (tooth area) located above the vocoder/Hovi tips on a TK helmet G Garrison- The largest type of 501st unit within a geographical region containing at least 25 members. Currently 76 world-wide Gaskets- Black ribbed rubber or shiny black coverings used to cover the shoulders, elbows and knees of FOTKs. Greeblie- A small part (usually plastic or resin) used to accessorize a prop weapon or armor H Hovi (mic) tips- Short round black plastic parts attached in the recessed areas on either side of the vocoder on a TK helmet. Note that the ones used in the original ROTJ helmets were metal. Hero- TK armor style as worn by Han and Luke in ANH. Differs slightly from Stunt. More info. here Hyperfirm- Maker of high quality rubber-type TK weapons/props. No longer in business. K Knee plates- Separate knee coverings worn by FOTKs which cover the front area between the thigh and shin L Legends- Please see EU in the acronyms area M Merch- Term often used when referring to FISD/501st branded merchandise Mobility cut- Arc shaped sections removed from the top rear of the calf and bottom rear of the thigh for comfort purposes N Neck Seal- Black ribbed collar used to conceal the entire neck and openings above the back/chest plate. Examples here O Outpost- The smallest 501st Legion unit containing at least 1 member, usually outside the borders of an existing Garrison/Squad. Currently 30 world-wide Overlap (construction)- As used on ROTJ armor, this is where one side of the bicep, forearm, thigh and calf connecting seams overlap the opposite seam, eliminating the need for a cover strip P Pauldron- Soft part used by Sandtroopers, HWTs and certain other TKs that cover the right shoulder Pull- Term used in vaccu-forming. Often used with "bad" or "rough" when the ABS loses it's intended shape in the heat molding process. R Rare Earth Magnets- Incredibly strong neodymium magnets commonly used for holding armor parts together during gluing. Info. here and here. Recast(er)- Person who steals someone else's original design in order to manufacture and sell copies, normally at a discounted price. Info here Return Edges- Angles on the edges of many parts of TK armor used for strength or to give them a thicker appearance. Info here S S-Trim- Black rubber gasket with an S shaped profile installed around the opening of a TK helmet Shim- ABS pieces normally used to extend the sides of the kidney plate, but can be used in other areas as needed. Single Cap Rivet- Hollow bodied fastener with a dome on one end used to connect the thigh ammo pack. Screen accurate, but split rivets may be substituted. Head diameter should be 5/16" (8mm) Sniper Knee Plate- Hexagon shaped piece attached to the top front of the left calf Shoulder bridge- Ribbed armor piece that connects the chest and back plate Spats- Circular pieces which wrap around the lower ankles of FOTK armor. Split Rivet- Round head metal fasteners with a split (bifurcated) shank attached on the left side of the kidney/abdominal plate. Head diameter should be 5/16" (8mm). Can also be used to mount the thigh ammo pack Squad- Subdivision of a 501st Garrison in a distinct region containing at least 10 members. Currently 78 world-wide Stunt- Armor style as worn by most TKs in ANH. Differs slightly from Hero. More info. here Swag- Alternate name for merchandise (coins, patches) etc. See also Merch. T Thermal Detonator- Elongated canister clipped to the rear of TK belts. Examples here Thigh ammo pack- Semi-round armor flexible piece with rectangular boxes, attached to the bottom front/sides of the right thigh Tears- Irregular triangle indentations located below the the eye openings on TK helmets. Pronounced "teer" Traps- The trapezoidal shaped indentations located above the rear of the brow trim on each side and on the rear of a TK helmet Troop- An event sanctioned by a local Garrison, Squad or Outpost. More info here Tube Stripes- Blue curved lines located on the upper section of the cheeks on TK helmets U Under Suit- Black (normally compression) garment(s) worn under TK armor to conceal all exposed skin Y Yoke- Extended tabs that are attached to the back plate and extend over the shoulder/under the armpits on FOTK armor. V Vocoder- The 7 raised black ribs located in the recessed area between the Hovi-tips5 points
-
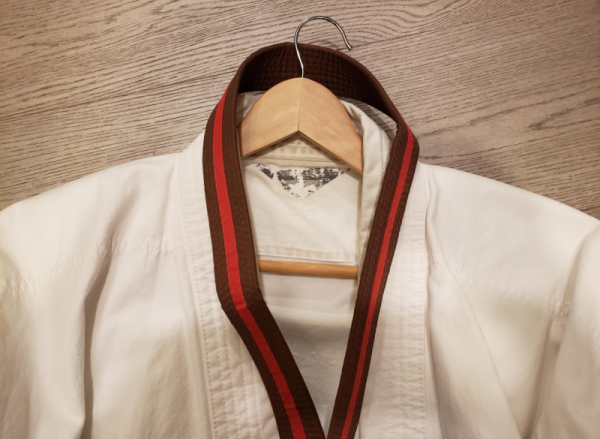
2.5 year ago I got tired of watching my kids do karate and stepped out on the dojo floor for the first time. I had just lost my step-father to heart disease and realized how short life could be. Last night my wife and I achieved the rank of ichi qu - meaning one degree below black belt and the highest belt rank we can achieve before that milestone. I am 52 years old. Making the jump from 3rd degree brown belt to black belt is a very big step. We are now expected to practice daily at home for the next 4 months in addition to class time, and that's just to be able to interview for the prep course (10% of people who do not take prep course earn their black belt, 80% of people who do, earn it). The prep course is a 2 hour weekly class from 7am-9am where you don't learn anything new, but they critique you to polish what you know to black belt level, and is 10 weeks long. We will have to refresh and perfect 4 katas we learned along the way and master one new kata (seems easy, right. Ha!). Plus we have to master 8 standard bunkai, develop our own 4 new bunkai, plus 26 partner techniques both as attacker and defender, for 52 total partner items. All of this has to be able to be performed perfectly, on demand, from memory. Students thus put in usually 4 hours a week of class time minimum, plus usually another hour a day especially as things get closer to test time. I have no idea if my wife & I will be able to achieve this level of performance in 6 months, or 12 months, or even 2 years. But one thing is for sure I will keep plugging away until I get there! I say this to help encourage those who tell themselves "I'm too old" or "I'm too out of shape" that these don't have to be excuses, or stories we tell ourselves that just aren't true. Never give up on a dream, not ever, and don't let negative self-talk get in the way. There are many days I really don't want to go to the dojo and would rather stay at home in front of the TV with a beer. It is also true that I never once regretted getting my ass out to the dojo and taking a class. Does anyone else have a story like this? It would be great if we could share them and help motivate each other.
 3 points
 -
Thank you, I should hopefully start working on the strapping system soon! Thanks Darren, although I can’t seem to find the mod. If you could share it again that would be great3 points
-
The photos are misleading, the inner thigh part is shorter giving the impression the cover strip is not flush but the cover strips are flush at the top of the outer thigh parts, It wasn't mentioned but he purchased the suit fully built from me you can see photo below the cover strips are flush to the outer thigh parts, by design the inner thigh parts are shorter, I also explained to him how to adjust everything, he's 160 lbs I built his suit to movies specs but many parts are still too big on him, making the armor smaller would start to look out of proportion so I suggested he use foam padding were needed, he's not that far off.3 points
-
These may not be the best photos but you can see the silver lines do not represent the original shape of the thigh tops. The silver lines were drawn keeping the same distance all the way around the top of the thigh, going in from all angles. The black like represents the original shape much better. The black line was drawn keeping the pen vertical from the top edge. I simply used my finger as a spacer and kept my hand parallel from my table, making sure I only took the height off the thigh - not the width.3 points
-
Yep that is right my armor needs a bit of TLC .So now that I will have my Jawa ready for trooping ( sending my pics to the gml tonight) I will concentrate on my ANH armor and give her the attention she needs. First of all I would like to refurbish the helmet insides. (padding,microphone,eye lenss and a lick of black paint. I am considering adding some items to make the helmet more electronic feel...Artneo supplies a kit for this. It is not functional one but gives a sensation of a real trooper helmet. I get some pics once i have them Then back to the painting of the blue tube stripes and helmet areas as I do not like how i have them now. After that all my armor need cutting and smothing rough areas to make it more comfortable. I have lost some weight so i need to adapt the changes...2 points
-
That´s it then, it can be low but is should still be straight and not "droopy"2 points
-
Congrats Robert! I look forward to following in your footsteps, and using your submission as a reference! As Joseph pointed out, your paint job is AMAZING! Sent from my iPhone using Tapatalk2 points
-
The Gap were Joseph pointed out with 3 exclamations is perfectly acceptable and normal all the movie suits have thats same gap and some even more so. Mark (AP)2 points
-
I orders From ATA Works. I’ll be doing a Imperial Trooper Kit.2 points
-
We are now just waiting for our belts to be finished and the stuff from trooperbay, which is our mic tips, visor, S-Trim and stencils for the paint. Thanks for all you help so far! Dad's armour is on it's way, should be getting here in around a weeks time. Still fels sort of surreal since I always though I was too skinny to be a stormtrooper but it's coming along nicely and I don't look half bad!1 point
-
Hey everyone! Back again, wasn't happy with my last test fit, so I tried again. Much better! Just upper body this time as that will be my focus for the time being. My arms do look quite skinny, but that should be remedied by the gaskets, which I will hopefully be starting soon. Stay tuned!1 point
-
Perfectly acceptable, Jonas.1 point
-
Hey Jonas, I’ve been watching your build, nice work! A quick peek at the CRL states that they are acceptable for EIB and I believe as well as Centurion. OPTIONAL Level two certification (if applicable): Lenses are green bubble or smoke bubble only1 point
-
I approached 5 different saber smiths and Kai was the only one that could/would do this. I sent him a reference picture and he made it look exact. I am really impressed with his work. He gave me a new update every day on the new tweaks and changes made along the way, which was awesome! It also only took him a few weeks to build, he had custom pieces 3D printed, soundboards perfectly installed. Gave me detailed instruction on what i can open/not open on it. It shipped from Germany to USA with no problem, well packaged. This is the guy you want building you a lightsaber. If i have any more custom builds in the future, im going to Kai! It costed me around $400, shipping included. Here is his page. https://www.etsy.com/shop/argentumsabers Sent from my iPhone using Tapatalk1 point
-
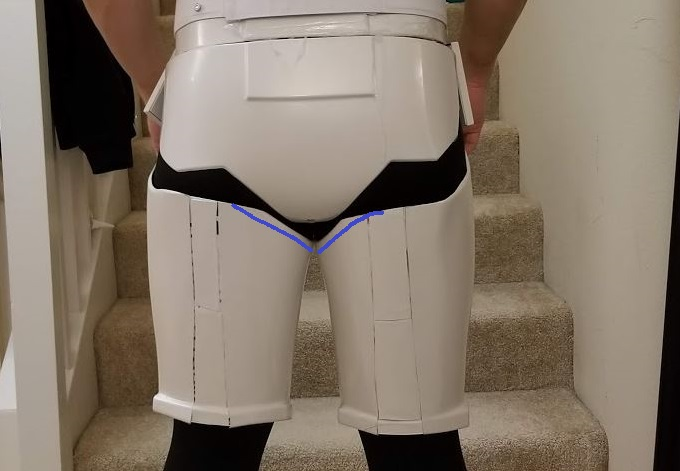
Just a suggestion for your thighs: You may try trimming a little more the back section to help minimize the armor bite.
 1 point
 -
I couldn't get the left thigh to oblong the way I wanted, but for some reason, the butt pinching is more serious on the right thigh. With the lateral elastic, the butt pinching is minimized quite a bit and I'm happy with it. How does the posterior look? If all looks ok, I'll start with the mobility cuts followed by ABS paste and cover strips1 point
-
Congratulations Robert!!!!!1 point
-
Wondering if I should've just bought a resin cast rather than an airsoft replica now Thanks for the notice! The power cylinders seem pretty convenient, I might pick up a new one from somewhere, I might be able to file and rework the grip a bit... not sure without disassembly...1 point
-
Whilst I don’t believe it will affect actual clearance, the grip and power cylinders on this blaster appear to be based on Rogue One blasters. The ANH E-11 has the power cylinders closer together and the grip is rounded, not squared like this model. As you’re aiming for L3, just thought it mention it as it might get flagged. There are other minor differences but these are the key ones. Again, not necessarily a clearance issue, just a consideration as you’re aiming for higher levels of accuracy. :-)1 point
-
Okay sounds good.1 point
-
Hey Names Rob, just ordered my first Kit from ATA Works. My Helmet is on its way. The Rest of the Kit is about 4 weeks out. Really excited about doing this. Something I have wanted to do for a really long time. Been reading all the pages about building for some time now. Will try reaching out to the local Garrison here in Seattle if I need to.1 point
-
You are close, William... so very close! It's pretty obvious you have put a LOT of work into this kit, and I honestly think you can bring it to EI and then Centurion level with some modifications. SO proud to see that you got rid of the return edges on the sides of the back and chest plates, and that the alignment of the kidney/ab gaps are absolutely PERFECT! Well done, sir! I realize that you are only trying to get your Basic approval right now, but I think you have the will and the determination to get to Level 2 (and then 3)! For that, you will need to raise the biceps and adjust the drop boxes to where the edges line up with end of the ammo belt and the shoulder bells, and the shoulder bells should have a much less significant gap in the front. The chest has a gap between it and the ab plate which must also be eliminated, but we can help with that.1 point
-
If it raises your voice more than one octave, loosen the cod/posterior plate connection. Otherwise, you may end up sounding like Salacious Crumb.1 point
-
no. make sure the codpiece is so high and tight it either raises your voice an octave, or you feel an urge to walk on tip toes to prevent friction. if thats not possible and leaves the black gap then you will need to resize something, and you wont be able to walk like that....1 point
-
for any cut edges I usually sand them down so that they are smooth and won't snag on my undersuit or rub against my skin. I start with 200 grit, then follow up with 400 and then 600. 200 is coarser than 600 so you are working your way to a finer, or smoother, finish.1 point
-
I managed to find some that has a really strong wire, once coiled it doesn't move, but I would think wire that jiggled would be ok as long as it doesn't loose it's coil1 point
-
Great news, can't wait for the excited unpacking, then the sheer horror of "where do I start"1 point
-
Welcome to the FISD Kyle. You couldn't have made a better choice ...1 point
-
GUYS. THERE IS A STORMTROOPER AT MY DOOR! I might need to leave work early to let him in. Obviously, to be continued...1 point
-
My gloves came in. Wow! What a quality. They fit perfect. These are from Endorfinders. Next and last missing softpart is the neckseal. Are there any recommendations for that?1 point
-
Overall the armour looks great - you just need to adjust some of the strapping. As mentioned above, you can tighten up your ab to chest strapping so the parts overlap. This might bring your chest down and therefore your shoulder straps forward - which is good because this will also help with the placement of your shoulder bells. Because of your height, you are going to want to hike up the cod and butt plates as much as possible if not done so already. When you raise your biceps, you will probably want to raise your forearms a little bit too. You may want to add a bicep hook to the inside to keep your bicep and shoulder bell sitting a bit more tidy. One thing I didn't see mentioned (I didn't read very carefully) is the coverstrips at the top of your thighs - you will want to cut that back to it is just flush with the thigh - it looks like it extends up past the end in the front-view picture. Also, if you have not done so already, try adding a bit of velcro to the top front of your boot and the inside of your shin (lower front). This will keep the shins from rotating on you. Just a few tweaks with the strapping and you are going to look awesome in that kit!1 point
-
If I may suggest IMPERIAL BOOTS , they are made of leather and the BEST BOOTS EVER ! Sent from my iPhone using Tapatalk1 point
-
Hi and thank you for this awesome detailed post. I have one question. In reference to the directions " I then cut a piece of 22mm diameter 3mm walled clear acrylic tube to length and slid it into the receiver until it sat where the barrel would normally be. The 3D printed LED end cap was assembled and the unit was then placed through the hole at the mag well, and placed over the end of the acrylic tube. The wires for the LED were once again cut to allow them to be routed back to the counter box. " The parts list for barrel LED mount from Lee McCormack - Shadow Defense Systems on Shapeways. Which I confirmed from Shadow Defense is the LED and Acrylic Tube Support that they're selling, description shows "Designed for use with a (20mm OD, 18mmID Bore) Clear Acrylic tube." I'm just trying to clarify, Instead of 22mm clear acrylic tube should I instead get the 20mm? Or is there something I'm missing. I'm very new at this type of hobby. Thanks for patience. Shadow Defense link below for the LED and Acrylic Tube Support https://www.shapeways.com/product/MEX83SXWX/blastfx-e11-led-and-acrylic-tube-supports?optionId=64236933&li=marketplace1 point


.thumb.jpg.a76e0f48e0bb54184765760e710c5f96.jpg)