Leaderboard


Popular Content
Showing content with the highest reputation on 02/29/2020 in all areas
-
Just realized sister is great at painting! She's killing it! Thanks everyone!3 points
-
Next up on today’s progress, I decided to tackle some work on my 850 Armor Works shield. There wasn’t a defined end to the return edge, but there is a curved edge where the abs bent out towards the table during the abs pull. It wasn’t a consistent measurement around the entirety of the piece so I just cut there first and then started to work my way around the edges until there was a consistent depth. Ended up being about a 1/4” deep once it was all smoothed out. My next step was to cut out the recessed triangle area. As I did on the outside, I trimmed around the edges until the return edge end was flat. I will be adding some lexan in the cut out area. Anyone known is the glass is clear or tinted? Sent from my iPhone using The Force2 points
-
Been out of town doing a little traveling and skiing the last few weekends here in Colorado, so I haven’t gotten as much done as I would’ve liked. But I had a full day to work on some things today so I decided to start knocking some things off the list. I’ve got a desk in the garage where I work on things. I bring out my iPad and speaker for entertainment. (Currently rewatching the Mandalorian, again.) I got this little table at Costco so I can expand my work area while the GF is at work. I like having my Hot Toys trooper for inspiration and reference. Really helps keep the motivation going when you can see a complete set of armor on front of you. Here are a few updates: Started on my thighs. I’ve really struggled with how to deal with the rear pieces. They come in big cylinder shapes with a VERY slight tapering curvature. The rest, I assume, is made this way to fit larger legs. I fall into the appropriate stormtrooper type figure. 5’10” and 185 with nothing close to having ‘big legs’. My approach was to start big and work down to the proper fit. So far I have the Left leg trimmed. Doing the Right one next. I used my magnets to secure the pieces into a decent shape and fit for my thighs. After that I just trimmed the rear area near the butt plate close enough to a reference photo. This allows you to slide the thighs up into the proper position. Once I get them trimmed up a bit more, I’ll attach the straps from my harness so I can have them on to allow for further adjustments and trimming. Next up, I finally got around to trimming up the contoured parts of the ab boxes. This was pretty time consuming and not easy. But was quite rewarding once you finally got the right fit. The current part I’m working on is modifying the forearms. I decided to go ahead and make them look more accurate to the TLJ/TROS armor instead of with the supplied Finn variant. I’m doing a support piece first to give the area as much strength as possible. Figured I would need it considering that exact area is the part that gets pressure applied to it when I bend my arm. As a side note, I saw this at the local Hobby Lobby (our big box hobby store). It’s a clear all-weather E6000. Might be handy for certain applications. That’s all for now. Gonna head back into the garage and get some more done. Trying to be done by May 2nd. They’re doing a big Star Wars themed pub crawl here in Denver. Would be cool to give the armor a trial run. If not, I always have my Obi-Wan Kenobi costume and my Savi’s Workshop lightsaber! Sent from my iPhone using The Force2 points
-
Not much time to build over the last week due to work, but found some time to repair the forearms as mentioned earlier. I shaved off both forearms leaving only the return edge: Then I glued 2 pieces of 2mm acrylic pieces together as I wanted a 4mm depth, but could not find any sheet that was that thick: Next, I bevelled off the edge, so that it will sit behind the return edge and be flush from the front, glued it in place, and filled the gap with more CA glue. After sanding down the front to make the acrylic flush with the return edge, I cut the pillbox recess. And then finally shaved off the rest of the excess at the bottom. This is how it looks after sanding and priming. Did the same to the other arm. Before final sanding and priming: And the finished forearm: Both forearms completed. A tedious step, but I think the results are worth it.2 points
-
So, these arrived today. Order processed, produced, and shipped so quick! Imperial Boots gets an A+ from me. Really cool sticker and patch included, too! I wear a size 10 shoe. Ordered a size 11. Might have been able to go with a 10.5, but not worried about it at all. I'm sure they will fit great with an insole added. Now I'm just waiting for armor to be shipped...2 points
-
[DISCLAIMER: THIS THREAD WILL INCLUDE MANY LINKS, FOR BOTH MY FUTURE REFERENCE AND USE BY OTHER TROOPERS] I've always wanted to wear an orange pauldron. I've always wanted to be a stormtrooper. Yes, sandtroopers are cool, and I imagine someday I will make the conversion (ABS yellowing?), but right now I'm still drawn to shiny white armor. I recently began my journey to join the Legion with an ANH Stunt TK kit and in the past couple of weeks I caught the BFG bug. DLT-19 and T-21 build threads consumed my Tapatalk time, and then I discovered the HWT. Eureka! Yes, I'll have to shell out for some MP-40 pouches, and build a backpack, which sounds fun, but—ORANGE PAULDRON and BFG!!! So much like Kman's side track, here is my semi-tangent. For kicks I'm going to have to boot up my old Battlefront games to check out some of the heavies, but luckily there are already some great screen caps here on the forum, and of course there's the CRL (link). I'm aware that there has been discussion on building packs to match the games vs the CRL, and my plan is to stick to Joseph's CRL model image as close as possible to maintain continuity (guide link), but there are several areas in which I will differ / provide my own interpretation. My plans, including the small variances which I believe will be approvable, will be noted by category in the next section below, and in general to plan take inspiration for my build from the following trailblazers: Tony's (Ukswrath) three part series Charles' (Templar) two threads Shawn's (@CrookKnight) thread (he also sells them) Kalani's (Kman) thread Zac's (Devolver) thread Bradley's (@AngryEwok) thread. My goodness, I particularly love the analysis on this one. Rick's (Caligari) thread Sarah's (Alay) thread Eric's (@Eric Ostendorf) 3D printed pack and files. Amazing work and very generous to share. [NEW ADDITION] Pauldron I've seen troopers debate between Trooper1 and TB for the purchase of a pauldron, and I'm almost certain I'll be going with @trooper1 for my orange. Is there any reason for me to reconsider other options? I'm still waiting on an email response from Jay for pricing, and hopefully I won't have to change plans based on the cost. MP-40 Pouches I likely simply need to do more research, but these recommended ebay ones from this thread are sold out, so I'm seeking alternatives. I did reach out to the ebay seller, and he hopes to have them back in stock sometime in the new year. In general I'd prefer to go pre-pade for these pouches, but any suggestions would be welcome. Oil Pan Base The oil pan used as the base of the backpack is perhaps the area in which I'm most curious about, in relation to the CRL. In the CRL photo Joseph is donning a pan from Bavarian Autosport, but unfortunately they closed shop earlier this (2019) year. [Anybody have an extra Bavarian pan they'd like to sell?] This means that all Heavies from now on will no longer be able to perfectly match the CRL, and we are instead left with two primary options—the Wedco 12.5qt model 83150 or the GarageBOSS 12.5q model GB150 (also available here). However, I believe there is a third, and possibly a fourth option. Here are the specs of the aforementioned pans, and the two others I am considering. CRL Model: Bavarian 16qt, dimensions 22" x 16" x 6.5' (photos by Templar (2) and justjoseph63) Wedco and GarageBOSS 12.5qt identical options, both with dimensions of 21.5" x 15.75" x 3.5" There are the most commonly-used oil cans now, since Bavarian has closed shop. I'm not a huge fan of them due to their shallow depth and their angled handle, which isn't accurate to the game or the CRL (see section right above). GarageBOSS 16qt discovery, dimensions 22.75" x 16.75" x 5.5" This is the first alternative option which I am considering building with. I especially like that it is deeper than the Wedco's, but not quite the the larger depth of the Bavarian. I'm quite bummed that I didn't pull the trigger on one of these the other day when Walmart had them clearanced for $12.32 shipped, since they're also out of stock on Amazon, but they can be found on eBay. The other aspect I like about this pan is that is has the larger cutout which would lay very well onto the backplate [ O II ] of TK armor. You can see how tight Joseph was able to cinch this same cutout style in his Bavarian photo above, which I'm not sure would be possible with the Wedco. Midwest 9qt discovery, dimensions 20.5" x 13.25" x 5" Finally, here is the most bold of the two alternative options I'm looking at. Most obvious, from the photos, is that there is no built-in handle, so I'd have to afix my own. Two potential options are shown below, and considering the fact that two different types of handles are already approvable, it seems like these (especially the first one) should be too. Such and add-on would also be more game accurate, but of course, I need to stay within the confines of the CRL for continuity. The two features I particularly like is the large recession, similar to the Bavarian and GarageBoss are the large recess which would lay against my backplate, and the non-flat surfaces on the sides, also like the Bavarian. This pan would also be deeper than the Wedco, but not to the extent of the Bavarian. The height and width are a little more narrow, so I'll need to examine those aspects. Rick has some great diagrams of the existing options, and I'm very interested in hearing feedback on these two other oil pans I'm investigating. Purchase sources: Autoplicity, Farm&Fleet Top Left Button Box As much as I am tempted to build the button box to the game-used ratio relative to the middle tube, I will be sticking with the commonly-accepted Popit! storage boxes. I don't recall which thread I saw it in, but somebody had cut squares in the octagonal pace plate in which they set the buttons (Amazon) to add a little depth and the appearance of functional utility; I may consider this. Too bad I have to buy 35 buttons when I only need four, but then again it may be useful to have spares. I think I will screw them into the box top from underneath for added security. Middle Tube This one will be easy to source, since we already use these wipes here at home. I'll just need to sneak purchasing the smaller, 35-count and less cost-efficient, tubes next time. =) Vent Box No rocking the boat in this area either. Popit! box with hopefully very clean-cut vent covers. Uniformity will be mandatory. Radio Box I'm not yet sure how much time I want to spend on this section, but I really like what Devolver did with his, and I do plan on using the Michael's box as the base. I grabbed three of them in black clearanced for $1.99 USD (plus tax) each. I like the idea of depth, and the framing on the sides of the box, but I want to ensure I remain CRL approvable. I think I will also reinforce walls of the cardboard box by adding some extra framing on the inside. There is an off-chance I may look into using Radio Shack project boxes in the same fashion that Charles did. Bottom Right Box I'm going to look into two alternative methods to make this box, though I still plan on using the Popit! boxes. I really REALLY want to angle the front of this box down like Templar did, but I'm not sure if my GML would be ok with it. I wonder if it would help my cause that the CRL model himself wished he had done it? I'm also interested in Bradly's cutout method to pride more depth than a sheet cover would. I am considering making two versions of this box, in case I get denied during my first submission. Drop Siphon Funnel Since the siphon will be the lowest point of the pack, and perhaps also the least sturdy due to the rounded mounting surface, I've decided that I want to go with a rigid structure, rather than a handmade / rolled piece. I checked out both of Devolver's options at Walmart and went with the floral vase due to it's larger taper, and the shaker cup having flat edges on two sides. The vase is nearly nine inches tall, so I know I will need to shorten it to reach the required six inch height. I'm also considering Bradley's nalgene bottle top portion, since I have tons of those laying around, and I might even look into a screw-removable siphon, to protect it from damage when laying the pack down. Antenna Tube There's not much up to interpretation and deviance in this area, and my goal is to close the ends of the tubes with flat caps. I've seen some Troopers mention that the home improvement stores only had curved-top caps and that they found flat ones at Walmart, but thus far I've had no such luck. Do any of you have purchase links to such caps? I briefly considered investigating a latching attachment mechanism for the tube for removal in transit, but I don't think any space benefits will be worth the hassle. E-11 Mount This may, perhaps, be the most controversial aspect of this pack build. I LOVE the idea of mounting a Rubies blaster on the left side of the pack, but I definitely will not be doing so before submitting for approval. If I do eventually elect to implement such a mount, I will go with a very simple, removable design. Other notes: No, I will not be including the previously-accepted antenna on top. It looks cool, but I understand it is not game or CRL accurate. Yes, I will be utilizing a "less is more" approach to armor weathering, especially since I want it to be removable. Joseph will be proud to hear this, and that I purchased the makeup brush set in the photo above for $2.49 in Walmart's Christmas clearance section. Now I just need the dollar store eye shadow. I purchased a thin $0.88 cutting board at Walmart with the intention of reenforcing the bottom of the radio box, but I may end up getting more and use it to create the framing / paneling on the entire radio box. The cutting board also has a texture to it, which may look better on a weathered radio than smooth cardboard. I may also have a fellow SW enthusiast friend print me some of Kman's templates. Question for @justjoseph63 or @Templar726: Which specific sticky floor tiles from Lowes did you use for your box covers? Here is my ANH Stunt TK Build Thread which will document the armor to be used for my HWT. My plan is to build it to Level 3 specs, submit for 501st approval, attain Centurion status through FISD, then transition (at least temporarily through Joseph's temporary weathering technique and Charles' styling) to HWT and submit for approval. Wow. I think it took me sessions (squeezed between baby naps and diaper changes) over four days to hammer this out. Hopefully this compilation of links will be helpful to future builders! MV1 point
-
Coming along nicely Chris. If you have a Tap Plastics in your area they should have what you're looking for regarding the Shield lens material. Tinted1 point
-
I’m gonna ditch gluing an outer abs piece. Decided to try the PlasticWeld and see if it stands up to the task of being used as a sturdy filler material. This stuff is supposed to be strong and take free form shapes once it fully cures. I like this stuff because it’s basically play-doh. It’s a bit sticky when you attempt to mold it. You do have some time to work with it and it’s gets a little less sticky as it has a listed set time of 25 minutes and a cure time of 3 hours. We will see what happens later this evening. Sent from my iPhone using The Force1 point
-
Great update, and great mods! Sent from my iPhone using Tapatalk Pro1 point
-
Definitely a dark tint on the glass. A smoky grey. Sent from my iPhone using Tapatalk Pro1 point
-
Ears, and greeblies with primer! Sent from my iPhone using Tapatalk1 point
-
You da' MAN!1 point
-
Thank you for the photos, Robert! Working on your submission now, so bear with me brother.1 point
-
Looking sharp. Damien, and really nice job on trimming the return edges on those wrists! The blue arrow below shows what I was saying about that area poking into your arms (and it will). Normally I would suggest trimming as seen with the yellow line, but since you have already glued the halves together if you trim that much out there would be too much room at the top opening. Instead, I would go with the blue line. I realize that the edges still need some fine tuning, (red arrow) but be sure to sand the edges down smooth (220 grit sandpaper). This is not only for comfort, but to make sure that any jagged edges don't snag on your under suit. Keep up the great work!1 point
-
Very true, but they don't particularly want the costume as they believe we should have it. Again nothing any detachment needs to worry about until someone somewhere does decide they want to do the research, construct it, draw up the base CRL and become the poster child.1 point
-
HUGE UPDATE! We are getting closer to finishing, sorry for not many updates! I'm pretty proud of it so far. Stormtrooper armour looks so sexy! This has been a dream of mine for like 3 years now. I remember sitting on the couch gorging over RS Propmasters ANH kit thinking i'd never get that or that I'm too skinny! Look at me now past me! They do have a convention at my local city May 5-6th, so it should be done by then, might even be approved, depending on how long it takes to get approved and if we have to make changes. Even though the armour is just layed out I could use all of your advice, if you noticed anything wrong please inform me! My main gripe right now is the boot right now, more on it below. I will be doing a full body fit very soon, just making the ammo knee and finishing the straps to keep the thigh bits up. Once we finsh most of the hard armour, we will go through and take out small errors and even it all up. I'm listing every item below starting now! This is the armour so far (plus test boot): Arms are pretty much done, maybe some padding here and there: Chest piece is also pretty much done (with my toe in the photo): Inside the chest piece i.e strapping: Free floating straps held down by the good ol' elastic: Ab armour is also pretty much done, will get some light trimming: Inside the ab structure, note the tabs we added on the butt plate: Some cert 3 stuff, the doo dads in the budgie smuggler area: The doodad on the ab plate for cert 3: The 6 rivets for cert 3, yet to be painted. We decided to do most of the painting + the detonator when we get our helmet parts: This is my test boot, painted with white spray paint, a bit rought. I got these boots, yet one of them squeak as I step, so might have to get a new pair. To be honest I am not too happy with them, as I don't know if they'd pass. I'd like your guys opinion on these! Good ol' shin pieces, glue still drying on the sniper knee, I'm proud of these! Now I do have a question about these, notice on the left shin, the sniper knee one, the outer bottom side curves down alot more than the other shin. Should I cut this down to make them more symmetrical? Velcro in the shins, came out way stronger than I expected! Cut down the loops for my holster for cert 3/ attaching to the belt: Inside the left thigh piece. We had to rip these apart and cut them down more since they were too big! My mistake! All about learning though, that is why they are untrimmed at the backside for now. Also note snaps for the under belt are being glued: These are two canvas belts we made, they are wrapped up since one of our cosplay friends will be sewing the edges soon. Mine and my dads are both here: Said underbelt for the thighs: This is one of the shins, a snap is being glued to have connect to the boots: And finally inside the arm, pretty standard strapping:1 point
-
Looking to speak with Mighty Tank . In regards to tk new hope armor thanks Pepper1 point
-
Several of the TFA updates carry over as freebies due to the way the templates are built, more reference now so may need to make some things that are currently shared separate. PS: Feel free to split off if needed: One topic JAFO and I discussed after TFA updates was the F-11 picture was incorrect, should have a black rear sight for regular and white rear sight for the scaled-up version. He sent me some photos but I need to get them off of FB and into here, will try and do so this next week.1 point
-
Fantastic job Dan1 point
-
Wow fantastic re-work on those forearms Jasper1 point
-
Love your work!1 point
-
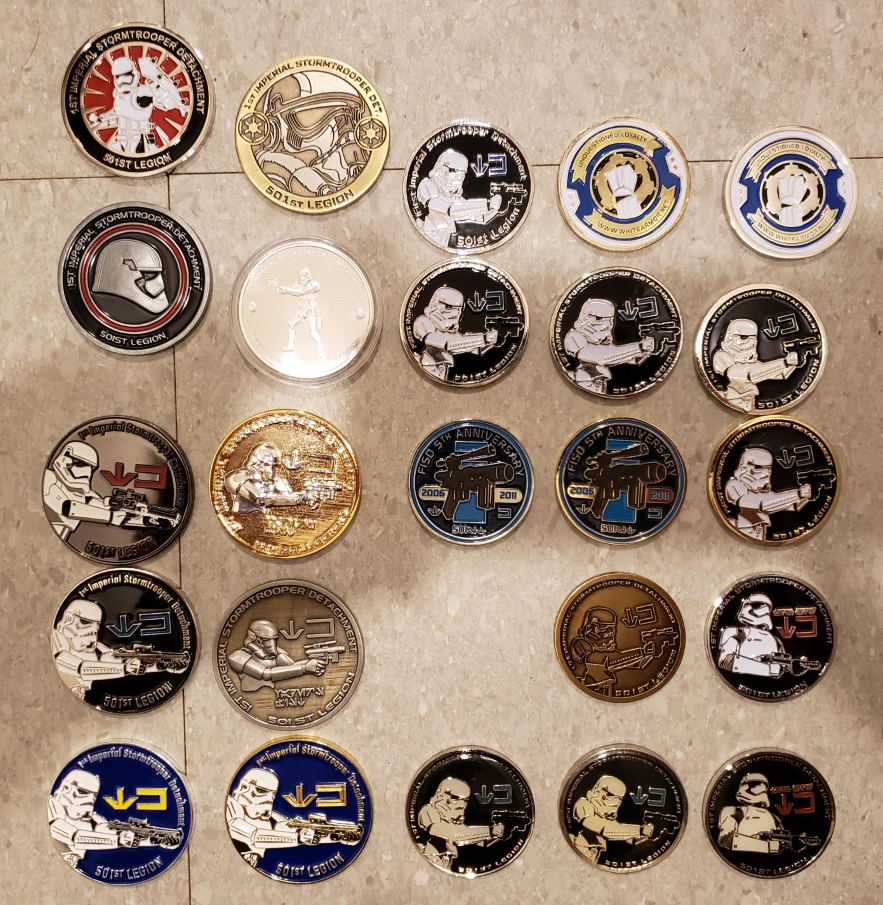
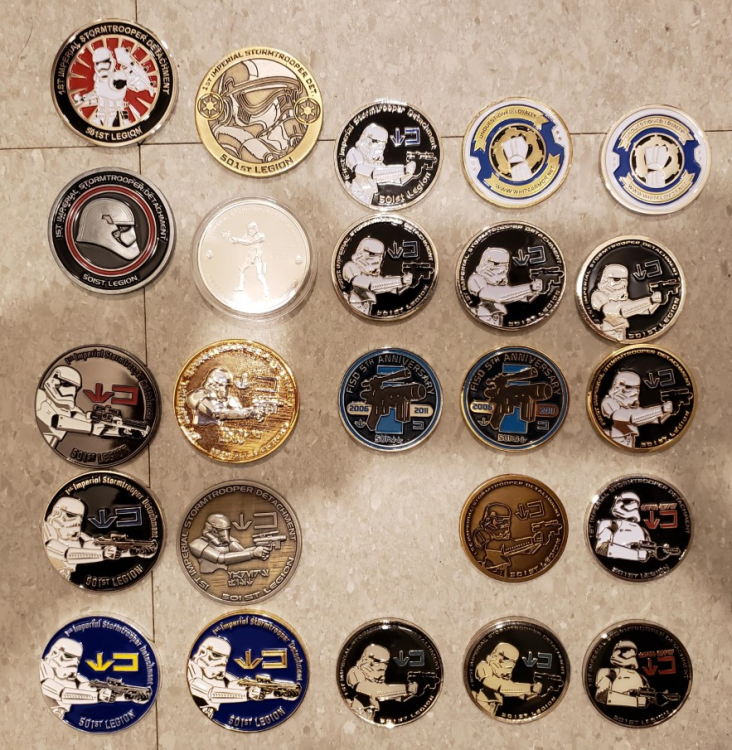
OK, here is what I was able to find in my bin, but I'm missing a baggy or something as there are coins I know I had several of but can't find anymore. What I'm missing and can't seem to find - Joint MEPD/FISD Coin What I'm missing and never had - Pride - 1.1 Silver (3 knuckle) - 1.1 Gold (3 knuckle) - v8 gold (FOTK version) I have like 5 versions at least that say "1st" or "First" of the regular coin, but at some point should educate myself on which is which in terms of "version" numbers. I think I'm missing a certain version of gold EI too, but am not sure which. I have easily over 100 coins, so have stock to trade for what I'm missing, though as you might imagine some coins like the gold ones I only have 1 each and they are not up for trade, nor are my 1.0 coins as they are super hard to find.
 1 point
 -
One side done. Cheek vents look much better!1 point
-
sent1 point
-
I would just remove as much as you need to for comfort. There is no hard and fast rule, but for Centurion level just be sure not to cut off anything past the raised ridge on either the calves or thighs,1 point
-
send me email at [email protected]1 point
-
hi, where to buy?1 point
-
Steady hand or mask and paint or you can use decals which looks like paint will last longer as paint will rub off in time Mark (AP)1 point
-
Additional photos1 point
-
https://trooperbay.com/abdominal-plate-masking-template Sent from my SM-G950U using Tapatalk1 point
-
I use a whole punch in some decal sheet and use those as a templates. Sometimes it can be the brush you use with painting. A thread that may be of use:1 point
-
Templates. TrooperBay. Paint the edges white to seal the edge, then paint the blue/grey. Sent from my SM-G950U using Tapatalk1 point
-
Time for the CableGuy montage. ;-) CableGuy Builds: Troopermaster completed montage1 point
-
My sincere apologies, Robert, but Brian Mentioned that: "I helped Robert with the photos and the calf halves shifted a bit when I was aligning the thighs and calves for the front photo. Normally they are closed and do not show any opening. A slight twist back in one direction and the halves line up nicely and are fully closed". Can you add an updated photo of those as well? Again, no need to get fully suited up, just the calves. THANKS!!! Side note: AWESOME job on that 3D blaster!! No print lines.. I wish all those who 3D print their weapons could see what can be achieved with some serious sanding and filler. WELL DONE!1 point