Leaderboard


Popular Content
Showing content with the highest reputation on 09/26/2019 in Posts
-
Helmet in question, known as the "set for stun" or Dave M helmet Some helmet-goodies3 points
-
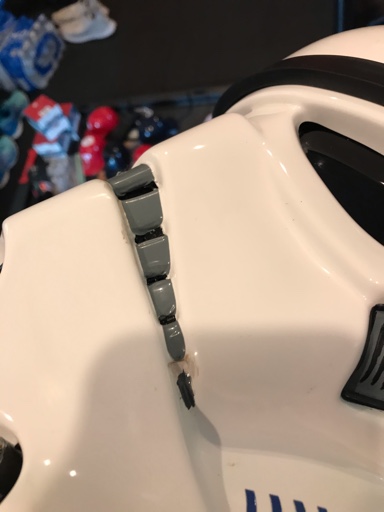
That particular helmet don’t have the last grey painted on that side. The last black is a hole but no screen behind as the originals didn’t have any screen behind the teeth Trivia: the number of cutouts varied between the helmets from a total of six to ten but it was decided to keep eight as the approvable standard for uniformity.3 points
-
So after some planning yesterday, started trimming, and some snarky mental commentary while doing so. Today I finished rough trimming everything today (woot!), take a look and tell me what you think I wasn't very clean on the joins of the legs and arms, because I think it'll probably all get cut off anyway And I'm going to need to sand either on the weekend or a day I come home relatively early. [original thought process] III. Assemble Armor A. order of attack 1. corset 2. torso 3. legs 4. arms B. Trim armor C. Fit pieces D. glue/attachments [New plan of attack] III. Assemble Armor A. Rough trim pieces B. Corset [torso has to fit over this, so this is core of build] C. Torso [possible put off until after legs?] D. Legs [so if I goof up while learning, it's not front and center] E. Arms [need to figure out attachment] Images: 1. Corset 2. Torso 3. Legs 4. Arms 5. Others but I have 2 new problems! 1 is a lady body problem, the other is a 2 is a living somewhat alone problem So to squick all the boys in the room, my period just started! Why does this matter? Like many ladies, I bloat/swell on my cycle... that means places that have lots of fatty tissue (tummy, chest, butt), and places where there are lots of capillaries but very few lymphatic veins (hands, feet, face) are bigger than usual. That means I'm veeeery loath to try to fit the corset pieces, since it might not fit right later. I'm also going to use that as the excuse for why it looks like the butt piece doesn't need trimming. Not because I have a big butt. Nope nope blame the menstrual cycle. Also, when I tried to fit the corset piece on, I couldn't figure out how to tape it so I could mark and see it. Living alone problems.... So anyhow, my landroomie will be back on the weekend, and hopefully by then the bloating will have gone down enough that I will be able to ask her to help me fit the corset pieces. In the meantime, I think I'll tackle none swelled areas, such as shoulders, biceps, and the backplate with detonater. YES! I made a post about periods in this forum!3 points
-
So BBB Day has finally arrived, and I'm beyond ecstatic! I'm not even scared about my first cut...yet lol. Before I make any cuts, I'm going to mark L and R pieces with my painters tape, as they were packed in the box in a definite order and I laid them out on the floor following that. And I'll practice on the hand guards first (as I bought silicon guards from Trooperbay). The beauty part is that an extra set of ears was included so I don't feel quite as daunted about messing one of those up (which in all my reading appears to be one of the most difficult parts to do). The only things left outstanding to get are a belt (which I might just make myself), holster, and an E-11 (since I'm going for Centurion). I have plenty to keep me busy for now. Looking forward to sharing my progress as it goes!2 points
-
Nothing better than a BBB, good luck with the build2 points
-
Glad it helped, Troopers Helping Troopers2 points
-
Thanks Dave! Cant wait! I have a Darman neck seal. Still need the tights, the boots to come in, the armor, and the E11 blaster.2 points
-
Ok, no, your good where your at you have the 8 cutouts. Leave it white and do a small grey mark after it. Here is my helmet Sent from my iPhone using Tapatalk
 2 points
 -
Hi Josh, Great to see you back & going for Centurion. Your next in line for me so give me a couple days and we'll get this going!2 points
-
Congratulations Steve, Good luck with your Build, be confidence on asking whatever you need , there's a lot of experienced troopers here and you can look at the https://www.whitearmor.net/forum/forum/80-anh-build-threads/ section an get tons of tips. Cheers1 point
-
Congrats on BBB day and good luck on your build!1 point
-
That’s a good idea. Thank you for letting me know I was not sure if that would make it less screen accurate and thus keep me from getting 501st approved. I also ordered the shorter thigh setup from Walt’s with a few other parts I feel I need to upgrade. Not sure how long that will be until I get those but I’ll try to finish everything else in the meantime.1 point
-
Thanks for the advice. Will definitely start in less conspicuous places until I get into a groove/comfort level. I was thinking about doing score and snap, and my first test on one guard confirms this to be the way to go. Thanks for reaffirming that!1 point
-
Excellent news on the BBB, looking forward to your build.1 point
-
Best of luck! Measure six times and cut once. Sounds boring but it'll save you a headache! After the hand guards, start low... as in shins upward. I started with the most visible pieces when I was the least bit knowledgeable, and as a result made some decisions and cuts I wished I hadn't on very visible areas. Everything's fixable, but get your legs under you (pun sort of intended) before you move on to the high visibility parts of the build. Since it looks like you've got 2mm ABS, I highly recommend the score and snap method for cutting. You'll wear your thumbs out cutting the abs, and the lines are never straight where you need them. Erasable pencils are also your friends. Enjoy the journey!1 point
-
Hey Dave looking great so far. If you haven't done so yet apply some fabric glue to the sew in snap stitching to help prevent them from unraveling, which they like to do over time.1 point
-
Working on feedback from my EIB for Centurion application. Raised the brow a little, I was able to just pull up the brow and it stayed in place. Tightened the strapping on left and right sides. Removed some return edge from the shoulder bells, maybe could do some more. For the ab buttons I used the decals provided in the AP kit. What have others done? Ab button paint shall not extend beyond the bottom of the actual raised button. I may remove them and paint by hand.1 point
-
well, BSP tells me that the boxes have been shipped to me but thus far they have not provided any tracking info. I'm hesitant to get my hopes up but maybe these will arrive shortly. I've got 3 sets of this armor being shipped to me. Two of my squad mates are going to be building along with me. I'm not sure if we'll all use this build thread or if they will start their own. This FOTK will be their first FISD submission.1 point
-
Yes, lots of good information preseneted here. One thing you may want to consider is the thickness of some kits. I tend to bump into things and can be clumsy sometimes. I went with a kit that was a little thicker material. the advantage of thinner is kit is that can get a little bit more detail on tight corners and curves, but I have a couple friend who have to fix with reinforcements on the back side to repair the thinner kits. I also like the feel o heavier material as it mimics weight and movement. To each their own. Michael Rose TK-12037 Great Lakes Garrison1 point
-
Hehe. Yes, that’s why they’re so awesome. ;-)1 point
-
I told you it was ok to lay off the perfection lol Sent from my iPhone using Tapatalk1 point
-
Hi Brendan, i think you can reduce the elactic strap a little bit more to have a better look. Cheers1 point
-
Felicitaciones Rodrigo, Bienvenido Centurion!!! Congratulations Rodrigo, Welcome Centurion !!!1 point
-
It’s a cut with screen behind it. Sent from my iPhone using Tapatalk1 point
-
Thanks for that — I went back and forth on this as the teeth curve into the gum and finding that sweet spot is an effort. Sent from my iPhone using Tapatalk1 point
-
Congrats Rodrigo [emoji3060][emoji3060][emoji3060][emoji122][emoji122][emoji122] Enviado desde mi SM-N950F mediante Tapatalk1 point
-
Hello again! I accidentally left something off my to-do list from my EIB feedback: General suggestion: Remove excess plastic from ammo belt Remove excess plastic from ammo belt Trimmed that puppy down, sanded, and we're good to go. Squeeze D-ring on E-11 to proper dimensions This is the smallest I can squeeze it—I think it is now good enough, though. It used to extend wider than the butt of the gun itself, but now it's within the dimensions. Bring shoulder bells closer to chestplate/shoulder bridges I had previously made shorter elastic straps to connect my shoulder bells to my shoulder straps: In addition to that, I sanded down the inside of my shoulder bells further so that they would sit closer against the biceps, and by extension, reduce the gap between them and my chestplate. Here is a comparison (the inner bell is updated, the outer bell yet is not): Happy with the result! That just leaves a bit more painting. Almost there! TO-DO LIST BEFORE L3 SUBMISSION General suggestions: Remove excess paint from one frown tooth Move tube stripes closer to cheeks Extend paint job on tears Make sure forearms aren't twisted in submission photos Remove excess paint from ab buttons Remove excess plastic from ammo belt Squeeze D-ring on E-11 to proper dimensions Centurion-specific suggestions: Swap Ukswrath's hovi-mic speakers for AP-supplied mic tips Bring shoulder bells closer to chestplate/shoulder bridges Correctly align drop-boxes to the edges of the ammo belt1 point
-
Andrew, Very nice job on the helmet. I've got your back on the armor. It has been started!!!1 point
-
Nice job, Thanks for the pictures.1 point
-
Loving this thread! Sorry about the crappy comments on imgur... And re elastic etc, Joanne's usually has a pretty good selection of sizes and colors.1 point
-
Hi Rodrigo , Thanks for your application, its always great to see fellow troopers wanting to take their armor to the highest level. CRL and Centurion Application Requirements All required photos are now in and, after review, we are pleased to welcome you to Centurion! On behalf of the DO team and myself, many congratulations! Other-Armor Fit/Assembly In this area we discuss areas that could benefit from additional improvement. Note that we consider both text (CRL) and pictures (screen caps/reference images) when reviewing submissions Like I said in your EIB application, weathering is open to interpretation and you have added some and I get that you want it to happen naturally. I would try to rub up against the right shoulder a little as well, Reference Photo Same with your belt. I know you've replaced it but would like to see a little aged look to it as well as Its a bit bright compared to the rest of the armor. You'll notice how the belt on the CRL model blends in with the Kidney Armor Reference Photo Last thing would be your sniper knee. You may want to trim the tops to follow the ridges along the top of the shin armor. And that should do it. I want to say congratulations and welcome to the ranks of Centurion, now go do the Emperor Proud Trooper!1 point
-
Next was to increase the painted area on the vocoder.1 point
-
I'm working on getting Centurion approval. I think I've addressed the issues regarding my helmet that were pointed out in my EIB approval thread. I just wanted to get some opinions before filling in holes with ABS paste and re-painting the screw heads. The First change: Align the ear screws with the traps.1 point
-
Looking good David! Sent from my iPhone using Tapatalk1 point
-
back side. Like I stated earlier have to raise the back about an inch and a half. But everything else looks correct. Excuse the piece of tape photo bombing the pic. Also the left arm bicep had slipped down. That has been corrected1 point
-
Sounds promising. Count me in and thanks for the explanation.1 point
-
Hello and welcome aboard, nice build you may want to just remove a little paint from the gum area, from the CRL: Frown is painted gray and does not leave the teeth area.1 point
-
Hi, David, welcome to FISD. here some reference photos and you can look at the gallety section and compare. ----------1 point
-
Thanks I'll give that a try. I didn't know that they made a product like that. I've use thier spray products and been very impressed.1 point
-
You may try by replacing the rubber parts, they tend to absorb odors more than plastic do. cheers1 point
-
Awesome - thanks!1 point
-
Thoughts had while trimming: Geeze, this was designed for a big boobed lady. *holds against chest* no wonder the Ladies of the Legion claim they can put water bottles here. ooooh I can put food. I think I have enough room for two pringles cans.... Omg the body is so huge, I'm going to be working my butt off slimming this down. Yay for being skinny, boo for more work. I think the corset is trying to impregnate me. *cuts off The Violater* Oh it looks the booty piece doesn't need to slimmed down...dammit. Does that mean I have a huge butt? Is this right or left? I think its left. No, it's right. No wait, I don't think there is a difference. Or is there? This bucket looks really big. *puts on bucket* oh dammit this is really small.1 point
-
I just got my 2 BBB today! Problem: I got it this morning at work, and now they're sitting on an empty desk next to me (colleague is out on PTO). It's taunting me. I'm not going to get any work done today.........1 point