Leaderboard


Popular Content
Showing content with the highest reputation on 04/22/2019 in Posts
-
So I bought this kit through the Armory Shop; they made it custom to my measurements and painted it for me. I appreciate the paint job they did, since I was too worried I'd mess it up. The custom fit isn't totally up to par as parts of the kit are way too big for my slim frame, but hopefully I can trim it a bit without ruining the kit. I've started connecting the yoke to the back piece and I've already ran into a bit of a snag. The two yoke pieces don't fit quite right side by side and I will have to sand down the other piece a bit to have it sit correctly. This will probably be an ongoing problem through out the project as there's a few pieces that don't fit where they should due to the paint job and will need sanding. After I get this connected properly I'll start putting together the strapping system. I've already bought the 1 inch nylon webbing straps, heavy duty snap kit and parachute buckles that I'll be needing for it. I'll keep posting updates in this thread as I go through the process of this build.1 point
-
Dear fellow Legionnaires, Check out the Star Wars stories created by ID/TK-27888 from Nordic Garrison and ID-42742 from Dune Sea Garrison aka Cannon Fodder Comics, for free (at the moment). Together Marietta & Elly tell the real stories of Imperial troopers who tirelessly work to keep our galaxies safe. Enjoy!! ---------- You can also follow them in Facebook, Twitter & Instagram: https://www.facebook.com/CannonFodderComics/ https://twitter.com/cannonfoddernet https://www.instagram.com/cannonfoddercomics/ https://www.instagram.com/mariettaart/ https://www.instagram.com/sneakybunyip/1 point
-
So did a lot of small things this break, however I did get a lot of work on the hand-plates and forearms! First step was to attach the rail greeblies in the center indentation. It was then time to grind down the clip greeblies. I sanded them down and used my heat gun to get the correct shape ( a hammer worked well for shaping). Once the right shape was achieved the greeblies were glued down. I also added Velcro to the inside of the forearms (not pictured). Added the velrco to the hand-plates so they attached to the gloves. Of course I had to try everything on with gaskets. I also started working on the biceps. Up first was drilling out the pill holes. I hope to keep making progress before it gets too hot to paint in the garage. Look for much more in the next update.1 point
-
Nice job so far, Jim! If I could make a small suggestion, it would be to sand down the rough edges on the trigger guard and trigger before painting. The reason being is that these areas will get a lot of use simply from inserting your fingers and cause the paint to wear off, showing the white resin underneath. Doopydoos makes a great kit, and before long you will have a blaster you can be proud of!! Keep the photos coming!1 point
-
Hey yeah the Velcro has held up just fine over the past few years. No issues whatsoever. No need to upgrade at all. A surprise to be sure, but a welcome one. And I was approved with it like that. I’d go with the Velcro if you have it. If you want to upgrade later, you can, but the Velcro is great because of its adjustability. I don’t plan on making any alterations to my suit. And now looking back it seams I never finished this thread... well, let’s see. I got approved, I fixed all the plates, I used a slot and tab system on the shin armor which has held up great... and in the past few years I got a TIE Pilot, Imperial Crewman and a Clone approved... Here are just a few highlights from some past troops: (Look Sir, they put my school in the painting!) Guess I gotta finish up this thread. More later. Sent from my iPad using Tapatalk1 point
-
I then drilled the holes for the pin and spring to make a working trigger1 point
-
Thanks Dan, I've done that now1 point
-
Amazing work! I love the last panel of this one especially.1 point
-
Nice progress, Jake. When you switch to a slotted screw for the grip, be sure to position it in the “lock” position (not free). See below; Example Keep up the good work. :-) Dan1 point
-
Awesome! Thank you so much! This is exactly what I was looking for!1 point
-
I sanded my kidney plate today. Slowest build in the world? we continue..!!1 point
-
Yeah, I had trouble seeing them on some of the photos, most of the ones I saw were of the reverse side without the number. Sent from my iPhone using Tapatalk1 point
-
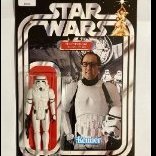
I think the most affordable maker is 850, kits instock at $350 (no helmet, might have white ABS in stock, mostly black ABS). Legit makers of FOTK (that I know of) ANOvos - coming from China/USA, white ABS with resin bits, available on the 3rd day of each leap year Back Stage Props (BSP) - white ABS armor, resin helmet?, to be released in the coming months (just beginning test pulls) Diversity Props - available from Europe, TLJ, ABS armor, resin helmet? Lots of reports of poor communication, refund issues Jimmiroquai - available from Indonesia?, flexible fiberglass, resin helmet?, both TFA and TLJ KB Props - available from USA, black/white ABS, resin helmet, TFA, not sure if TLJ yet 850 Armor works - available from USA?, both white and black ABS, resin helmet?, TFA Recast FN Armor - white ABS, absolutely horrible1 point
-
Hi Jakebullet, Yes, the three should be there. The real M38 scope had them. Sent from my iPhone using Tapatalk1 point
-
Hello and welcome aboard1 point
-
Hi, this time it worked ! Do you have any plans to add some electronics to your project? Gesendet von iPhone mit Tapatalk1 point
-
1 point
-
Welcome Nick! I'd suggest you reach out to @sharkbait, she's local(ish) to you, one of our attachés, and will be your Squad Leader once you join the 501st.1 point
-
If there’s no space for it, best to leave it. I guess you’re aware that FX sadly cannot be used for Centurion so probably best to aim for EI level with it. :-)1 point
-
Can I ask how the velcro system has held up? Did you get approved with the velcro system? Did you troop only using the velcro system? I like the idea of using the velcro system until I get approved and get a few troops under my belt before putting on more permanent solution. Plus, this way I can just peel velcro off without worrying about having to peel off snap plates that are E6000 stuck on armor. I know this way late reply to your post, but I am curious.1 point
-
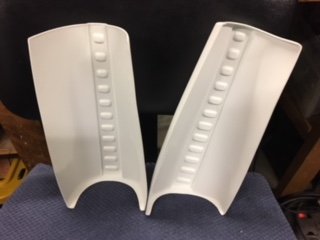
Thank you very much Joseph and Christine for the compliments and the suggestions, there's always more to learn. T-TRACKS LEFT SIDE WITHOUT WEATHERING T-TRACKS RIGHT SIDE WITHOUT WEATHERING Thanks gmrhodes13 for the suggestions about the handle HANDLE LEFT SIDE WITOUTH WEATHERING HANDLE RIGHT SIDE WITOUTH WEATHERING1 point
-
People I helped on their armor builds, that are now EIB/Centurion: TK-14469 Sascha Raabe @Darth Raveen I guess we'll never forget the mess I created with your belt Also helped to reinforce the broken brackets and some other minor issues before applying EIB & Centurion. (definitely took us more than 30 minutes hands-on, I even had to stay overnight ) TK-30087 Jochen Till @Jochensen We literally spent days in his office to build that armor. And just because we were in mood, we built a second one within 10 days only for the celebration orlando Troopathalon contest (that second one was buildt to dress as quickly as possible, most of the strapping using magnets) [more to come....] Got some more troopers out there I helped a lot with their build, but they still have to make their EIB applications. (TK-55015, TK-50893, TK-11699, ...)1 point
-
Ok, most of it is trimmed and sanded and put together, except for the belt. Tried it on. Looks ok, I guess! Sent from my SM-G950U using Tapatalk1 point
-
Here's another one TK-39701 Pascal Gutfleisch @GIZA87 Spent hours together with @GIZA87 side by side. Helping each other to build the helmet. And let's not forget that last-minute trimming on the forearms, haha1 point
-
Congratulations! Welcome to EIB.1 point
-
Congratulations and welcome to the EI ranks trooper1 point
-
Congratulations trooper!1 point
-
Congratulations on your EI approval.1 point
-
You're welcome! And thanks for being my first ESB armor approval.1 point
-
It's been raining a little every day here, which is slowing down suit work considerably. It also doesn't help that even though I'm working with the epoxy in the most ventilated space (outside) and with a mask on, my asthma has not been taking kindly to the fumes. Thankfully I don't think I have to use it much longer; most of the things I still have to do on my suit don't need glue that crazy and I've found okay alternatives. The abdomen is a hot mess right now, as I'm trying to glue the panels in a way that makes it seamless. There's still an annoying gap on either side, which I'm going to see if I can remedy with DAP latex chaulk. My dad recommended it as it's easy to work with and it's paintable. If it doesn't work, I can probably snap off the panels and start over. I attached the shoulder bells to the yoke with a short nylon strap on either side with heavy duty snaps expoxied on. There's a thin black elastic loop that I also glued on the underside that my arm goes through so that the shoulder bells move with my arms. I'm pretty happy with how it looks so far. Comparing it to images on the internet of the FOTK, I think the proportions are okay. The forearms are a little large, but they are one thick heavy piece and can't be altered. Even if I could, I don't think I would because even with them seeming a little large, I can just barely get my hands through. The one thing I can change is that I can probably widen the biceps. What do you guys think?1 point
-
I then disassembled the helmet again to sort out the lenses. a large section of a welding screen was provided and i initially cut that down by half with the intention of having a one piece lense screen. positioned visor in face plate and used masking tape to lay out for unwanted material. this was done a few times till i was happy with shape and fit again this was then clamped in place and clearance holes added with the face plate being used as a guide. then all excess material round the edge of the face plate removed prior to reassembly i am painting all the required areas, have used frog tape to lay out for all the panels on the back plate (really good tape no seep through) and did the teeth frown and vocoder by eye fans have arrived and have dug out all left over padding i have lying around, also some lovely tube stripe templates turned up as i intended to hand paint them as well . from this point i reassembled the helmet.1 point
-
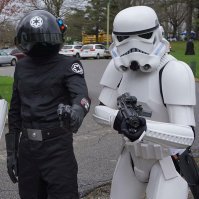
GUYS, IT'S OFFICIAL, MY SUIT IS COMPLETED! Some post shots to show the fitting... LOOK AT MY FLEXIBILITY!!!! ACTION POST TIME!!!! And finally adding in the (non-submission costume) pieces to model after my old SWG character of eight years... And of course, the biggest smile I've had one since getting the big brown box! (please excuse my _awful_ hair) But lets be real; the real fun has just begun! The rest of the fitting! I definitely need to remove some return edge on the shins, maybe cut away the back of the tops for more mobility. The thighs have one or two pinch points too. Any comments on fitting, where I can improve? THANK YOU ALL FOR ALL YOUR HELP!!! BEST COMMUNITY EVER!1 point