Leaderboard


Popular Content
Showing content with the highest reputation on 12/28/2018 in all areas
-
Hello! I'm undertaking a helmet electronics project what I'd consider mostly from scratch (no components pre-wired together). I'm near-novice level; it's not that I've never wielded a soldering iron, it's just that the last time I did I was 12. Fortunately a good friend is an electrical engineer working in the field who can both explain things five times in a row AND lend a hand with stringing everything together. Phew. THE CURRENT (lol, electrical jokes already) PLAN: My voice changer will be a Teensy 3.2 coupled with the audio adapter shield and Bluetooth module as per TK Talkie's delightfully detailed V3 directions. A PJRC prop shield LC will act as amplifier for the little speakers which I'll be setting in my hovi mic tips. I'll have [many] helmet fans ('cause I'm here for a good time, not a sweaty time) on an independent circuit to cut down on electrical noise within my audio system, most likely powered by a rechargeable USB battery. I'll experiment with lavalier microphones behind my neck seal, and will probably integrate a hearing assist system down the road. Disclaimer: this project is in between invention and re-inventing the wheel. People sell similar pre-built components and systems! I've just been spoiling for an electronics project so I want to do it all myself. This promises to be quite the adventure for my ANH stunt bucket Smudge and me. Come along, if you dare.2 points
-
@justjoseph63 as always! Much appreciated solid post joseph! Unless someone knows another place, it looks like i'll be ordering a pack from the seller you linked. I think the 2 details in addition to the T-tracks are the extractor on bolt detail and serrations on the rear sight. It doesn't seem to be listed as a requirement, but seems easy enough to do for better accuracy.2 points
-
Gotta love a Horshack reference.2 points
-
Hello! My name is Laura, and myself and my daughters have a cosplay group I like to call Just Believe Cosplay (hence the forums handle). I'm here because I've been wanting to join the 501st for awhile, specifically as Captain Phasma. I’ve actually had a kit for almost a year now, but have been too afraid to dive into it. I'm in Alaska and live three hours from the nearest seasoned garrison members. I’ve never seen how a kit is constructed firsthand, and since I am a very hands-on learner, trying to figure it out from just photos on the internet has been terribly intimidating. BUT - I’m tired of allowing myself to be held back by this fear. It’s actually a step away from that just to post here, because I’ve been planning to for a year and never had the guts to. I really hope I can get Phasma going and maybe possibly finished in time for May the 4th. I would appreciate any tips or hints anyone could give for this build! Here’s everything I have at the moment- Armor from KB Props Helmet from Jim Tripon Hand armor from Shawn Thorsson Gaskets and soft parts from Geeky Pink's Phantastic Gaskets Boots and gloves purchased on Amazon1 point
-
I’m extremely jealous of all those patches guys. Thanks for the pics.1 point
-
Nice work so far Patrick! Keep on going with that work and you will have a very nice E11 ! Marko1 point
-
While we're still waiting for our shipments, I figure I'd go ahead and wish all of you patient folks a Happy New Year as well!!1 point
-
Guys, a long period of silence from my end, unfortunately, but some things cannot wait and have more priority. I hope you guys had some nice holidays!? Nevertheless i now had some time to spend some time on my E11 again. The last step, I was stuck was the small wooden plate which holds the magnets for the magazine. Now, i created a piece of aluminum which will not bend, although it has to hold the two magnets, the electrical switch and the four screws. During the time of absence i did some investigation on the German and US customs... i finally was able to import an original folding stock from the US which will be attached as soon as possible. Furthermore, the warfighter magazine got some corrections... Thanks in advance for reading and commenting !1 point
-
looks good. i will suggest what I always suggest: - the helmet (bucket) is honestly the first, middle, and last thing the crowd sees. the Tk bucket is THE iconic face of the franchise. with that in mind, make it perfect. - with regards to comfort: ensure cover strips do not extend beyond that which they are covering. trim them so they are flush-ish. in both cases, I always suggest finding a Centurion Application thread for your armour, and compare photos. More work done out of the box, less anguish later undoing or redoing small things. as far as basic approval, you should be fine :-)1 point
-
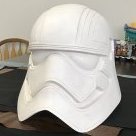
Painting day today! I figured it'd be easier to do the traps before the helmet is assembled. Unfortunately, I don't have any toothpicks on hand. I'll be picking some up later to tidy the edges once the enamel paint dries. As many have suggested, I first traced the guidelines with a pencil. Then I copied Scimitar's awesome idea of painting the black outlines first, and filling in the grey afterwards. This way you only have to worry about making one pretty edge at a time! Then, while my paintbrush was still black, I did the vocoder. Then came grey. I was really looking forward to painting the frown. On all the other build threads I've looked at, this step was always when the face came alive! After that, I filled in the traps and tears with grey. That's all the painting I could do for now. Once it's dry, I'll assemble the rest of the helmet and paint the ears, trap/tear lines and tube stripes. In the mean time, I drilled some holes in the chin recesses to install Ukswrath's hovi-tip speakers. A heads up to anyone else who uses PlasticWeld to reinforce this part of the mask: at this point, I learned that the mic tips won't sit flush against the plastic (at least on an AP helmet), meaning that when I measured the threaded portion of the speakers to make sure they'd make it all the way through the PlasticWeld, my calculations were flawed. Thankfully, it ended up juuuust making it through for me, so all is good. Not really a biggie if they didn't—you'd just sand the PlasticWeld down—but better to be aware of ahead of time. Now to let the paint dry. I'll report back later!1 point
-
I was thinking that one would be nice since it is a little lighter than a regular jacket. I live in Northern California so, like your region, it doesn’t get too cold (except last night LOL).1 point
-
Ok well now my question seems super stupid, haha. This: looked like leather or something bridging the shoulder gap beyond the elastic further around the arm, perhaps to hide the end of the neck seal bib or something was my thought. Must just be the lighting! Return to your homes. Nothing to see here.1 point
-
The quality of the paint job you have so far is absolutely incredible! I would, however suggest making the trap a bit bigger to fill the space. The tube stripes should be about 7/16ths of an inch away from the cheek. and although the CRL states that the number should be between 9 and 16, what I have outlined below should do the trick. You don't want them too close to the ear. Hint: When using the tube stripe templates, after pressing them down firmly, hit them with a this coat of white first. This will seal the edges and prevent the blue from bleeding around the edges. Do not leave the template on too long after drying, as it can peel up the edges of the stripes. Speaking of ears, try your best to line up the screws with the back angle of the upper trap as seen in the reference image below.1 point
-
One step closer, James! As mentioned, the T-tracks will need to be longer to extend to the rear holes as seen below. This diagram is from the E-11 Blaster Reference guide located here: https://www.whitearmor.net/forum/topic/32111-fisd-e-11-blaster-reference/ Not sure what kind of budget you are on, but the only place I know of right off hand to get the new ones is here: https://www.ebay.com/itm/Star-Wars-T-Track-T-Profile-Kit-Stormtrooper-E11-Blaster-With-HiBond-Tape/223040300675?hash=item33ee3ce683:m:mGEmA54iNxtb695LwmQuCJg:rk:2:pf:0 If there is another source perhaps someone could weigh in with it. Below is another detail from the Blaster Guide to give you a better idea of where the scope/Hengstler counter should sit. Lastly, the CRL for Centurion does not mention decals on the counter, so you are good to go with that. The information listed below can be found at the bottom of the page here: http://databank.501st.com/databank/Costuming:TK_anh_stunt For level 2 (Expert Infantry) Level two certification (if applicable): Folding stock (does not need to function). A real or replica ammo counter - based off of a Hengstler counter - shall be present. D-ring mounted on the rear. Sterling based blasters have the correct M-38 or M-19 style scope. Two power cylinders on the magazine housing. Scratch-built or cast blasters shall have a total of 6 T-tracks on blaster (leaving the lowest row on the magazine housing side uncovered). If using the Hasbro E11 toy blaster, it is modified to have the correct number of T-tracks (6 total), with a lower row of open vent holes on the magazine housing side. This is accomplished by covering the pre-existing rows of holes with T-tracks, then grinding off the lower integrated T-track on the magazine housing side, and drilling a new row of holes in its place. No ESB/ROTJ greeblies are allowed on the blaster. For level 3 (Centurion) Level three certification (if applicable): Hasbro and Rubies blasters are not allowed, even conversions.1 point
-
a couple of things that jump out at me are the t-tracks seem short and the rail to which the scope is mounted is short as well. The front should extend passed the mag well into the first vent hole. If memory serves the rear of the rail mount should either be attached directly to the rear sight or if bent downwards as it seems to appear in your pics should be about 1cm or so away from the rear sight and not flushed against it. The scope is way too far back. I don't think the charging handle should be silver. I'm curious as to how the face of the counter looks like.1 point
-
Waiting anxiously Sent from my iPhone using Tapatalk1 point
-
Looks like Cricket has got it covered, thanks Christine1 point
-
That's the elastic that holds the shoulder bell to the shoulder strapping. One half of the size 10 snap is sewn into the white elastic. The other half of the snap is sewn into the black elastic strap. The other end of the black elastic strap is glued directly into the shoulder bell. Hope that helps!1 point
-
Oh, oh, oh! I think I know this one!!! (waving hand wildly) Offsetting the snap in the white elastic is a good thing because it provides more stability/strength for the connection. In the pic below, you're looking at the white elastic as seen from under the plastic shoulder strap from the back. This is the right shoulder, BTW. My elastics are more narrow than most TKs, and that's because I had to narrow the chest/neck and shoulder areas. The wider elastic would have been visible if I'd gone with the usual stuff. Anyhow, you want to keep your snaps in as close to the inside (towards your neck) as possible. This will help prevent your elastics at the shoulders from sagging due to the pulling of the arms. Did I get that right, Tony?1 point
-
ok pipe build e11 guys made you a few tubes1 point
-
Thanks Dan, that helped a lot! Unfortunately the Rolson set was sold out, but I found one from AmTech that looks identical. Keywords to search for: “wax carver tools”.1 point
-
1 point
-
Merry Christmas everyone! Time for another update. Still working on the details, which take more time than I thought (at least for a beginner like me). Lots of dremeling, sanding and repairing with green stuff... Here’s an overview of the recent progress: 20181225_215425 - placed M4 hex bolts in the folding stock pivot - relocated the clearing strip of the inner bolt (I know, the lower right side is still a bit high but unfortunately I noticed after gluing it) - lots more hollowing of the folding stock - finished the end cap, filled air bubles in the resin cast with green stuff - replaced the U-channel of the end cap clip by the aluminum one from Tino’s kit - hollowed the front sight guard, recreated the front sight block and inserted the grub screw from Tino’s kit, made the front sight from an M4 screw - replaced the resin hat nut in the grip by a real one Here’s a closer look at the tiny details on the end cap clip and the front sight: 20181225_215740 That’s it for now... Hope to make some more progress in between the family visits.1 point
-
The best source is TrooperBay: https://trooperbay.com/trooper-helmet-s-neck-trim1 point
-
I got some progress done on my main "radio" box. The basic shape of the box is now cut out. This is pretty much just a basic blank slate and there are still details I need to cut and sculpt in: The black sections are a layers of styrene and rigid foam core board. I am slowly building up layers to match the visual reference and give an overall sense of depth. For the sides of the box, I am trying to match the details of the circled section in this reference image: I also got the basic side details cut out and attached on one side. I will have to do this to the other side too as per reference images. At the moment, this is purely foam core, but i will be shaping and detailing with Milliput, Green Stuff and Bondo. I will use Milliput and Bondo in areas that need to be smooth and won't need excessive flex and Green Stuff for areas that will need to have a bit of flex: One note if you've never worked with styrene (I hadn't) is to not use the "score and snap" method that is commonly used with ABS construction. This stuff is a bit brittle, and even when scored, sometimes breaks off sections that are beyond your initial cut. I find it easier to just lightly run a shop knife across your marked cut line to get your rough cut and then slice all the way through without bending the scored section. The foam core board also doesn't take kindly to CA glue, so I have been using E6000. The E6000 holds perfectly and is easy to clean up where it may run, just like ABS armor. That's all for now! Happy Holidays to all of you! I will start back on the project once Christmas is over.1 point
-
Dec 2018 Troopers, it's been brought to my attention that Locitus' name has not been brought forth yet on this thread, yet he is a recipient nonetheless. This is entirely an oversight on previous administrations, which may and truly have been one of my own! Either way, we should ensure that the reasons are posted transparently so that the integrity of the award is beyond doubt. Mathias (Locitus) has been on staff many years as you can see from his staff award badge, including being a former DL. However there have been years where this is not the case, and Mathias has many times over not only been a tremendous help and resource for new members, but has been one of the key players in keeping our forums up to date, recovering them when an upgrade has proven unstable, and put in many hours resolving technical issues that otherwise would bedevil this detachment that few outside of the command and site admin team will ever know. He is truly an FISD legend and clearly deserving of this merit.1 point
-
Hey guys, we've recently released V4 of the TK-Talkie system. This latest update includes more voice effects INCLUDING a voice pitch changer (up or down!) so if you're a dude that wants to sound like Phasma or a lady who wants to sound like Vader this update is for you! We've also updated the control app with a new interface and more features, and have added a Control Glove to the mix. More than just a sound glove, you can program each individual button via the app to perform up to 2 functions including volume adjustments, sleep/wake, PTT, mic gain, loop start/stop, mute/un-mute and more. More info is available at tktalkie.com/v4 or at our store at store.tktalkie.com. The video(s) below offer an overview and brief demonstration of some of the capabilities. The first video is a standard setup and basic config, and the second video runs you through using the app and demonstrates different profiles you can setup and how to use the control glove. facebook.com/groups/tktalkie1 point
-
Yea, I joined the ANOVOS FB build group and it was not what I had expected, nor what I want to be a part of. (Actually they're not that bad, I only saw a couple of posts with mediocrity, but they have the right intention of following your guide). I had no idea the amount of detail and craftsmanship required to build one when I initially purchased the kit; only after I received it in the mail and found your thread, I understood the dedication and skill required to do it right. I do consider myself a bit of a snob when it comes to legitimacy, and couldn't picture myself building this suit half mule. Thank you and all for keeping the artistry and craftsmanship alive in the empire!1 point
-
Some FB groups that aren't focused on accuracy and also aren't interested in referring people here think they have all the answers Sadly nobody has all the answers however, the collection of very talented builders that can be found here will get you going in the right direction and help maintain that. Without proper guidance people are more apt to head down the wrong path resulting in poor quality builds.1 point