Leaderboard


Popular Content
Showing content with the highest reputation on 10/07/2018 in all areas
-
Put the thighs aside for a moment and started on the ab boxes. Here`s all the pieces laid ot and I managed to put the second from the left (as looking at it) upside down. The boxes need shaping so I´m using a contour tool for that. I eye-balled the thicknes of the boxes by looking att screen shots and the Crl and used the first box (when I was happy with it) as a guide for the others so they are consistent, had started the shaping when I remebered to take a pic so that`s way the biggest box is already finished. Here`s how they will be installed. Using a plastic screw and you drill a hole, insert the screw, put some glue on the head, put the box in place and then from the inside push the screw up to the box, I´m using super glue so hold for a few seconds and that`s it. Just in case I´ll be mixing some epoxy to cover the screw heads but not untill all boxes are done. And..some time later all boxes are trimmed, holes drilled and the screws in place. Using the method described one box at a time got done. Extra glue added, ready to install. Installed: Screws are obiously cut down on the inside unless you want to test your pain threshold2 points
-
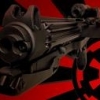
When I did mine the standard was for everything to be satin black and the grip to be gloss. I chose to weather mine with a little silver showing on wear areas and the bolt and brass showing on the scope. -----------2 points
-
Omg its a Stormtrooper! Sent from my iPhone using Tapatalk2 points
-
Hi all I picked up a wireless mic that I saw someone use with their TrooperTalk setup and can’t seem to get it working. I get no audio signal at all. The wired headset that came with the speaker works fine with the app, and the wireless system works fine plugged directly into the speaker and also when I use other apps like Voice Memos. Im using the splitter that was recommended by the app developer. Any ideas? Sent from my iPhone using Tapatalk1 point
-
For some reason the forum does not like the standard imgur links, if you right click, go to properties and copy that link, you will notice the link has an i in front of imgur the other links do not1 point
-
Alright, Shins - Swapped the coverstrips and the velcro redone on shins. Opens on the inside now. Chest Gap - made a new elastic loop about a centimeter and half larger. Put it in the center bracket, now chest sits lower and isn't being pushed upwards. Wrist - lengthened the elastic about 2 cm of the bicep to wrist strap. Now wrists line up better. Waiting on shins drying before doing new pics. Sent from my SM-G955U1 using Tapatalk1 point
-
Looks great! You've done a better job than I did lol Sent from my SM-G960F using Tapatalk1 point
-
Nice tip about the toothpick! Here is my first round of painting...1 point
-
Updaaates~ Got to go to another armor party last night, which was once again, a huge help! One of the members helped me finish up my forearms to where they fit me a looot better. Also trimmed a little on the top of the chest plate to bring it up so more of the ab shows. And began strapping! Yay, progress! Torso is nice and fitted. Just have to strap together my arms, finish strapping the torso and begin the legs. (Also, disclaimer, my forearms aren't THAT big. The angle of the photo is just weird.) At least I'll look buffer now, haha! Sent from my LGLS992 using Tapatalk1 point
-
Nice one. Welcome to the world of RWA armour (I’m very proud of mine) and congrats on your BBB. If you haven’t already, check out Ross’ tutorials on YouTube. They got me through my build and right the way up to Centurion. Best wishes Dan1 point
-
Not to worry, the best is yet to come - and thanks, hoping to have this approved and ready for a convention-troop come mid november1 point
-
Wow, Daniel. I haven't check out this build in a while - nice work!1 point
-
Thanks Daniel! I'll look into heating the shins with water ... or maybe a hair drier. Since the front is already glued, I worry about getting the whole thing wet. Maybe shaping with a hair drier while bending into shape with my fingers will work. I'll read more on it ...1 point
-
I’ve given up on my N52 magnets after one nearly took my finger off last night. I ended up grabbing some c clamps that seem to be working better but don’t reach all the way to the middle of the thigh piece. I’m using a few of the smaller magnets I had stacked together to hold the middle where the clamps won’t reach. Unfortunately it’s a bit slow going as I can only do one cover strip at a time with the clamps, but I think this solution will work. I’ll need to do some major glue residue clean up and polish before I’ll feel good about wearing it out. Fingers crossed and pics to come. So close! Sent from my iPhone using Tapatalk1 point
-
So...The RS suit is cast from an original suit so it can`t get any closer to the Movie Troopers than that and as it may look a bit wierd when laying or holding it, it will fall in line when you wear it. As we all are a bit different in tearms of body composition, at the same height one can have longer legs and the other has a longer torso so the fit of the suit will also differ as the modifications one needs. Those corners however are not something anyone should cut. Pic shows the RS suit (screen used) and the corners are intact. I´ll include some more and you will also see how they should go together. Back plate centers to the kidney and kidney and butt alligns with that resessed molding that goes full lenght on the kidney and transfers onto the butt plate. The strapping was repaired during filming so that`s way they go straight threw the face of the armor - although one can argue it`s screen accurate it`s not something to replicate for approval. On the following pics you can also see were the brackets was originally installed (in the return edge) and that is what you replicate Pis below is from the Lucas archives and here one can see that when strapped together the back (top) will tilt backwards making the edges alligne. This is how awesome you will look when you wear it Back to fitting: when you put the back pieces together you can test how it sits on your body, backplate up nice and high on your shoulders (as seen on pics provided) and posterior plate (butt)...well….on your butt and not hanging to low, it beeing to high is unlikely beeing 5`9 but we`ll see. Or you can go ahead and tape the ab plate to the kidney to one side, you line the top of the ab with the top of the kidney. Then you put it on and tape it shut butting the sides together with no overlap. this will help you see how much room there will be. If going with the ab plate on the get go you use that to help get things were it should be and the ab or more the cod (lower part of ab) should sit close to your privates, basicly as high as you can get it. This should get you started, post some pics when you have it on your body and everyone will be happy to assist1 point
-
Here is also the positioning on belt1 point
-
There are 2 alternatives you can use, Michael, resin or aluminum. Here is a seller on eBay that sells the resin ones: ----------- Below is a seller I used on my last Doopydoos build to replace the muzzle. I personally like the sharpness of the aluminum edges. I cut off the front and had to use a Dremel to thin out the barrel opening so that it would fit, but after some epoxy, sanding and painting it came out great. ----------- I also used his aluminum parts to replace the mag well, folding stock, magazine and end cap.1 point
-
Here you go, sir:1 point
-
No you do not need to cut anything yet. What you need to do is a test fit. Have the parts on you body, use painters tape / masking tape to hold the pieces in place and take some pictures (you will need someone to help you with this). Look at those pictures first, then you will have a far better idea where to cut or where to shim. When things do not fit, it does not necessarily means you have to pull a knife, sometimes hot water bath and hair dryer can help do the trick (test with a piece of scrap plastic first!).1 point
-
I am working on a new neckseal, with velcro to the bib so it stays in position better when worn on top. Didn't think of trapping the tramp to the chest yet. Might experiment with that a bit indeed. And comfy, well. My first troop was a 10km hike in it, so yeah.. it is well worn in by now1 point
-
So I'm working on reviving a THG Props E-11 and unsure how to paint it. It is a solid cast mold with T-track molded into it. So my question is I was to use a hammered paint but beyond the T-track is the rest of the main body hammered? Leaving the counter, scope, rail, power cylinders untextured? Sent from my VK815 using Tapatalk1 point
-
Coming along well Lorelei. Sent from my VK815 using Tapatalk1 point
-
REAL quick before I go play Mario Kart - another dry fit this evening. I have thoughts on it of course but I'm curious if anything glaringly awful jumps out at anybody (other than the kidney overlapping the ab, and other obvious test fit, er, idiosyncrasies). I know, you mistook me for a real live stormtrooper in that last one. Just me. Just me.1 point
-
Thighs was next and like the shins I wanted to try and get the curve on the seams. Well tape is in the way you mor.... yes that’s true but kind of hard to tape up from the inside when sizing, I could have taped from the inside after but it’s not that hard to trace the missing bits when you remove the tape Was going to glue the outer seam with a butt-joint but did an overlap instead, sanded the edges to smooth it out and will sand more later. After the front piece was cut I transfered the lines to the back. Same method as with the shins. Glued the left thigh and then used the cut-outs to trace out the right. As I had a piece to place as a guide I didn’t need the tape to Keep things together, I could also have taken the pieces apart but felt it would be easier to draw and see how it would look when put together so that’s why I did what I did. Compared to CRL - the overall shape of the thigh need shaping to look a bit more like the movie so for now I only looked att the curve. Not perfect but atleast not just a straight line Both thighs glued awaiting trimming1 point
-
I'm very grateful to @gmrhodes13 for this, as it opens up the TKC and Shock trooper builds for many more people. As the CRL is usually regarded as law, this helps me greatly. Thanks guys.1 point
-
In Soviet Russia, Last Jedi hates you!1 point
-
Was approved a couple months ago but an accident took me off trooping since. Finally back in the game and hope to take the TK out for a spin soon1 point
-
Was sizing up the spats (boy they are ugly) when I realized I forgot the greeble on the right shin...so dremmel away and glue. wasn’t finished with painting so that’s why I just glued it on. And the spats I planned for1 point
-
The left shin has a clip greeble and two boxes on the outside and using the CRL pic I eye-balled the locations, the clip greeble also rest in a little indention (on the ANOVOS armor anyway) and I wanted to give that a go - probably won`t make any difference but I like to have it Used the greeble to trace out the space and then used the dremmel and some sandpaper….was I worried about cutting to deep? naaah...that was my first thought, to cut all the way through and glue a backing piece and even the edges out with abs paste so just went for it. Not cutting all the way though. The two boxes are fixed just below and I shaped them to follow the contur of the armor and layed it in place to check against CRL. Works for me and I opted to simply weld them on, glued extra abs on the inside to ad the contact surface. Also marked them to avoid confusion. And welded on and I did some shaping with a hairdryer to get the clip to bend just a tad, abs pasted the boxes to be seamless as per CRL. Sanded and ready for paint. Some painted stuff1 point
-
1 point
-
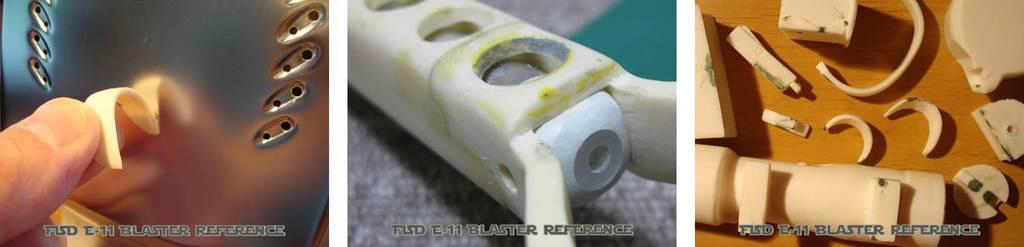
#02 - Resin Repairs If a part is bent or warped (for example the arms of the folding stock) you can heat it up and carefully bring it to the correct shape. You must ensure that it maintains the proper shape while it cools down. To heat the part, you can use an oven or hot water bath for larger parts. Hair dryers or heat guns are ideal to warm up a specific spot of a part. How you heat the part depends on the part's size, and the temperature and time required to make the correction. If you use heat to alter a part, the most important ground rule is to start at a low temperature, and increase it until you are able to make the correction and not any higher. If you receive a broken part, you can fix it using super glue/CA glue. For additional support you might want to add one (or more) metal pins to the part during the repair process. A close inspection of your parts will surely reveal air bubbles (or tiny holes) in some parts. These and other defects can be filled up or removed by using modeling clay (like "Green Stuff" or "Bondo Cream"). One (or both) will be used during your build if you are doing any modifications anyway, so it is best to have it on hand. The major difference is the consistency of the two, as the Bondo product is (as the name says) a cream, while the "Green Stuff" is a 2-component modeling clay. When you start to make these repairs, consider whether the defect could be used in your weathering process to indicate some battle damage or wear if you alter it and paint it appropriately.
 1 point

.thumb.jpg.9e934f6d8fe42c9336611e829a1973bd.jpg)