Leaderboard


Popular Content
Showing content with the highest reputation on 10/02/2018 in all areas
-
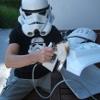
Plugging along here, and close to finished! Everything is in a state of final e6000 curing, so it's just a matter of hurry up and wait at this point. I've managed to size the arms to fit the torso, but didn't bother taking pics as I went. Sorry! It was all quite tedious, really. Sizing the biceps and forearms was not all that difficult. I removed one divot off the end of each forearm, and didn't even bother removing any length from the biceps at all. The shoulder bells were the biggest challenge because they needed to be trimmed along the chest and back plates. Tracing approximate cuts was easy to do with a pencil in the front, but everything had to be guessed when it came to the back. My arms just don't contort like they need to in order to make a trace line along the back of the bells! As a result, it was a lot of try-on-take-off of each arm, with millimeters of trimming happening in between. I'm happy with the result, though. I'm left with just sizing the legs for length now. I think I still need to remove a little bit from the bottoms of the shins to bring them down. And I haven't even begun to trim the thighs for length yet. That's because I just finished getting the torso fully adjusted and finalized yesterday. If any of you have followed my other Vertically Challenged builds, you'll know that having the torso correctly fitted is necessary before trimming down the thighs! I plan on spending tomorrow morning getting the thighs and shins properly trimmed down to fit. And aside from the helmet, this build will be pretty much wrapped up. My goal has been to complete the entire build in less than a month, and it looks like I'm on track.3 points
-
Name: Louis Meszaros Garrison : Georgia Armor maker: AM Helmet maker: AM Cloth belt maker: TKittell Neck seal maker: Darman Holster maker: Darman Boot maker: IB Blaster maker: Master Blaster with BlastFX electronics Height: 6'1" Weight:186 TK type: ANH Stunt Name(s) of any Trooper(s) who significantly helped @shashachu @Seansull @TheSwede @Scimitar @StrmTRPR85 @Cricket2 points
-
Hi all We will be adding a few new rules to the Ongoing Sales & Project Orders section of our forums. These are not being implemented because of any wrong doing, but rather to bring the sale of armor on our boards in to line with other sales items. These will eliminate any grey area and are general common sense that our armorers have adhered to in the past These will be published in the October News letter and the rules added to the section on the 8th October Rule 10 is only amended 10) Merchandise and or armor must be "in-hand" and ready to ship before accepting payment . Interest threads are allowed to determine selling order. New rules 13) Armor vendors must be on the vetted makers list and only the armorer can list their products. No agents 3rd party or shills. 14) Photos of armor kit or completed build are to be posted in the sales thread along with price and expected time frame for delivery. 15) Only armor relating directly to the Detachment can be advertised in this section, no costumes outside the FISD CRL's This section amended to clean up excess info not required. Please note when paying for any product and/or services: PayPal is always going to be a safe way to send any payment. However, you must understand NEVER to send any payment via the "Gift" option for any product, work or services. PayPal will not cover any transaction under the "Gift" option at all. Always use the "Goods and Services", option when sending payments so, that you have recourse through PayPal if any problems should arise during or after the transaction. NOTE: You have a 90 window with PayPal to file a dispute/claim. Never send cash and/or money orders. These can easily be lost and never the reach the proper person. Plus you have no record for any recourse.2 points
-
Time for yet another round of "What have I gotten myself into this time?" courtesy of Sharkbait (ooh ha ha!). After numerous people telling me I should do a Phasma, what the character could (and should) have been (don't get me started on TLJ), how awesome Gwendoline Christie is, and that Make-A-Wish troop I don't stop talking about ever where our then-Squad Leader pulled every favor he ever had and then some to get the Make-A-Wish little girl her favorite character, Phasma (at the time there were about 10 Phasmas in the entire Legion), and I got to troop my TK along side, I finally decided I was going to do Phasma. Armor: KB Props, in hand Helmet: JImmi - in hand (Thorsson, in hand- being relegated to battle damage Phasma prop) Neck seal: Geeky Pink's, in hand Gaskets: Geeky Pink's, in hand Fingers: Jim (Starbuckcylon) (resin), in hand Belt: Jessica's, in hand Undersuit: TK undersuit/Easbay compression shirt and pants, in hand Cloth belt pouches: TrooperBay, in hand Boots: In hand, random black boots found on clearance for $12. Ended up using Calto lifted shoes. Inserts: 4.4''. I estimate with my barefoot height (5' 11''), the boot heel (1''), the inserts (4.4'') and the dome on the helmet (1''), I'll stand at about 6' 4''. Using lifted shoes for total lift, not inserts, but height still remains the same- about 6'4'' in costume. Cape: Jessica's, In hand Blaster: Heston3DSolutions F-11D in hand, chromed Chroming: Current plan is one of two professional chromers for the armor, I will do the prop helmet and blasters myself to save on costs. Extras: Heston 3DSolutions SE-44C, in hand and chromed and JJ Industries quicksilver baton. Are either from TFA? No. Do I care? Obviously not. Haha- hence "extras." Majority of my events are non-canon, the public doesn't know the difference, and that baton is amazing and I knew I wanted to play with it regardless. Toys and photo props and talking pieces. I won't use them at every troop, just once in a while for the fun of it, and obviously they will stay at home for the few canon troops we get. Also Heston had another 50% off sale and I had been toying with grabbing a SE-44C anyway, so just take my money already. Goal Timeline: Finish by the release of Episode IX - December 20, 2019, so I can troop that premiere (locally). Well, that didn't happen. New goal is Fresno State Men's Basketball Star Wars Night, January 4, 2020. Submitted for the third time 09/10/20. Third time's the charm, right?1 point
-
Thanks Christine! Could not have done the second set of shins without you and the magic range top shattering cauldron of water. To say I was nervous after screwing up the first set (cause I screwed up the lines on the thighs) is an understatement. E6000 is drying on the boxes and belt, thanks for the catch!1 point
-
I prefer a fan whatever the weather, as I find the lenses can get a bit foggy. All depends on how much free space you've got in your lid; the more padding and the bigger head you have (like me haha), the more likely it is to fog up Sent from my SM-G960F using Tapatalk1 point
-
Most use the Anker 1605, but really any personal amplifier will work. Sent from my 5054N using Tapatalk1 point
-
When it comes to removing excess glue, the properties of E6000 make it among the easiest. In fact, it's so easy that I make no attempt to limit the amount of extra that squeezes out (to a point, of course). Here's what I did with my build. First, I used a razor knife to cut through the excess, using the edge of the cover strip itself to guide the knife for a nice, straight cut. Make several light passes with the knife to avoid scoring the plastic itself. The idea is to just cut through the glue, and not down into the ABS. Then, pry up one end of the glue using a fingernail, toothpick, the tip of the knife, whatever, and just pull it off in a long solid "string." E6000 dries firm, but rubbery, rather like silicone caulking. You may find that if you cut through it all the way that you can pull all the glue from the edge of a cover strip in a single string. However, since you're being careful not to cut through the glue all the way to the plastic, you're bound to leave lots of little bits of glue along the edge of the cover strip. Any sharp object will easily scrape those out, but be sure to use something that is not harder than the plastic or you could scratch it. A sharp metal object would be bad, but something made of wood such as a sharpened popsicle stick or toothpick, or plastic, like this scrap of cover strip cut to an angled point, is perfect: This will loosen almost all those little bits. For any tiny stragglers, you can get them with a fingernail. If you want to really be fussy, a pair of tweezers can grab those little guys nicely. Still, rubbing a fingernail along the edge of the cover strip will most likely get the little bits loose. You might still have a bunch of tiny loose bits in the crevice along the edge of the cover strips. Although not really "stuck" to the plastic, the loose bits are still rubbery and tend to stay put on glossy plastic. I found that once you have all the big pieces pulled free and the little bits loose, wiping the armor along the length of the cover strip with terry cloth -- old towel material -- wipes those little bits off. Shake out your cloth periodically to get rid of the bits, and just wipe down the cover strip till it's as clean as you want. A.J.1 point
-
I’m jelly. Great job! Sent from my iPhone using Tapatalk1 point
-
Great job on the armor! Looks like a really good fit. Easy pass.1 point
-
Looks great, Lou! Nice job with how you were able to get the backs of the shins and thighs lined up. (Steve and I agonized over those cuts!) The only thing I can see that might need attention for Centurion (you are applying for Centurion, right? ) is that the drop boxes on your belt could use a little more securing. When your belt is flat, you've got the boxes lined up correctly to the ends of the plastic belt. But when the belt is on you, I can see the drop boxes are sliding in a bit. Adding a drop of e6000 between the white elastic and canvas belt will help to keep those boxes in check.1 point
-
Agreed with everyone else, easy pass for basic! Next!1 point
-
Thanks - looking forward to getting that nice final polish then on this armor. Guess sandtrooper isn’t for me Sent from my iPhone using Tapatalk1 point
-
It's very hard not to get some glue coming out from the sides of cover strips no matter how careful you are. I find using a soft cloth is good to get it off on flat pieces, on the edges I use pieces of scrap abs, gets in to the corners nicely. For any stubborn bits some polish normally will help to get it off1 point
-
Great job on your build! Easy approval Trooper!1 point
-
Great work i enjoy it1 point
-
If you mean the rear covers, we cut them at an angle Sent from my SM-G950F using Tapatalk1 point
-
Using CA (super) glue is really not recommended for first time builders, Tommy. First, due to it's thin viscosity it can run or drip, and if it gets on your armor it will at the very least cause a rough patch even if you wipe it off right away. If it dries, expect to spend a lot of time with super fine grit sandpaper removing it, and then polishing it out. Secondly, after it dries it can become brittle, and on areas like the front calf connection this can cause problems as they are under a lot of stress from opening and closing them while getting suited up. Lastly, if you do make a mistake it is unforgiving. The main reason we recommend E-6000 is that it had fantastic adhesion properties, but can be removed through various ways if needed without damaging your armor. The downside is that it requires extended drying time, but it is well worth it, trust me. I'm sure (like all of us) that you want to get your kit done as quickly as possible, but like I always say, building a set of armor is more of a marathon than a sprint, so take your time. You will get there! Don't get me wrong, I always keep a supply of the gel type CA glue in my bin along with an activator for emergency repairs, but that's all I use it for.1 point
-
Schaut doch soweit schon mal gut aus1 point
-
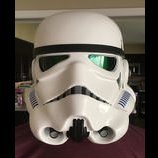
Wow, Lou.. just WOW! EXCELLENT job on this AM armor, sir. You have obviously been studying some of the submissions in the Advanced Tactics area, as your attention to detail is incredible. You should have absolutely no problems for basic approval, and I expect to see your submission for Expert Infantry right after! The one thing you will need to address for that is your left ear could stand to be moved back a bit. The right one is OK, but if you look at the difference in the area between the front of the round part and the tear there is a smaller gap. Note on the screen used bucket below how the center of the top lines up with the rear of the trap, and that it is angled back. Yours doesn't need to be quite that severe, but it should be closer to it. Also, once you get your basic approval, don't forget to apply for Legion access here on the FISD! https://www.whitearmor.net/forum/topic/16-501st-trooper-status-requests-include-link-to-your-501st-profile-in-your-request/ Again, outstanding work, sir! (Nice hand guards, btw, ).1 point
-
Nice work, looks like you won't have any issues, good luck with approval1 point
-
As Tony suggested always test glue before you apply, some can cause distortion with heat and for more quick setting glues they can crack when being flexed. Definitely feather/sand if there is a difference in thickness, do this wet with wet and dry sandpaper, you can add a little dishwashing liquid as it helps stop clogging the sandpaper and glides easier. Star with a courser grits then finer until you reach 1200 or ultrafine, you can then use an automotive cutting compound to bring back the shine.1 point
-
I definitely don't have as an experienced eye as many of the folks here, but I'll echo the above, should be an easy approval and quick steps to Centurion. Everything looks great Lou! Good job!1 point
-
Looking good Lou! I don't see anything that's stopping basic approval and after that should be an easy path to Centeruion! Good job trooper!1 point
-
Shout out to @zv288bot for the two challenge coins!! Thanks for helping to feed my coin addiction!! The patch came from a Kylo Ren in the GA garrison (IG21826) who actually lives in my neighborhood and we had no idea until Cricket's armor party. Haha! He made sure he gave me my first Georgia Garrison patch. This community is nothing short of awesome! Troop #2 yesterday went flawlessly and I had zero issues with the armor. As soon as I get some free time I'll be shooting my EIB application pictures.1 point
-
Let me elaborate, remove the desired amount of return edge needed. Add new shim using the butt and strip method (most common). Fill the outer seam created with ABS paste, sand, paint and you're good to go. Note: The Anovos armor is very thin, especially in this area. Any reinforcement in and around the shim seam will greatly add to the area strength.1 point
-
My son had the same issue, here's what he did with his.. Sent from my SM-G950F using Tapatalk1 point
-
Nice job! I'm glad the build helped! As mentioned, you are good for basic... at least. Most of what is mentioned above could be dressing issues. Daniel makes a good point regarding the button plate. For your shoulder bells - try giving them a little hot water bath to change the curve of the bottom. They tend to be a little narrow front to back - if that makes sense. Or tighten up the elastic that goes around the bicep - that can help too. Your forearms could come down a touch to balance out the black space between your hand guards and forearms versus your forearms and bicep. Sometime this is just a matter of giving the forearms a little tug down - at least until your elastics get a bit more worn. Again, looks great!1 point
-
Very nice, every piece adds up in the end1 point
-
Hi, folks! Time tending to always be my limiting factor, my build thread took a back seat to just building. I apologize for not documenting the rest of the build, but it is "finished". You can see my pre approval photos here: Thank you to all of you who chimed in on questions and gave helpful advice in your own build threads. This was a tough project but well worth the time and effort I've put into it. I'm excited to be at this point and looking forward to moving towards EIB and Centurion eventually. I'm truly grateful to this community and for the confidence you gave me to pursue this dream. If you don't mind, go to the pre approval thread and let me know what you think. Thanks!1 point
-
Still need to raise the brow a tad, but... Sent from my iPhone using Tapatalk1 point
-
Very nice work, well done1 point
-
That´s the Stunt-configuration. Hero has four and as most people build for a Stunt, they had to remove the upper screws and fill in the holes in the belt (unless you changed the whole belt) ANOVOS listened and changed to the kit version which makes it easier1 point
-
Having no return is approvable at all levels, however it`s not screen accurate as seen below, ref pic from Lucas archives, you can clearly see the return, granted it`s minimal in some places and removed in order to level out the inside/outside thigh piece in the back so one can say that having a return is more accurate than not1 point
-
Yes always take equal measure from each. Sent from my 5054N using Tapatalk1 point
-
I am super impatient when it comes to this build. When I get impatient, I get... er...crazy... no.... reckless... no.... I think I mean... brave. I had intended on using boiling water to further shape my kidney before installing permanent strapping. The top left corner of the kidney does this really odd flare outwards, and it was hitting my left arm in an awkward manner. So instead of waiting for the whole boiling water bit, I decided to take a heat gun (GASP!) to my kidney. Heat guns terrify me, but I wanted to move this build along! My biggest challenge in dealing with the heat gun is the lack of control I seem to have on it. I feel like I always need an extra pair of hands. I suddenly realized that I own a vice, and figured I could use that to hold my heat gun while I shaped the part of the kidney that needed shaping. Here's what my super fancy setup looked like: And it worked quite well! I took the advice of many troopers before me and kept the heat on low and kept the plastic moving. I just applied gentle pressure to curve the kidney the whole time, and before I knew it, my kidney was shaped how I wanted it. Whew. I was so encouraged that I shaped the lower left corner of the back plate, too (because it needed shaping to match the kidney now). That turned out just as well. Now, would I do this same thing to my shins to shape them to close perfectly? No way. I am not that impatient! But for the small things I needed, it certainly did the trick! I trimmed more of the width off of the chest plate (because I couldn't move my arms across my chest), and some extra off the straps at the top of the chest and straps at the top of the back. And now I've got everything assembled on my duct tape dummy... which looks super crazy with those untrimmed shoulder bells. Linebacker trooper for sure! Next up: Get the permanent torso strapping installed (kidney/butt brackets are already installed) so I can size the arms and legs.1 point
-
How is the build comming along?1 point