Leaderboard


Popular Content
Showing content with the highest reputation on 09/26/2018 in all areas
-
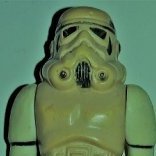
TK Life with Lorelei has repetitive episodes - Lorelei consults her 80 page reference notebook, reads 7 relevant threads, cross-references all advice given in said threads with movie stills, and still sits on the floor cradling the relevant armor piece unable to bring knife/file to plastic until she posts for confirmation on her build thread. But really, I'm glad you're not all *completely* sick of my questions yet. Thank you, thank you, thank you. Oh yeah, teeth are nowhere near done. I'm just not entirely paralyzed by fear on them, though. Haha. Back to work!!4 points
-
So after looking at more build threads and also checking out some of the KB build groups on Facebook, I realized I had the totally wrong idea about the forearm assembly. When I trimmed the side rails, I'd left some return edge on the bottoms so that they stuck up a lot. If you look at my forearm from the previous post, you'll see I butted it right up against the ridge on the outside of the forearm, making a sort of seam. But after looking at the CRL image, I realized the forearm past the ridge should be flat and seamless: Fortunately, I'd glued it with E-6000 so I just ripped it apart. I had intended to attach the side rails to the outer forearm via overlapping, but the only way to make everything seamless is to use a butt joint with an inner cover strip. So I trimmed off the return edge of the side rails that would face the outer forearm, and did some significant trimming of the outer forearm piece: Another change I made was to cut off essentially all the return edge on the flat inner forearm: In this rough tape-up, you can see that now none of the pieces overlap: Then I went ahead and glued the side rails on using an inner cover strip: I'm feeling much more confident about the forearms now. As that was drying, I also started work on trimming and heat shaping the left bicep, and glued one half: That's it for now! I think I finally have the upper limbs figured out.3 points
-
Just emailed my GML. I'm good to go with 40mm cover strips on the shin backside for basic. He said to try and match the thigh coverstrips, which will be nice as it means I can give my thighs a little more space.2 points
-
Thanks! Certainly my experience with my ANH kit has given me a lot of confidence working with armor in general, but also knowing that the TFA is going to have to be filled, sanded, and painted removes a lot of fear of not making everything perfect.2 points
-
Good to know. I does seem a bit wonky on the left side. That's how they went on right off the sticker template...From what I researched they seemed universal.2 points
-
I still have over 10Gigs of research material from just my first TK build stored on my iPad, it’s constantly being added too, always amazing how a new photo reference or detail can appear even after all these years. Great to have when helping out at armor workshops too (we don’t call them parties anymore, some took the word party literally) I find it useful not to have any return edge, you use the inside corners quite a lot and especially with my Hero helmet, can hardly see out of those bubble lenses anyway2 points
-
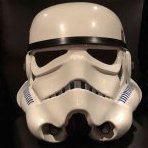
Eye sockets - As little back return edge as possible is recommended however, in the following reference photo you see some screen used helmets with the back return edge. We feel though it is screen accurate it just doesn't look as clean as it does without it. I've seen several people make binders of my Anovos build especially after someone created a PDF. Whatever works for ya I always say.2 points
-
It’s just for different ranks, nothing official but have a read here https://www.whitearmor.net/forum/topic/12217-painting-rank-on-ear-piece/ or here https://www.whitearmor.net/forum/topic/1707-question-about-ear-rank-insignia/2 points
-
JUST IN CASE anyone thinks I'm joking about that reference notebook - And look how much room I've left in the binding posts. *Ominous music*2 points
-
I look forward to the daily edition of TK life with Lorelei. This build has high entertainment value! I'd say you have room to trim both the eyes (to the trim lines you drew) and the teeth a bit more.2 points
-
Thanks for the pics, guys!!! Borrowing a page from Alay's build, I used Chicago screws for the ammo belt attachment to the canvas belt. I kind of like the non-permanentness rather than using pop rivets. I used 1/4 inch Chicago screws which I further trimmed off about another 1.5mm (using a dremel cutting disk) to make sure the stem wasn't too long. The left side shows the trimmed down Chicago screws and the right side are the "full height" originals. I marked the hole locations on the canvas belt while the ammo belt was curved around the Ab. I noted that with the belt flat, the outer holes were about 2mm further toward the edges than with the belt curved around the ab. Now just holding the belt in place... Do you think this is OK? The belt is pressed against the bottom of the main button panel. There's a bit of a lip there. Or should it actually sit on top of the main button panel? The photos you guys provided make it seem like it's actually overlapping on top of the button panel. And as a follow up question....popper snaps or line 24 snaps for the belt to AB? I saw the original Ukswrath post used poppers. I have both. I tried a popper just on a scrap piece of ABS and, to me, it didn't seem it had the strength of a line 24. Opinions? Thanks for all the help!! Thinking of this build, I think the belt has me the most stressed. :-) Mark2 points
-
Morning, all! I recently got inspired by a thread in the NCO Club (Off Topic) section about the differences between OT TKs and if a spreadsheet laying them out existed. We came to the conclusion we didn't think one did, and then on Friday I didn't have any real work to do at work, so I made one. It's OT TK only for now; I may make one for FOTKs someday, but that is not this day. There are spreadsheets for OTTKs and FOTKs- now including TLJ Phasma as per the recent update to the CRL! They are also now in PDF format for easy viewing! Here's the link for viewing/downloading (it looks terrible in preview- Google Sheets or download are the way to go). OT TKs - https://drive.google.com/file/d/10tEVteIreh6AHMogW010cuH_Bf8TBfU6/view?usp=sharing FOTKs - https://drive.google.com/file/d/1GBkXIfRs9lYW6vnhVjqdEv5oNdp2ToTs/view?usp=sharing So my question is: Where should I post this for all to view? Armor discussion? Generic tutorials? My only thought is put it where it will be the most helpful, and I would prefer it not limited to the 501st-only areas, as it could help someone decide which TK to do for acceptance into the Legion (that was the point of the thread that inspired it). FURTHER EDIT: These have both been posted under the "Getting Started - Read this First!" Section. I note this post was pinned, but those weren't- those are the ones I'd recommend pining, as those are the ones I'll be updating with CRL changes.1 point
-
Name: Aaron Countryman Height: 6'1" Weight: 235lbs FISD Name: ocmano Legion ID#: 91973 Profile Page: http://www.501st.com/members/displaymember.php?userID=26271&costumeID=124 Garrison: Washington State, USA - Titan Garrison Build Information Armor Maker: Armor Master 2.0 Helmet Maker: Armor Master 4.5 Hand Plates Type: Armor Master ABS Boots: Imperial Boots Canvas Belt: TrooperBay Holster Maker: Darman Gloves: Home Depot Rubber Gloves Electronics: Ukswraths hovi mic and fans Neck Seal: Darman E11 Blaster: Praetorian Blasters DLT19 Rifle: Hyperfirm B Grade Front Back Left Right Abdomen Details Action Shot (older photo before thigh modifications. Doing a new one once E11 arrives) Cod and Butt plate Interior Strapping Helmet - Front Helmet Side Helmet - Back Helmet - Screw Details Helmet - S Trim Helmet - Mic Tips Helmet - Lens Color E11 - Coming Soon Hopefully DLT19 - Left Right Neck Seal Thermal Detonator - Back Belt - Front Belt - Back Thank you for consideration! Let me know if you need anything else.1 point
-
Much agreed! So much easier to do it EIB or Centurion from the start then retroactively do things.1 point
-
Congratulations trooper and welcome to the ranks1 point
-
Congratulations once again trooper1 point
-
One thing I haven't been happy with over the years is the belt system used to hold up the thighs, the strain from the elastic around the belt makes it bunch up in turn the hanging thigh straps can move around. Been thinking of a solution for a while and came up with a bracket which keeps the belt from bunching as well as it allows sideways and up/down adjustment. Only at the prototype stage and of course will need to be tested but we will see how it goes. The way I have made them allows two different ways of running the elastic through, if you leave the top slot open you can also add suspenders to the system and still the belt won't bunch. Diagram of the bracket in the top right of the photo below, with the two options of strapping.1 point
-
I wanted to add the original style brackets but was just worried about the cracking down the track so when for a standard elastic system inside. Even if you go with the brackets you could always have the elastic attached to those a little loose and add an elastic system inside, this will keep the strain of the brackets and hopefully they will last a little longer. I have 3 cracks in my ATA and that's over 6 years so I'm pretty happy, two came from airline transport, noticed them when I got to the destination, one in the kidney plate and one on the shoulder straps, both have been fixed with extra support glued behind. The most recent crack is on the sides of one of my shins, I guess because of the opening closing over the years, again I've added a support piece behind.1 point
-
Good job on the armor! Sent from my iPhone using Tapatalk1 point
-
Worked on the shins and wanted to make them look as similar to the Anovos and CRL I traced a line trying the replicate that. Made the cut and transfered it to the back piece, I´m glueing it with an overlap so drew another line, a glue-line if you will, and then cut the excess of (2nd pic below although it`s the left shin as I forgot to take a pic when doing the right) Glued together Then I trimmed the top sides, CRL seam is straighter at the bottom but it will do (might trim the top a bit "flatter") The inside will be closed with velcro and instead of using overlap I chose to use a inner strip as velcro shelf, to me that would make the gap slightly less. Here`s how i did the left shin but same applies for both. First I drew a line so it would follow the shape of the seam and then did another one further in, big enough to have velcro on it and to be able to glue it to the inside of the shin. Ready to be glued in, not perfect but it will get the job done - hopefully Finished Then taped and trimed it. For the right shins inner seam I used the cut-out from the left Cut Transfered the line Made the inner strip as described, taped together and trimmed The might need a bit of heat-persuasion to stay closed but I will find that out ones I put the velcro on after painting.1 point
-
Yeah I plan on maintaining it pretty well, but just like driving, you can only control what you do and not what anyone else does. I'm envisioning bumps and jostles to where I might want that little bit of extra rigidity on the brackets just in case. Sent from my MSE-6 droid using Tapatalk1 point
-
ATA armor is very robust. It should be able to handle brackets without cracking however, every armor has a shelf life. If you build it correctly, to your body type and maintain it, it should last for quite some time .1 point
-
That gap in your forearm won't be noticed unless your cover strip is too short. Be sure to remove all the return edge from the wrist end for a little extra accuracy You can remove all return edge from the biceps if you wish! Many do it to make them more comfortable.1 point
-
Yes indeed. Proud to add you to the ranks1 point
-
Great work!1 point
-
Tony has a nice little tutorial of reinforcing the attachment points for the brackets here Not sure if that's enough of a photo set for you, but it's a start. Definitely shows how they end up.1 point
-
Congrats on your approval!1 point
-
That is good news and sounds like it will make it a bit more comfortable. Sent from my 5054N using Tapatalk1 point
-
Well done!! Welcome to Centurion. :-)1 point
-
I made it Tony ! Sent from my iPhone using Tapatalk1 point
-
Maybe once or twice Rat Just marking out spacing for the side rivets, will have to leave this until trial fit, see if any shims will be needed. Time to make some snap plates, I used to use abs plates but find the nylon conforms to the armor better and there is no need for any heat. You can never have enough magnets, clamps or tape, in fact I've ordered another 50 magnets Next start gluing them, a few pieces of scrap abs can help keep the nylon flat. Almost done.1 point
-
Looks good. I think you may have put the tube stripes on the wrong sides. The left side looks off to me. The police will be by soon I'm sure. Great paint job. Keep up the good work!1 point
-
Heh. I noticed that, too. The spreadsheet in the OP still shows it reversed, unless there's a different one later for some reason. Great table, though!1 point
-
Thanks for the info1 point
-
Really Glen? Another illustration to add to my collection.1 point
-
You got this! Sent from my iPhone using Tapatalk1 point
-
Hahahaha! As it should be Lorelei. Sent from my 5054N using Tapatalk1 point
-
Looks good Ron. Sent from my 5054N using Tapatalk1 point
-
I'd say it looks good where you have your lines, but I'm not familiar with the trimming of the depth of that part. The eyes and teeth look good though. Sent from my 5054N using Tapatalk1 point
-
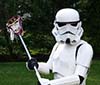
If i thought i could actually sit in that chair it would make for an epic pic.1 point
-
Thank you!! Hopefully the EIB application won't be too far behind this.1 point
-
It's not a huge deal but the hovi tips screen mesh should actually sit just inside, instead of at the tip edge. Keep up the great work Reference photo1 point
-
Agree with the above. Vcoder reference photo1 point
-
Interior strip length doesn't matter so long as it doesn't extend past the edge of the armor also. Here's a canon photo1 point
-
Thanks, how does this look before I reglue them down and do the others! Thanks for all the help Sent from my iPhone using Tapatalk1 point
-
Absolutely wait for them. Sent from my VK815 using Tapatalk1 point
-
Congratulations Trooper Get that Expert Infantryman app in1 point
-
Well done, Aaron. :-)1 point
-
Making some adjustments and fixes for my Centurion application. Replaced snaps on the butt plate and strap, added some of the Anovos supplied velcro to tighten up a couple of spots, made further mods to the belt by adding a small scrap of abs to stiffen up near the holster (no photo as it is gluing) and did some touch up paint on the vocoder. Sent from my VK815 using Tapatalk1 point
-
Just a side note, make sure you check out the requirements for EIB and Centurion from the get go if wish to apply for those as there are some extra differences at the higher levels1 point